python简单图片处理
环境:python3.6
PyQt 5.11.3
cython 0.28.7
guiqwt 3.0.3
opencv-python 3.4.3
项目要求是软件通过CCD传感器采集激光并分析数据。
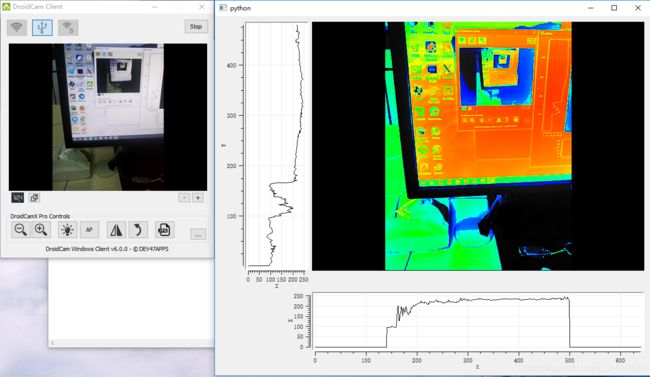
现在开发阶段没有硬件设备,用手机连接到电脑上代替摄像头。手机上用的DroidCamX,电脑上用的Droidcam Client。
首先采集摄像头的图像并转换成灰度图,然后转换成彩虹图。
PyQt分线程采集图像数据并转换成灰度图,然后将灰度图数据发送到主线程。
#device.py
# -*- coding:utf-8 -*-

import cv2,time
from PyQt5.QtCore import pyqtSignal,QThread
import numpy as np

class ccd_dev(QThread):
    datasignal = pyqtSignal(int,list)
    def __init__(self):
        super(ccd_dev, self).__init__(parent=None)

        self.stop = 0

    def run(self):
        cap = cv2.VideoCapture(0)

        while 1:
            #print('start')
            time.sleep(0.001)
            if cap.isOpened():
                ret,frame = cap.read()
                if ret:
                    clr = cv2.cvtColor(frame, cv2.COLOR_BGR2GRAY)
                    self.datasignal.emit(1,list(clr))

                if self.stop:
                    cap.release()
                    break

    def set_stop(self):
        self.stop = 1
需要将灰度图转换成彩虹图,用matplotlib的cmap刷新太慢,所以要使用自制彩虹图算法。
参照了这个https://blog.csdn.net/michaelhan3/article/details/70833648
但是图像数据大小是1280*640,python性能有限速度很慢,大概在0.7秒左右才能计算一次,所以采用Cython。
参照网上的碎片信息,试着做了一下。calxd是将灰度图转换成彩虹图的算法,calxm是找出各行最大值组成一维数组,各列最大值组成一维数组。
#calc.pyx
import numpy as np
cimport numpy as np
cimport cython
DTYPE = np.uint8
DTYPE1 = np.int

ctypedef np.uint8_t DTYPE_t
ctypedef np.int_t DTYPE1_t

@cython.boundscheck(False)
@cython.wraparound(False)
def calxd(np.ndarray[DTYPE_t,ndim=2] data):
    cdef int height, width ,i ,j
    cdef unsigned char num, r, g, b#0-255
    height = data.shape[0]
    width = data.shape[1]
    cdef np.ndarray[DTYPE_t, ndim=3] rgb = np.zeros([height,width,3],dtype=DTYPE)#3维,全为零的数组

    for i in range(height):
        for j in range(width):
            num = data[i,j]
            if num <=25:#在彩虹图算法的基础上增加了灰色
                b = num * 1
                g = num * 1
                r = num * 1
            elif num <= 51:
                num -= 25
                b = 255
                g = num * 5
                r = 0
            elif num <= 102:
                num -= 51
                b = 255 - num * 5
                g = 255
                r = 0
            elif num <= 153:
                num -= 102
                b = 0
                g = 255
                r = num * 5
            elif num <= 204:
                num -= 153
                b = 0
                g = 255 - (128 * num / 51 + 0.5)#类型转换
                r = 255
            else:
                num -= 204
                b = 0
                g = 127 - (127 * num / 51 + 0.5)
                r = 255

            #rgb[i,j] = [r,g,b]#这种太慢

            rgb[i,j,0] = r
            rgb[i,j,1] = g
            rgb[i,j,2] = b

    return rgb


@cython.boundscheck(False)
@cython.wraparound(False)
def calxm(np.ndarray[DTYPE_t,ndim=2] data):
    cdef int i, j, height, width, max, num
    height = data.shape[0]
    width = data.shape[1]

    cdef np.ndarray[DTYPE_t, ndim=1] ver = np.zeros([height],dtype=DTYPE)
    cdef np.ndarray[DTYPE_t, ndim=1] hor = np.zeros([width],dtype=DTYPE)
    cdef np.ndarray[DTYPE1_t, ndim=1] x = np.zeros([width],dtype=DTYPE1)
    cdef np.ndarray[DTYPE1_t, ndim=1] y = np.zeros([height],dtype=DTYPE1)
    cdef np.ndarray[DTYPE_t, ndim=2] d1 = np.transpose(data)#转置数组

    #ver = [max(dat) for dat in data]#这种超慢
    for i in range(height):
        max = data[i,0]
        y[i] = height - i
        for j in range(width):
            num = data[i,j]
            if num > max:
                max = num
        ver[i] = max

    for i in range(width):
        x[i] = i
        max = d1[i,0]
        for j in range(height):
            num = d1[i,j]
            if num > max:
                max = num
        hor[i] = max

    return ver,hor,x,y
然后创建一个setup.py文件,准备编译,因为calc.pyx文档里包含了
cimport numpy as np所以setup文件要加入
include_dirs=[np.get_include()]#setup.py
from distutils.core import setup
from Cython.Build import cythonize
import numpy as np
setup(
    name='calculation', ext_modules=cythonize('calc.pyx'),include_dirs=[np.get_include()])
在cmd命令行cd到当前路径,并输入python setup.py build_ext --inplace
编译完成大概是这个样子
编译完成文件夹会出现两个后缀名为*.c和*.pyd的文件。
然后测试一下编译的代码运行的速度
#test13.py
import cv2
import calc
import time

img2 = cv2.imread('123.png')

img = cv2.cvtColor(img2, cv2.COLOR_BGR2GRAY)

height,width = img.shape

start = time.time()
calc.calxd(img)
end = time.time()
print(end-start)
m,n,x,y = calc.calxm(img)
end2 = time.time()

print(end2-end)
测试结果:非常快,比之前的0.7秒快很多了
主程序图表用的是guiqwt,是因为刷新比较快,matplotlib刷新太慢了。
#chart.py
import cv2,time,sys
import numpy as np
from PyQt5.QtWidgets import QWidget, QLabel, QVBoxLayout, QApplication, QHBoxLayout
from PyQt5.QtGui import QImage, QPixmap, QPainter
from PyQt5.QtCore import Qt

import calc
from guiqwt.plot import CurveWidget
from guiqwt.builder import make
from device import ccd_dev

class chart(QWidget):
    def __init__(self):
        super(chart, self).__init__(parent=None)
        #self.resize(800,600)

        self.win1 = CurveWidget()
        self.win1.setFixedWidth(170)
        self.curve = make.curve([],[])#纵向的图表
        self.plot = self.win1.get_plot()
        self.plot.add_item(self.curve)
        self.plot.set_axis_limits(2,0,255)#X轴范围

        self.plot.set_axis_title(0,'Y')#Y轴标签
        self.plot.set_axis_title(2,'Z')#X轴标签

        self.plot.grid.setMajorPen(Qt.DotLine)#大网格实线QtGui.QPen类
        self.plot.grid.setMajorPen(QColor('#e9e9e9'))#大网格颜色
        self.plot.grid.setMinorPen(Qt.NoPen)#小网格不可见

        self.win2 = CurveWidget()
        self.win2.setFixedHeight(150)
        self.curve2 = make.curve([],[])
        self.plot2 = self.win2.get_plot()
        self.plot2.add_item(self.curve2)
        self.plot2.set_axis_limits(0,0,255)
        self.plot2.set_axis_title(0,'Z')
        self.plot2.set_axis_title(2,'X')

        self.plot2.grid.setMajorPen(Qt.DotLine)#大网格实线QtGui.QPen类
        self.plot2.grid.setMajorPen(QColor('#e9e9e9'))#大网格颜色
        self.plot2.grid.setMinorPen(Qt.NoPen)#小网格不可见

        self.lab = QLabel()#显示图片的载体,不知道为什么

        vbox1 = QVBoxLayout()#为了图表曲线高度和图片高度一致
        vbox1.addWidget(self.lab)
        vbox1.addStretch(0)

        hbox = QHBoxLayout()
        hbox.addWidget(self.win1)
        hbox.addLayout(vbox1)

        hbox2 = QHBoxLayout()#为了图表曲线长度和图片长度一致
        hbox2.addStretch(0)
        hbox2.addWidget(self.win2)

        vbox = QVBoxLayout(self)
        vbox.addLayout(hbox)
        vbox.addLayout(hbox2)

        self.th = ccd_dev()#采集图像的分线程
        self.th.datasignal.connect(self.slot_data)
        self.th.start()

    def slot_data(self,i,img):
        #t1 = time.time()
        clr = np.array(img)#Type:list -> np.array,灰度图数据
        height, width = clr.shape
        self.lab.setFixedSize(width,height)
        self.win1.setFixedHeight(height+35)
        self.win2.setFixedWidth(width+47)
        rgb = calc.calxd(clr)#自制彩虹图的算法
        ver, hor, x, y = calc.calxm(clr)#ver是每一行的最大值集合,hor是每一列的最大值集合
        self.curve.set_data(ver,y)#更新图表
        self.curve2.set_data(x,hor)
        image = QImage(rgb,width,height,QImage.Format_RGB888)#QImage.Format_Indexed8显示为灰度图
        self.lab.setPixmap(QPixmap.fromImage(image))#显示图片
        #t2 = time.time()
        #print(t2 - t1)#测量部分代码运行时间


if __name__ == '__main__':
    app = QApplication(sys.argv)
    ar = chart()
    ar.show()
    sys.exit(app.exec_())
界面是这样


