Mixin

备注:子类没有重写超类A方法的前提下,如果2个或多个超类拥有相同签名的A方法,那么子类会以继承的最后一个超类中的A方法为准。
如果子类自己重写了A方法则以本身的A方法为准。
泛型-泛型函数
main() {
K addCache
K temp = key;
print('${key}: ${value}');
return temp;
}
var key = addCache('dongnao', 'damon');
print(key);
}
备注:Dart1.21开始可以使用泛型函数。
泛型函数可以在以下几个地方使用类型参数:
<1> 函数的返回值类型。
<2> 参数的类型。
<3> 局部变量的类型。
泛型-构造函数泛型
main() {
var p = Phone
print(p.mobileNumber);
}
class Phone
final T mobileNumber;
Phone(this.mobileNumber);
}
备注:Dart1.21开始可以使用泛型函数。
泛型函数可以在以下几个地方使用类型参数:
<1> 函数的返回值类型。
<2> 参数的类型。
<3> 局部变量的类型。
泛型-泛型限制
main() {
var footMassage = FootMassage();
var m = Massage
m.massage.doMassage();
}
class Massage
final T massage;
Massage(this.massage);
}
class FootMassage {
void doMassage() {
print('脚底按摩');
}
}
备注:实现泛型类型时,您可能希望限制其参数的类型,可以在<>里面使用extends。
泛型-与java区别
Java中的泛型信息是编译时的,泛型信息在运行时是不存在的
Dart的泛型类型是固化的,在运行时也有可以判断的具体类型
var names = List
print(names is List
print(names.runtimeType); // List
备注:在Java中,可以测试对象是否为List,但无法测试它是否是List
库-使用核心库
使用import关键字来载入库:
import "dart:math";
void main() {
print(sqrt(4));//开平方 2.0
}
备注:import 后的必须参数为库 的 URI。(Uniform Resource Identifier统一资源标识符)
对于内置的库,URI 使用特殊的 dart: scheme。
对于其他的库,你可以使用文件系统路径或者 package: scheme。
库-载入第三方库
1.编写pubspec.yaml:
dependencies:
flutter:
sdk: flutter
cupertino_icons: ^0.1.0
dio: ^2.1.0
2.调用
import "package:dio/dio.dart";
void main() {
getHttp();
}
void getHttp() async {
try {
Response response = await Dio().get("https://www.baidu.com");
print(response);
} catch (e) {
print(e);
}
}
库-指定库前缀
如果两个库有冲突的标识符,可以为其中一个或两个库都指定前缀:
import 'MyLib1.dart' as lib1;
import 'MyLib2.dart' as lib2;
void main() {
var myLib = lib1.MyLib();
var myLib2 = lib2.MyLib();
}
库-选择性载入
show-只载入库的某些部分
hide-筛选掉库的某些部分
import 'Mylib1.dart' as lib1 show Test;
import 'Mylib2.dart' as lib2 hide Test;
var test = lib1.Test();
var lib = lib2.MyLib();
备注:果只使用库的一部分功能,则可以选择需要导入的 内容。
库-延迟载入
使用deferred as导入
使用标识符调用loadLibrary()加载库
import 'MyLib1.dart' deferred as lazyLib;
void main() {
lazyLoad();
}
lazyLoad() async {
await lazyLib.loadLibrary();
var t = lazyLib.Test();
t.test();
}
备注:使用 await 关键字暂停代码执行一直到库加载完成。
可提高程序启动速度。
用在不常使用的功能。
用在载入时间过长的包。
执行 A/B 测试,例如 尝试各种算法的 不同实现。
库-自定义库
1.//mylib/mylib.dart
library mylib;
part 'util.dart';
part 'tool.dart';
void printMyLib() => print('mylib');
2.//mylib/tool.dart
part of mylib;
void printTool() => print('tool');
3.import 'mylib/mylib.dart';
void main() {
printMyLib();
printUtil();
printTool();
}
备注:part 可以把一个库分开到多个 Dart 文件中。
或者我们想让某一些库共享它们的私有对象的时候,可以需要使用part。
import不会完全共享作用域,而part之间是完全共享的。如果说在A库中import了B库,B库import了C库,A库是没有办法直接使用C库的对象的。而B,C若是A的part,那么三者共享所有对象。并且包含所有导入。
异步-async和await
void main(){
getName1();
getName2();
getName3();
}
Future getName1() async {
await getStr1();
await getStr2();
print('getName1’);
}
getStr1() {
print('getStr1’);
}
getStr2() {
print('getStr2’);
}
getName2() {
print('getName2’);
}
getName3() {
print('getName3’);
}
备注:await关键字必须在async函数内部使用
await表达式可以使用多次
异步-then,catchError,whenComplete
void main() {
new Future(() => futureTask())//异步任务的函数
.then((m) => "result:$m")//任务执行完后的子任务
.then((m) => m.length) //其中m为上个任务执行完后的返回的结果
.then((m) => printLength(m))
.catchError(print)
.whenComplete(() => whenTaskCompelete());//所有任务完成后的回调函数
}
备注:
如果需要监听“完毕”这个状态,那么用whenComplete,需要监听“成功”这个状态,用then,需要监听“失败”这个状态,用catchError。
如果重写了test方法,test返回true就可以在catchError的onError方法里捕获到异常,如果test返回false,就把该异常继续抛出而不会在catchError方法里被捕获,如果不写test默认实现一个返回true的test方法
异步-Event-Looper
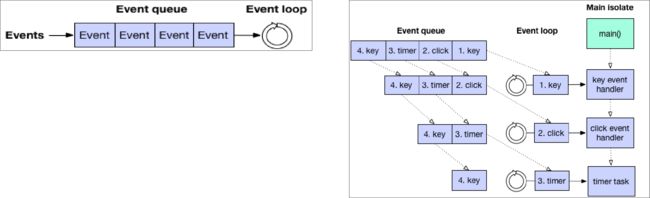
备注:一个消息循环的职责就是不断从消息队列中取出消息并处理他们直到消息队列为空。
消息队列中的消息可能来自用户输入,文件I/O消息,定时器等。例如上图的消息队列就包含了定时器消息和用户输入消息。
Dart中的Main Isolate只有一个Event Looper,但是存在两个Event Queue: Event Queue以及Microtask Queue。
异步-Event Queue和Microtask Queue
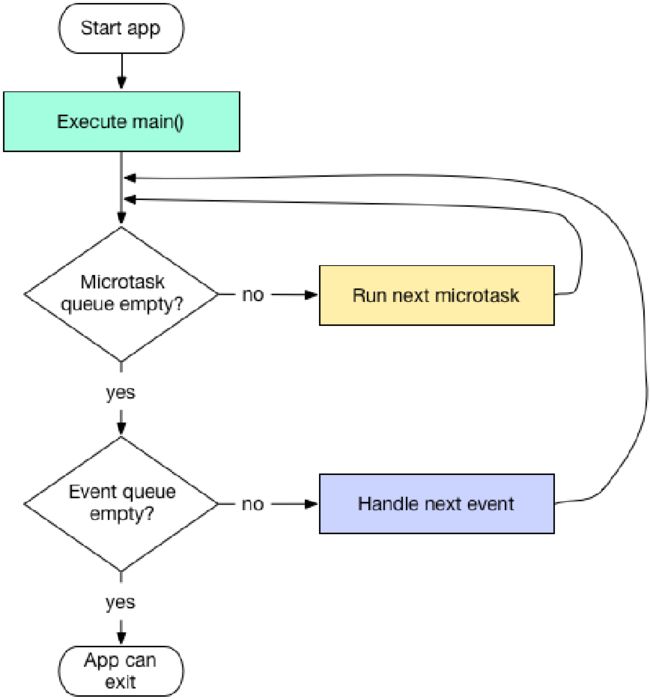
备注:优先全部执行完Microtask Queue中的Event。
直到Microtask Queue为空时,才会执行Event Queue中的Event。
当Event Looper正在处理Microtask Queue中的Event时候,Event Queue中的Event就停止了处理了,此时App不能绘制任何图形,不能处理任何鼠标点击,不能处理文件IO等等。
绘制图形,处理鼠标点击,处理文件IO等都是在Event Queue里完成的。
异步-任务调度
使用Future类,可以将任务加入到Event Queue的队尾
使用scheduleMicrotask函数,将任务加入到Microtask Queue队尾

异步-new Future()
void main(){
testFuture();
}
void testFuture() {
Future f = new Future(() => print('f1'));
Future f1 = new Future(() => null);
//Future f1 = new Future.delayed(Duration(seconds: 1) ,() => null);
Future f2 = new Future(() => null);
Future f3 = new Future(() => null);
f3.then((_) => print('f2'));
f2.then((_) {
print('f3');
new Future(() => print('f4'));
f1.then((_) {
print('f5');
});
});
f1.then((m) {
print('f6');
});
print('f7');
}
备注:使用new Future将任务加入event队列。
Future中的then并没有创建新的Event丢到Event Queue中,而只是一个普通的Function Call,在FutureTask执行完后,立即开始执行。
如果在then()调用之前Future就已经执行完毕了,那么任务会被加入到microtask队列中,并且该任务会执行then()中注册的回调函数。
使用Future.value构造函数的时候,就会上一条一样,创建Task丢到microtask Queue中执行then传入的函数。
Future.sync构造函数执行了它传入的函数之后,也会立即创建Task丢到microtask Queue中执行。
当任务需要延迟执行时,可以使用new Future.delay()来将任务延迟执行。
异步-scheduleMicrotask()
import 'dart:async';
void main(){
testFuture();
}
void testScheduleMicrotask(){
scheduleMicrotask(() => print('s1'));
new Future.delayed(new Duration(seconds: 1), () => print('s2'));
new Future(() => print('s3')).then((_) {
print('s4');
scheduleMicrotask(() => print('s5'));
}).then((_) => print('s6'));
new Future(() => print('s7'));
scheduleMicrotask(() => print('s8'));
print('s9');
}
备注:如果可以,尽量将任务放入event队列中。
使用Future的then方法或whenComplete方法来指定任务顺序。
为了保持你app的可响应性,尽量不要将大计算量的任务放入这两个队列。
大计算量的任务放入额外的isolate中。
生成器-同步生成器
Main(){
var it = getSyncGenerator(5).iterator;
while (it.moveNext()) {
print(it.current);
}
}
Iterable
print('start');
int k = 0;
while (k < n) {
yield k++;
}
print('end');
}
备注:使用sync*,返回的是Iterable对象。
yield会返回moveNext为true,并等待 moveNext 指令。
调用getSyncGenerator立即返回Iterable对象。
调用moveNext方法时getSyncGenerator才开始执行。
生成器-异步生成器
Main(){
//getAsyncGenerator(5).listen((value) => print(value));
StreamSubscription subscription = getAsyncNumIterator(5).listen(null);
subscription.onData((value) {
print(value);
if(value>=2){
subscription.pause();
}
});
}
Stream
print('start');
int k = 0;
while (k < n) {
yield k++;
}
print('end');
}
备注:使用async*,返回的是Stream对象。
yield不用暂停,数据以流的方式一次性推送,通过StreamSubscription进行控制。
调用getAsyncGenerator立即返回Stream,只有执行了listen,函数才会开始执行。
listen返回一个StreamSubscription 对象进行流监听控制。
可以使用StreamSubscription对象对数据流进行控制。
生成器-递归生成器
Main(){
var it = getSyncRecursiveGenerator(5).iterator;
while (it.moveNext()) {
print(it.current);
}
}
Iterable
if (n > 0) {
yield n;
yield* getSyncNumDownFrom(n - 1);
}
}
备注:yield* 以指针的方式传递递归对象,而不是整个同步对象。
隔离-Isolates
所有Dart代码都在隔离区内运行,而不是线程。每个隔离区都有自己的内存堆,确保不会从任何其他隔离区访问隔离区的状态。
备注:Dart没有共享内存的并发,没有竞争的可能性所以不需要锁,也就不用担心死锁的问题。
isolate之间没有共享内存,所以他们之间的通信唯一方式只能是通过Port进行,而且Dart中的消息传递总是异步的。
isolate神似Thread,但实际上两者有本质的区别。操作系统内的线程之间是可以有共享内存的而isolate没有,这是最为关键的区别。
元数据(注解)-@deprecated
main() {
dynamic tv = new Television();
tv.activate();
tv.turnOn();
}
class Television {
@deprecated
void activate() {
turnOn();
}
void turnOn() {
print('Television turn on!');
}
}
备注:所有的 Dart 代码都可以使用: @deprecated 和 @override。
元数据(注解)-自定义
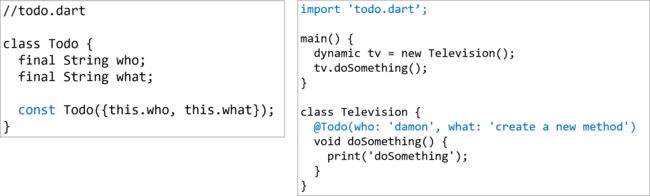
备注:在java中,如果自定义一个注解,需要添加 @Target 作用域注解,@Retention 注解类型注解,添加 @interface,然后定义注解参数。
构造方法定义为编译时常量