图像分类篇——使用pytorch搭建GoogLeNet
目录
- 1. GoogLeNet网络详解
-
- 1.1 GoogLeNet网络概述
- 1.2 Inception网络结构
- 1.3 辅助分类器Auxiliary Classifier
- 1.4 GoogLeNet网络结构和详细参数
- 2. Pytorch搭建
-
- 2.1 model.py
- 2.2 train.py
- 2.3 predict.py
本文为学习记录和备忘录,对代码进行了详细注释,以供学习。
内容来源:
★github: https://github.com/WZMIAOMIAO/deep-learning-for-image-processing
★b站:https://space.bilibili.com/18161609/channel/index
★CSDN:https://blog.csdn.net/qq_37541097
1. GoogLeNet网络详解
1.1 GoogLeNet网络概述
GoogLeNet在2014年由Google团队提出。
论文全名:Going deeper with convolutions.
论文链接:GoogLeNet, Inceptionv1(Going deeper with convolutions)
该网络的亮点是:①引入了Inception 结构(融合不同尺度的特征信息)。②使用1x1的卷积核进行降维以及映射处理。③添加两个辅助分类器帮助训练(AlexNet和VGG只有1个输出层,而GoogLeNet有3个输出层,其中包含1个主类器和2个辅助分类器)。④丢弃全连接层,使用平均池化层(大大减少模型参数)。
1.2 Inception网络结构
(1)1×1卷积
1×1卷积操作不改变w和h,但是可以改变#channels。如6×6×32与1×1×32×(#filters)得到的结果为6×6×#filters.

(2)Inception网络结构
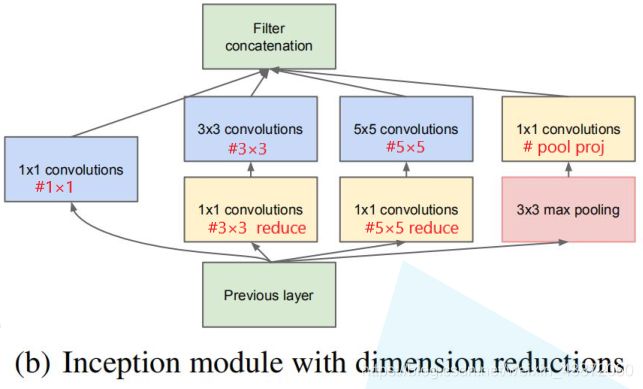
将上一层得到的特征矩阵同时输入到四个分支中进行处理,再将四个分支得到的特征矩阵按深度进行拼接,得到输出特征矩阵。Inception网络的作用是替代你决定卷积层中的filter类型或是否要创建Conv or Pool.即网络自主学习它需要什么样的参数,采用哪些filter组合。(注:每个分支的特征矩阵的高和宽必须相同)
1.3 辅助分类器Auxiliary Classifier

●要点1:平均池化层卷积核大小为5,步距为3。GoogLeNet中两个辅助分类器分别来自Inception-4a和Inception-4d的输出后,Inception-4a输出为1414512,经过平均池化后变为44512,计算过程为[(14-5)/3]+1=4,且池化后深度不变;Inception-4d输出为1414528,经过平均池化后变为44528.
●要点2:用128个1*1的卷积核进行卷积处理,可以降低维度,并且这里使用了ReLu函数。
●要点3:采用节点个数为1024的全连接层,并同样采用ReLu函数。
●要点4:在两个全连接层中间使用Dropout函数,它以70%的比率失活神经元。
●要点5:输出层节点个数对应着要预测的类别个数,然后经过softmax得到概率分布。
1.4 GoogLeNet网络结构和详细参数

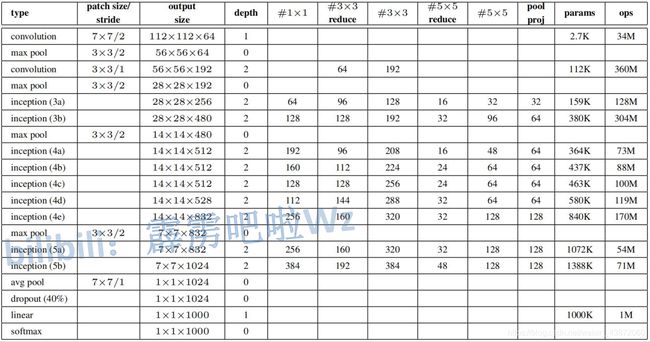
第1列代表名称,第2列代表参数(卷积核大小和步距),第3列代表输出特征矩阵大小,第4列depth代表卷积层个数,第5列~第10列为Inception层参数,可对照(2)②中图理解。
注:实际中还存在LRN(Local Response Norm)层,但作用不大,搭建过程中将其舍弃。
2. Pytorch搭建
对于代码的解释都在注释中,方便对照查看学习。
2.1 model.py
导入模块:
import torch.nn as nn
import torch
import torch.nn.functional as F
因为卷积层和RuLu激活单元经常成对出现,所以首先定义一个BasicConv2d类,将卷积层和ReLu两层结合起来作为一个基本卷积模板,这样可以简化编程。
class BasicConv2d(nn.Module):
    def __init__(self, in_channels, out_channels, **kwargs):
        # BasicConv2d传入3个参数:输入特征矩阵深度in_channels,卷积核个数(即输出特征矩阵个数)out_channels,及**kwargs:步距、padding等
        super(BasicConv2d, self).__init__()
        self.conv = nn.Conv2d(in_channels, out_channels, **kwargs)  # 输入特征矩阵深度=传入特征矩阵深度,卷积核个数=输出特征矩阵深度
        self.relu = nn.ReLU(inplace=True)

    def forward(self, x):  # 正向传播,先经过卷积层然后经过ReLu激活
        x = self.conv(x)
        x = self.relu(x)
        return x
下一步定义Inception模板,Inception模块包括4个分支,分别定义这4个分支。
class Inception(nn.Module):
    def __init__(self, in_channels, ch1x1, ch3x3red, ch3x3, ch5x5red, ch5x5, pool_proj):
        # in_channels为输入特征矩阵深度,ch1x1=#1x1,ch3x3red=#3x3reduce,ch3x3=#3x3,ch5x5red=#5x5reduce,ch5x5=#5x5,pool_proj=#pool_proj
        super(Inception, self).__init__()

        # 分支1,1*1*(#1*1)卷积
        # 采用最下面定义的BasicConv2d模板(Conv+ReLu),输入特征矩阵深度为in_channels,卷积核个数为ch1x1,卷积核大小为1,步距为1
        self.branch1 = BasicConv2d(in_channels, ch1x1, kernel_size=1)

        # 分支2,包括两个基本卷积模板:1*1*(#3*3 reduce)卷积 和 3*3*(#3*3)卷积
        self.branch2 = nn.Sequential(
            BasicConv2d(in_channels, ch3x3red, kernel_size=1),
            BasicConv2d(ch3x3red, ch3x3, kernel_size=3, padding=1)   # padding=1保证输出大小等于输入大小
            # 输入特征矩阵深度为上一层卷积核个数(上一层卷积核个数即为上一层输出特征矩阵的深度,也即下一层输入特征矩阵的深度)
        )

        # 分支3与分支2类似,包含1*1*(#5*5 reduce)卷积 和 5*5*(#5*5)卷积
        self.branch3 = nn.Sequential(
            BasicConv2d(in_channels, ch5x5red, kernel_size=1),
            BasicConv2d(ch5x5red, ch5x5, kernel_size=5, padding=2)   # padding=2保证输出大小等于输入大小
        )

        # 分支4先3*3Max pooling,再1*1*(# pool proj)卷积
        self.branch4 = nn.Sequential(
            nn.MaxPool2d(kernel_size=3, stride=1, padding=1),
            BasicConv2d(in_channels, pool_proj, kernel_size=1)  # 因为池化不改变深度,因此输入特征矩阵深度仍为in_channels
        )

    def forward(self, x):  # 定义前向传播过程:将输入矩阵分别输入到分支1、2、3、4
        branch1 = self.branch1(x)
        branch2 = self.branch2(x)
        branch3 = self.branch3(x)
        branch4 = self.branch4(x)

        outputs = [branch1, branch2, branch3, branch4]  # 将输出放入到列表中
        return torch.cat(outputs, 1)  # 用torch.cat函数将四个输出合并
        # 传入第1个参数为四个输出特征矩阵的列表,第2个参数为所需要合并的维度,torchtensor排列顺序为[batch,c,h,w],则此处1表示在深度方向合并
接下来定义辅助分类器(Auxiliary Classifie),辅助分类器包括:①.平均池化层 。②.1*1卷积层。③.FC(Full Connected Layer)1。④.FC2。
class InceptionAux(nn.Module):
    def __init__(self, in_channels, num_classes):  # 在初始化函数中传入输入特征矩阵深度 和 要分类类别的个数
        super(InceptionAux, self).__init__()
        self.averagePool = nn.AvgPool2d(kernel_size=5, stride=3)  # 定义一个kernel_size=5, stride=3的平均池化下采样层,得4*4*c的特征矩阵
        self.conv = BasicConv2d(in_channels, 128, kernel_size=1)  # 卷积核个数固定为128,1*1卷积改变#c,则output[batch, 128, 4, 4]

        self.fc1 = nn.Linear(2048, 1024)  # 输入节点个数为128*4*4=2048,输出结点个数为1024
        self.fc2 = nn.Linear(1024, num_classes)  # 输入节点个数为上一层输出1024,输出节点个数为预测的类别个数

    def forward(self, x):  # 定义正向传播过程
        # aux1: N x 512 x 14 x 14, aux2: N x 528 x 14 x 14 两个分类器经平均池化前输入特征矩阵参数
        x = self.averagePool(x)
        # aux1: N x 512 x 4 x 4, aux2: N x 528 x 4 x 4 两个分类器经平均池化后输出特征矩阵参数
        x = self.conv(x)
        # N x 128 x 4 x 4 ,由于都固定采用128个卷积核,则无论辅助分类器1、2,输出特征矩阵shape都等于128*4*4
        x = torch.flatten(x, 1)  # 将输出特征矩阵展平,此处1代表从channel维度开始展平
        x = F.dropout(x, 0.5, training=self.training)  # 展平向量与FC1之间加入一个Dropout,并传入training参数
        # N x 2048
        # ######当实例化一个model后,可通过model.train()和model.eval()来控制模型的状态,控制Dropout是否有效######
        # ######model.train()下,self.training=True,model.eval()下,self.training=False######
        x = F.relu(self.fc1(x), inplace=True)  # inplace=True是一种节省内存的方法
        x = F.dropout(x, 0.5, training=self.training)
        # N x 1024
        x = self.fc2(x)
        # N x num_classes
        return x
最后,定义GoogLeNet网络:
class GoogLeNet(nn.Module):
    def __init__(self, num_classes=1000, aux_logits=True, init_weights=False):
        # 初始化函数中传入3个参数:分类类别个数、是否使用辅助分类器和是否初始化权重
        super(GoogLeNet, self).__init__()
        self.aux_logits = aux_logits  # 将是否使用辅助分类器的布尔变量传入到类变量中

        # 下面根据GoogLeNet简图来搭建网络,每一层数据都由网络详解表格中数据得出
        self.conv1 = BasicConv2d(3, 64, kernel_size=7, stride=2, padding=3)
        self.maxpool1 = nn.MaxPool2d(3, stride=2, ceil_mode=True)  # 最大池化结果为小数时,ceil_mode=True,向上取整;ceil_mode=False,向下取整

        self.conv2 = BasicConv2d(64, 64, kernel_size=1)
        self.conv3 = BasicConv2d(64, 192, kernel_size=3, padding=1)
        self.maxpool2 = nn.MaxPool2d(3, stride=2, ceil_mode=True)

        self.inception3a = Inception(192, 64, 96, 128, 16, 32, 32)
        self.inception3b = Inception(256, 128, 128, 192, 32, 96, 64)
        self.maxpool3 = nn.MaxPool2d(3, stride=2, ceil_mode=True)

        # Inception层的输入矩阵深度可由表格上一层的output size得到,也可由上一层四个分支的特征矩阵的深度加和得到
        self.inception4a = Inception(480, 192, 96, 208, 16, 48, 64)
        self.inception4b = Inception(512, 160, 112, 224, 24, 64, 64)
        self.inception4c = Inception(512, 128, 128, 256, 24, 64, 64)
        self.inception4d = Inception(512, 112, 144, 288, 32, 64, 64)
        self.inception4e = Inception(528, 256, 160, 320, 32, 128, 128)
        self.maxpool4 = nn.MaxPool2d(3, stride=2, ceil_mode=True)

        self.inception5a = Inception(832, 256, 160, 320, 32, 128, 128)
        self.inception5b = Inception(832, 384, 192, 384, 48, 128, 128)

        if self.aux_logits:  # 如果传入参数aux_logits=True,则生成两个辅助分类器。辅助分类器需要2个参数:输入特征深度和分类类别个数
            self.aux1 = InceptionAux(512, num_classes)  # 第1个辅助分类器的输入矩阵深度是Inception4a的输出特征矩阵深度
            self.aux2 = InceptionAux(528, num_classes)  # 第2个辅助分类器的输入矩阵深度是Inception4d的输出特征矩阵深度

        self.avgpool = nn.AdaptiveAvgPool2d((1, 1))  # 自适应平均池化下采样,将输入数据自适应地变为高为1,宽为1的特征矩阵
        self.dropout = nn.Dropout(0.4)  # 在展平特征矩阵和输出结点之间加1个Dropout层
        self.fc = nn.Linear(1024, num_classes)  # 输出层,num_class为预测类别的个数
        if init_weights:  # 如果传入参数init_weights=True,则进行参数初始化
            self._initialize_weights()

    def forward(self, x):  # 根据GoogLeNet网络结构图进行正向传播
        # N x 3 x 224 x 224
        x = self.conv1(x)
        # N x 64 x 112 x 112
        x = self.maxpool1(x)
        # N x 64 x 56 x 56
        x = self.conv2(x)
        # N x 64 x 56 x 56
        x = self.conv3(x)
        # N x 192 x 56 x 56
        x = self.maxpool2(x)

        # N x 192 x 28 x 28
        x = self.inception3a(x)
        # N x 256 x 28 x 28
        x = self.inception3b(x)
        # N x 480 x 28 x 28
        x = self.maxpool3(x)
        # N x 480 x 14 x 14
        x = self.inception4a(x)
        # N x 512 x 14 x 14
        if self.training and self.aux_logits:    # eval model lose this layer
            aux1 = self.aux1(x)  # 满足条件时,将结果输入到辅助分类器1中得到结果。
        # ####训练过程中self.training=True;验证过程中,self.training=False。self.aux_logits为是否调用辅助分类器####

        x = self.inception4b(x)
        # N x 512 x 14 x 14
        x = self.inception4c(x)
        # N x 512 x 14 x 14
        x = self.inception4d(x)
        # N x 528 x 14 x 14
        if self.training and self.aux_logits:    # eval model lose this layer
            aux2 = self.aux2(x)

        x = self.inception4e(x)
        # N x 832 x 14 x 14
        x = self.maxpool4(x)
        # N x 832 x 7 x 7
        x = self.inception5a(x)
        # N x 832 x 7 x 7
        x = self.inception5b(x)
        # N x 1024 x 7 x 7

        x = self.avgpool(x)
        # N x 1024 x 1 x 1
        x = torch.flatten(x, 1)  # 将所得特征矩阵进行展平处理
        # N x 1024
        x = self.dropout(x)
        x = self.fc(x)
        # N x 1000 (num_classes)
        if self.training and self.aux_logits:   # eval model lose this layer
            return x, aux2, aux1
        # 如果是训练模式(self.training=True)且使用辅助分类器(self.aux_logits=True)的话,则返回3个值:主分类器输出,辅助分类器2输出,辅助分类器1输出
        return x  # 如果条件不满足,则只返回主分类器输出结果

    def _initialize_weights(self):
        for m in self.modules():
            if isinstance(m, nn.Conv2d):  # 对卷积层进行初始化
                nn.init.kaiming_normal_(m.weight, mode='fan_out', nonlinearity='relu')
                if m.bias is not None:
                    nn.init.constant_(m.bias, 0)
            elif isinstance(m, nn.Linear):  # 对全连接层进行初始化
                nn.init.normal_(m.weight, 0, 0.01)
                nn.init.constant_(m.bias, 0)
2.2 train.py
GoogLeNet的网络训练与AlexNet 、VGG基本相似,区别在于:
①.定义模型部分(line72)
net = GoogLeNet(num_classes=5, aux_logits=True, init_weights=True)
定义网络预测的类别个数为5(根据数据集类别个数不同进行改变,此处预测的是画分类数据集,类别个数为5),使用辅助分类器(aux_logits=True)且初始化权重(init_weights=True)
②.损失函数部分(line90-line93)
 logits, aux_logits2, aux_logits1 = net(images.to(device))
 loss0 = loss_function(logits, labels.to(device))
 loss1 = loss_function(aux_logits1, labels.to(device))
 loss2 = loss_function(aux_logits2, labels.to(device))
 loss = loss0 + loss1 * 0.3 + loss2 * 0.3
分别计算出主分类器输出与标签之间的损失、辅助分类器1输出与标签之间的损失和辅助分类器2输出与标签之间的损失,然后将辅助分类器的损失按0.5的权重进行加权求和得到总损失。
③.net.train()和net.eval()的区别
net.train()是训练过程,此时self.training=True,网络中生成了辅助分类器,网络有3个输出:主分类器输出,辅助分类器2输出和辅助分类器1输出。
net.eval()是验证过程,此时self.training=False,网络中不需要生成辅助分类器,网络只有1个输出:主分类器输出。
即通过self.training这个布尔变量来控制网络是否生成辅助分类器,从而减少计算量。
训练部分全部代码如下:
import os
import json

import torch
import torch.nn as nn
from torchvision import transforms, datasets
import torch.optim as optim
from tqdm import tqdm

from model import GoogLeNet


# ##############与AlexNet VGG基本相似,区别在于1.定义模型部分line72  2.损失函数部分line90-line93  3.net.train()和net.eval()的区别
def main():
    device = torch.device("cuda:0" if torch.cuda.is_available() else "cpu")
    print("using {} device.".format(device))

    data_transform = {

        "train": transforms.Compose([transforms.RandomResizedCrop(224),
                                     transforms.RandomHorizontalFlip(),
                                     transforms.ToTensor(),
                                     transforms.Normalize((0.5, 0.5, 0.5), (0.5, 0.5, 0.5))]),
        "val": transforms.Compose([transforms.Resize((224, 224)),
                                   transforms.ToTensor(),
                                   transforms.Normalize((0.5, 0.5, 0.5), (0.5, 0.5, 0.5))])}

    data_root = os.path.abspath(os.path.join(os.getcwd(), "../.."))  # get data root path
    image_path = os.path.join(data_root, "data_set", "flower_data")  # flower data set path
    assert os.path.exists(image_path), "{} path does not exist.".format(image_path)
    train_dataset = datasets.ImageFolder(root=os.path.join(image_path, "train"),
                                         transform=data_transform["train"])
    train_num = len(train_dataset)

    # {'daisy':0, 'dandelion':1, 'roses':2, 'sunflower':3, 'tulips':4}
    flower_list = train_dataset.class_to_idx
    cla_dict = dict((val, key) for key, val in flower_list.items())
    # write dict into json file
    json_str = json.dumps(cla_dict, indent=4)
    with open('class_indices.json', 'w') as json_file:
        json_file.write(json_str)

    batch_size = 32
    nw = min([os.cpu_count(), batch_size if batch_size > 1 else 0, 8])  # number of workers
    print('Using {} dataloader workers every process'.format(nw))

    train_loader = torch.utils.data.DataLoader(train_dataset,
                                               batch_size=batch_size, shuffle=True,
                                               num_workers=nw)

    validate_dataset = datasets.ImageFolder(root=os.path.join(image_path, "val"),
                                            transform=data_transform["val"])
    val_num = len(validate_dataset)
    validate_loader = torch.utils.data.DataLoader(validate_dataset,
                                                  batch_size=batch_size, shuffle=False,
                                                  num_workers=nw)

    print("using {} images for training, {} images for validation.".format(train_num,
                                                                           val_num))

    # test_data_iter = iter(validate_loader)
    # test_image, test_label = test_data_iter.next()

    # net = torchvision.models.googlenet(num_classes=5)
    # model_dict = net.state_dict()
    # pretrain_model = torch.load("googlenet.pth")
    # del_list = ["aux1.fc2.weight", "aux1.fc2.bias",
    #             "aux2.fc2.weight", "aux2.fc2.bias",
    #             "fc.weight", "fc.bias"]
    # pretrain_dict = {k: v for k, v in pretrain_model.items() if k not in del_list}
    # model_dict.update(pretrain_dict)
    # net.load_state_dict(model_dict)
    net = GoogLeNet(num_classes=5, aux_logits=True, init_weights=True)  # 定义网络预测的类别个数为5,使用辅助分类器且初始化权重
    net.to(device)
    loss_function = nn.CrossEntropyLoss()
    optimizer = optim.Adam(net.parameters(), lr=0.0003)

    epochs = 30
    best_acc = 0.0
    save_path = './googleNet.pth'
    train_steps = len(train_loader)
    for epoch in range(epochs):
        # train
        net.train()  # 训练过程,self.training=True,网络有3个输出:主分类器输出,辅助分类器2输出和辅助分类器1输出
        running_loss = 0.0
        train_bar = tqdm(train_loader)
        for step, data in enumerate(train_bar):
            images, labels = data
            optimizer.zero_grad()
            logits, aux_logits2, aux_logits1 = net(images.to(device))
            loss0 = loss_function(logits, labels.to(device))  # 计算主分类器输出与标签之间的损失
            loss1 = loss_function(aux_logits1, labels.to(device))  # 计算辅助分类器1输出与标签之间的损失
            loss2 = loss_function(aux_logits2, labels.to(device))  # 计算辅助分类器2输出与标签之间的损失
            loss = loss0 + loss1 * 0.3 + loss2 * 0.3  # 将损失加权求和(原文中说明将辅助分类器的损失按0.5的权重加入到总损失中)
            loss.backward()  # 将损失进行反向传播
            optimizer.step()  # 通过优化器去更新模型参数

            # print statistics
            running_loss += loss.item()

            train_bar.desc = "train epoch[{}/{}] loss:{:.3f}".format(epoch + 1,
                                                                     epochs,
                                                                     loss)

        # validate
        # 在预测中,不需要管辅助分类器的输出结果,因此通过self.training这个布尔变量来控制是否生成辅助分类器,从而减少计算量
        net.eval()  # 验证过程self.training=False,网络只有1个输出:主分类器输出
        acc = 0.0  # accumulate accurate number / epoch
        with torch.no_grad():
            val_bar = tqdm(validate_loader)
            for val_data in val_bar:
                val_images, val_labels = val_data
                outputs = net(val_images.to(device))  # eval model only have last output layer,验证过程只有一个主分类器输出
                predict_y = torch.max(outputs, dim=1)[1]
                acc += torch.eq(predict_y, val_labels.to(device)).sum().item()

        val_accurate = acc / val_num
        print('[epoch %d] train_loss: %.3f  val_accuracy: %.3f' %
              (epoch + 1, running_loss / train_steps, val_accurate))

        if val_accurate > best_acc:
            best_acc = val_accurate
            torch.save(net.state_dict(), save_path)

    print('Finished Training')


if __name__ == '__main__':
    main()
2.3 predict.py
GoogLeNet的网络预测与AlexNet 、VGG基本相似,区别在于:
建立模型部分(line38-line49)
    # create model
    model = GoogLeNet(num_classes=5, aux_logits=False).to(device)
●预测过程中只要最后总分类器的预测结果,不需要生成两个辅助分类器,因此预测过程中实例化模型时,初始化参数aux_logits=False。
    # load model weights
    weights_path = "./googleNet.pth"
    assert os.path.exists(weights_path), "file: '{}' dose not exist.".format(weights_path)
    missing_keys, unexpected_keys = model.load_state_dict(torch.load(weights_path, map_location=device),
                                                          strict=False)

    model.eval()
● strict默认等于True,它会精准地匹配当前模型和需要载入的权重模型。但在此处,因为保存模型时将训练时辅助分类器的参数也保存了,而预测时不需要辅助分类器,两者匹配起来肯定会缺一些层结构,所以这里设置strict=False。因此,调试会发现unexpected_keys中会有一系列层,这些层都属于那两个辅助分类器。
预测部分全部代码如下:
import os
import json

import torch
from PIL import Image
from torchvision import transforms
import matplotlib.pyplot as plt

from model import GoogLeNet


# ##############和AlexNet,VGG差不多,主要区别在于建立模型line38-line49##############
def main():
    device = torch.device("cuda:0" if torch.cuda.is_available() else "cpu")

    data_transform = transforms.Compose(
        [transforms.Resize((224, 224)),
         transforms.ToTensor(),
         transforms.Normalize((0.5, 0.5, 0.5), (0.5, 0.5, 0.5))])

    # load image
    img_path = "../tulip.jpg"
    assert os.path.exists(img_path), "file: '{}' dose not exist.".format(img_path)
    img = Image.open(img_path)
    plt.imshow(img)
    # [N, C, H, W]
    img = data_transform(img)
    # expand batch dimension
    img = torch.unsqueeze(img, dim=0)

    # read class_indict
    json_path = './class_indices.json'
    assert os.path.exists(json_path), "file: '{}' dose not exist.".format(json_path)

    json_file = open(json_path, "r")
    class_indict = json.load(json_file)

    # create model
    model = GoogLeNet(num_classes=5, aux_logits=False).to(device)
    # ###预测过程是不需要两个辅助分类器的,因此初始化设置aux_logits=False

    # load model weights
    weights_path = "./googleNet.pth"
    assert os.path.exists(weights_path), "file: '{}' dose not exist.".format(weights_path)
    missing_keys, unexpected_keys = model.load_state_dict(torch.load(weights_path, map_location=device),
                                                          strict=False)
    # ###strict默认等于True,它会精准地匹配当前模型和需要载入的权重模型###
    # 因为保存模型时将训练时辅助分类器的参数也保存了,而预测时不需要辅助分类器,对比起来肯定会缺一些层结构,所以这里设置strict=False
    # 调试会发现unexpected_keys中会有一系列层,这些层都属于那两个辅助分类器

    model.eval()
    with torch.no_grad():
        # predict class
        output = torch.squeeze(model(img.to(device))).cpu()
        predict = torch.softmax(output, dim=0)
        predict_cla = torch.argmax(predict).numpy()

    print_res = "class: {}   prob: {:.3}".format(class_indict[str(predict_cla)],
                                                 predict[predict_cla].numpy())
    plt.title(print_res)
    print(print_res)
    plt.show()


if __name__ == '__main__':
    main()
