PyTorch Tensor(一)【附代码】
PyTorch Tensor 介绍
目录
Tensor
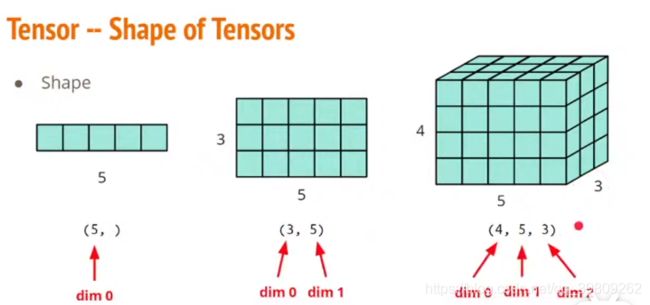
1.Tensor Shape(形状)
2. Tensor Constructor (创建、初始化)
3.Tensor Operators (简单操作)
3.1 改变形状
3.2算术运算
4. 索引(类似numpy)
5. Broadcasting(类似numpy)
6.Tensor 和Numpy之间相互转换
1.Tensor Shape
2. Tensor Constructor
import torch
import numpy as np-
创建一个Tensor
# 未初始化
x = torch.empty(5,3)
x
tensor([[9.2755e-39, 1.0561e-38, 9.1837e-39],
[9.9184e-39, 8.4490e-39, 9.6428e-39],
[1.1112e-38, 9.5511e-39, 1.0102e-38],
[1.0286e-38, 1.0194e-38, 9.6429e-39],
[9.2755e-39, 9.1837e-39, 9.3674e-39]])# 随机初始化
x = torch.rand([5,3])
xtensor([[0.6631, 0.4854, 0.6094],
[0.0914, 0.9664, 0.2811],
[0.2526, 0.0601, 0.4049],
[0.3359, 0.0137, 0.9214],
[0.6712, 0.8900, 0.8775]])
x = torch.rand(5,3)
x
tensor([[0.7771, 0.9077, 0.3229],
[0.6859, 0.0093, 0.5541],
[0.9685, 0.5233, 0.6504],
[0.9050, 0.9366, 0.4523],
[0.1750, 0.6035, 0.4121]])
# 指定数据类型
x = x.new_ones(5, 3, dtype=torch.float64)
x
tensor([[1., 1., 1.],
[1., 1., 1.],
[1., 1., 1.],
[1., 1., 1.],
[1., 1., 1.]], dtype=torch.float64)
-
从列表和numpy array
x = torch.tensor([[1,1],[1,1]])xtensor([[1, 1],
[1, 1]])x = torch.from_numpy(np.array([[1.,-1],[-1,1]]))
y = torch.tensor(np.array([[1.,-1],[-1,1]]))
x==ytensor([[True, True],
[True, True]])-
Zero tensor
x = torch.zeros([2,2])
x
tensor([[0., 0.],
[0., 0.]])
-
Unit tensor
x = torch.ones([1,2,5])
x
tensor([[[1., 1., 1., 1., 1.],
[1., 1., 1., 1., 1.]]])
3.Tensor Operators
3.1 改变形状
-
Unsqueeze:扩展一个新维度
x = torch.zeros([2,3])
x.shape
torch.Size([2, 3])x = x.unsqueeze(1)
x.shapetorch.Size([2, 1, 3])在第一个维度(dim1)上产生。增加一个dim1
-
Transpose 转置
x = torch.zeros([2,3])
x
tensor([[0., 0., 0.],
[0., 0., 0.]])x.shapetorch.Size([2, 3])x = x.transpose(0,1)
xtensor([[0., 0.],
[0., 0.],
[0., 0.]])x.shapetorch.Size([3, 2])x.size()torch.Size([3, 2])torch.size()返回的是一个元组,支持元组的所有操作
-
view()
y = x.view(15)
y
tensor([1., 1., 1., 1., 1., 1., 1., 1., 1., 1., 1., 1., 1., 1., 1.])z = x.view(-1,15) # -1所指的维度数可以通过其他维度推出
ztensor([[1., 1., 1., 1., 1., 1., 1., 1., 1., 1., 1., 1., 1., 1., 1.]])print(x.shape,y.shape,z.shape)torch.Size([5, 3]) torch.Size([15]) torch.Size([1, 15])注:view()返回的tensor与源tensor共享内存,并不创建的新副本,更改其中一个,另外一个也会改变
x +=1
print(x)
print(y) # y也加了1
tensor([[2., 2., 2.],
[2., 2., 2.],
[2., 2., 2.],
[2., 2., 2.],
[2., 2., 2.]])
tensor([2., 2., 2., 2., 2., 2., 2., 2., 2., 2., 2., 2., 2., 2., 2.])view() 仅仅改变了这个张量的观角度
那么如何创建一个新副本呢,即不跟之前的共享内存?
reshape() 可以改变形状,但是不能保证返回的是其拷贝---不推荐。 clone() 可以创造一个副本,然后使用view()改变形状---推荐
x_copy = x.clone().view(15)
x-=1
print(x)
print(x_copy)
tensor([[1., 1., 1.],
[1., 1., 1.],
[1., 1., 1.],
[1., 1., 1.],
[1., 1., 1.]])
tensor([2., 2., 2., 2., 2., 2., 2., 2., 2., 2., 2., 2., 2., 2., 2.])使用
clone还有一个好处:输入会被记录在计算图中,即梯度回传到副本时也会传到源tensor
-
item()将一维tensor(标量)转成python number
x = torch.randn(1)
print(x)
print(x.item())
tensor([-2.7166])
-2.7166399955749513.2算术运算
-
加法1
x = torch.ones([5,3])
y = torch.rand(5, 3)
print(x + y)
tensor([[1.7332, 1.1109, 1.6096],
[1.1618, 1.1612, 1.9675],
[1.2780, 1.0743, 1.4032],
[1.3017, 1.1256, 1.1229],
[1.4796, 1.9607, 1.6434]])-
加法2
print(torch.add(x, y))# 指定输出为result
result = torch.empty(5, 3)
torch.add(x, y, out=result)
print(result)tensor([[1.9620, 1.3404, 1.5272],
[1.7312, 1.3472, 1.2201],
[1.2031, 1.5638, 1.3487],
[1.5959, 1.9309, 1.3309],
[1.7680, 1.6222, 1.4205]])-
加法3:in_place
# adds x to y
y.add_(x)
print(y)
tensor([-1.7166, -1.7166, -1.7166, -1.7166, -1.7166, -1.7166, -1.7166, -1.7166,
-1.7166, -1.7166, -1.7166, -1.7166, -1.7166, -1.7166, -1.7166])4. 索引(类似numpy)
x = torch.ones(2,4)
y = x[0,:]
y

tensor([1., 1., 1., 1.])
y+=1
print(y)tensor([2., 2., 2., 2.])
print(x[0,:]) # 原来的tensor--x 也被改变了tensor([2., 2., 2., 2.])5. Broadcasting(类似numpy)
x = torch.arange(1,3).view(1,2)
x
tensor([[1, 2]])y = torch.arange(1,4).view(3,1)
ytensor([[1],
[2],
[3]])print(x+y)tensor([[2, 3],
[3, 4],
[4, 5]])根据广播机制,自动匹配,参考numpy
print(x*y)tensor([[1, 2],
[2, 4],
[3, 6]])广播机会在维度上自动扩充来实现匹配,然后再进行计算
6.Tensor 和Numpy之间相互转换
numpy()和from_numpy可以实现相互转换。 但是,这两个函数所产生的Tensor和ndarray共享相同的内存,可以快速实现转换,并且改变一个,另外一个也会改变,只是在类型上有区别
-
Tensor ---> NumPy(
x.numpy())
a = torch.ones(4)
b=a.numpy()
print(type(a),type(b))
a += 1
print(a,b)tensor([2., 2., 2., 2.]) [2. 2. 2. 2.]b *=2
print(a,b)tensor([4., 4., 4., 4.]) [4. 4. 4. 4.]-
NumPy ---> Tensor(
torch.from_numpy(x))
a = np.ones(6)
a
array([1., 1., 1., 1., 1., 1.])b = torch.from_numpy(a)
print(b)tensor([1., 1., 1., 1., 1., 1.], dtype=torch.float64)a +=1
print(a,b)[3. 3. 3. 3. 3. 3.] tensor([3., 3., 3., 3., 3., 3.], dtype=torch.float64)b/=3
print(a,b)[1. 1. 1. 1. 1. 1.] tensor([1., 1., 1., 1., 1., 1.], dtype=torch.float64)注:上面讲到的torch.tensor(),会创建副本,拷贝数据,返回的tensor不跟原来的共享内存。
c = torch.tensor(a)
a+=1
print(a,c)
[2. 2. 2. 2. 2. 2.] tensor([1., 1., 1., 1., 1., 1.], dtype=torch.float64)
