Gitgraph:製作 Git 分支圖
Gitgraph:製作 Git 分支圖
文章目錄
- Gitgraph:製作 Git 分支圖
-
- 簡介
- 參考
- 正文
-
- 1. Basic Usage 基礎使用
-
- createGitgraph 繪圖上下文
- branch 創建分支
- commit 提交信息
- merge 合併分支
- tag 標籤
- 2. Advanced Usage 進階用法
-
- mode 模式
- Event 事件
- 結語
簡介
在一些項目管理活動中,git 活動紀錄也佔據了非常重要的一部分,版本控制決定了代碼開發的健壯性,保持穩定的基線才能正確地發布版本。本篇將要來介紹一個使用 JS 將 git 提交紀錄可視化的庫:gitgraph.js,我們就一起來看看吧。
參考
| gitgraph | https://gitgraphjs.com/ |
| gitgraph-API | https://gitgraphjs.com/stories/ |
正文
接下來我們透過提供幾個版本的範例來說明這個庫的能力,我們將只會介紹幾個常見的基本能力,更詳細的用法可以到參考二的鏈接查詢。
1. Basic Usage 基礎使用
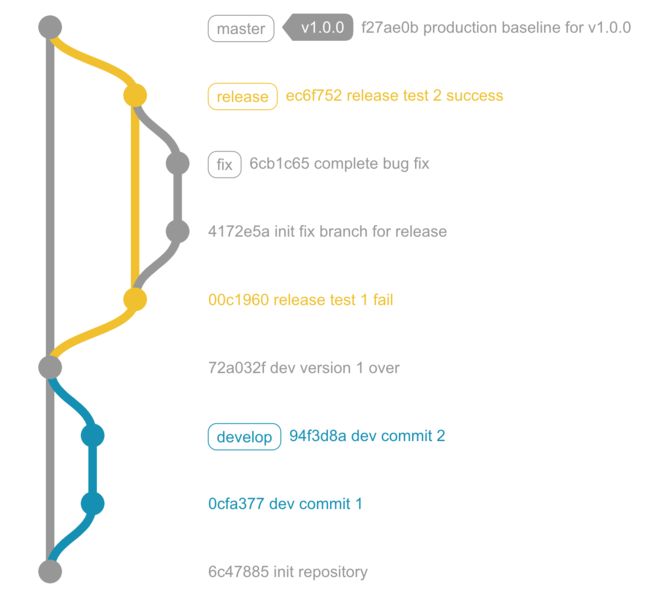
首先第一個例子我們先展示最基礎的使用
import {

  createGitgraph,
  templateExtend,
  TemplateName,
  Mode
} from '@gitgraph/js'
// 創建 gitgraph 容器
const graphContainer = document.getElementById('git-graph')
const gitgraph = createGitgraph(graphContainer, {

  /* options */
  template: templateExtend(TemplateName.Metro, {

    commit: {

      message: {

        displayAuthor: false
      }
    }
  })
})
// 初始化
const master = gitgraph.branch('master').commit('init repository')
const develop = gitgraph
  .branch('develop')
  .commit('dev commit 1')
  .commit('dev commit 2')

master.merge(develop, 'dev version 1 over')

const release = gitgraph.branch('release').commit('release test 1 fail')
const fix = gitgraph
  .branch({

    name: 'fix',
    from: release
  })
  .commit({
      subject: 'init fix branch for release' })
  .commit('complete bug fix')

release.merge(fix, 'release test 2 success').tag('v1.0.0')
master.merge(release, 'production baseline for v1.0.0').tag('v1.0.0')
createGitgraph 繪圖上下文
createGitgraph 可以說是容器,也可以說是一個繪圖的上下文,就好像 canvas 的 getContext('2d') 一樣,也是這整個庫最重要的對象之一。我們可以選擇只傳入一個元素作為圖的容器
const graphContainer = document.getElementById('git-graph')
const gitgraph = createGitgraph(container)
也可以像上面一樣,額外傳入一個參數對象(options)
const graphContainer = document.getElementById('git-graph')
const gitgraph = createGitgraph(graphContainer, {

  /* options */
  template: templateExtend(TemplateName.Metro, {

    commit: {

      message: {

        displayAuthor: false
      }
    }
  })
})
template 表示模板類型,其他還有如 orientation 表示繪圖方向,mode 表示提交信息顯示模式(tooltip 等),reverseArrow 指定箭頭方向等,詳細可選值可以參考官方 storybook 範例
branch 創建分支
有了 gitgraph 上下文之後,在提交版本之前我們需要先創建分支,使用上下文的 branch 方法傳入分支名
const master = gitgraph.branch('master')
const develop = gitgraph.branch('develop')
我們也可以傳入一個配置對象
const fix = gitgraph.branch({

  name: 'fix',
  from: release
})

const feature = gitgraph.branch({

  name: 'feature',
  style: {

    label: {

      bgColor: '#ffce52',
      color: 'black',
      strokeColor: '#ce9b00',
      borderRadius: 0,
      font: 'italic 12pt serif'
    }
  }
})
commit 提交信息
再來就可以在對應的分支上提交版本了,注意這邊調用 commit 方法之後依舊會返回原分支,所以這邊可以使用鏈式調用
const master = gitgraph.branch('master').commit('init repository')
const develop = gitgraph
  .branch('develop')
  .commit('dev commit 1')
  .commit('dev commit 2')
我們也可以在提交分支的時候傳入一個配置對象,subject 將作為提交信息的主標題
const fix = gitgraph
  .branch({

    name: 'fix',
    from: release
  })
  .commit({
      subject: 'init fix branch for release' })
  .commit('complete bug fix')

fix.commit({

  subject: 'main commit message',
  body: 'body message, put some detail here'
})
merge 合併分支
創建好分支,經過幾次提交之後,接下來就是合併分支的 merge 方法了
// 注意這邊第一個參數需要傳入一個分支對象,不能只有字符串
// 第二個方法為合併分之的 message
master.merge(develop, 'dev version 1 over')
release.merge(fix, 'release test 2 success')
master.merge(release, 'production baseline for v1.0.0')
當然,跟 branch 和 commit 一樣,也可以傳入一個配置對象
master.merge({
      branch: release, fastForward: true })
tag 標籤
第一個例子用到的最後一個功能是標籤功能,主要可以拿來紀錄提交版本號,也可以拿來表示其他作用
// tag 方法跟在想要標示的 commit 紀錄後面調用
release.merge(fix, 'release test 2 success').tag('v1.0.0')
master.merge(release, 'production baseline for v1.0.0').tag('v1.0.0')

// 當然也可以傳入一個配置對象
gitgraph
  .branch('feat1')
  .commit()
  .tag({
      name: 'mutation feature', style: customTagStyle })
2. Advanced Usage 進階用法
在簡單的情況下,基礎用法裡面的功能大概已經囊括了所有常用的方法,接下來的進階用法會加入點擊事件、懸浮提示框等方法
import {
createGitgraph,
templateExtend,
TemplateName,
Mode
} from '@gitgraph/js'
// 創建上下文
const graphContainer = document.getElementById('git-graph')
const gitgraph = createGitgraph(graphContainer, {
/* options */
mode: Mode.Compact, // compact 模式,在 tooltip 顯示提交信息
template: templateExtend(TemplateName.Metro, {
commit: {
message: {
displayAuthor: false
}
}
})
})
// 相關事件定義
const onClick = function (commit) {
console.log('click')
console.log(commit)
}
const onMouseOver = function (commit) {
console.log('mouse over')
console.log(commit)
}
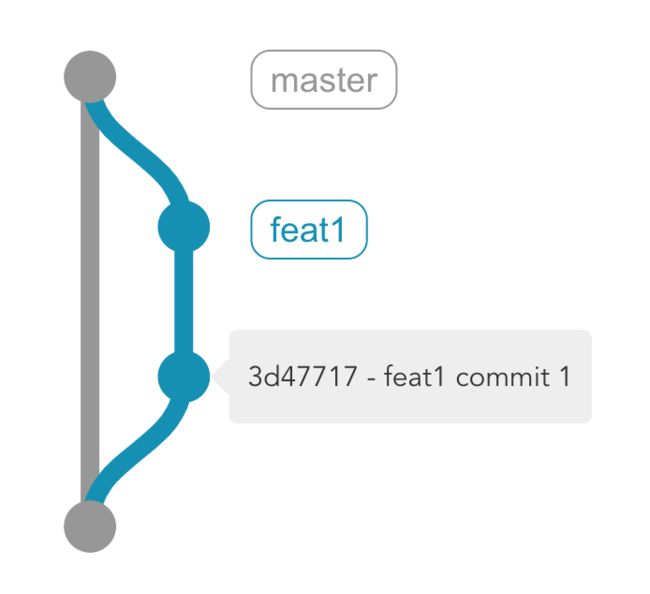
const master = gitgraph.branch('master').commit('init repository')
const feat1 = gitgraph
.branch('feat1')
.commit({
subject: 'feat1 commit 1', onClick }) // 單次提交附加相關事件
.commit({
subject: 'feat1 commit 2', onMouseOver })
master.merge(feat1, 'merge feat 1 fast forward')
mode 模式
我們可以透過設置 mode: Mode.Compact 來將提交信息的顯示方式改為 tooltip,不過實測發現效果並不佳,不建議使用
const gitgraph = createGitgraph(graphContainer, {

  /* options */
  mode: Mode.Compact, // compact 模式,在 tooltip 顯示提交信息
  template: templateExtend(TemplateName.Metro, {

    commit: {

      message: {

        displayAuthor: false
      }
    }
  })
})
Event 事件
除了創建分支(branch)、提交(commit)、合併(merge)、標籤(tag)等方法操作靜態模板之外,我們還可以透過附加事件到單次提交(commit)上
const onClick = function (commit) {

  console.log('click')
  console.log(commit)
}
const onMouseOver = function (commit) {

  console.log('mouse over')
  console.log(commit)
}

const feat1 = gitgraph
  .branch('feat1')
  .commit({
      subject: 'feat1 commit 1', onClick }) // 單次提交附加相關事件
  .commit({
      subject: 'feat1 commit 2', onMouseOver })
結語
本篇就介紹這麼多啦,其實有些工具並不需要真的研究到每一個屬性都掌握,主要掌握到全局的架構以及一些重要或是常用的使用方式即可。像是這個 gitgraph 庫還提供了許多客製化模板的接口,然而從業務的角度來說其實並不需要做到高度客製化,還是要以業務需求為基準。