NodeJS学习笔记
更新:2018.11.07
使用NodeJS创建小型网站,比如公司内部
下载
在官网上下载最新的Windows 64 https://nodejs.org/en/
默认安装即可,进入CMD,验证安装成功
C:\Users\lenovo>node -v
v10.13.0
安装模块Koa 框架和 koa-route 模块
可以和Express框架比较一下,koa或Express至少会用其中一个
如果电脑在局域网中,安装过程会用到代理,整个过程如下
Microsoft Windows [版本 10.0.16299.726]
(c) 2017 Microsoft Corporation。保留所有权利。

C:\Users\lenovo>node -v
v10.13.0

C:\Users\lenovo>npm config set proxy http://cn-proxy.jp.oracle.com:80

C:\Users\lenovo>npm config set https-proxy http://cn-proxy.jp.oracle.com:80

C:\Users\lenovo>npm install --save koa koa-route
npm notice created a lockfile as package-lock.json. You should commit this file.
npm WARN lenovo@1.0.0 No description
npm WARN lenovo@1.0.0 No repository field.

+ koa-route@3.2.0
+ koa@2.6.1
added 44 packages from 22 contributors and audited 59 packages in 15.784s
found 0 vulnerabilities注意:安装如果不指定全局安装,安装的模块仅仅安装在本地,这里就是c:\Users\lenovo\node_modules文件夹里
关于全局局部安装:https://www.cnblogs.com/chyingp/p/npm-install-difference-between-local-global.html
查看已安装模块的版本信息
先查看当前目录下的node_modules,然后往上寻找父目录下的node_modules。。。
Microsoft Windows [版本 10.0.16299.726]
(c) 2017 Microsoft Corporation。保留所有权利。

C:\Users\lenovo>npm list koa
lenovo@1.0.0 C:\Users\lenovo
`-- koa@2.6.1
做一个简单的Web项目
创建项目
文件夹,PS,子文件夹JS,完整的项目下载:https://share.weiyun.com/5HD9Nhh
PS
|-- JS                        // 所有的代码,依赖的库,包括NodeJS环境
|    |- autoDump              // 系统名称文件夹,放创建的项目代码文件,依赖的库
|    |      |-- node_modules  // 依赖的模块,可以从你之前安装的地方拷贝过来
|    |      |-- public        // 公共文件夹,放一些静态文件,比如html/css/js/images
|    |      |-- routes        // 路由文件夹,处理浏览器发来的不同url的请求处理
|    |      |-- views         // 视图文件夹,放置html模板文件
|    |      |-- app.js        // 应用程序代码文件,可以看作main函数
|    |- nodejs                // nodejs系统文件夹,如果你本机安装好了,可以拷贝一份到此
|-- launchnodejs.bat  // 启动运行整个系统的批处理文件
使用VS Code调试
下载安装最新版https://code.visualstudio.com/
打开VS Code,然后File-Open Folder,选择PS文件夹即可,会自动生成.\PS\.vscode\launch.json文件
修改如下
{
    // Use IntelliSense to learn about possible attributes.
    // Hover to view descriptions of existing attributes.
    // For more information, visit: https://go.microsoft.com/fwlink/?linkid=830387
    "version": "0.2.0",
    "configurations": [
        {
            "type": "node",
            "request": "launch",
            "name": "启动程序",
            "runtimeExecutable": "${workspaceFolder}/JS/nodejs/node.exe",
            "program": "${workspaceFolder}/JS/autoDump/app1.js"
        }
    ]
}
注意:app1.js可以改成任何其他的启动文件,也就是说你可以有多个,启动哪个就在这里写下路径
调试
箭头所指的按钮分别用来浏览文件,调试
下图所在界面为点击调试按钮后的样子,如果设置好了断点,直接F5就可以进入调试状态

设置断点后F5运行
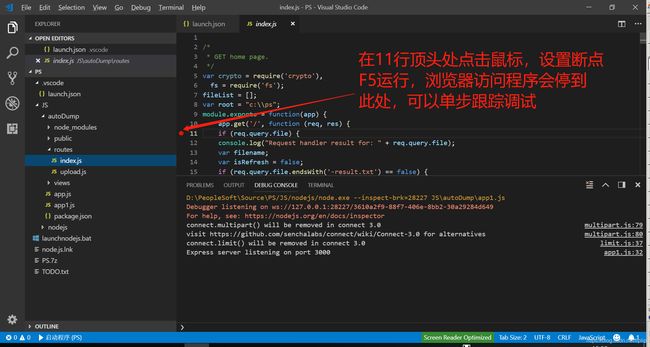
浏览器访问
输入http://127.0.0.1:3000/

上传文件
Express3.x
使用bodyParser即可
Express4.x
4.x不再包含bodyParser的文件上传解析功能
upload file参考资料
1.upload_demo_html.html
2. express-fileupload
3. Simple file uploads with Express 4
4. https://stackoverflow.com/questions/23340548/how-to-upload-files-use-expressjs-4
5. https://stackoverflow.com/questions/23114374/file-uploading-with-express-4-0-req-files-undefined
问题
爬虫长时间运行卡的问题,见https://www.v2ex.com/amp/t/456956
常见错误
模块导出module export,SyntaxError: Unexpected token export
参考:https://github.com/BlockchainLabsNZ/awesome-solidity/blob/master/Testing_errors.md
Export/import failure
- Error message
(function (exports, require, module, __filename, __dirname) { export default async promise => {...}
                                                              ^^^^^^
SyntaxError: Unexpected token export
- Method to fix The reason we've got this error is because
export/importis not standard js syntax. You either use babel.js to compile to standard JavaScript (if you know how) or change
export default async promise => {...}
to
module.exports = async function (promise) {...}
Similar issue when it comes to import. Change
import assertRevert from './helpers/assertRevert';
to
const assertRevert = require('./helpers/assertRevert');
will fix the problem.
错误示例
原本正确的写法
module.exports = {
  register: async function(name, pwd) {
    let data
    if(name == 'ikcamp' && pwd == '123456'){
      data = {
        status: 0,
        data: {
          title: "个人中心",
          content: "欢迎进入个人中心"
        }
      }
    }else{
      data = {
        status: -1,
        data: {
          title: '登录失败',
          content: "请输入正确的账号信息"
        }
      }
    }
    return data
  }
}
提示修改成如下,然而启动时报错
export async function register(name, pwd) {
let data;
if (name == 'ikcamp' && pwd == '123456') {
data = {
status: 0,
data: {
title: "个人中心",
content: "欢迎进入个人中心"
}
};
}
else {
data = {
status: -1,
data: {
title: '登录失败',
content: "请输入正确的账号信息"
}
};
}
return data;
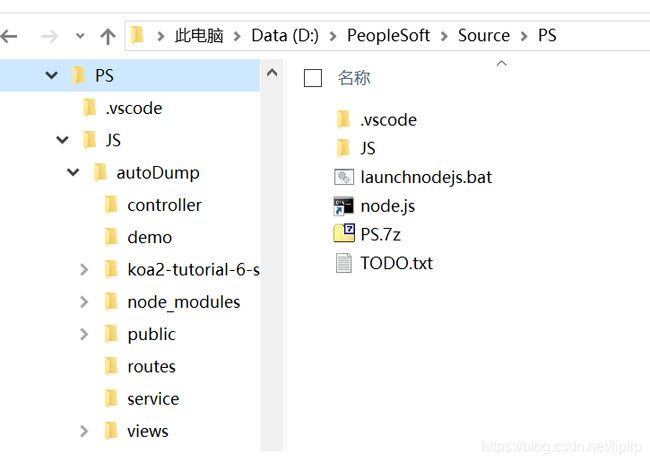
}关于NodeJS的根路径root dir,以及在VS Code中的对应设置
我的文件夹构成如果所示,
JS文件夹里是nodejs工程文件夹,所有的资源都在该文件夹下
launchnodejs.bat是在Windows上用于启动nodejs工程的批处理脚本
.vscode是VS Code工具用到的配置文件夹,内含launch.json
@echo off
call .\JS\nodejs\nodevars.bat
echo .
echo .
cd /d .\JS\autoDump
node app.js
对应的VS Code的启动配置,注意name为Demo的工程配置,其中的cwd表明工程的根目录,它的默认值为"${workspaceFolder}",如果不设置此值,运行环境的根目录与VS Code调试下的根目录可能不一致,从而导致执行错误
{
    // Use IntelliSense to learn about possible attributes.
    // Hover to view descriptions of existing attributes.
    // For more information, visit: https://go.microsoft.com/fwlink/?linkid=830387
    // debug multiple applications concurrently
    // https://stackoverflow.com/questions/45258755/visual-code-debug-multiple-servers-concurrently-from-launch-json
    "version": "0.2.0",
    "configurations": [
        {
            "type": "node",
            "request": "launch",
            "name": "Demo",
            "cwd": "${workspaceFolder}/js/autodump/",
            "program": "${workspaceFolder}/js/autodump/demo.js"
        },
// 其他工程
        {
            "type": "node",
            "request": "launch",
            "name": "Launch Program",
            "runtimeExecutable": "${workspaceFolder}/JS/nodejs/node.exe",
            "program": "${workspaceFolder}/js/autoDump/app.js"
        },
        {
            "type": "node",
            "request": "launch",
            "name": "启动程序",
            "runtimeExecutable": "${workspaceFolder}/JS/nodejs/node.exe",
            "program": "${workspaceFolder}/JS/autoDump/app1.js"
        }
    ]
}
VS Code Debug参考资料
1. Node.js debugging in VS Code
2. Debugging
3. Node.js tutorial in Visual Studio Code
4. 迁移到 Express 4
koa使用完整示例
参考:https://github.com/ikcamp/koa2-tutorial/tree/6-static