第二章 IOC
第二章 IOC
2.1 IOC(Inversion of control)
IOC是控制反转,在第一章中我们已经做了介绍,IOC的关键就是向容器中注册组件。
2.1.1 IOC的第一个HelloWorld
之前都是new对象,现在所有的对象都交给容器创建和管理,所以,我们需要知道如何向容器中注册组件。
在IDEA中新建一个空的项目,空的项目创建完成后,在项目中新建一个maven包,在新建的maven包中的pom.xml配置文件中加入以下的依赖:
<dependencies>
    <dependency>
        <groupId>org.springframeworkgroupId>
        <artifactId>spring-webmvcartifactId>
        <version>5.1.10.RELEASEversion>
    dependency>
dependencies>
我们只导入了一个springframework的依赖,其他的依赖会自动帮我们导入
更改后的pom.xml文件内容如下:
<project xmlns="http://maven.apache.org/POM/4.0.0" xmlns:xsi="http://www.w3.org/2001/XMLSchema-instance"
  xsi:schemaLocation="http://maven.apache.org/POM/4.0.0 http://maven.apache.org/xsd/maven-4.0.0.xsd">
  <modelVersion>4.0.0modelVersion>

  <groupId>org.jxdgroupId>
  <artifactId>helloworldartifactId>
  <version>1.0-SNAPSHOTversion>


  <properties>
    <project.build.sourceEncoding>UTF-8project.build.sourceEncoding>
    <maven.compiler.source>1.8maven.compiler.source>
    <maven.compiler.target>1.8maven.compiler.target>
  properties>

  <dependencies>
    <dependency>
      <groupId>org.springframeworkgroupId>
      <artifactId>spring-webmvcartifactId>
      <version>5.1.10.RELEASEversion>
    dependency>
    <dependency>
      <groupId>junitgroupId>
      <artifactId>junitartifactId>
      <version>4.11version>
      <scope>testscope>
    dependency>
    <dependency>
      <groupId>org.junit.jupitergroupId>
      <artifactId>junit-jupiterartifactId>
      <version>RELEASEversion>
      <scope>compilescope>
    dependency>
  dependencies>

  <build>

  build>
project>
编写一个Person实体类:
package beans;

public class Person {

    private String name;
    private Integer age;

    public Person(String name, Integer age) {

        this.name = name;
        this.age = age;
    }

    public Person() {

    }

    public String getName() {

        return name;
    }

    public void setName(String name) {

        this.name = name;
    }

    public Integer getAge() {

        return age;
    }

    public void setAge(Integer age) {

        this.age = age;
    }

    @Override
    public String toString() {

        return "Person{" +
                "name='" + name + '\'' +
                ", age=" + age +
                '}';
    }
}
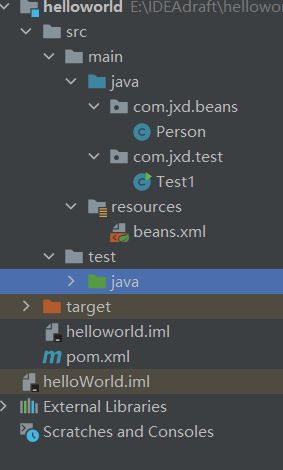
在main目录下新建一个resources目录,在这个目录中新建一个名为beans.xml的Spring配置文件,如下:
<beans xmlns="http://www.springframework.org/schema/beans"
       xmlns:xsi="http://www.w3.org/2001/XMLSchema-instance"
       xsi:schemaLocation="http://www.springframework.org/schema/beans http://www.springframework.org/schema/beans/spring-beans.xsd">


    <bean id="person1" class="beans.Person">

        <property name="name" value="张三">property>

        <property name="age" value="12">property>
    bean>


beans>
注意:
- src源码包开始的路径,称为类路径的开始。源码包中的内容都会进入bin目录,而bin目录就是类路径的开始。上面的beans.Person就是在src源码包下的beans目录下的Person.java中
- 先向maven的pom.xml中的配置文件中引入依赖后再创建beans.xml这个配置文件
- IDEA中受到Spring接管的类会显示一个叶子的标志
下面编写一个测试类,从容器中获取注册的id为person1的Person对象:
package com.jxd.test;

import com.jxd.beans.Person;
import org.junit.jupiter.api.Test;
import org.springframework.context.ApplicationContext;
import org.springframework.context.support.ClassPathXmlApplicationContext;

public class Test1 {


    public static void main(String[] args) {

        ApplicationContext ioc = new ClassPathXmlApplicationContext("beans.xml");
        Person tom = (Person) ioc.getBean("person1");
        System.out.println(tom);
    }

}
运行结果:
Person{
     name='tom', age=12}
整个包的目录结构如下:
注意:
- 因为bean.xml是在类路径下,所以使用的是
ClassPathXmlApplicationContext(“ ”);如果bean.xml不是在类路径下,我们可以使用
FileSystemXmlApplicationContext(“F://bean.xml”)
- Person类在容器启动之前就创建了,而不是在我们使用的时候才创建
- 同一个组件在IOC容器中默认是单实例的
- 获取容器中没有的组件就会产生异常
- IOC容器创建组件对象时会利用
set()方法为对象的属性进行赋值,所以请确保注册到容器中的对象的所有属性都有相应的set()方法- javaBean的属性名是由getter/setter方法去掉get和set后的那一串字符串决定的(首字母小写),而不是由对象的属性名决定的,所以建议自动生成getter和setter方法
注意:Eclipse中增加注解可能会报错,右键项目,选择
Java Compiler,在右边的选项中找到Enable project specific settings,将其勾选,找到Compiler compliance setting后面的版本,将其调高到1.7。
2.1.2 在配置文件中为各种属性赋值
在上面的例子中,我们使用配置文件的方法向IOC容器中注册注册了一个Person组件(对象)并为它的name、age属性赋值。但是,name、age的属性值都是基本的数据类型,然而在现实中,对象的属性也有可能是对象类型、数组、Map等一些复杂的属性;因此,我们还需要掌握为对象的各种复杂类型的属性进行赋值。
下面就介绍了如何向容器中注册的组件的各种属性赋值。
1.null(重点)
<bean id="man1" class="beans.Man">

    <property name="name">
        <null/>
    property>
bean>
2. 基本数据类型(重点)
<bean id="book1" class="beans.Book">
    <property name="price" value="12"/>
    <property name="name" value="活着"/>
bean>
3. 内部的bean或外部的bean(重点)
<bean id="man1" class="beans.Man">
    <property name="car">

        <bean class="beans.Car">
            <property name="carName" value="自行车"/>
            <property name="price" value="350"/>
        bean>
    property>
bean>
<bean id="motorbike" class="beans.Car">
     <property name="carName" value="摩托车"/>
     <property name="price" value="3000"/>
bean>

<bean id="man1" class="beans.Man">

    <property name="car" ref="motorbike">property>
bean>
4. List,Map等(重点)
<bean id="man2" class="beans.Man">

    <property name="booksList" >
        <list>
            <bean class="beans.Book" p:name="西游记"/>
            <ref bean="book1"/>
        list>
    property>


    <property name="map">

        <map>

            <entry key="key01" value="张三"/>
            <entry key="key02" value="14"/>
            <entry key="key03" value-ref="book1"/>
            <entry key="ley04">
                <bean class="beans.Car">
                    <property name="carName" value="单车"/>
                    <property name="price" value="123"/>
                bean>
            entry>
        map>
    property>


    <property name="properties">
        <props>
            <prop key="userName">rootprop>
            <prop key="password">123456prop>
        props>
    property>
bean>
5. 使用util集合空间
<util:map id="myMap1">
    <entry key="key0" value="value0"/>
    <entry key="key1" value="value1"/>
util:map>
<bean id="man3" class="beans.Man">
    <property name="map" ref="myMap1"/>
bean>
注意:
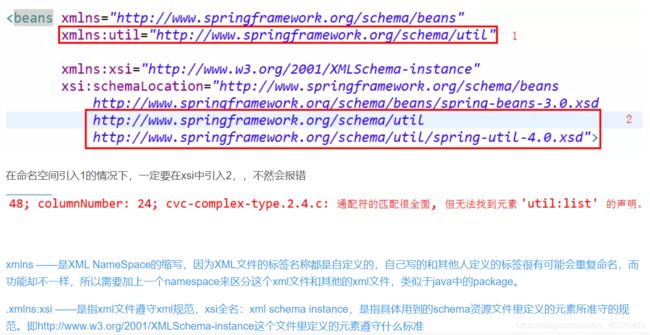
使用util名称空间需要导入响应的xml规范:
<beans xmlns="http://www.springframework.org/schema/beans"
       xmlns:xsi="http://www.w3.org/2001/XMLSchema-instance"
       xmlns:util="http://www.springframework.org/schema/util"
       xmlns:p="http://www.springframework.org/schema/p"
       xsi:schemaLocation="http://www.springframework.org/schema/beans http://www.springframework.org/schema/beans/spring-beans.xsd
                            http://www.springframework.org/schema/util
                            http://www.springframework.org/schema/util/spring-util-4.0.xsd">
6. 一个注意事项
<util:list id="list1">
    <list/>
    <bean class="beans.Man"/>
    <value>12value>
    <ref bean="myMap1"/>
util:list>
7. 级联属性
级联属性也别称作为属性的属性,比如:Man类有一个类型为Car的car属性,而Car对象又有一些自己的属性,这些属性就被称为级联属性。
<bean id="motorbike" class="beans.Car">
     <property name="carName" value="摩托车"/>
     <property name="price" value="3000"/>
bean>


<bean id="man4" class="beans.Man">
    <property name="car" ref="motorbike"/>
    <property name="car.price" value="1000000"/>
bean>
8. 使用继承实现配置信息的继承
<bean id="man5" class="beans.Man">
    <property name="age" value="23"/>
bean>

<bean id="man6" class="beans.Man" parent="man5">
    <property name="name" value="小明"/>
bean>
注意:这里的继承和java中的继承不同,这里的继承只是继承了bean的配置信息,而不代表某个bean是另一个bean的父类。
9. 指定bean是抽象的
<bean id="man7" class="beans.Man" abstract="true">

bean>
2.1.3 bean的其他设置
1. 设置bean的依赖关系
<bean id="man1" class="beans.Man" depends-on="car1,book1">bean>
<bean id="car1" class="beans.Car">bean>
<bean id="book1" class="beans.Book">bean>
设置man1依赖于car1和book1后,就会先创建car1,在创建book1,然后才会创建man1。
2. 设置bean是否为单实例(重点)
<bean id="man2" class="beans.Man" scope="prototype">bean>
将bean设置为多实例后,每次从容器中获取该对象都会新创建一个。
3. 配置通过静态工厂方法创建bean、实例工厂方法创建bean、FactoryBean(重点)
bean的创建默认就是框架利用反射new出来的实例。
静态工厂:工厂本身不用创建,也就是工厂类中获取对象的方法是静态的,可以直接通过静态工厂名.方法名来获取对象
实例工厂:工厂本身必须创建,创建后再使用这个工厂实例的方法来获取对象
<bean id="book2" class="factory.BookStaticFactory"
      factory-method="getBook">
    <constructor-arg value="书名1">constructor-arg>
bean>


<bean id="instanceBookFactory" class="factory.BookFactory">bean>

<bean id="book3" class="factory.BookFactory" factory-bean="instanceBookFactory" factory-method="getBook">

    <constructor-arg name="bookName" value="书名2">constructor-arg>
bean>
4. 实现FactoryBean的工厂(重点)
FactoryBean是Spring规定的一个接口,一个类只要是这个接口的实现类,Spring都认为这个一个工厂,且实现这个接口的工厂只会在需要的时候才创建对象。
package factory;

import beans.Book;
import org.springframework.beans.factory.FactoryBean;

public class MyFactoryBeanImpl implements FactoryBean<Book> {


    /**
     * 工厂方法,在Spring的配置中注册这个工厂bean就会自动调用
     * getObject()方法,也就是你注册的是一个book,不是这个工厂的bean
     * @return 返回创建的对象
     */
    @Override
    public Book getObject() {

        // Book实体类请大家自己创建
        Book book = new Book();
        book.setName("java从入门到放弃");
        return book;
    }

    /**
     * 返回创建对象的类型
     * Spring会自动调用这个方法来确定我们创建对象的类型
     * @return 对象的类型
     */
    @Override
    public Class<?> getObjectType() {

        return Book.class;
    }

    /**
     * 判断创建的对象是否是单例
     * @return 创建的对象是否是单例
     */
    @Override
    public boolean isSingleton() {

        return FactoryBean.super.isSingleton();
    }
}
将我们继承了FactoryBean的工厂类注册到容器中:
<bean id="MyFactoryBeanImpl" class="factory.MyFactoryBeanImpl">bean>
大家可以自己测试一下从ioc容器获取MyFactoryBeanImpl这个对象,看看它是不是一个name属性为“java从入门到放弃”的Book对象。
5. 创建带有生命周期方法的bean
bean的生命周期包括创建和销毁,我们可以为bean自定义一些生命周期方法,Spring在创建或销毁bean的时候就会调用我们指定的方法。
<bean id="book" class="Book" init-method="myInit" destroy-method="myDestroy">bean>
6. 后置处理器
Spring中有一个后置处理器接口BeanPostProcessor,可以在bean初始化前后调用相关的方法。
创建一个Book类:
public class Book {

    private String name;
    private Integer price;

    public void myInit(){

        System.out.println("生命周期方法myInit执行了!");
    }

    public void myDestroy(){

        System.out.println("生命周期方法myDestroy执行了!");
    }

    public Book() {

    }

    public Book(String name, Integer price) {

        this.name = name;
        this.price = price;
    }

    public String getName() {

        return name;
    }

    public void setName(String name) {

        this.name = name;
    }

    public Integer getPrice() {

        return price;
    }

    public void setPrice(Integer price) {

        this.price = price;
    }
}
创建一个实现了BeanPostProcessor这个接口的方法MyBeanPostProcessor:
import org.springframework.beans.BeansException;
import org.springframework.beans.factory.config.BeanPostProcessor;

public class MyBeanPostProcessor implements BeanPostProcessor {

    /**
     * 对象初始化之前调用
     * @param bean
     * @param beanName
     * @return
     * @throws BeansException
     */
    @Override
    public Object postProcessBeforeInitialization(Object bean, String beanName) throws BeansException {

        System.out.println("["+beanName+"]"+"调用初始化之前执行的方法了!");
        return bean;
    }

    /**
     * 对象初始化之后调用
     * @param bean
     * @param beanName
     * @return
     * @throws BeansException
     */
    @Override
    public Object postProcessAfterInitialization(Object bean, String beanName) throws BeansException {

        System.out.println("["+beanName+"]"+"调用初始化之后执行的方法了!");
        return bean;
    }
}
applicationContext.xml文件中做如下修改:
<beans xmlns="http://www.springframework.org/schema/beans"
       xmlns:xsi="http://www.w3.org/2001/XMLSchema-instance"
       xsi:schemaLocation="http://www.springframework.org/schema/beans http://www.springframework.org/schema/beans/spring-beans.xsd">

    <bean id="book" class="Book" init-method="myInit" destroy-method="myDestroy">bean>
    <bean id="beanPostProcessor" class="MyBeanPostProcessor">bean>
beans>
编写一个测试类:
import org.junit.Test;
import org.springframework.context.ApplicationContext;
import org.springframework.context.support.ClassPathXmlApplicationContext;

public class TestJ {

    @Test
    public void test1(){

        ApplicationContext applicationContext = new ClassPathXmlApplicationContext("applicationContext.xml");
        Book book = (Book) applicationContext.getBean("book");
        System.out.println(book);
    }
}
运行结果:
[book]调用初始化之前执行的方法了!
生命周期方法myInit执行了!
[book]调用初始化之后执行的方法了!
Book@51e69659
6. 引用外部属性文件(重点)
数据库连接池作为一个单实例是最好的,一个项目一个连接池,而一个连接池中管理多个连接。可以让Spring帮我们创建连接池对象,也就是注册连接池组件。
因为我们创建的是maven包,所以也需要在pom.xml配置文件中引入c3p0所需的依赖:
<project xmlns="http://maven.apache.org/POM/4.0.0"
         xmlns:xsi="http://www.w3.org/2001/XMLSchema-instance"
         xsi:schemaLocation="http://maven.apache.org/POM/4.0.0 http://maven.apache.org/xsd/maven-4.0.0.xsd">
    <modelVersion>4.0.0modelVersion>

    <groupId>org.examplegroupId>
    <artifactId>Spring-03-newTestartifactId>
    <version>1.0-SNAPSHOTversion>

    <dependencies>
        <dependency>
            <groupId>org.springframeworkgroupId>
            <artifactId>spring-webmvcartifactId>
            <version>5.1.10.RELEASEversion>
        dependency>

        <dependency>
            <groupId>com.mchangegroupId>
            <artifactId>c3p0artifactId>
            <version>0.9.5.2version>
        dependency>

        <dependency>
            <groupId>mysqlgroupId>
            <artifactId>mysql-connector-javaartifactId>
            <version>8.0.16version>
        dependency>
        <dependency>
            <groupId>junitgroupId>
            <artifactId>junitartifactId>
            <version>RELEASEversion>
            <scope>testscope>
        dependency>


    dependencies>

    <properties>
        <maven.compiler.source>11maven.compiler.source>
        <maven.compiler.target>11maven.compiler.target>
    properties>

project>
注意:同时需要mysql-connector-java和c3p0这两个依赖
在applicationContext.xml文件中注册连接池对象:
<bean id="dataSource" class="com.mchange.v2.c3p0.ComboPooledDataSource">
        <property name="user" value="root">property>
        <property name="password" value="123456">property>
        <property name="driverClass" value="com.mysql.cj.jdbc.Driver">property>
        <property name="jdbcUrl" value="jdbc:mysql://localhost:3307/books?useSSL=false&allowPublicKeyRetrieval=true&serverTimezone=UTC">property>
    bean>
编写测试类从容器中获取连接池对象并获取一个数据库连接:
import com.mchange.v2.c3p0.ComboPooledDataSource;
import org.junit.Test;
import org.springframework.context.support.ClassPathXmlApplicationContext;

import java.sql.Connection;
import java.sql.SQLException;

public class TestJ {

    @Test
    public void test1() throws SQLException {

        ClassPathXmlApplicationContext applicationContext = new ClassPathXmlApplicationContext("applicationContext.xml");
        ComboPooledDataSource dataSource = (ComboPooledDataSource) applicationContext.getBean("dataSource");
        Connection connection = dataSource.getConnection();
        System.out.println(connection);
    }

}
我们习惯于将c3p0的配置抽取成一个配置文件,现在我们就将c3p0的配置文件抽取成一个c3p0Config.properties文件,我们在resources文件夹下创建一个名为c3p0Config.properties文件:
jdbc.user=root
jdbc.password=123456
jdbc.driverClass=com.mysql.cj.jdbc.Driver
jdbc.jdbcUrl=jdbc:mysql://localhost:3307/books?useSSL=false&allowPublicKeyRetrieval=true&serverTimezone=UTC
更改applicationContext.xml文件的内容为:
<beans xmlns="http://www.springframework.org/schema/beans"
       xmlns:xsi="http://www.w3.org/2001/XMLSchema-instance"
       xmlns:context="http://www.springframework.org/schema/context"
       xsi:schemaLocation="http://www.springframework.org/schema/beans
       http://www.springframework.org/schema/beans/spring-beans.xsd
       http://www.springframework.org/schema/context
       http://www.springframework.org/schema/context/spring-context-4.2.xsd"
>


    <context:property-placeholder location="classpath:c3p0Config.properties">context:property-placeholder>
    <bean id="dataSource" class="com.mchange.v2.c3p0.ComboPooledDataSource">
        <property name="user" value="${jdbc.user}">property>
        <property name="password" value="${jdbc.password}">property>
        <property name="driverClass" value="${jdbc.driverClass}">property>
        <property name="jdbcUrl" value="${jdbc.jdbcUrl}">property>
    bean>

beans>
再次测试,我们发现同样也成功了!
注意:由于username等其他单词是spring中的个关键字,为了避免冲突,所以上面的properties配置文件中的字段都带了
jdbc.这个前缀
7. 基于xml的自动装配(自定义类型)
如果自定义类型的bean的属性是bean,且这个bean在容器中存在,就可以使用自动装配。
注意:自动装配只能对自定义类型起作用
<beans xmlns="http://www.springframework.org/schema/beans"
       xmlns:xsi="http://www.w3.org/2001/XMLSchema-instance"
       xsi:schemaLocation="http://www.springframework.org/schema/beans http://www.springframework.org/schema/beans/spring-beans.xsd">

    <bean id="car" class="Car">
        <property name="carName" value="自行车">property>
        <property name="price" value="123">property>
    bean>


    <bean id="man1" class="Man">
        <property name="car" ref="car">property>
    bean>


    <bean id="man2" class="Man" autowire="byName">

    bean>
beans>
8. SpEl测试
SpEl是Spring Expression language的缩写,Spring的表达式语言,支持运行时查询并且可以操作对象。
基本语法
SpEL使用#{}作为定界符,所有在#{}中的字符串都可以认为是SpEl表达式
使用字面量
- 整数:
- 小数:
- 科学计数法:
- 字符串:
- boolean值:
<beans xmlns="http://www.springframework.org/schema/beans"
       xmlns:xsi="http://www.w3.org/2001/XMLSchema-instance"
       xsi:schemaLocation="http://www.springframework.org/schema/beans http://www.springframework.org/schema/beans/spring-beans.xsd">

    <bean id="car1" class="Car">
        <property name="carName" value="自行车">property>
        <property name="price" value="120">property>
    bean>

    <bean id="student1" class="Student">

        <property name="name" value="#{
      'Tom'}">property>
        <property name="age" value="#{12*2}">property>

        <property name="car" value="#{car1}">property>
        <property name="carName" value="#{car1.carName}">property>

        <property name="email" value="#{T(java.util.UUID).randomUUID().toString().substring(0, 5)}">property>

        <property name="weight" value="#{car1.getPrice()}">property>
    bean>
beans>
9. 使用注解
通过给bean添加一些注解就可以快速的将bean注册到容器中。
@Controller:控制器,推荐给控制器层(servlet)加这个
@Service:业务逻辑,推荐给业务逻辑层加这个
@Repository:给持久化层(数据库层,dao层)的组件加这个
@Componet:给不属于以上几个的添加
使用注解的步骤:
-
根据组件的类型,给要扫描的组件标上对应的注解
-
告诉Spring,自动扫描加了注解的组件,也就是配置扫描路径,依赖context名称空间
依赖aop包
-
加了注解的类的id默认是类名首字母小写,使用注解加入到容器中的组件和通过配置加入到容器中的组件的行为和属性都是一样的
- 在配置文件applicationContext.xml中配置扫描路径
<beans xmlns="http://www.springframework.org/schema/beans"
       xmlns:xsi="http://www.w3.org/2001/XMLSchema-instance"
       xmlns:context="http://www.springframework.org/schema/context"
       xsi:schemaLocation="http://www.springframework.org/schema/beans http://www.springframework.org/schema/beans/spring-beans.xsd http://www.springframework.org/schema/context http://www.springframework.org/schema/context/spring-context.xsd">


    <context:component-scan base-package="com.jxd">context:component-scan>

beans>
- 为要注册的组件添加相应的注解
package com.jxd.service;

import org.springframework.stereotype.Service;

@Service("BookService")  //将这个组件的ID改为BookService,默认为bookservice
public class BookService {

}
通过@Service这个注解,我们就将BookService这个组件注册到了容器中;同时,我们也可以在注解后加上括号,在括号中写入自定义的ID名来修改这个组件的ID名。
注意:使用注解来注册的组件的ID名默认为将类名第一个字母小写后的字符串,不要因为忘了这个导致 No bean named ‘XXXXX’
9.1 使用@Scope()注解
使用注解注册的组件默认是单实例的,可以通过@Scope()注解来更改组件是否为单实例:
@Scope(value=“prototype”) 设置为多实例
@Scope(value=“singleton”) 设置为单实例
10. 使用context:include-filter和context:exclude-filter制定扫描规则
<beans xmlns="http://www.springframework.org/schema/beans"
       xmlns:xsi="http://www.w3.org/2001/XMLSchema-instance"
       xmlns:context="http://www.springframework.org/schema/context"
       xsi:schemaLocation="http://www.springframework.org/schema/beans http://www.springframework.org/schema/beans/spring-beans.xsd http://www.springframework.org/schema/context http://www.springframework.org/schema/context/spring-context.xsd">

    <context:component-scan base-package="com.jxd">


        <context:exclude-filter type="assignable" expression="com.jxd.service.BookService"/>
    context:component-scan>


    <context:component-scan base-package="com.jxd" use-default-filters="false">


        <context:include-filter type="annotation" expression="org.springframework.stereotype.Controller"/>
    context:component-scan>

beans>
11. @Autowired注解的使用
使用@Autowired注解可以让容器将我们依赖的对象自动注入:
package com.jxd.service;

import com.jxd.dao.BookDao;
import org.springframework.beans.factory.annotation.Autowired;
import org.springframework.stereotype.Service;

@Service("bookService")
public class BookService {


    @Autowired
    private BookDao bookDao;

    public void saveBook(){

        System.out.println("正在调用BookDao的saveToDB方法");
        bookDao.saveToDB();
    }
}
使用@Autowired(required=false)可以指定如果找不到就装配null。
常见的自动注入失败原因:
- 在项目中有多余的@Autowired
- 检查配置路径是否正确
- 检查配置中的
,也就是检查扫描规则
@Autowired自动装配的步骤:
- 第一步:按照类型再容器中找到对应的组件,
- 找到一个:装配
- 未找到:异常
- 找到多个:
- 按照变量名作为Id继续匹配
- 匹配上:装配
- 没有匹配上:异常
- 按照变量名作为Id继续匹配
在方法上使用@Autowired注解:
如果在一个方法上使用了@Autowired注解,这个方法会在该bean创建的时候自动运行,且这个方法的每一个参数都会自动注入
12. 使用@Qualifier()注解
@Qualified()注解可以指定自动装配时采用@Qualified("ID名")指定的ID来查找,如果通过@Qualified注解指定的ID来查找还是未找到,就会产生异常。
在方法的形参位置使用@Qualifier注解:
指定这个形参自动注入依据的ID名
13. @Autowired,@Resource,@Inject
它们都是自动装配的注解,但是,@Autowired的功能是最强大的。
- @Autowired:最强大,Spring自己的注解
- @Resource:j2ee的标准,扩展性更强
- @Inject:是JSR330 (Dependency Injection for Java)中的规范
14. 使用Spring的单元测试
提示:需要依赖Spring的单元测试的jar包
例子:
package com.jxd.test;


import com.jxd.service.BookService;
import org.junit.Test;
import org.junit.runner.RunWith;
import org.springframework.beans.factory.annotation.Autowired;
import org.springframework.test.context.ContextConfiguration;
import org.springframework.test.context.junit4.SpringJUnit4ClassRunner;

@ContextConfiguration(locations = "classpath:applicationConfig.xml")
@RunWith(SpringJUnit4ClassRunner.class)
public class TestJ1 {


    @Autowired
    BookService bookService;

    @Test
    public void test1(){

        bookService.saveBook();
    }
}
@ContextConfiguration(location=“ ”):用来指定Spring的配置文件的位置
@RunWith( ):指定用那种驱动进行单元测试,默认是junit
15. 测试泛型依赖注入
泛型依赖注入,注入一个组件的时候,它的泛型也是参考标准。
Spring中可以使用带泛型的父类类型来确定子类的类型。
2.1.4 IOC总结
IOC(Inversion of control)是一个容器,它可以帮我们管理注册到容器中的组件(类)。容器启动,会创建所有的单实例bean,autowired自动装配的时候,是从容器中找到符合要求的bean,ioc.getBean(“ ”)也是从容器中找到指定的bean。这个容器其实是一个map,这个map保存了所有创建好的bean,并提供相应的功能。

