node
Node.js的基础知识
为什么要学习node.js
- 能够和后端程序员更加紧密的配合
- 学习前端知识需要后端知识的支撑(ajax)
- 能够扩宽自己的知识视野
node开发需要做的事情
- 实现网站的业务逻辑
- 实现数据的增删改查
选择node的意义
- 使用javascript语法开发后端应用
- 一些公司要求前端工程师必须要掌握node开发
- 生态系统活跃,有大量开源库可以使用
- 前端开发工具大多都是基于node开发
node开发的好处
node是基于chrome v8引擎的javascript代码运行环境
安装node.js的方法
参考菜鸟教程:https://www.runoob.com/nodejs/nodejs-install-setup.html
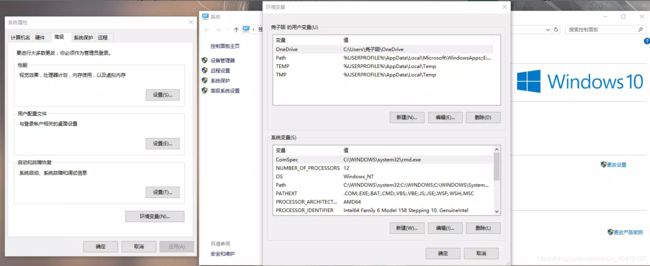
node安装失败的解决方法
系统权限不足
path环境变量
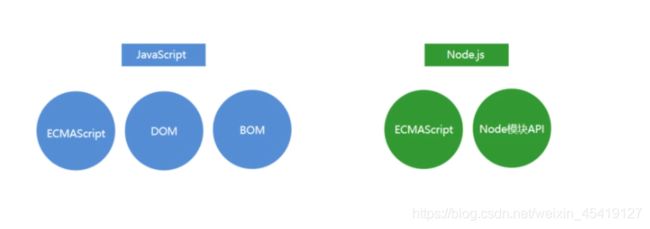
node.js的组成
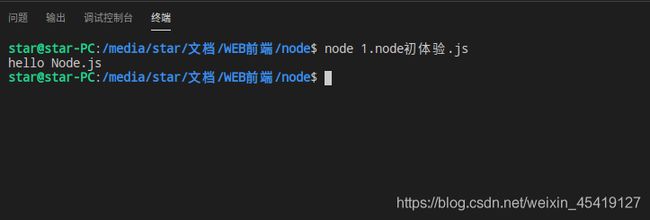
Node如何执行js文件
- cd:跳转目录
cd …/:跳转上一级目录
clear:清除命令行
Node打开js文件
点击键盘上的shift键,再次点击鼠标,打开命令行工具,即可打开js文件
function fn() {
    console.log('hello Node.js');
}
fn()
global
浏览器全局对象是window Node.js全局对象是global
global.console.log('hello Node.js');

global.setTimeout(() => {
    console.log('hello Node');
}, 2000);
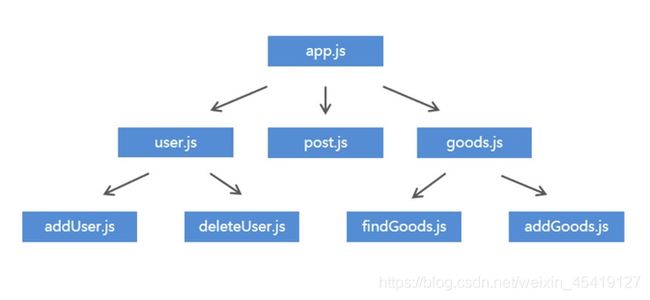
Node.js模块化开发
js在使用的时候存在两大问题:文件依赖及命名冲突,而Node模块化开发恰恰解决这个问题,文件之间处于半封闭的状态,把需要的模块暴露出来,不需要的模块则不需要暴露出来
软件中的模块化开发
一个功能就是一个模块,多个模块组成一个完整的应用,抽取一个模块不会影响其它模块的运行
模块化开发的规范
模块开发的第一种方法
a模块
const add = (n1, n2) => n1 + n2;
// 导出a模块
exports.add = add;
b模块
// 导入a模块
const b = require('./a');
// 使用a模块的方法
console.log(b.add(20, 50));
模块开发的第二种方法
使用module.exports导出模块
a模块
const Name = name => `hello ${name}`;
module.exports.Name = Name;
const x = 100;
// 导出模块
exports.x = x;
b模块
let b = require('./a');
console.log(b.Name('尧子陌'));
console.log(b.x)
module.exports与exports的区别
当module.exports与exports指向不同的地址时,最后的结果以module.exports为准
a模块
    module.exports = {
        name: "尧子陌"
    },
    exports = {
        name: "张三"
    }
b模块
let b = require('./a.js');
console.log(b);
Node系统模块
Node运行环境提供的API,便叫做系统模块
fs模块
f:文件 s:系统 fs:文件系统
读取文件
- readFile:读取文件
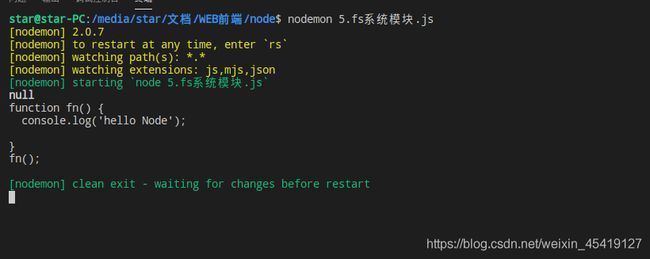
- err:如果文件读取出错,err是一个对象,包含错误信息,如果文件读取正确,err的值为null
- doc:是文件读取的结果
let fs = require('fs');

fs.readFile('./1.node初体验.js', 'utf8', (err, doc) => {

  console.log(err);
  console.log(doc);
})
写入文件
写入文件后,会自动生成demo.text,内容为尧子陌
let fs = require('fs');

fs.writeFile('./demo.text', '尧子陌', err => {
    if (err != null) {
        console.log(err);
        return;
    }
    console.log('文件写入成功');
})
path模块
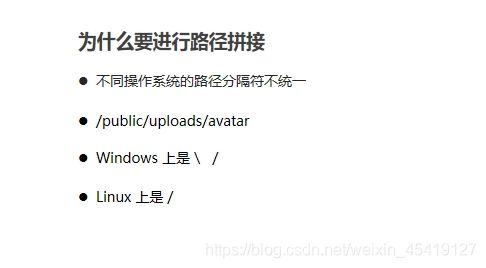
path模块中join()方法可以判断我们使用的是哪种操作系统,从而可以实现符合当前的操作系统的路径拼接
// 引入path模块
let path = require('path');

// 开始拼接路径
let pathFile = path.join('path模块', 'path');
console.log(pathFile);
node系统模块中的相对路径和绝对路径
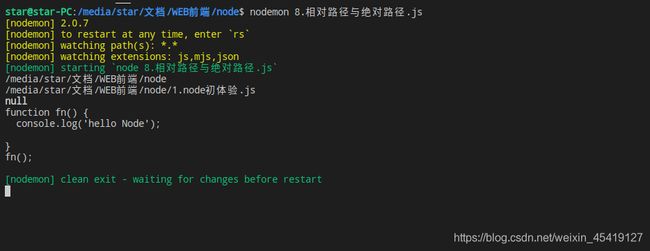
大多数的情况下,相对路径是相对于命令行所在的目录,而绝对路径是相对于当前的工作目录
const fs = require('fs');

const path = require('path')

console.log(__dirname);
console.log(path.join(__dirname, '1.node初体验.js'));

fs.readFile(path.join(__dirname, '1.node初体验.js'), 'utf8', (err, doc) => {
    console.log(err);
    console.log(doc);
})
第三方模块
别人写好的 具有特定的功能,我们可以直接使用的模块被称为第三方模块
第三方模块的存在形式
- js文件形式存在,主要提供API为主
- 命令行形式存在,辅助项目开发
npm
npm:node的第三方模块管理工具
使用方法
-
下载模块:npm install 模块名称
-
卸载模块:npm uninstall package 模块名称
nodemon
nodemon:命令行工具,用来辅助项目开发,主要用来监视用户状态,代码发生改变时,命令行的结果同步改变
下载方式:npm install nodemon -g
nrm
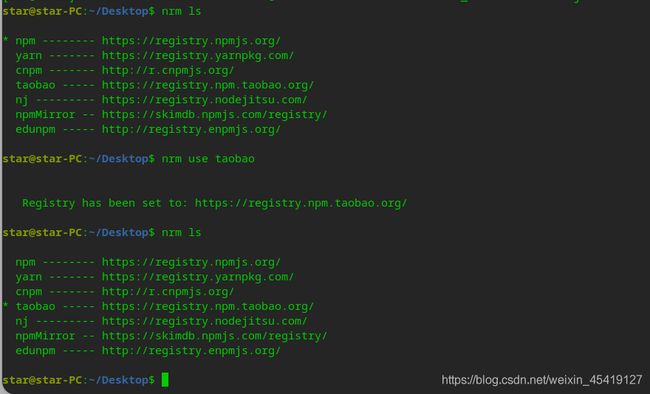
nrm:npm下载切换工具
使用方法
1.使用npm install nrm –g 下载它
2.查询可用下载地址列表 nrm ls
3.切换npm下载地址 nrm use 下载地址名称
Node.js的模块加载机制
当模块名没有后缀时
require('./find.js)

require('./find')
1.如果模块后缀省略,先找同名JS文件再找同名JS文件夹
2.require方法根据模块路径查找模块,如果是完整路径,直接引入模块。
3.如果找到了同名文件夹,找文件夹中的index.js
4.如果文件夹中没有index.js就会去当前文件夹中的package.json文件中查找main选项中的入口文件
5.如果找指定的入口文件不存在或者没有指定入口文件就会报错,模块没有被找到
当模块名既没有后缀也没有路径时
require('find)
1.Node.js会假设它是系统模块
2.Node.js会去node_modules文件夹中
3.首先看是否有该名字的JS文件
4.再看是否有该名字的文件夹
5.如果是文件夹看里面是否有index.js
6.如果没有index.js查看该文件夹中的package.json中的main选项确定模块入口文件
7.否则找不到报错
URL
URL:统一资源定位符,也就是我们常说的网页地址
URL的组成
- 传输协议://服务器IP或域名:端口/资源所在位置标识
- http://www.itcast.cn/news/20181018/09152238514.html
- http:超文本传输协议,提供了一种发布和接收HTML页面的方法。
客户端和服务端的说明
在开发的过程中,客户端和服务端使用的是同一台电脑,即为开发人员电脑
创建自己的服务器
- req:请求
- res:响应
 //引进http模块
 const http = require('http');

 //创建服务器对象app
 const app = http.createServer();

 //当有服务器请求的时候,便会启动服务器
 app.on('request', (req, res) => {
    // 设置页面内容是html,编码格式是utf-8。
     res.writeHead(200, { 'Content-Type': 'text/html; charset=utf-8' });
     //返回服务器响应的内容
     res.end("尧子陌")

 })

 //监听端口
 app.listen(8080);

 //附加说明
 console.log('服务器启动成功');
报文
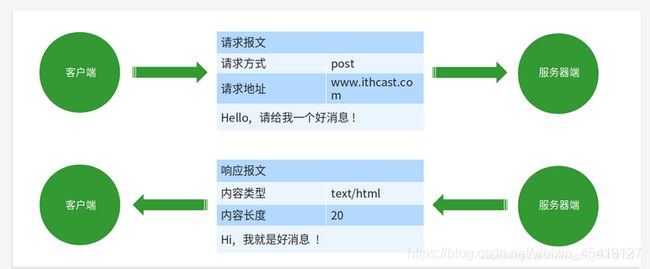
请求报文
请求方式
- GET:请求数据
- POST:发送数据
请求地址
 //引进http模块
 const http = require('http');

 //创建服务器对象app
 const app = http.createServer();

 //当有服务器请求的时候,便会启动服务器
 app.on('request', (req, res) => {
     // 设置页面内容是html,编码格式是utf-8。
     res.writeHead(200, { 'Content-Type': 'text/html; charset=utf-8' });

     //获取请求报文的属性
     console.log(req.headers['accept']);
     //根据请求的网址响应不同的内容
     if (req.url == '/index' || req.url == '/') {
         res.end("welcome to home")
     } else if (req.url = '/list') {
         res.end("welcome to list")
     } else {
         res.end('not found')
     }


     //根据请求方式响应不同的内容
     if (req.method == 'GET') {
         res.end('get')
     } else if (req.method == 'POST') {
         res.end('post')
     }

 })

 //监听端口
 app.listen(3030);

 //附加说明
 console.log('服务器启动成功');
form.html
表单请求
响应报文
HTTP状态吗
- 200:请求成功
- 404:请求的资源没有被找到
- 500:服务器端错误
- 400:客户端请求有语法错误
内容类型
- text/html
- text/css
- application/javascript
- image/jpeg
- application/json
HTTP请求与响应处理
客户端向服务器端发送请求时,有时需要携带一些客户信息,客户信息需要通过请求参数的形式传递到服务器端,比如登录操作。
GET请求参数
参数被放置在浏览器地址栏中,例如:http://localhost:3000/?name=zhangsan&age=20
参数获取需要借助系统模块url,url模块用来处理url地址
//引进http模块
const http = require('http');
//创建服务器对象app
const app = http.createServer();
//引进系统模块
const url = require('url');
//当有服务器请求的时候,便会启动服务器
app.on('request', (req, res) => {
//HTTP响应报文的代码
res.writeHead(200, { 'Content-Type': 'text/html; charset=utf-8' });
console.log(url.parse(req.url));
//query是请求参数,第二个参数为true可以转换成对象序列
//pathname是路径
let {query,pathname} = url.parse(req.url,true);
console.log(query.name);
console.log(query.age)
if (pathname == '/index' || pathname == '/') {
res.end("欢迎来到首页
")
} else if (pathname == '/list') {
res.end("欢迎来到列表页
")
} else {
res.end("not find
")
}
// 设置页面内容是html,编码格式是utf-8。
//返回服务器响应的内容
res.end("尧子陌")
})
//监听端口
app.listen(3000);
//附加说明
console.log('服务器启动成功');
POST请求参数
POST请求参数
- 参数是放在请求体中进行传输
- 获取post请求参数需要data和end事件
- 需要querystring来将请求参数转换成对象格式
![]()
//引进http模块
const http = require('http');

//创建服务器对象app
const app = http.createServer();

//处理请求参数模块
const querystring = require('querystring')

//当有服务器请求的时候,便会启动服务器
app.on('request', (req, res) => {
    //HTTP响应报文的代码
    res.writeHead(200, { 'Content-Type': 'text/html; charset=utf-8' });

    //post参数是通过事件的方式接受的
    //参数进行传递的过程中的触发data事件
    //参数传递结束的时候触发end事件

    let postParams ='';

    req.on('data',params=>{
        postParams +=params;
    })

    req.on('end',()=>{
        console.log(querystring.parse(postParams))

    })


    //返回服务器响应的内容
    res.end("ok")

})

//监听端口
app.listen(3000);

//附加说明
console.log('服务器启动成功');
表单请求
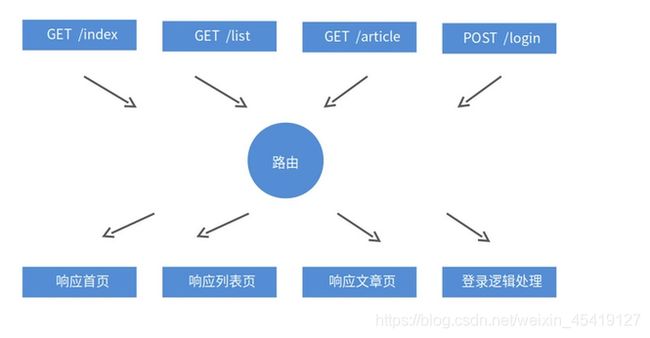
node路由
http://localhost:3000/index
http://localhost:3000/login
简单来说:客户端请求不同的内容,服务器端响应不同的内容
app.js
//1.引入系统模块
const http = require('http');
const url = require('url');
//2.创建服务器对象
const app = http.createServer();
//3.为服务器对象添加请求
//4.实现路由功能
app.on('request',(req,res)=>{
//获取客户端强求方式
const method = req.method.toLowerCase()
//获取客户端请求地址
let {query,pathname } = url.parse(req.url,true);
//设置报文响应的代码
res.writeHead(200, { 'Content-Type': 'text/html; charset=utf-8' });
if(method=='get'){
if(pathname=='/index'||pathname=='/'){
res.end('欢迎来到首页')
}else if(pathname=='/list'){
res.end('欢迎来到列表页')
}else {
res.end('not found')
}
} else if (method == 'post') {
if (pathname == '/main') {
res.end('欢迎来到主目录
')
} else if (pathname == '/detail') {
res.end('欢迎来到详情页
')
} else {
res.end('404')
}
}
})
//设置服务器端口
app.listen('3000');
console.log('服务器启动成功')
form.html
表单请求
node资源
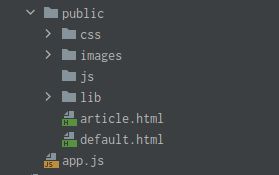
静态资源
服务器端不需要处理,可以直接响应给客户端的资源就是静态资源,例如CSS、JavaScript、image文件。
动态资源
相同的请求地址不同的响应资源,这种资源就是动态资源。
//引进系统模块
const  http = require('http');
const   url = require('url');
const   fs = require('fs');
const   path = require('path');
const   mime = require('mime');


//创建服务器对象
const  app = http.createServer();
//为服务器对象添加请求
app.on('request',(req,res)=>{
    //获取请求路径
    let pathname = url.parse(req.url).pathname;

    pathname = pathname =='/'?'default.html':pathname
    //讲用户的路径转换成绝对路径
    let realPath = path.join(__dirname,'public'+pathname);

    let type = mime.getType('realPath')
    console.log(realPath)

    //读取文件
    fs.readFile('realPath',(err,result)=>{
        // 如果文件读取失败
        if (err != null) {
            res.writeHead(404, {
                'content-type': 'text/html;charset=utf8'
            })
            res.end('文件读取失败');
            return;
        }else {
            res.writeHead(200, {
                'content-type': type
            })

            res.end(result);
        }

    })


})


//监听服务器端口
app.listen('8020');
console.log('服务器启动成功')
客户端请求路径
GET方式
- 浏览器地址栏
- link标签的href属性
- script标签的src属性
- img标签的src属性
- Form表单提交
POST方式
- From:表单提交
Node异步编程
同步API
同步API:只有当前API执行完毕后,才会执行下一个API
console.log('before');
console.log('after')
异步API
异步API: 当前API的执行不会影响后续代码的执行
console.log('before');
setTimeout(()=>{
    console.log('hello word')
},2000)

console.log('after')
同步API,异步API的区别(获取返回值)
同步API可以从返回值中拿到API执行的结果,而异步API是不可以的
同步API
function sum(num1, num2) {
    return num1 + num2;

}

const result = sum(20, 50);
console.log(result);
异步API
function getSum() {
  setTimeout(()=>{
    return {
      msg:'hello word'
    }
  },2000)
};

console.log(getSum())
Node中的回调函数
回调函数
回调函数可以作为另一个函数的参数使用,这种函数便叫做回调函数
function getMsg(callback){
    callback('尧子陌')
};

 getMsg(function(string){
    console.log(string)
})
回调函数会让异步API返回API的执行结果
function getMsg(callback) {
    setTimeout(() => {
        callback({
            msg: "hello word"
        })
    }, 2000);
};

getMsg(function(msg) {
    console.log(msg);
})
同步API及异步API的区别(代码执行顺序)
同步API的代码执行顺序
同步API从上往下依次执行,前面代码会堵塞后面代码的执行
for (var i =0;i<10;i++){
   console.log(i)
}
console.log('代码执行完毕')
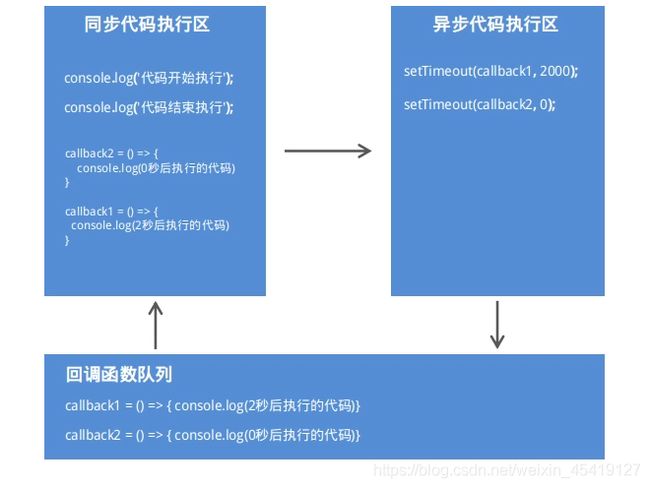
异步API的代码执行顺序
异步API不会等待API执行完毕后,再去执行下面的代码
console.log('代码开始执行');
setTimeout(()=>{
    console.log('2秒之后开始执行')
},2000)

setTimeout(()=>{
    console.log('0秒之后开始执行')
})
console.log('代码结束执行')
Node.js中的异步API
Node.js中的异步API:读取文件 创建服务器对象,客户端发送请求均为异步API
Node.js中的回调地狱
回调函数嵌套着回调函数,被称为回调地狱,缺点:不易于维护。
需求如下
- 依次读取A文件、B文件、C文件
a.txt
Node.js中的异步编程
Promise
Promise的出现,是为了解决Node.js中的回调地狱问题
里面有两个方法,resolve及reject,异步API执行成功后则调用resolve方法,异步API执行失败则调用reject方法,无论异步API执行成功或者失败,都会将异步API的结果传输到Promise的外面。
//引进系统模块
const  fs = require('fs');

//调用promise对象
let promise = new Promise((resolve, reject) => {

    fs.readFile('./a.txt','utf8',(err,doc)=>{
        if(err !=null){
            //读取失败的时候,调用reject方法
            reject(err)
        }else{
            //读取成功的时候 ,调用resolve方法
            resolve(doc)
        }

    })


})

//无论读取成功或者失败,都会将结果返回promise外面

promise.then((doc)=>{
    console.log(doc)
}).catch((err)=>{
    console.log(err)
})
Promise来解决回调地狱
//引进系统模块
const  fs = require('fs');

function p1(){
    //必须使用return才能使用then()方法
    return new Promise((resolve, reject) =>{
        fs.readFile('./a.txt','utf8',(err,doc)=>{
            resolve(doc)
        })

    } )

}

function p2(){
    //必须使用return才能使用then()方法
    return new Promise((resolve, reject) =>{
        fs.readFile('./b.txt','utf8',(err,doc)=>{
            resolve(doc)
        })

    } )

}

function p3(){
    //必须使用return才能使用then()方法
    return new Promise((resolve, reject) =>{
        fs.readFile('./c.txt','utf8',(err,doc)=>{
            resolve(doc)
        })

    } )

}

p1().then((doc)=>{
    console.log(doc);
    return p2()
}).then((doc2)=>{
    console.log(doc2);
    return p3()
}).then((doc3)=>{
    console.log(doc3)
})
anysc关键字
- 1.普通函数定义前加async关键字,普通函数变成异步函数
- 2.异步函数默认返回promise对象
- 3.异步函数中使用return关键字进行结果返回,用return关键字代替resolve方法
- 4.异步函数中使用throw关键字抛出程序异常
- 5.调用异步函数链式中调用then方法获取异步函数的执行结果
- 6.调用异步函数链式中调用catch方法获取异步函数的执行的错误信息
async function fn(){
    throw 'Error';
    return  'hello async'
}

fn().then((data)=>{
    console.log(data)
}).catch((err)=>[
    console.log(err)
])
await关键字
- 1.await关键字只能出现在异步函数中
- 2.await后面只能写promise对象,写其它的类型是不可以的
- 3.await关键字暂停异步函数向下执行,直到promise返回结果。
async  function p1(){
    return 'p1'
}
async  function p2(){
    return 'p2'
}
async  function p3(){
    return 'p3'
}

async function run(){
    let r1 = await p1();
    let r2 = await  p2();
    let r3 = await  p3();
    console.log(r1);
    console.log(r2);
    console.log(r3)
}
run()
异步读取文件优化
const fs = require('fs');

//改造现有异步函数API,返回promise对象,从而支持异步函数语法
const promisify = require('util').promisify;
console.log(promisify)

//重新生成readFile方法
const  readFile = promisify(fs.readFile);


async function run(){
    let r1 = await readFile('./a.txt','utf8');
    let r2= await readFile('./b.txt','utf8');
    let r3 = await readFile('./c.txt','utf8');
    console.log(r1);
    console.log(r2);
    console.log(r3)

}
run()


