SpringCoudAlibaba之Sentinel下-底层篇
Sentinel 1.8.1 底层原理篇
---楼兰文章目录
- 一、Sentinel整体流程
-
- 1、初始化加载
- 2、构建责任链
- 3、处理限流请求
- 二、动态规则扩展
-
- 1、通过API直接修改
- 三、Sentinel的扩展点
-
- 1、初始化函数InitFunc
- 2、流程处理逻辑ProcessorSlot
Sentinel的底层其实相对来说,流程还是比较简单明了的,他的很多精彩之处是在他的算法当中。其实站在Sentinel的角度,这也很容易理解。他的业务目的就是限流,那要做的就是针对特定的指标,对数据进行分析收集,再计算。然后,对于Sentinel,还一个问题就是怎么与DashBoard沟通。那这里重点也就是梳理下这两个问题。
一、Sentinel整体流程
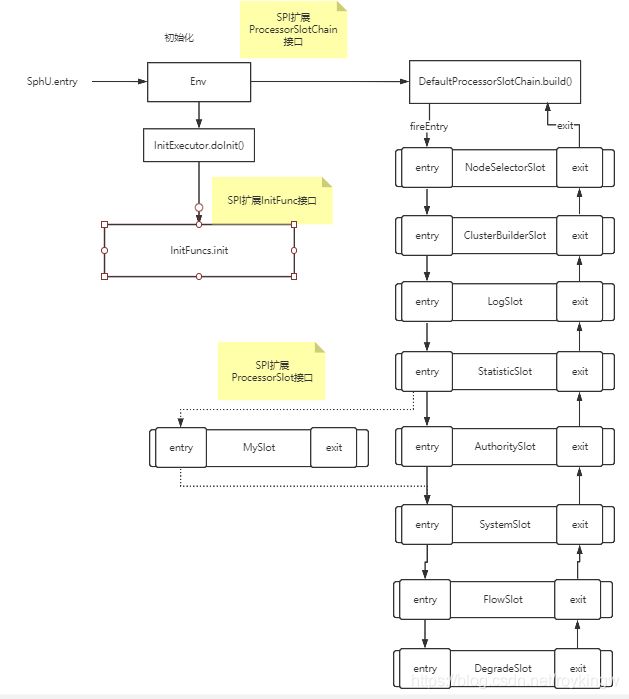
Sentinel的整体流程大概分为三个步骤:1、初始化加载,2、构建责任链,3、处理限流请求。了解的入口还是从一个最为常用的API说起:SphU.entry(KEY); 整个处理流程涵盖了Sentinel大部分的核心。
1、初始化加载
在跟进去这个entry方法时,首先会看到他是通过Env.sph对象来构建的
public static Entry entry(String name) throws BlockException {

        return Env.sph.entry(name, EntryType.OUT, 1, OBJECTS0);
    }
进入Env这个类,可以看到Sentinel的初始化过程:
public class Env {

    public static final Sph sph = new CtSph();
    static {

        // If init fails, the process will exit.
        InitExecutor.doInit(); //<====初始化过程
    }
}
这个InitExecutor.doInit方法就会去加载初始化组件,这个初始化组件是通过SPI机制来加载的。他会去加载com.alibaba.csp.sentinel.init.InitFunc的不同实现类,并且这些实现类会按照其上的@InitOrder注解,进行排序。最终通过init方法去进行一些初始化工作。
2、构建责任链
然后继续跟踪entry方法。最终会进入com.alibaba.csp.sentinel.Ctsph的entryWithPriority方法
private Entry entryWithPriority(ResourceWrapper resourceWrapper, int count, boolean prioritized, Object... args)
        throws BlockException {

        Context context = ContextUtil.getContext();
        ......
        //<====构建责任链
        ProcessorSlot<Object> chain = lookProcessChain(resourceWrapper);

    	......

        Entry e = new CtEntry(resourceWrapper, chain, context);
        try {

            //<=====责任链发起调用
            chain.entry(context, resourceWrapper, null, count, prioritized, args);
        } catch (BlockException e1) {

            e.exit(count, args);
            throw e1;
        } catch (Throwable e1) {

            // This should not happen, unless there are errors existing in Sentinel internal.
            RecordLog.info("Sentinel unexpected exception", e1);
        }
        return e;
    }
先看第一个构建责任链的方法lookProcessChain。
首先,看他传入的参数resourceWrapper。这个对象就是对Sentinel的资源进行的包装。所以从这里可以看到,对每一个资源,sentinel都会构建一条单独的责任链。那可以想象,对不同的资源,是可以有不同的责任链的。这也是Sentinel的一个可扩展点。
然后,在这个方法中,同样会用SPI机制加载com.alibaba.csp.sentinel.slotchain.SlotChainBuilder的实现子类。在这个接口下只配置了一个子类com.alibaba.csp.sentinel.slots.DefaultSlotChainBuilder用来构建责任链。
@Spi(isDefault = true)
public class DefaultSlotChainBuilder implements SlotChainBuilder {


    @Override
    public ProcessorSlotChain build() {

        ProcessorSlotChain chain = new DefaultProcessorSlotChain();

        List<ProcessorSlot> sortedSlotList = SpiLoader.of(ProcessorSlot.class).loadInstanceListSorted();
        for (ProcessorSlot slot : sortedSlotList) {

            if (!(slot instanceof AbstractLinkedProcessorSlot)) {

                RecordLog.warn("The ProcessorSlot(" + slot.getClass().getCanonicalName() + ") is not an instance of AbstractLinkedProcessorSlot, can't be added into ProcessorSlotChain");
                continue;
            }

            chain.addLast((AbstractLinkedProcessorSlot<?>) slot);
        }

        return chain;
    }
}
而在DefaultSlotChainBuilder的build方法中,又会通过SPI加载com.alibaba.csp.sentinel.slotchain.ProcessorSlot的实现类,这些实现类同样会通过上面的@Order注解来降序排序。而这些ProcessorSlot就承载了最为核心的具体业务。Sentinel就是通过这些ProcessorSlot构建出整体的功能架构。
#sentinel-core/src/main/resources/META-INF/services/com.alibaba.csp.sentinel.slotchain.ProcessorSlot 文件
# Sentinel default ProcessorSlots
com.alibaba.csp.sentinel.slots.nodeselector.NodeSelectorSlot
com.alibaba.csp.sentinel.slots.clusterbuilder.ClusterBuilderSlot
com.alibaba.csp.sentinel.slots.logger.LogSlot
com.alibaba.csp.sentinel.slots.statistic.StatisticSlot
com.alibaba.csp.sentinel.slots.block.authority.AuthoritySlot
com.alibaba.csp.sentinel.slots.system.SystemSlot
com.alibaba.csp.sentinel.slots.block.flow.FlowSlot
com.alibaba.csp.sentinel.slots.block.degrade.DegradeSlot
对于这些Slot,大致按照加载顺序总结了一下
NodeSelectorSlot负责收集资源的路径,并将这些资源的调用路径,以树状结构存储起来,用于根据调用路径来限流降级;ClusterBuilderSlot则用于存储资源的统计信息以及调用者信息,例如该资源的 RT, QPS, thread count 等等,这些信息将用作为多维度限流,降级的依据;LogSlot负责记录后续Slot执行时的限流错误日志。StatisticSlot则用于记录、统计不同纬度的 runtime 指标监控信息;FlowSlot则用于根据预设的限流规则以及前面 slot 统计的状态,来进行流量控制;AuthoritySlot则根据配置的黑白名单和调用来源信息,来做黑白名单控制;DegradeSlot则通过统计信息以及预设的规则,来做熔断降级;SystemSlot则通过系统的状态,例如 load1 等,来控制总的入口流量;
在Sentinel中,这些Slot的顺序必须是固定的,因为这些Slot的业务数据是有依赖的。而从SPI机制也可以了解到,客户端是可以通过SPI机制去加入自己的扩展功能的。而关于如何扩展,可以查看Demo中的sentinel-demo-slot-api部分。
然后关于这个责任链,可以看到,他其实就是一个Slot的链表结构。链表结构中的每个节点Node,都包含了一个指向下一个节点的Next指针。
3、处理限流请求
每个Slot都实现了两个方法,entry和exit方法。
- entry是请求进入的方法,在这个方法中,每个Slot在完成自己的业务逻辑之后,都会通过一个fireEntry方法去调用下一个Slot的entry方法。
- 而关于exit方法,在上一篇使用篇提到,必须由业务代码来保证与entry方法对应,否则就会抛异常。而在与其他框架的集成过程中,大都是使用try-finally方式来保证与entry方法对应。即进入一次entry之后,就要进入一次exit方法。
例如:Sentinel提供了一个与Spring-boot的集成扩展
<dependency>
	<groupId>com.alibaba.cloudgroupId>
	<artifactId>spring-cloud-starter-alibaba-sentinelartifactId>
dependency>
加入这个扩展后,就可以通过在SpringCloud应用中可以对需要保护的方法添加@SentinelResource注解,而在这个扩展当中,就是通过AOP来处理注解的。而在AOP处理类SentinelResourceAspect中,就保证了exit方法与entry方法的对应。
有了这个之后,就可以整理出Sentinel的整体执行流程大概是这样的:
为什么要单独列出SPI扩展?因为每个SPI都是框架给应用提供的扩展点。
这里就简单梳理下Sentinel的整体处理流程。关于Sentinel中如何去计算具体的指标,涉及的算法太多,像时间滚动窗口、漏桶、令牌桶等等,就不再一一整理了。
二、动态规则扩展
Sentinel的理念是开发者只需要关注资源定义,资源定义成功后,就可以动态添加各种规则,进行降级流控等各种控制。Sentinel有两种方式可以用来修改规则。
1、通过API直接修改
这种方式比较简单明了,示例中有很多Demo都是用这种方式来加载的规则。
FlowRuleManager.loadRules(List rules); // 修改流控规则
DegradeRuleManager.loadRules(List rules); // 修改降级规则
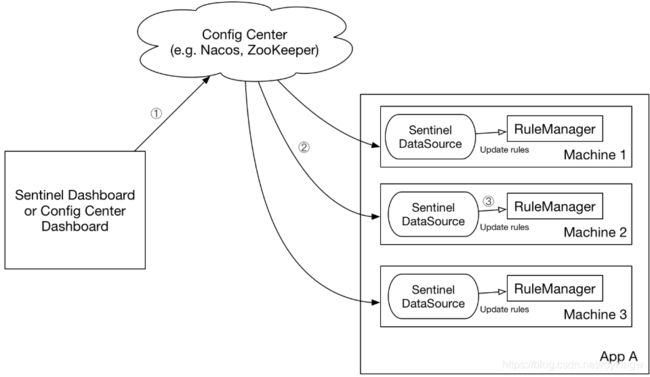
这种方式是由应用用硬编码的方式主动去加载规则,使用简单,但是只接受内存态的规则对象,不利于在分布式环境下在多个应用之间进行规则同步。在分布式场景下,如果要修改一个规则,就必须每个应用依次进行修改。所以这种方式通常只用于测试和演示。在生产环境下通常会要求通过外部存储来管理规则,像文件、数据库、配置中心等。这样分布式应用之间的规则就能够统一进行管理。官方推荐的方式是通过实现DataSource接口,主动适配各种数据源。
DataSource扩展常见的实现方式有:
- 拉模式: Pull-based。客户端主动向某个规则管理中心定期轮询拉取规则。这种方式的优点是简单,但是缺点是无法及时获取变更。 拉模式支持的规则中心有 动态文件数据源、Consul、Enreka。
- 推模式: Push-based。规则中心统一推送,客户端通过注册监听器的方式时刻监听变化。这种方式有更好的实时性和一致性保证。支持Zookeeper,Redis,nacos,Apollo,etcd。
拉模式的示例详见demo中的sentinel-demo-dynamic-file-rule模块。关键的代码:
ClassLoader classLoader = getClass().getClassLoader();
        String flowRulePath = URLDecoder.decode(classLoader.getResource("FlowRule.json").getFile(), "UTF-8");

        // Data source for FlowRule
        FileRefreshableDataSource<List<FlowRule>> flowRuleDataSource = new FileRefreshableDataSource<>(
            flowRulePath, flowRuleListParser);
        FlowRuleManager.register2Property(flowRuleDataSource.getProperty());
其中FileRefreshableDataSource是AutoRefreshDataSource抽象类的一个实现子类。另外还一个实现子类 EurekaDatasource。 而定时更新的逻辑都在AutoRefreshDataSource这个抽象类中。默认会以3秒的间隔来拉取规则。-初始等待3秒,执行频率3秒。
推模式的示例有很多,比如参见sentinel-demo-nacos-datasource模块。关键的代码:
 ReadableDataSource<String, List<FlowRule>> flowRuleDataSource = new NacosDataSource<>(remoteAddress, groupId, dataId,
                source -> JSON.parseObject(source, new TypeReference<List<FlowRule>>() {

                }));
        FlowRuleManager.register2Property(flowRuleDataSource.getProperty());
在去关注如何注册监听时,核心是在构建NacosDataSource时,会使用Nacos自己提供的监听服务。
private void initNacosListener() {

        try {

            this.configService = NacosFactory.createConfigService(this.properties);
            // Add config listener.
            configService.addListener(dataId, groupId, configListener);
        } catch (Exception e) {

            RecordLog.warn("[NacosDataSource] Error occurred when initializing Nacos data source", e);
            e.printStackTrace();
三、Sentinel的扩展点
在Sentinel的核心包core包下,提供了两个SPI扩展点,一个是sentinel-core/src/main/resources/META-INF/services/com.alibaba.csp.sentinel.init.InitFunc 还一个是sentinel-core/src/main/resources/META-INF/services/com.alibaba.csp.sentinel.slotchain.ProcessorSlot。 (另外还一个SlotChainBuilder的扩展点,在之前使用时已经提到过,这个扩展点是用来构建slot的,由于slot已经可以动态扩展,那构建的方式一般就不需要去扩展了。)
1、初始化函数InitFunc
扩展机制原理
Sentinel基于SPI机制提供了这个初始化机制,业务应用也可以按照SPI机制添加自己的扩展。
那可以用他来干什么呢?比如之前注册动态规则时,要初始化Datasource,这个过程就可以用这个扩展点来提前他的加载时机。例如,官网的上就有这个Demo
package com.test.init;

public class DataSourceInitFunc implements InitFunc {


    @Override
    public void init() throws Exception {

        final String remoteAddress = "localhost";
        final String groupId = "Sentinel:Demo";
        final String dataId = "com.alibaba.csp.sentinel.demo.flow.rule";

        ReadableDataSource<String, List<FlowRule>> flowRuleDataSource = new NacosDataSource<>(remoteAddress, groupId, dataId,
            source -> JSON.parseObject(source, new TypeReference<List<FlowRule>>() {
     }));
        FlowRuleManager.register2Property(flowRuleDataSource.getProperty());
    }
}
接下来就可以在应用的classpath下添加SPI的扩展文件 META-INF/services/ com.alibaba.csp.sentinel.init.InitFunc 。文件中添加以下内容:
com.test.init.DataSourceInitFunc
那这种机制有什么用呢?很多Demo中都是通过在main方法中调用Sentinel的xxxManager去加载规则有什么区别呢?
其实最大的区别在于这个SPI机制的加载位置。这个InitFunc机制的处理位置是在com.alibaba.csp.sentinel.Env类的static静态代码块中调用的,也就是说,这个机制是在JVM类加载的过程中加载的。熟悉JVM的话,就知道他是在main方法执行之前加载的。提前加载当然是有好处,只是,这点提前执行的优势在实际应用中是微乎其微的。这也体现了为什么他的init方法没有传入任何其他的对象。
2、流程处理逻辑ProcessorSlot
这些Slot其实就是Sentinel中处理实际业务的一个个插槽。Sentinel提供了这个SPI扩展点后,应用就可以在Sentinel基础上扩展自己的业务功能。
这些slot的加载过程Sentinel做了一些封装。原始的SPI机制加载时前后顺序是随机的,而Sentinel对SPI机制做了一些扩展,在加载这些Slot时,是按照这些Slot头部的@Order注解的顺序排列的。有了这个机制后,应用可以在Sentinel的Slot链中任意插入自己的Slot。
但是这样有什么用呢?其实比较有意思的是这一个StatisticSlot。
@Spi(order = Constants.ORDER_STATISTIC_SLOT) //<====加载顺序
public class StatisticSlot extends AbstractLinkedProcessorSlot<DefaultNode> {

    @Override
    public void entry(Context context, ResourceWrapper resourceWrapper, DefaultNode node, int count,boolean prioritized, Object... args) throws Throwable {

        try {

            // 触发下一个Slot的entry方法
            fireEntry(context, resourceWrapper, node, count, prioritized, args);
            // 添加统计信息
            node.increaseThreadNum();
            node.addPassRequest(count);
			......
        } catch (PriorityWaitException ex) {

            // 添加统计信息
            node.increaseThreadNum();
            ......
        } catch (BlockException e) {

            // 添加统计信息
            node.increaseBlockQps(count);
          	.....
        } catch (Throwable e) {

            .....
        }
    }
    @Override
    public void exit(Context context, ResourceWrapper resourceWrapper, int count, Object... args) {

        //获取当前Node
        Node node = context.getCurNode();
		......
        //触发前一个Slot的exit方法
        fireExit(context, resourceWrapper, count);
    }
    .....
}
像上面对这个Slot的源码进行简单的解读,会发现,Sentinel收集了非常多的运行时数据,像QPS、BlockQps、ThreadNum等。而这些数据,Sentinel是用来进行他后面的各种规则判断的。而应用就可以通过这个SPI扩展机制,拿到这些很关键的信息来做监控或者数据埋点等别的什么用。
比如我们来看这个entry方法,StatisticSlot会在node当中添加一些数据,而这个node会往下传给后面的Slot。那应用就可以在StatisticSlot之后插入一个Slot,就可以拿到这些统计信息。而拿到了之后就可以将这些统计信息通过MQ或者其他组件传送出去,这是不是就是非常好的数据埋点?
这里要注意下的是exit方法,他也会将node通过Context上下文往下传递,但是这个传递就是从后往前传递了。 也就是说要拿到Exit中插入到node中的值,就需要在StatisticSlot的前面插入应用才可以拿到。


