Spring Boot学习(二十三):Spring Boot整合Redis,五分钟搞定
前言
Spring Boot系列: 点击查看Spring Boot系列文章
Redis
Redis 是一个开源(BSD许可)的,内存中的数据结构存储系统,它可以用作数据库、缓存和消息中间件。 它支持多种类型的数据结构,如 字符串(strings), 散列(hashes), 列表(lists), 集合(sets), 有序集合(sorted sets) 与范围查询, bitmaps, hyperloglogs 和 地理空间(geospatial) 索引半径查询。 Redis 内置了 复制(replication),LUA脚本(Lua scripting), LRU驱动事件(LRU eviction),事务(transactions) 和不同级别的 磁盘持久化(persistence), 并通过 Redis哨兵(Sentinel)和自动 分区(Cluster)提供高可用性(high availability)。Redis 是一个高性能的key-value数据库。
Spring Boot集成Redis
Spring Data依赖用来帮你使用各种各样的NoSQL技术,包括MongoDB, Neo4J, Elasticsearch, Solr, Redis, Gemfire, Couchbase和Cassandra。Spring Boot为Redis, MongoDB, Elasticsearch, Solr和Cassandra提供自动配置。
1、在pom文件添加依赖,一个即可,即spring-boot-starter-data-redis
<dependency>
   <groupId>org.springframework.boot</groupId>
   <artifactId>spring-boot-starter-data-redis</artifactId>
</dependency>
注:springboot2之前redis的连接池为jedis,2.0以后redis的连接池改为了lettuce。我们可以看导入的依赖
默认是不使用连接池的,只有配置 redis.lettuce.pool下的属性的时候才可以使用到redis连接池(当然,你也可以配置jedis连接池)
如果我们想要使用lettuce连接池,不仅要在配置文件配置连接池信息,还要添加以下依赖
  <!-- redis的lettuce连接池依赖-->
    <dependency>
        <groupId>org.apache.commons</groupId>
        <artifactId>commons-pool2</artifactId>
    </dependency>
否则会抛出以下错误
org.springframework.beans.factory.BeanCreationException: Error creating bean with name 'redisConnectionFactory' defined in class path resource [org/springframework/boot/autoconfigure/data/redis/LettuceConnectionConfiguration.class]: Bean instantiation via factory method failed; nested exception is org.springframework.beans.BeanInstantiationException: Failed to instantiate [org.springframework.data.redis.connection.lettuce.LettuceConnectionFactory]: Factory method 'redisConnectionFactory' threw exception; nested exception is java.lang.NoClassDefFoundError: org/apache/commons/pool2/impl/GenericObjectPoolConfig
如果我们就想要使用jedis连接池,那么需要添加以下依赖。exclusion排除lettuce连接池,然后添加jedis依赖
       <dependency>
            <groupId>org.springframework.boot</groupId>
            <artifactId>spring-boot-starter-data-redis</artifactId>
            <exclusions>
                <exclusion>
                    <groupId>io.lettuce</groupId>
                    <artifactId>lettuce-core</artifactId>
                </exclusion>
            </exclusions>
        </dependency>

        <dependency>
            <groupId>redis.clients</groupId>
            <artifactId>jedis</artifactId>
        </dependency>
2、在配置文件进行redis配置,以下时比较详细的配置,其实我们简单使用只需要配置host、port、password即可
#Redis服务器地址
spring.redis.host=127.0.0.1
#Redis服务器连接端口
spring.redis.port=6379
#Redis服务器连接密码(默认为空)
spring.redis.password=
# Redis数据库索引,一共有16个
spring.redis.database=0
#连接超时时间(毫秒)
spring.redis.timeout=10000
# 连接池最大连接数(使用负值表示没有限制)
spring.redis.lettuce.pool.max-active=8
# 连接池最大阻塞等待时间(使用负值表示没有限制)
spring.redis.lettuce.pool.max-wait=-1
# 连接池中的最大空闲连接
spring.redis.lettuce.pool.max-idle=8
# 连接池中的最小空闲连接
spring.redis.lettuce.pool.min-idle=0
3、配置了配置信息,我们就可以直接使用StringRedisTemplate进行redis的操作了。我们直接在需要使用的地方注入StringRedisTemplate ,然后使用StringRedisTemplate 进行redis的操作即可。在spring boot操作redis就是这么简单。
例:
@RestController
public class RedisTest {


    @Autowired
    private StringRedisTemplate stringRedisTemplate;

    @GetMapping("/redis")
    public String getRedis(){

         //给redis设值
        stringRedisTemplate.opsForValue().set("count","1");
        //取出redis的值
        return stringRedisTemplate.opsForValue().get("count");
    }

}
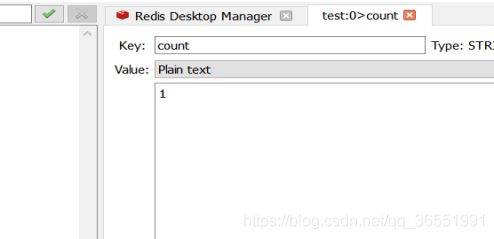
调用上面的接口后,我们可以查看redis的管理工具。可以看到多了一个count,值为1
配置RedisTemplate
除了直接使用默认的StringRedisTemplate和redisTemplate ,我们还可以手动配置RedisTemplate的序列化等配置。
如
@Configuration
public class RedisConfig {


    @Bean(name = "redisTemplate")
    public RedisTemplate redisTemplate(RedisConnectionFactory factory) {

        //创建一个redisTemplate对象
        RedisTemplate<String, String> redisTemplate = new RedisTemplate<>();
        //配置连接信息
        redisTemplate.setConnectionFactory(factory);
        //使用Jackson2JsonRedisSerializer来序列化和反序列化redis的value值(默认使用JDK的序列化方式)
        Jackson2JsonRedisSerializer jacksonSeial = new Jackson2JsonRedisSerializer(Object.class);
        ObjectMapper om = new ObjectMapper();
        // 指定要序列化的域,field,get和set,以及修饰符范围,ANY是都有,包括private和public
        om.setVisibility(PropertyAccessor.ALL, JsonAutoDetect.Visibility.ANY);
        // 指定序列化输入的类型,类必须是非final修饰的,final修饰的类,比如String,Integer等会跑出异常
        om.enableDefaultTyping(ObjectMapper.DefaultTyping.NON_FINAL);
        jacksonSeial.setObjectMapper(om);
        //设置redis的值的序列化方法
        redisTemplate.setValueSerializer(jacksonSeial);
        //使用StringRedisSerializer来序列化和反序列化redis的key值
        redisTemplate.setKeySerializer(new StringRedisSerializer());


       /* // 设置hash key 和value序列化模式
        redisTemplate.setHashKeySerializer(new StringRedisSerializer());
        redisTemplate.setHashValueSerializer(jacksonSeial);
        */

//       redisTemplate.afterPropertiesSet();
        return redisTemplate;
    }
}
注:一般我们直接使用StringRedisTemplate就可以了,不会出现一些序列化的错误。

