Windows下linux子系统 + docker环境搭建
Windows下linux子系统 + docker环境搭建
文章目录
- Windows下linux子系统 + docker环境搭建
-
- 一、Ubuntu18.04 TLS + WSL2
-
- 1、windows安装ubuntu子系统
- 2、windows安装终端
- 3、WSL2环境搭建
-
- 1)WSL2是什么
- 什么是WSL?
- 什么是WSL2?
- 是否可以在 WSL 2 中访问 GPU? 是否计划增加硬件支持?
- 2)更新WSL 2 linux内核
- 3)更新window10版本
- 4)将WSL更新为WSL2
- 5)windows + linux整合开发
- 6)WSL2 网络配置
- 二、安装Docker Desktop
-
-
- 1)为什么要使用windows + linux + docker
- 2)Docker Desktop的安装
- 3)Docker Desktop开启WSL2
-
- Prerequisites
-
-
- 4)docker下安装ubuntu
-
- 三、Docker Desktop的使用
-
- 1、Docker的仓库,镜像,容器
-
- 1)Docker镜像的概念
- 2)Docker镜像加载原理
- 3)Docker镜像分层的好处
- 4)容器数据卷
- 5)docker比较快的源
- 2、Docker常用命令
-
- 1)容器生命周期管理
- 2)本地镜像管理
- 3)容器数据持久化
- 4)linux的文件复制到docker容器中
- 3、DockerFile保留字指令
-
- 1)dockerfile解析
- 4、IDEA配置和使用Docker
- 5、零碎问题
一、Ubuntu18.04 TLS + WSL2
1、windows安装ubuntu子系统
参考官网即可 Windows Subsystem for Linux Installation Guide for Windows 10
此时注意勾选(控制面板>>程序和功能)

2、windows安装终端
Windows Terminal这个终端可以打开任意个powershell,ubuntu终端,cmd控制台。

- Install and set up Windows Terminal
- 解决Windows Terminal[启动“powershell.exe”时出现错误 0x80070002]错误
3、WSL2环境搭建
到microsoft官网查看相应文档https://docs.microsoft.com/zh-cn/
1)WSL2是什么
什么是WSL?
Windows Subsystem for Linux,适用于 Linux 的 Windows 子系统可让开发人员按原样运行 GNU/Linux 环境 - 包括大多数命令行工具、实用工具和应用程序 - 且不会产生虚拟机开销。
什么是WSL2?
- WSL 2 是 WSL 中体系结构的新版本,它更改 Linux 发行版与 Windows 交互的方式。
- WSL 2 的主要目标是提高文件系统性能并增加系统调用的完全兼容性。
- 每个 Linux 发行版都可以作为 WSL 1 或 WSL 2 发行版运行,并可随时进行切换。
- WSL 2 是底层体系结构的主要功能,它使用虚拟化技术和 Linux 内核来实现其新功能。
是否可以在 WSL 2 中访问 GPU? 是否计划增加硬件支持?
我们发布了相关支持,可在 WSL 2 发行版内访问 GPU! 这意味着,在涉及到大数据集时,现在可以更轻松地将 WSL 用于机器学习、人工智能和数据科学应用场景。 请查看 GPU 支持入门教程。 从现在开始,WSL 2 不包括串行支持和 USB 设备支持。 我们正在研究添加这些功能的最佳方法。
参考
- 在Windows 10中启动WSL2 并安装Linux( Ubuntu 为例)并运行docker
- https://docs.microsoft.com/zh-cn/windows/wsl/wsl2-faq
参考
- WSL使用史上最详细教程
2)更新WSL 2 linux内核
下载Linux内核更新包,更新WSL 2 linux内核
下载地址:https://wslstorestorage.blob.core.windows.net/wslblob/wsl_update_x64.msi (就一步next和finish)
参考官网 Updating the WSL 2 Linux kernel
3)更新window10版本
-
win10发布的版本:https://docs.microsoft.com/zh-cn/windows/release-information/status-windows-10-2004
-
安装windows官方更新软件“易升”,升级windows10版本
https://www.microsoft.com/zh-cn/software-download/windows10
4)将WSL更新为WSL2
设置默认WSL子系统安装版本
wsl --set-default-version 2
这时发现wsl -l - v无效的问题,主要原因是你的windows10是预览版,需要升级到2004等以上版本

注意:①遇到“命令行选项无效”问题,参考此链接`https://gitmemory.com/issue/microsoft/WSL/4280/509675282,检查发现,只参与预览体验计划不行,win10专业版OS版本号1909没有WSL2,必须升级到2004才可以,微软现在还未全面向用户推送2004版本,那么我们可以通过官方的“易升”软件来获取更新。
参考Windows下Linux子系统的安装与使用 wsl
解决方法:
-
win10发布的版本:https://docs.microsoft.com/zh-cn/windows/release-information/status-windows-10-2004
-
我的win10版本:

-
安装windows官方更新软件“易升”,升级windows10版本
https://www.microsoft.com/zh-cn/software-download/windows10
-
升级后windows版本号为20H2,WSL2可以用了,Docker Desktop也可以用WSL2了

-
这时注意
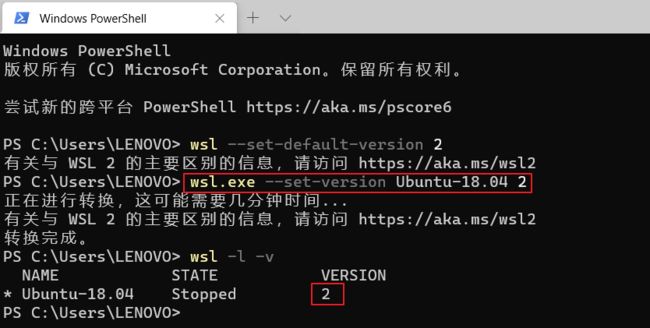
wsl --set-default-version 2无效,会出现有关与 WSL 2 的主要区别的信息,请访问 https://aka.ms/wsl2 -
正确命令:
wsl.exe --set-version Ubuntu-18.04 2
参考升级 Windows 10 v2004 和 wsl2
-
5)windows + linux整合开发
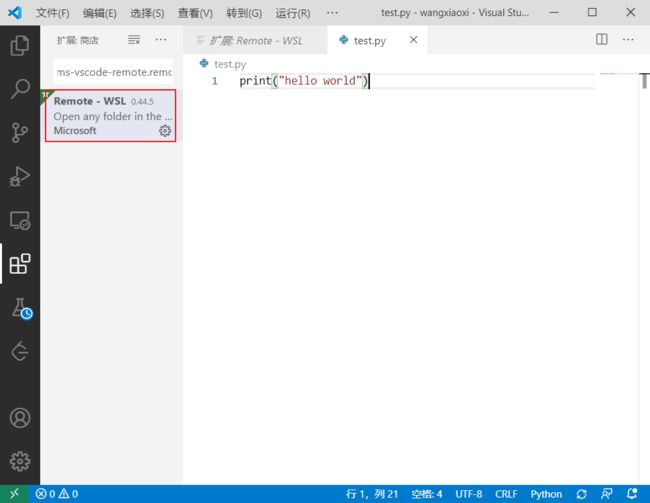
Step1:在ubuntu18.04中输入code .,会自动打开windows下的VSCode,提示安装WSL插件

Step2:在该目录文件夹下创建python文件,这时在linux子系统中会出现这个文件。

Step3:用ubuntu中默认安装的python3运行py文件

6)WSL2 网络配置
-
查看ubuntu的ip地址:
ip addr或者是直接查看eth0的ip
ip addr | grep eth0
- 查看windows的ip地址

- WSL2和WIFI的关系

- 如何将虚拟机的ip暴露在外面(待研究)
二、安装Docker Desktop
1)为什么要使用windows + linux + docker
因为要学习机器学习,但是网上大部分的项目都是用linux编译的,现在手头上有三种方案:
-
买个新笔记本(不喜欢,没钱)
-
安装VMWare虚拟机,搭建ubuntu环境。(不喜欢,每次都得打开VMWare启动Ubuntu,与windows交互不是很友好)
-
整个双系统。(不喜欢,一时半会抛弃不了windows)
学习linux开发已成为必然趋势,但是现阶段想买个GPU(这是最好的方案),又不太现实,怎么办?(2021.1.14补充:后来发现安装linux子系统+desktop很耗C盘空间,其实白嫖阿里天池免费算力也是很香的,不用自己配置pytorch环境。)
之前在centos中使用过docker,感觉docker和maven,pip(conda)类似,有个远程公共仓库,只要输入命令,就会把所需要的安装包download下来,可以统一配置环境,避免插件版本不同带来的不便。而且方便打包部署到其他已经安装docker的环境中。
知乎有些大神也分享了docker在实际开发中的优点
你开发软件的时候用的是Ubuntu,但是运维管理的都是centos,运维在把你的软件从开发环境转移到生产环境的时候就会遇到一些Ubuntu转centos的问题,比如:有个特殊版本的数据库,只有Ubuntu支持,centos不支持,在转移的过程当中运维就得想办法解决这样的问题。这时候要是有docker你就可以把开发环境直接封装转移给运维,运维直接部署你给他的docker就可以了。而且部署速度快。
https://www.zhihu.com/question/28300645/answer/67707287
结合docker易部署的优点,我决定在windows下安装docker,开启我的机器学习生涯。
现在先来介绍windows下docker的两个版本吧
Docker 不同版本介绍
适合安装在windows上的docker有2个版本:Docker Desktop 和 Docker Toolbox。
Docker Desktop:适合安装Windows版本:Win10系统Pro、Enterprise或者Education以及苹果OS 系统,特点是安装、设置、使用会更简单;持续更新。
Docker Toolbox:Windows所有的版本都可以安装, 但它只是一种替代方案,安装、设置、使用也会更麻烦一些,且自2018年后未曾更新过,相信将来慢慢的会被Docker Desktop取代,所以,安装Dock时,小编建议大家尽量升级自己的操作系统安装docker desktop版本。不过,目前windows10家庭版系统仍是个人电脑主流配置,所以Toolbox版安装问题仍是多数人会遇到的,所以今天先介绍Docker Toolbox版的安装。
https://www.jianshu.com/p/6d02cffb1384
在正式安装Docker Desktop之前,要认识到Docker Desktop虽然给我们配置了docker的环境,但是我们不一定要用Docker Desktop提供的docker环境。我们可以在windows上安装ubuntu,ubuntu里再装docker,然后用Docker Desktop来管理ubuntu里的docker容器(需要打开WSL2)。
所以我们最好把Docker Desktop看做是docker容器运行的可视化工具(比如Github对应的Github Desktop)。
2)Docker Desktop的安装
正式安装:
安装教程看下面几个blog就行,很详细
-
Docker Toolbox:Docker 工具安装(windows Toolbox版本)详解版!
-
Docker Desktop:Docker Desktop for Windows 安装步骤 下载路径https://hub.docker.com/editions/community/docker-ce-desktop-windows?tab=description
在开启hyper-v时会出现
正在搜索需要的文件的问题 windows10一直显示正在搜索需要的文件

补充说明
-
安装Docker Desktop需要开启Hyper-V,一旦Hyper-V开启,其他虚拟机软件都会没法使用,像VirtualBox和VMWare https://www.zhihu.com/question/325903456
-
Docker Desktop从18.02开始,使用Windows容器模式,可以通过Hyper-V的linux容器技术,直接使用内置的Linux内核跑Linux容器而无需在Hyper-V里面额外安装运行一台Linux VM。https://docs.microsoft.com/en-us/virtualization/windowscontainers/quick-start/quick-start-windows-10-linux

3)Docker Desktop开启WSL2
-
Win10版本号在哪里查看,怎么查看Win10系统版本
Prerequisites
Before you install the Docker Desktop WSL 2 backend, you must complete the following steps:
- Install Windows 10, version 1903 or higher.
- Enable WSL 2 feature on Windows. For detailed instructions, refer to the Microsoft documentation.
- Download and install the Linux kernel update package.
-
docker desktop识别不了WSL2,怎么办:升级windows10版本

解决方法(见步骤一.3.2)):
安装windows官方更新软件“易升”,升级windows10版本
https://www.microsoft.com/zh-cn/software-download/windows10
- 升级windows10版本后,可以使用WSL2环境,来管理Ubuntu下的docker容器

参考文档:
-
Docker Desktop WSL 2 backend
-
在Windows 10中启动WSL2 并安装Linux( Ubuntu 为例)并运行docker
 docker run -it ubuntu bash
 docker run hello-world
4)docker下安装ubuntu
在windows下的ubuntu子系统中安装docker,并在docker下安装ubuntu

三、Docker Desktop的使用
1、Docker的仓库,镜像,容器
在使用Docker之前,先了解三个概念:仓库,镜像,容器
可以简单理解:仓库是指远程的镜像仓库(也包含本地仓库中的本地镜像),镜像是一个文件,容器则是通过镜像创建的进程

1)Docker镜像的概念
- 镜像是用来打包软件运行环境和基于运行环境开发的软件,它包含运行某个软件所需的所有内容,包括代码,运行时、库、环境变量和配置文件。
- 联合文件系统(UnionFS)是Docker镜像的基础。联合文件系统是一种分层,轻量级,高性能的文件系统,支持对文件系统的修改作为一次提交来一层层的叠加。
- 虽然镜像产生过程中包含多层封装,但最后打包成只有唯一ID的一个镜像文件(tomcat:8.5 image只有一个ID)
其实tomcat镜像是经过多层的打包形成的:(假设宿主机为centos,镜像需要打包centos的内核)

2)Docker镜像加载原理
- bootfs(boot file system):主要包含bootloader和kernel,bootloader主要引导加载kernel,在Docker镜像的最底层是bootfs。
- rootfs(root file system):rootfs是各种不同的操作系统发行版,比如Ubuntu,Centos。
3)Docker镜像分层的好处
- 最大的一个好处就是-共享资源
- 比如:有多个镜像都从相同的base镜像构建而来,那么宿主机只需在磁盘上保存一份base镜像,同时内存中也只需加载一份base镜像,就可以为所有容器服务了。而且镜像的每一层都可以被共享。
参考
-
https://www.bilibili.com/video/BV1At41137mP?p=16
-
关于docker容器和镜像的区别
-
Docker容器和镜像的区别
4)容器数据卷
- Docker容器产生的数据,如果不通过docker commit生成新的镜像,使得数据做为镜像的一部分保存下来,那么当容器删除后,数据自然也就没有了。为了能保存数据在docker中我们使用卷。
- 容器的持久化
- 容器间继承
- 容器和宿主机之间共享数据
5)docker比较快的源
参考docker比较快的源
2、Docker常用命令
docker的命令文档写得晦涩难懂(我比较菜,大神绕行),不方便上手
例如docker create [OPTIONS] IMAGE [COMMAND] [ARG...]
Usage:  docker create [OPTIONS] IMAGE [COMMAND] [ARG...]

Create a new container

Options:
      --add-host list                  Add a custom host-to-IP mapping
                                       (host:ip)
  -a, --attach list                    Attach to STDIN, STDOUT or STDERR
      --blkio-weight uint16            Block IO (relative weight),
                                       between 10 and 1000, or 0 to
                                       disable (default 0)
      --blkio-weight-device list       Block IO weight (relative device
                                       weight) (default [])
      --cap-add list                   Add Linux capabilities
      --cap-drop list                  Drop Linux capabilities
      --cgroup-parent string           Optional parent cgroup for the
                                       container
      --cidfile string                 Write the container ID to the file
      --cpu-period int                 Limit CPU CFS (Completely Fair
                                       Scheduler) period
      --cpu-quota int                  Limit CPU CFS (Completely Fair
                                       Scheduler) quota
      --cpu-rt-period int              Limit CPU real-time period in
                                       microseconds
      --cpu-rt-runtime int             Limit CPU real-time runtime in
                                       microseconds
  -c, --cpu-shares int                 CPU shares (relative weight)
      --cpus decimal                   Number of CPUs
      --cpuset-cpus string             CPUs in which to allow execution
                                       (0-3, 0,1)
      --cpuset-mems string             MEMs in which to allow execution
                                       (0-3, 0,1)
      --device list                    Add a host device to the container
      --device-cgroup-rule list        Add a rule to the cgroup allowed
                                       devices list
      --device-read-bps list           Limit read rate (bytes per second)
                                       from a device (default [])
      --device-read-iops list          Limit read rate (IO per second)
                                       from a device (default [])
      --device-write-bps list          Limit write rate (bytes per
                                       second) to a device (default [])
      --device-write-iops list         Limit write rate (IO per second)
                                       to a device (default [])
      --disable-content-trust          Skip image verification (default true)
      --dns list                       Set custom DNS servers
      --dns-option list                Set DNS options
      --dns-search list                Set custom DNS search domains
      --domainname string              Container NIS domain name
      --entrypoint string              Overwrite the default ENTRYPOINT
                                       of the image
  -e, --env list                       Set environment variables
      --env-file list                  Read in a file of environment variables
      --expose list                    Expose a port or a range of ports
      --gpus gpu-request               GPU devices to add to the
                                       container ('all' to pass all GPUs)
      --group-add list                 Add additional groups to join
      --health-cmd string              Command to run to check health
      --health-interval duration       Time between running the check
                                       (ms|s|m|h) (default 0s)
      --health-retries int             Consecutive failures needed to
                                       report unhealthy
      --health-start-period duration   Start period for the container to
                                       initialize before starting
                                       health-retries countdown
                                       (ms|s|m|h) (default 0s)
      --health-timeout duration        Maximum time to allow one check to
                                       run (ms|s|m|h) (default 0s)
      --help                           Print usage
  -h, --hostname string                Container host name
      --init                           Run an init inside the container
                                       that forwards signals and reaps
                                       processes
  -i, --interactive                    Keep STDIN open even if not attached
      --ip string                      IPv4 address (e.g., 172.30.100.104)
      --ip6 string                     IPv6 address (e.g., 2001:db8::33)
      --ipc string                     IPC mode to use
      --isolation string               Container isolation technology
      --kernel-memory bytes            Kernel memory limit
  -l, --label list                     Set meta data on a container
      --label-file list                Read in a line delimited file of labels
      --link list                      Add link to another container
      --link-local-ip list             Container IPv4/IPv6 link-local
                                       addresses
      --log-driver string              Logging driver for the container
      --log-opt list                   Log driver options
      --mac-address string             Container MAC address (e.g.,
                                       92:d0:c6:0a:29:33)
  -m, --memory bytes                   Memory limit
      --memory-reservation bytes       Memory soft limit
      --memory-swap bytes              Swap limit equal to memory plus
                                       swap: '-1' to enable unlimited swap
      --memory-swappiness int          Tune container memory swappiness
                                       (0 to 100) (default -1)
      --mount mount                    Attach a filesystem mount to the
                                       container
      --name string                    Assign a name to the container
      --network network                Connect a container to a network
      --network-alias list             Add network-scoped alias for the
                                       container
      --no-healthcheck                 Disable any container-specified
                                       HEALTHCHECK
      --oom-kill-disable               Disable OOM Killer
      --oom-score-adj int              Tune host's OOM preferences (-1000
                                       to 1000)
      --pid string                     PID namespace to use
      --pids-limit int                 Tune container pids limit (set -1
                                       for unlimited)
      --platform string                Set platform if server is
                                       multi-platform capable
      --privileged                     Give extended privileges to this
                                       container
  -p, --publish list                   Publish a container's port(s) to
                                       the host
  -P, --publish-all                    Publish all exposed ports to
                                       random ports
      --read-only                      Mount the container's root
                                       filesystem as read only
      --restart string                 Restart policy to apply when a
                                       container exits (default "no")
      --rm                             Automatically remove the container
                                       when it exits
      --runtime string                 Runtime to use for this container
      --security-opt list              Security Options
      --shm-size bytes                 Size of /dev/shm
      --stop-signal string             Signal to stop a container
                                       (default "15")
      --stop-timeout int               Timeout (in seconds) to stop a
                                       container
      --storage-opt list               Storage driver options for the
                                       container
      --sysctl map                     Sysctl options (default map[])
      --tmpfs list                     Mount a tmpfs directory
  -t, --tty                            Allocate a pseudo-TTY
      --ulimit ulimit                  Ulimit options (default [])
  -u, --user string                    Username or UID (format:
                                       [:])
      --userns string                  User namespace to use
      --uts string                     UTS namespace to use
  -v, --volume list                    Bind mount a volume
      --volume-driver string           Optional volume driver for the
                                       container
      --volumes-from list              Mount volumes from the specified
                                       container(s)
  -w, --workdir string                 Working directory inside the container
你不禁会问:-和--有什么区别?? 我也不知道
对于create容器,主要是这个参数比较重要:```–name string Assign a name to the container``
这里以tomcat为例进行docker命令的介绍
1)容器生命周期管理
-
查看本地所有容器(运行和停止):
docker ps -a -
通过镜像创建容器(记得用
:指定镜像版本):docker create --name mytomcat2 tomcat:8.5 -
运行容器:
docker run -d -p 50080:8080 tomcat:test1-p是指定宿主主机和容器的端口映射, 用宿主主机的50080端口映射容器的8080端口 -
进入容器内部(例如修改tomcat容器内的配置文件)
docker exec -i -t mytomcat2 /bin/bash还可以使用(如果使用windows下的linux子系统,运行docker容器则使用下面命令,或者是使用Docker Desktop创建容器)
docker run -it tomcat:8.5 /bin/bash如果使用下面命令运行容器,则会报错(好像强迫进入容器内部才能运行容器)
docker run -d -p 50080:8080 tomcat:test1 --- Unable to find image 'mytomcat2:latest' locally docker: Error response from daemon: pull access denied for mytomcat2, repository does not exist or may require 'docker login': denied: requested access to the resource is denied. See 'docker run --help'.-
进入后用
cd,ls等命令查找文件 -
如果要编辑文件,则需要安装vim 参考进入docker里编辑文件,默认里面是不能执行vim命令,所以需要先安装
apt-get update #更新来源 apt-get install -y vim #安装vim -
vim常用命令 参考vim常用命令总结
因为用的是windows cmd打开下的vim,用cmd复制粘贴,比直接用vim粘贴简单得多
esc + : wq #保存退出
-
-
退出容器:
exit -
停止容器:
docker stop 9e5d336e838b -
删除容器:
docker rm 9e5d336e838b -
重启容器:
docker restart 9e5d336e838b -
容器转镜像:
docker commit -a="wangxiaoxi" -m="update catalina.properties" 9e5d336e838b wangxiaoxi/tomcat:8.5
2)本地镜像管理
-
查看本地所有镜像:
docker images
- 查看远程仓库镜像:
docker search tomcat
- 下载一个镜像:

```dockerfile
docker pull tomcat:8.5
- docker images
REPOSITORY                     TAG                 IMAGE ID            CREATED             SIZE
wangxiaoxi/tomcat              8.5                 cad5ec4d9dc1        11 seconds ago      581MB
- 对于
exec,stop,rm,restart命令,ID和容器名可以相互替换,而对于run则不能替换
 docker run -it 9e5d336e838b  /bin/bash
 Unable to find image '9e5d336e838b:latest' locally
- 镜像commit时,新的镜像名格式要正确
wangxiaoxi/tomcat:8.5  √
/wangxiaoxi/tomcat:8.5  × invalid reference format
docker的命令文档如下:
- https://docs.docker.com/engine/reference/commandline/docker/
- 也可以采用
docker --help
Notes:建议看菜鸟教程,有命令实例
参考
- Docker实战之创建一个tomcat容器
- docker如何进入tomcat容器
3)容器数据持久化
docker run -it -v /宿主机绝对路径目录:/容器内目录  镜像名
docker run -it -v /D:/test
参考
- docker rm 命令 删除容器与数据卷
- Docker : 数据卷(创建、挂载、查看、删除)
4)linux的文件复制到docker容器中
docker cp /home/wangxiaoxi/CVProject/R3Det_Tensorflow 0ced89ac249d:/usr/CVProject
参考
- 将linux系统中的文件复制到docker容器中
- Docker语法 - docker cp怎么用?
3、DockerFile保留字指令
1)dockerfile解析
-
dockerfile是用来构建Docker镜像的构建文件,是由一系列命令和参数构成的脚本。指令按照从上到下,顺序执行。用
#表示注释 -
每条指令都会创建一个新的镜像层,并对镜像进行提交
-
dockerfile文件 -> docker build -> docker run
4、IDEA配置和使用Docker
参考
- IDEA中配置及使用Docker
- idea配置docker
5、零碎问题
1、Docker 使用国内镜像仓库
2、Docker 资源汇总
