IdentityServer4 (IDS4) 快速入门
一、系统环境
win10
C:\Users\zhoujy>dotnet --version
5.0.102
IdentityServer4 4.0.0
Microsoft Visual Studio Community 2019
版本 16.8.4
二、IdentityServer4 基本原理
1、当前应用程序大多数情况下,如下图的模式
最常见的交互是:
- 浏览器与Web应用程序通信
- Web应用程序与Web API通信(有时是独立的,有时是代表用户的)
- 基于浏览器的应用程序与Web API进行通信
- 本机应用程序与Web API通信
- 基于服务器的应用程序与Web API进行通信
- Web API与Web API进行通信(有时是独立的,有时是代表用户的)
2、 IdentityServer4重组应用程序以支持安全令牌服务将支持下体系结构和协议
三、示例入门
入门的示例创建最简单的IdentityServer服务器、需保护的API资源、授权访问的客户端三个项目,来模拟发放token令牌和利用令牌访问资源API的过程。
1、创建IdentityServer4服务器
先安装IdentityServer4提供的模板
dotnet new -i IdentityServer4.Templates创建quickstart/src目录,并创建IdentityServer项目
md quickstart
cd quickstart

md src
cd src

dotnet new is4empty -n IdentityServer
创建解决方案并加入项目,以便在Visual Studio中使用
cd ..
dotnet new sln -n Quickstart

dotnet sln add ./src/IdentityServer/IdentityServer.csproj
在Visual studio中打开解决方案,在IdentityServer项目中修改config.cs文件,以定义API范围及客户列表
// Copyright (c) Brock Allen & Dominick Baier. All rights reserved.
// Licensed under the Apache License, Version 2.0. See LICENSE in the project root for license information.


using IdentityServer4.Models;
using System.Collections.Generic;

namespace IdentityServer
{
    public static class Config
    {
        public static IEnumerable IdentityResources =>
            new IdentityResource[]
            {
                new IdentityResources.OpenId()
            };

        public static IEnumerable ApiScopes =>
             new List
            {
                new ApiScope("api1", "My API")
            };

        public static IEnumerable Clients =>
             new List
            {
                new Client
                {
                    ClientId = "client",

                    // no interactive user, use the clientid/secret for authentication
                    AllowedGrantTypes = GrantTypes.ClientCredentials,

                    // secret for authentication
                    ClientSecrets =
                    {
                        new Secret("secret".Sha256())
                    },

                    // scopes that client has access to
                    AllowedScopes = { "api1" }
                }
              };
    }
}
配置startup.cs文件,载入资源和客户定义。
   public void ConfigureServices(IServiceCollection services)
        {
            // uncomment, if you want to add an MVC-based UI
            //services.AddControllersWithViews();

            var builder = services.AddIdentityServer(options =>
            {
                // see https://identityserver4.readthedocs.io/en/latest/topics/resources.html
                options.EmitStaticAudienceClaim = true;
            })
                .AddInMemoryIdentityResources(Config.IdentityResources)
                .AddInMemoryApiScopes(Config.ApiScopes)
                .AddInMemoryClients(Config.Clients);

            // not recommended for production - you need to store your key material somewhere secure
            builder.AddDeveloperSigningCredential();
        }
一个最简单的IdentityServer服务就可以运行了。
L:\CSharp\quickstart\src\IdentityServer> dotnet run dev
[14:50:12 Information]
Starting host...

[14:50:13 Information] IdentityServer4.Startup
Starting IdentityServer4 version 4.0.0+1acafade44176bf817412aa4309d5dff6587a741

[14:50:13 Information] IdentityServer4.Startup
You are using the in-memory version of the persisted grant store. This will store consent decisions, authorization codes, refresh and reference tokens in memory only. If you are using any of those features in production, you want to switch to a different store implementation.

[14:50:13 Information] IdentityServer4.Startup
Using the default authentication scheme idsrv for IdentityServer

[14:50:13 Debug] IdentityServer4.Startup
Using idsrv as default ASP.NET Core scheme for authentication

[14:50:13 Debug] IdentityServer4.Startup
Using idsrv as default ASP.NET Core scheme for sign-in

[14:50:13 Debug] IdentityServer4.Startup
Using idsrv as default ASP.NET Core scheme for sign-out

[14:50:13 Debug] IdentityServer4.Startup
Using idsrv as default ASP.NET Core scheme for challenge

[14:50:13 Debug] IdentityServer4.Startup
[14:55:06 Information] Microsoft.Hosting.Lifetime
Now listening on: https://localhost:5001

[14:55:06 Information] Microsoft.Hosting.Lifetime
Application started. Press Ctrl+C to shut down.
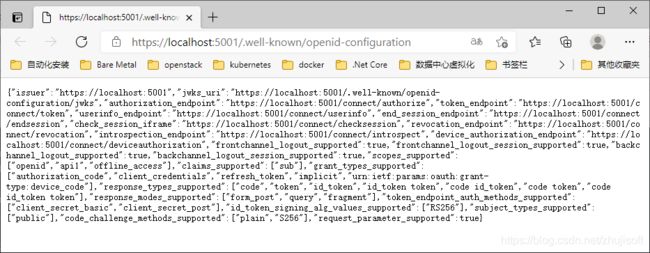
访问 https://localhost:5001/.well-known/openid-configuration
2、创建需要保护的资源API
进入quickstart/src目录
dotnet new webapi -n Api将项目加入解决方案
cd ..
dotnet sln add ./src/Api/Api.csproj
编辑Properties文件夹中的launchSettings.json文件,将启动URL改为https://localhost:6001
{
  "profiles": {
    "SelfHost": {
      "commandName": "Project",
      "launchBrowser": true,
      "environmentVariables": {
        "ASPNETCORE_ENVIRONMENT": "Development"
      },
      "applicationUrl": "https://localhost:6001"
    }
  }
添加一个新的控制类IdentityController,来测试访问授权要求。
using Microsoft.AspNetCore.Authorization;
using Microsoft.AspNetCore.Mvc;
using System.Linq;

namespace api.Controllers
{
    [Route("identity")]
    [Authorize]
    public class IdentityController : ControllerBase
    {
        [HttpGet]
        public IActionResult Get()
        {
            return new JsonResult(from c in User.Claims select new { c.Type, c.Value });
        }
    }
}
添加依赖包
dotnet add ./src/api/api.csproj package Microsoft.AspNetCore.Authentication.JwtBearer配置startup.cs文件
最后一步是将IdentityServer添加到DI(依赖注入),并将身份验证中间件添加到管道。这些将:
- 验证传入令牌以确保它来自受信任的发行者
- 验证令牌是否可以与此API一起使用(也称为受众群体)
using Microsoft.AspNetCore.Builder;
using Microsoft.AspNetCore.Hosting;
using Microsoft.Extensions.Configuration;
using Microsoft.Extensions.DependencyInjection;
using Microsoft.Extensions.Hosting;
using Microsoft.IdentityModel.Tokens;
using Microsoft.OpenApi.Models;

namespace api
{
    public class Startup
    {
        public Startup(IConfiguration configuration)
        {
            Configuration = configuration;
        }

        public IConfiguration Configuration { get; }

        // This method gets called by the runtime. Use this method to add services to the container.
        public void ConfigureServices(IServiceCollection services)
        {

            services.AddControllers();
            services.AddSwaggerGen(c =>
            {
                c.SwaggerDoc("v1", new OpenApiInfo { Title = "api", Version = "v1" });
            });

            services.AddAuthentication("Bearer")
                     .AddJwtBearer("Bearer", options =>
                     {
                         options.Authority = "https://localhost:5001";

                         options.TokenValidationParameters = new TokenValidationParameters
                         {
                             ValidateAudience = false
                         };
                     });

            //添加授权范围
            services.AddAuthorization(options =>
            {
                options.AddPolicy("ApiScope", policy =>
                {
                    policy.RequireAuthenticatedUser();
                    policy.RequireClaim("scope", "api1");
                });
            });
        }

        // This method gets called by the runtime. Use this method to configure the HTTP request pipeline.
        public void Configure(IApplicationBuilder app, IWebHostEnvironment env)
        {
            if (env.IsDevelopment())
            {
                app.UseDeveloperExceptionPage();
                app.UseSwagger();
                app.UseSwaggerUI(c => c.SwaggerEndpoint("/swagger/v1/swagger.json", "api v1"));
            }

            app.UseHttpsRedirection();

            app.UseRouting();

            app.UseAuthentication();
            app.UseAuthorization();


            app.UseEndpoints(endpoints =>
            {
                endpoints.MapControllers()
                    .RequireAuthorization("ApiScope");
            });
        }
    }
}
3、创建模拟访问客户端
最后一步是编写一个请求访问令牌的客户端,然后使用该令牌访问API。进入quickstart/src目录
dotnet new console -n Client添加到解决方案中
cd ..
dotnet sln add .\src\Client\Client.csproj
添加IdentityModel包
cd src
cd client
dotnet add package IdentityModel
修改program.cs文件,以模拟发现服务、请求令牌和使用令牌访问API的过程。
using IdentityModel.Client;
using Newtonsoft.Json.Linq;
using System;
using System.Net.Http;
using System.Threading.Tasks;

namespace Client
{
    class Program
    {
        private static async Task Main(string[] args)
        {
            // 从无数据中发现端点
            var client = new HttpClient();
            var disco = await client.GetDiscoveryDocumentAsync("https://localhost:5001");
            if (disco.IsError)
            {
                Console.WriteLine(disco.Error);
                return;
            }
            else
            {
                Console.WriteLine(disco.AuthorizeEndpoint);
            }

            // 请求令牌
            var tokenResponse = await client.RequestClientCredentialsTokenAsync(new ClientCredentialsTokenRequest
            {
                Address = disco.TokenEndpoint,

                ClientId = "client",
                ClientSecret = "secret",
                Scope = "api1"
            });

            if (tokenResponse.IsError)
            {
                Console.WriteLine(tokenResponse.Error);
                return;
            }

            Console.WriteLine(tokenResponse.Json);


            // 使用令牌访问API
            var apiClient = new HttpClient();
            apiClient.SetBearerToken(tokenResponse.AccessToken);

            var response = await apiClient.GetAsync("https://localhost:6001/identity");
            if (!response.IsSuccessStatusCode)
            {
                Console.WriteLine(response.StatusCode);
            }
            else
            {
                var content = await response.Content.ReadAsStringAsync();
                Console.WriteLine(JArray.Parse(content));
            }

        }
    }
}
运行测试,先启动IdentityServer、Api项目,然后再运行Client可以看到请求到的令牌和使用令牌访问Api的结果。
L:\CSharp\quickstart\src\Client> dotnet run dev
https://localhost:5001/connect/authorize
{"access_token":"eyJhbGciOiJSUzI1NiIsImtpZCI6IjY4QzlCRkQ0QkY2RUQzNjNCRkEwQjA0NUE0QUY1RjI5IiwidHlwIjoiYXQrand0In0.eyJuYmYiOjE2MjAwODk0ODksImV4cCI6MTYyMDA5MzA4OSwiaXNzIjoiaHR0cHM6Ly9sb2NhbGhvc3Q6NTAwMSIsImF1ZCI6Imh0dHBzOi8vbG9jYWxob3N0OjUwMDEvcmVzb3VyY2VzIiwiY2xpZW50X2lkIjoiY2xpZW50IiwianRpIjoiOTg2MTBEMTY1NkFBRTk5RTk1NENDRDJDRUE2MERDQ0UiLCJpYXQiOjE2MjAwODk0ODksInNjb3BlIjpbImFwaTEiXX0.aFddnjOPoNdE6KfnWG1W2IZvMGiu6CPJCAnAXE5YE0zbrBspXDn0mrN9hGzqdmg_DLUHdEpVOykWZMt1-lEZV2Yro1PvvuZr5tRFokcKZ55eFeSotgpeVAS-ZogJlMGRZir_JjJrU9XsXtaZd9PBC8glJzTGmyh6qpxWM_vMFkgGQDoG2H0IrpPltT7CXztMrfDgELlLoY_gaD91gwUqjLamY4ZpRKvP_4bicBJtPVcVTa8y5-dhMRszvG_pKL5Eve3zC0gAPB2uVYYJTKYZlNetabJxhzuwk-oD_K2v2_s27jgAYsfDFqmc-B_EFKWcyd4893l4L9wTrmnH7mlWkw","expires_in":3600,"token_type":"Bearer","scope":"api1"}
[
  {
    "type": "nbf",
    "value": "1620089489"
  },
  {
    "type": "exp",
    "value": "1620093089"
  },
  {
    "type": "iss",
    "value": "https://localhost:5001"
  },
  {
    "type": "aud",
    "value": "https://localhost:5001/resources"
  },
  {
    "type": "client_id",
    "value": "client"
  },
  {
    "type": "jti",
    "value": "98610D1656AAE99E954CCD2CEA60DCCE"
  },
  {
    "type": "iat",
    "value": "1620089489"
  },
  {
    "type": "scope",
    "value": "api1"
  }
]
四、参考文档
1、https://identityserver4.readthedocs.io/en/latest/
2、https://github.com/IdentityServer/IdentityServer4


