(十八)博客--分类管理(1)
1.概述

2.建一个分类页面
		<div class="ui container">
		<div class="ui menu">
			<div class="right menu">
				<a href="#" class="item">发布a>
				<a href="#" class="ui active item">列表a>
			div>
		div>
		div>

		<div class="m-margin-large">
			<div class="ui  container">


			    <table class="ui celled table">
			    	<thead>
			    		<tr>
			    			<th>th>
			    			<th>名称th>
			    			<th>操作th>
			    		tr>
			    	thead>
					<tbody>
						<tr>
							<td>1td>
							<td>刻意练习清单td>
							<td>
								<a href="#" class="ui teal basic button">编辑a>
								<a href="#" class="ui red basic button">删除a>
							td>
						tr>
						<tr>
							<td>1td>
							<td>刻意练习清单td>
							<td>
								<a href="#" class="ui teal basic button">编辑a>
								<a href="#" class="ui red basic button">删除a>
							td>
						tr>

						<tr>
							<td>1td>
							<td>刻意练习清单td>
							<td>
								<a href="#" class="ui teal basic button">编辑a>
								<a href="#" class="ui red basic button">删除a>
							td>
						tr>

					tbody>
					<tfoot>

						<th colspan="6">
							<div class="ui  pagination menu">
								<a href="#" class="ui teal basic  button ">上一页a>
								<a href="#" class="ui teal basic button">上一页a>
							div>
								<a href="#" class="ui right floated teal basic button">新增a>
						th>
					tfoot>
			    table>
			div>
		div>
分类发布页面
		<div class="ui container">
			<div class="ui menu">
				<div class="right menu">
					<a href="#" class="ui active item">发布a>
					<a href="#" class="item">列表a>
				div>
			div>


			<form action="#" method="post" class="ui segment form">
				<div class="required field">

				div>
				<div class="field">
					<div class="ui labeled input">
					<div class="ui teal label">名称div>
						<input type="text" placeholder="分类名称"/>
					div>
				div>

				<div class="ui error message">div>

				<div class="ui right aligned container">
					<button type="button" class="ui button" click="window.history.go(-1)">返回button>
					<button class="ui teal button">提交button>
				div>
			form>
		div>
功能实现
1.先建立dao层
package com.lrm.blog.dao;
import com.lrm.blog.po.Type;
import org.springframework.data.jpa.repository.JpaRepository;
public interface TypeRepository extends JpaRepository<Type,Long> {

}
2.然后sevice层(实现接口)
package com.lrm.blog.service;

import com.lrm.blog.po.Type;
import org.springframework.data.domain.Page;
import org.springframework.data.domain.Pageable;

public interface TyepService {

//    新增完后保存实体对象
    Type saveType(Type type);
//    根据id查询type
    Type getType(Long id);
//    分页查询
    Page<Type> listType(Pageable pageable);
//    修改先根据id查询在吧修改后的type保存到数据库
    Type updateType(Long id,Type type);
//    删除
    void deleteType(long id);

}
实现接口
package com.lrm.blog.service;

import com.lrm.blog.dao.TypeRepository;
import com.lrm.blog.po.Type;
import com.lrm.blog .NotFoundException;
import org.springframework.beans.BeanUtils;
import org.springframework.beans.factory.annotation.Autowired;
import org.springframework.data.domain.Page;
import org.springframework.data.domain.Pageable;
import javax.transaction.Transactional;

public class TypeService implements TyepService{


//注入
    @Autowired
    private TypeRepository typeRepository;

//    将“增删改查”放在事务里 使用@Transactional
    @Transactional
    @Override
    public Type saveType(Type type) {

        return typeRepository.save(type);
    }
    @Transactional
    @Override
    public Type getType(Long id) {

        return typeRepository.findById(id).;
    }
    @Transactional
    @Override
    public Page<Type> listType(Pageable pageable) {

        return typeRepository.findAll(pageable);
    }
    @Transactional
    @Override
    public Type updateType(Long id, Type type) {

       Type t = typeRepository.findById(id);
       if (t==null){

           throw new NotFoundException("不存在该类型");
       }
        BeanUtils.copyProperties(type,t);
        return typeRepository.save(t);
    }
    @Transactional
    @Override
    public void deleteType(long id) {

         typeRepository.deleteById(id);
    }
}
3.web层
ackage com.lrm.blog.web.admin;

import com.lrm.blog.service.TypeService;
import org.springframework.beans.factory.annotation.Autowired;
import org.springframework.data.domain.Page;
import org.springframework.data.domain.Pageable;
import org.springframework.data.domain.Sort;
import org.springframework.data.web.PageableDefault;
import org.springframework.stereotype.Controller;
import org.springframework.ui.Model;
import org.springframework.web.bind.annotation.GetMapping;
import org.springframework.web.bind.annotation.RequestMapping;

@Controller
@RequestMapping("/admin")
public class TypeController {


    @Autowired
    private TypeService typeService;

    @GetMapping("/types")
    public String types(@PageableDefault(size = 10, sort = {
     "id"},direction = Sort.Direction.DESC)
                                    Pageable pageable,
                        Model model){
     //springboot会根据前端页面的参数自动封装到pageablel类中
//@PageableDefault(size = 10, sort = {"id"},direction = Sort.Direction
//   表示设置默认的值 条数为“10”   根据来id倒序排序
        model.addAttribute("page",typeService.listType(pageable));
//        通过model.addAttribute前端就会拿到page对象做一些分页处理
        return "admin/types";
    }
}
设置页面
首页拿到一个pageable对象,将pageable里面一页一页的值放在前端页面
封装好的pageable对象的具体内容


	<tbody>

						<tr th:each="type,iterStat : ${page.content}}">
							<td th:text="${iterStat.count}">1td>

							<td th:text="${type.name}">刻意练习清单td>
							<td>

								<a href="#" th:href="@{/admin/types/{id}/input(id=${type.id})}" class="ui teal basic button">编辑a>
								<a href="#" th:href="@{/admin/types/{id}/delete(id=${type.id})}" class="ui red basic button">删除a>
							td>
						tr>

					tbody>
分页面
<tfoot>

						<th colspan="6">
							<div class="ui  pagination menu">
								<a href="#" th:href="@{/admin/types(page=${page.number}-1)}" class="ui teal basic  button ">上一页a>
								<a href="#" th:href="@{/admin/types(page=${page.number}+11)}" class="ui teal basic button">上一页a>
							div>
								<a href="#" th:href="@{/admin/types/input}" class="ui right floated teal basic button">新增a>
						th>
					tfoot>
需要处理一下导航的url(添加th:href="@{/admin/tags})
当鼠标点击到那个导航栏就跳转到那个页面
  <h2 class="ui teal header item">博客管理h2>
            <a href="#" th:href="@{/admin/blogs}" lass="m-m  item m-mobile-hide" th:classappend="${n==1} ? 'active'"><i class="mini home icon ">i>博客a>
            <a href="#" th:href="@{/admin/types}" class="m-m item m-mobile-hide" th:classappend="${n==2} ? 'active'"><i class="mini idea icon">i>分类a>
            <a href="#" th:href="@{/admin/tags}" class="m-m item m-mobile-hide" th:classappend="${n==3} ? 'active'"><i class="mini tags icon">i>标签a>
分类的新增功能
1.实现“新增按钮”跳转到“新增分类”页面
在typeController中添加
    @GetMapping("/types/input")
    public String input(){

        return "admin/types_input";
    }
然后在types-input页面中设置
1.添加submit属性,就会自动提交
2.设置name属性
3.-添加action属性
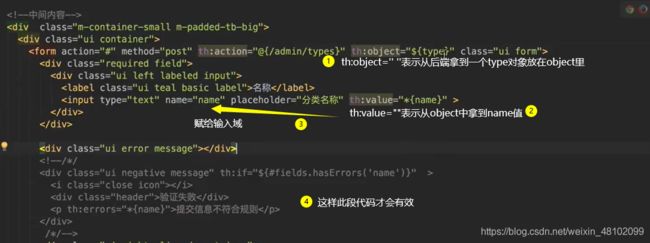
			<form action="#" method="post" th:action="@{/admin/types}" class="ui segment form">
				<div class="required field">

				div>
				<div class="field">
					<div class="ui labeled input">
					<div class="ui teal label">名称div>

						<input type="text" name="name" placeholder="分类名称"/>
					div>
				div>

				<div class="ui error message">div>

				<div class="ui right aligned container">

					<button type="button" class="ui button" click="window.history.go(-1)">返回button>

							<button class="ui teal submit button">提交button>
				div>
			form>
		div>
然后在typeController中添加post方法
    @PostMapping("/types")
    public String post(Type type){
       //前端页面的会把新增分类name通过post传给此处的type
        Type t = typeService.saveType(type);//次方发获取到type会通过dao保存到数据库
        if (t == null){

            //
        }else {

            //
        }
        return "redirect:/admin/types";//然后重定向到/admin/types
    }
此时会发现“上一页和下一页”没有意义 ,所以加页数判断
给分页按钮添加
th:unless="${page.first}"属性
表示“除非page不是最后一页”,否则不显示此按钮last同理
当不显示时会出现竖杠(div)

解决办法:在menu中添加th:if="${page.totalPages}>1"表示“如果页数大于1就会不显示”
<tfoot>

						<th colspan="6">
							<div class="ui  pagination menu" th:if="${page.totalPages}>1">
								<a href="#" th:href="@{/admin/types(page=${page.number}-1)}" class="ui teal basic  button" th:unless="${page.first}">上一页a>
								<a href="#" th:href="@{/admin/types(page=${page.number}+1)}" class="ui teal basic button" th:unless="${page.last}">下一页a>
							div>
								<a href="#" th:href="@{/admin/types//input}" class="ui right floated teal basic button">新增a>
						th>
					tfoot>
添加提交分类成功的提示信息、表单的非空验证、不能重复的验证
1.添加提交分类成功的提示信息
步骤:
1.通过attributes来获取message信息
 @PostMapping("/types")
    public String post(Type type, RedirectAttributes attributes){
       //前端页面的会把新增分类name通过post传给此处的type
        Type t = typeService.saveType(type);//次方发获取到type会通过dao保存到数据库
        if (t == null){

            attributes.addFlashAttribute("message","操作失败");
        }else {

            attributes.addFlashAttribute("message","操作成功");
        }
        return "redirect:/admin/types";//然后重定向到/admin/types
    }
2.然后再分类的页面中接受message
<div class="ui container">
<div class="ui menu">
<div class="right menu">
<a href="#" class="item">发布a>
<a href="#" class="ui active item">列表a>
div>
div>
div>
<div class="m-margin-large">
<div class="ui container">
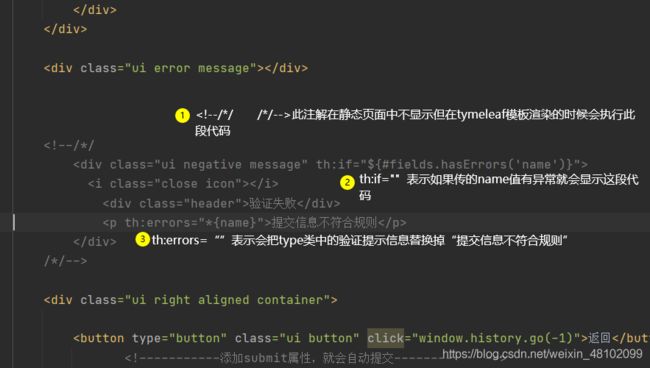
<div class="ui success message" th:unless="${#strings.isEmpty(message)}" >
<i class="close icon">i>
<div class="header">提示:div>
<p th:text="${message}">恭喜,操作成功!p>
div>
此时添加分类后

为了能让提示信息“点击❌”消失
需要做js的处理
		<script>
		//	消息提示关闭初始化
			$('.message .close').on('click',function(){

						$(this)
								.closest('.message')
								.transition('fade');
			});
		script>
然后做非空校验(前端校验)
$('.ui.form').form({
				fields:{
					title:{
						identifier:'name',
						rules:[{
							// type:'empty',表示验证方式非空
							type:'empty',
							// prompt表示当出错时的提示信息
							prompt:'请输入分类名称'
						}]
					}
				}
			});
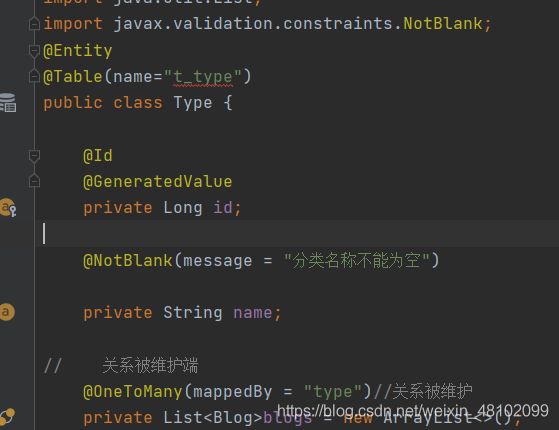
后端校验(在type实体类中)
spring boot新版本需要引入 import javax.validation.constraints.NotBlank;
(springboot2.3.0 javax.validation.constraints.NotBlank找不到异常)
要想使用校验功能要手动引入包(在pom文件中)
<dependency>
            <groupId>org.springframework.bootgroupId>
            <artifactId>spring-boot-starter-validationartifactId>
        dependency>
然后刷新Maven
这里是引用
由于TypeController类中的POST方法提交过来的是一个Type对象,所以在type对象中添加一个@NotBlank注解去校验type
然后再post方法中进行设置
通常情况下post在提交时如果提交的内容为空会在后台报错
    @PostMapping("/types") //BindingResult result 表示返回的校验结果
    public String post(@Valid Type type, BindingResult result, RedirectAttributes attributes){
       //前端页面的会把新增分类name通过post传给此处的type
        Type t = typeService.saveType(type);//次方发获取到type会通过dao保存到数据库
        if (result.hasErrors()){
       //如果校验的结果有异常
            return "admin/types-input";
        }
        if (t == null){

            attributes.addFlashAttribute("message","操作失败");
        }else {

            attributes.addFlashAttribute("message","操作成功");
        }
        return "redirect:/admin/types";//然后重定向到/admin/types
    }
接着在type-input页面中添加如下代码
此时会报错
解决办法:在TypeContorller中
    @GetMapping("/types/input")
    public String input(Model model){

        model.addAttribute("type",new Type());//new 一个空的Type  这样才能保证前端可用
        return "admin/types-input";
    }
后端校验运行到这儿时出错了,先跳过,已解决, 具体原因不知道

重复校验
在service层中的接口增加
//    通过名称得到一个type
    Type getTypeByName(String name);
然后实现
  @Override
    public Type getTypeByName(String name) {

//        通过调用dao层的findByName方法获取name
        return typeRepository.findByName(name);
    }
dao层添加findByName方法
package com.lrm.blog.dao;
import com.lrm.blog.po.Type;
import org.springframework.data.jpa.repository.JpaRepository;
public interface TypeRepository extends JpaRepository<Type,Long> {

    Type findByName(String name);
}
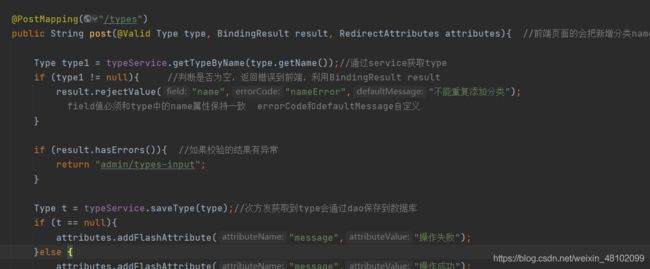
然后在TypeConttorrler中的post中添加如下代码
 Type type1 = typeService.getTypeByName(type.getName());//通过service获取type
        if (type1 != null){
          //判断是否为空,返回错误到前端,利用BindingResult result
            result.rejectValue("name","nameError","不能重复添加分类");
//            field值必须和type中的name属性保持一致  errorCode和defaultMessage自定义
        }
运行时出现如下错误,
query.uniqueResult只能返回一个对象,数据库中存在两个相同的对象导致了此异常 “query did not return a unique result: xxxx”后边xxx会报出数据库中有多少个相同的对象。
解决方法:1、可以将数据库中相同的键值删除。
2、让其返回listquery.List();
![]()
运行成功

编辑功能的实现
首先在Controller中添加如下方法,编辑和新增公用同一个页面
//  这样才能跳转到编辑页面
    @GetMapping("/types/{id}/input")
    public String editInput(@PathVariable Long id,Model model){
     //@PathVariable此注解才能保证接收到id,和/types/{id}/input中的id一致
        model.addAttribute("type",typeService.getType(id));//更具id获取type
        return "admin/types-input";
    }
由于“编辑”之前已经设置好跳转路径

编辑后再提交
在controller中重新写一个修改方法
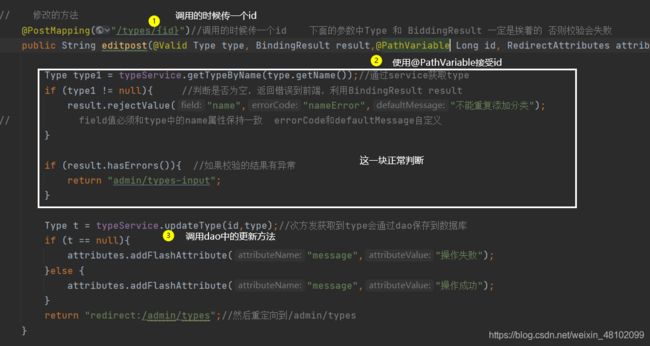
//    修改的方法
    @PostMapping("/types/{id}")//调用的时候传一个id    下面的参数中Type 和 BiddingResult 一定是挨着的 否则校验会失败
    public String editpost(@Valid Type type, BindingResult result,@PathVariable Long id, RedirectAttributes attributes){
       //前端页面的会把新增分类name通过post传给此处的type

        Type type1 = typeService.getTypeByName(type.getName());//通过service获取type
        if (type1 != null){
          //判断是否为空,返回错误到前端,利用BindingResult result
            result.rejectValue("name","nameError","不能重复添加分类");
//            field值必须和type中的name属性保持一致  errorCode和defaultMessage自定义
        }

        if (result.hasErrors()){
       //如果校验的结果有异常
            return "admin/types-input";
        }

        Type t = typeService.updateType(id,type);//次方发获取到type会通过dao保存到数据库
        if (t == null){

            attributes.addFlashAttribute("message","更新失败");
        }else {

            attributes.addFlashAttribute("message","更新成功");
        }
        return "redirect:/admin/types";//然后重定向到/admin/types
    }
然后在前端的types-input页面做区分

<form action="#" method="post" th:action="*{id}==null ? @{/admin/types} : @{/admin/types/{id}(id=*{id})}" th:object="${type}" class="ui segment form">
**需要注意的是前端的id是告诉后端要修改那个值,而后端的id是根据前端的id去数据库修改
删除功能的实现
在controler中增加删除方法
//删除方法
    @GetMapping("/types/{id}/delete")
    public String delete(@PathVariable Long id,RedirectAttributes attributes){

        typeService.deleteType(id);
        attributes.addFlashAttribute("message","删除成功");
        return "redirect:/admin/types";
    }
最后在设置一下二级导航的跳转路径

