orangepi 3 H6之uboot,linux源码,rootfs,linux镜像编译
orangepi 3 H6的uboot,linux源码,rootfs,linux镜像编译
计算机系统的组成:
CPU , 内存, 输入/输出设备, 外存(硬盘)
单片机: 一个芯片上就是一个完整的计算机系统.
SOC: 片上系统(system on chip), 其实就是功能更强大的单片机
arm: 一种CPU核心(如:51(intel)). arm公司不会生产具体的硬件芯片, 只设计CPU核心.
arm通过与芯片厂家合作, 生产基于arm核心的具体CPU芯片.
基于arm的合作厂家有: 三星, 高通, MTK, 华为海思, 全志, TI, 晨星(MStar)
pc机的启动过程:
bios —> grub —> kernel —> fs
arm启动过程:
bios(soc内部的rom) --> uboot —> kernel —> fs
grub 与 uboot都是bootloader的一种, 用于引导linux内核启动
学习笔记
获取 linux sdk 的源码
1) 首先下载 orangepi-build 的代码,orangepi-build 的代码是基于 armbian build 编译
系统修改而来的,目前 H6 系列开发板已经支持 legacy 分支和 current 分支
huislee@huislee-virtual-machine:~/work/$ sudo apt update
huislee@huislee-virtual-machine:~/work/$ sudo apt install git
huislee@huislee-virtual-machine:~/work/$ git clone https://github.com/orangepi-xunlong/orangepi-build.git
2)) legacy 分支一般使用 BSP 版本的 u-boot 和内核,current 分支一般使用接近主线
版本的 u-boot 和内核
3) orangepi-build 下载完后会包含下面的文件和文件夹
a. build.sh: 编译启动脚本
b. external: 包含编译镜像需要用的配置文件、特定的脚本以及部分程序的源
码等
c. LICENSE: GPL 2 许可证文件
d. README.md: orangepi-build 说明文件
e. scripts: 编译 linux 镜像的通用脚本
huislee@huislee-virtual-machine:~/work/orangepi-build$ ls
build.sh external LICENSE README.md scripts

**下载交叉编译工具链**
1) orangepi-build第一次运行的时候会自动下载交叉编译工具链放在toolchains文件
夹中,每次运行 orangepi-build 的 build.sh 脚本后,都会检查 toolchains 中的交叉编
译工具链是否都存在,如果不存在则会重新开始下载,如果存在则直接使用,不会
重复下载
2) 交叉编译工具链在中国境内的镜像网址为清华大学的开源软件镜像站
https://mirrors.tuna.tsinghua.edu.cn/armbian-releases/_toolchain/
3) toolchains 下载完后会包含多个版本的交叉编译工具链
test@test:~/orangepi-build$ ls toolchains/
gcc-arm-9.2-2019.12-x86_64-aarch64-none-linux-gnu
gcc-linaro-7.4.1-2019.02-x86_64_arm-linux-gnueabi
gcc-arm-9.2-2019.12-x86_64-arm-none-linux-gnueabihf
gcc-linaro-aarch64-none-elf-4.8-2013.11_linux
gcc-linaro-4.9.4-2017.01-x86_64_arm-linux-gnueabi
gcc-linaro-arm-linux-gnueabihf-4.8-2014.04_linux
gcc-linaro-7.4.1-2019.02-x86_64_aarch64-linux-gnu
gcc-linaro-arm-none-eabi-4.8-2014.04_linux
4) 编译 H6 linux 内核源码使用的交叉编译工具链为
a. linux4.9
gcc-arm-9.2-2019.12-x86_64-aarch64-none-linux-gnu
b. linux5.4
gcc-arm-9.2-2019.12-x86_64-aarch64-none-linux-gnu
5) 编译 H6 u-boot 源码使用的交叉编译工具链为
a. u-boot 2014.07
gcc-linaro-4.9.4-2017.01-x86_64_arm-linux-gnueabi
b. u-boot 2020.04
gcc-arm-9.2-2019.12-x86_64-aarch64-none-linux-gnu
gcc-arm-9.2-2019.12-x86_64-aarch64-none-linux-gnu
b. linux5.4
gcc-arm-9.2-2019.12-x86_64-aarch64-none-linux-gnu
5) 编译 H6 u-boot 源码使用的交叉编译工具链为
a. u-boot 2014.07
gcc-linaro-4.9.4-2017.01-x86_64_arm-linux-gnueabi
b. u-boot 2020.04
gcc-arm-9.2-2019.12-x86_64-aarch64-none-linux-gnu

orangepi-build 完整目录结构说明
1) orangepi-build 仓库下载完后并不包含 linux 内核、u-boot 的源码以及交叉编译工
具链,linux 内核和 u-boot 的源码存放在独立的 git 仓库中(请不要单独下载使用内
核和 u-boot 的源码进行编译操作,除非你知道怎么用)
2) orangepi-build 第一次运行的时候会去下载交叉编译工具链、u-boot 和 linux 内核
源码,成功编译完一次 linux 镜像后在 orangepi-build 中可以看到的文件和文件夹有
a. build.sh: 编译启动脚本
b. external: 包含编译镜像需要用的配置文件、特定功能的脚本以及部分程序
的源码,编译镜像过程中缓存的 rootfs 压缩包也存放在 external 中
c. kernel: 存放 linux 内核的源码,里面名为 orange-pi-4.9-sun50iw6 的文件夹
存放的就是 H6 开发板 legacy 分支的内核源码,里面名为 orange-pi-5.4 的文
件夹存放的就是 H6 开发板 current 分支的内核源码(如果只编译了 legacy
分支的 linux 镜像,那么则只能看到 legacy 分支的内核源码;如果只编译了
current 分支的 linux 镜像,那么则只能看到 current 分支的内核源码),内核
range Pi 用户手册 深圳市迅龙软件有限公司版权所有
www.orangepi.cn 113 www.xunlong.tv
源码的文件夹的名字请不要手动修改,如果修改了编译系统运行时会重新下
载内核源码
d. LICENSE: GPL 2 许可证文件
e. README.md: orangepi-build 说明文件
f. output: 存放编译生成的 u-boot、linux 等 deb 包、编译日志以及编译生成的
镜像等文件
g. scripts: 编译 linux 镜像的通用脚本
h. toolchains: 存放交叉编译工具链
i. u-boot: 存放 u-boot 的源码,里面名为 v2014.07-sun50iw6-linux4.9 的文件夹
存放的就是 H6 开发板 legacy 分支的 u-boot 源码,里面名为 v2020.04 的文
件夹存放的就是 H6 开发板 current 分支的 u-boot 源码(如果只编译了 legacy
分支的 linux 镜像,那么则只能看到 legacy 分支的 u-boot 源码;如果只编译
了 current 分支的 linux 镜像,那么则只能看到 current 分支的 u-boot 源码),
u-boot 源码的文件夹的名字请不要手动修改,如果修改了编译系统运行时会
重新下载 u-boot 源码
j. userpatches: 存放编译脚本需要用到的配置文件
huislee@huislee-virtual-machine:~/work/orangepi-build$ ls
build.sh external kernel LICENSE output README.md scripts toolchains
u-boot userpatches
. 编译 linux 内核
1) 运行 build.sh 脚本,记得加 sudo 权限
huislee@huislee-virtual-machine:~/work/orangepi-build$ sudo ./build.sh
2) 选择 kernel package,然后回车
3) 接着选择开发板的型号
4) 然后选择分支
a. current 会编译 linux 5.4
b. legacy 会编译 linux4.9
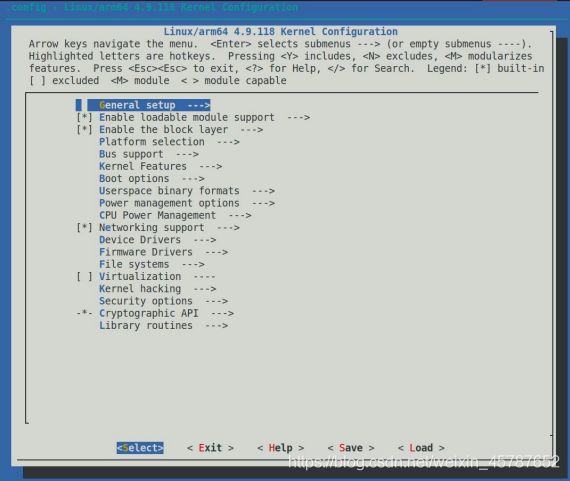
5) 然后会弹出通过 make menuconfig 打开的内核配置的界面,此时可以直接修改内
核的配置,如果不需要修改内核配置,直接退出即可,退出后会开始编译内核源码

a. 如果不需要修改内核的配置选项,在运行 build.sh 脚本时,传入
KERNEL_CONFIGURE=no 就可临时屏蔽弹出内核的配置界面了
huislee@huislee-virtual-machine:~/work/orangepi-build-main$ sudo ./build.sh KERNEL_CONFIGURE=no
b. 也可以设置 orangepi-build/userpatches/config-default.conf 配置文件中的
KERNEL_CONFIGURE=no,这样可以永久禁用这个功能
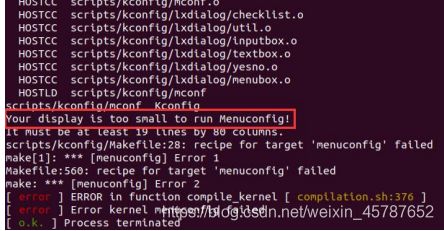
c. 编译内核的时候如果提示下面的错误,这是由于 Ubuntu PC 的终端界面太
小,导致 make menuconfig 的界面无法显示,请把 Ubuntu PC 的终端调到最大,然
后重新运行 build.sh 脚本
6) 编译内核源码时提示的部分信息说明如下(以 legacy 分支为例)
a. linux 内核源码的版本
[ o.k. ] Compiling legacy kernel [ 4.9.118 ]
b. 使用的交叉编译工具链的版本
[ o.k. ] Compiler version [ aarch64-none-linux-gnu-gcc 9.2.1 ]
c. 内核默认使用的配置文件以及它存放的路径
[ o.k. ] Using kernel config file [ config/kernel/linux-sun50iw6-legacy.config ]
d. 如果设置了 KERNEL_CONFIGURE=yes,内核最终使用的配置文件.config
会复制到 output/config 中,如果没有对内核配置进行修改,最终的配置文
件和默认的配置文件是一致的
[ o.k. ] Exporting new kernel config [ output/config/linux-sun50iw6-legacy.config ]
e. 编译生成的内核相关的 deb 包的路径
[ o.k. ] Target directory [ output/debs/ ]
f. 编译生成的内核镜像 deb 包的包名
[ o.k. ] File name [ linux-image-legacy-sun50iw6_2.1.0_arm64.deb ]
g. 编译使用的时间
[ o.k. ] Runtime [ 5 min ]
h. 最后会显示重复编译上一次选择的内核的编译命令,使用下面的命令无需通
过图形界面选择,可以直接开始编译内核源码
[ o.k. ] Repeat Build Options [ sudo ./build.sh BOARD=orangepi3 BRANCH=legacy
BUILD_OPT=kernel KERNEL_CONFIGURE=yes ]
7) 查看编译生成的内核相关的 deb 包
a. linux-dtb-legacy-sun50iw6_2.1.0_arm64.deb 包含内核使用的 dtb 文件
b. linux-headers-legacy-sun50iw6_2.1.0_arm64.deb 包含内核头文件
c. linux-image-legacy-sun50iw6_2.1.0_arm64.deb 包含内核镜像和内核模块
test@test:~/orangepi-build$ ls output/debs/linux-*
output/debs/linux-dtb-legacy-sun50iw6_2.1.0_arm64.deb
output/debs/linux-headers-legacy-sun50iw6_2.1.0_arm64.deb
output/debs/linux-image-legacy-sun50iw6_2.1.0_arm64.deb
8) 生成的 linux-image 的 deb 包包含的文件如下所示
a. 使用下面的命令可以解压 deb 包
huislee@huislee-virtual-machine:~/work/orangepi-build$ cd output/debs
huislee@huislee-virtual-machine:~/work/orangepi-build/output/debs$ mkdir test
huislee@huislee-virtual-machine:~/work/orangepi-build/output/debs$ cp \
linux-image-legacy-sun50iw6_2.1.0_arm64.deb test/
huislee@huislee-virtual-machine:~/work/orangepi-build/output/debs$ cd test
test@test:~/orangepi_build/output/debs/test$ dpkg -x \
linux-image-legacy-sun50iw6_2.1.0_arm64.deb .
huislee@huislee-virtual-machine:~/work/orangepi-build/output/debs/test$ ls
boot etc lib linux-image-legacy-sun50iw6_2.1.0_arm64.deb usr
b. 解压后的文件如下所示
huislee@huislee-virtual-machine:~/work/orangepi-build/output/debs/test$ tree -L 2
.├── boot
│ ├── config-4.9.118-sun50iw6 //编译内核源码使用的配置文件
│ ├── System.map-4.9.118-sun50iw6
│ └── vmlinuz-4.9.118-sun50iw6 //编译生成的内核镜像文件
├── etc
│ └── kernel
├── lib
│ └── modules //编译生成的内核模块
├── linux-image-legacy-sun50iw6_2.1.0_arm64.deb
└── usr
├── lib
└── share
8 directories, 4 files
9) orangepi-bulid 编译系统编译 linux 内核源码时首先会将 linux 内核源码和 github
服务器的 linux 内核源码进行同步,所以如果想修改 linux 内核的源码,首先需要关
闭源码的更新功能(需要完整编译过一次 linux 内核源码后才能关闭这个功能,否
则会提示找不到 linux 内核的源码),否则所作的修改都会被还原,方法如下:
设置 userpatches/config-default.conf 中的 IGNORE_UPDATES 变量为“yes”
huislee@huislee-virtual-machine:~/orangepi-build$ vim userpatches/config-default.conf
IGNORE_UPDATES="yes"
10) 如果对内核做了修改,可以使用下面的方法来更新开发板 linux 系统的内核和内
核模块
a. 将编译好的 linux 内核的 deb 包上传到开发板的 linux 系统中
huislee@huislee-virtual-machine:~/orangepi-build$ cd output/debs
huislee@huislee-virtual-machine:~/orangepi-build/output/debs$ scp \
linux-image-legacy-sun50iw6_2.1.0_arm64.deb [email protected]:/root
b. 然后登录到开发板,卸载已安装的 linux 内核的 deb 包
root@orangepi:~# apt purge -y linux-image-legacy-sun50iw6
c. 再安装刚才上传的新的 linux 内核的 deb 包
root@orangepi:~# dpkg -i linux-image-legacy-sun50iw6_2.1.0_arm64.deb
d. 然后重启开发板,再查看内核相关的修改是否已生效
11) 安装内核头文件到 linux 系统中的方法如下所示
a. 将编译好的 linux 头文件的 deb 包上传到开发板的 linux 系统中
huislee@huislee-virtual-machine:~/orangepi-build$ cd output/debs
huislee@huislee-virtual-machine:~/orangepi-build/output/debs$ scp \
linux-headers-legacy-sun50iw6_2.1.0_arm64.deb [email protected]:/root
b. 然后登录到开发板,安装刚才上传的的 linux 头文件的 deb 包
root@orangepi:~# dpkg -i linux-headers-legacy-sun50iw6_2.1.0_arm64.deb
c. 安装完后在/usr/src 中就可以看到刚才安装的内核头文件相关的内容了
root@orangepi:~# ls /usr/src
linux-headers-4.9.118-sun50iw6
root@orangepi:~# ls /usr/src/linux-headers-4.9.118-sun50iw6
Documentation Module.symvers certs firmware init lib net security usr
Kconfig arch crypto fs ipc mm samples sound virt Makefile block
drivers include kernel modules scripts tools
  HDRINST usr/include/asm/kvm_para.h
  INSTALL ./debian/headertmp/usr/include
patching file tools/include/tools/be_byteshift.h
patching file tools/include/tools/le_byteshift.h
  CLEAN   scripts/basic
  CLEAN   scripts/dtc
  CLEAN   scripts/kconfig
  CLEAN   scripts/mod
  CLEAN   scripts/selinux/genheaders
  CLEAN   scripts/selinux/mdp
  CLEAN   scripts
dpkg-deb: 正在 '../linux-headers-current-sunxi64_2.1.0_arm64.deb' 中构建软件包 'linux-headers-current-sunxi64'。
dpkg-deb: 正在 '../linux-dtb-current-sunxi64_2.1.0_arm64.deb' 中构建软件包 'linux-dtb-current-sunxi64'。
dpkg-deb: 正在 '../linux-image-current-sunxi64_2.1.0_arm64.deb' 中构建软件包 'linux-image-current-sunxi64'。
dpkg-buildpackage: info: binary-only upload (no source included)
[ o.k. ] Kernel build done [ @host ]
[ o.k. ] Target directory [ /home/huislee/work/orangepi-build-main/output/debs/ ]
[ o.k. ] File name [ linux-image-current-sunxi64_2.1.0_arm64.deb ]
[ o.k. ] Runtime [ 67 min ]
[ o.k. ] Repeat Build Options [ sudo ./build.sh  BOARD=orangepi3 BRANCH=current BUILD_OPT=kernel KERNEL_CONFIGURE=yes ]

linux编译完成
编译 u-boot
1) 运行 build.sh 脚本,记得加 sudo 权限
huislee@huislee-virtual-machine:~/work/orangepi-build-main$ sudo ./build.sh
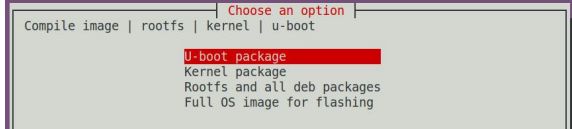
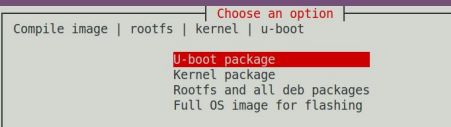
2) 选择 U-boot package,然后回车
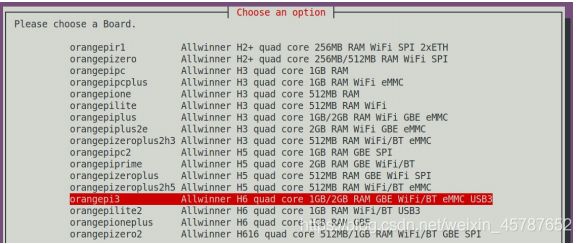
3) 接着选择开发板的型号
4) 然后选择分支
a. current 会编译 u-boot v2020.04
b. legacy 会编译 u-boot v2014.07
5) 然后就会开始编译 u-boot


huislee@huislee-virtual-machine:~/work/orangepi-build-main$ sudo ./build.sh
[sudo] huislee 的密码:
[ o.k. ] Using config file [ /home/huislee/work/orangepi-build-main/userpatches/config-example.conf ]
[ o.k. ] Preparing [ host ]
[ o.k. ] Build host OS release [ focal ]
[ o.k. ] Syncing clock [ cn.pool.ntp.org ]
[ o.k. ] Checking for external GCC compilers
[ o.k. ] Downloading sources
[ o.k. ] Checking git sources [ /home/huislee/work/orangepi-build-main/u-boot v2020.04 ]
[ .... ] Up to date
[ o.k. ] Checking git sources [ /home/huislee/work/orangepi-build-main/kernel orange-pi-5.4 ]
[ .... ] Up to date
[ o.k. ] Checking git sources [ /home/huislee/work/orangepi-build-main/external/cache/sources/arm-trusted-firmware-sunxi-mainline v2.2 ]
[ .... ] Up to date
[ o.k. ] Checking git sources [ /home/huislee/work/orangepi-build-main/external/cache/sources/sunxi-tools master ]
[ .... ] Up to date
[ o.k. ] Cleaning /home/huislee/work/orangepi-build-main/output/debs for [ orangepi3 current ]
[ o.k. ] Compiling ATF
[ o.k. ] Compiler version [ aarch64-none-linux-gnu-gcc 9.2.1 ]
[ o.k. ] Started patching process for [ atf sunxi64-orangepi3-current ]
[ o.k. ] Looking for user patches in [ userpatches/atf/atf-sunxi64 ]
[ o.k. ] * [l][c] 0001-Fix-reset-issue-on-H6-by-using-R_WDOG.patch
  CC      drivers/arm/gic/common/gic_common.c
  CC      drivers/arm/gic/v2/gicv2_helpers.c
  CC      drivers/arm/gic/v2/gicv2_main.c
.....
OBJCOPY spl/u-boot-spl-nodtb.bin
  COPY    spl/u-boot-spl.bin
  MKSUNXI spl/sunxi-spl.bin
  CAT     u-boot-sunxi-with-spl.bin
  CFGCHK  u-boot.cfg
[ o.k. ] Building deb [ linux-u-boot-current-orangepi3_2.1.0_arm64.deb ]
[ o.k. ] U-boot build done [ @host ]
[ o.k. ] Target directory [ /home/huislee/work/orangepi-build-main/output/debs/u-boot ]
[ o.k. ] File name [ linux-u-boot-current-orangepi3_2.1.0_arm64.deb ]
[ o.k. ] Runtime [ 5 min ]
[ o.k. ] Repeat Build Options [ sudo ./build.sh  BOARD=orangepi3 BRANCH=current BUILD_OPT=u-boot KERNEL_CONFIGURE=yes ]

uboot编译完成。
6) 查看编译生成的 u-boot deb 包
huislee@huislee-virtual-machine:~/work/orangepi-build-main$ ls output/debs/u-boot/
linux-u-boot-current-orangepi3_2.1.0_arm64.deb
7) 生成的 u-boot 的 deb 包包含的文件如下所示
a. 使用下面的命令可以解压 deb 包
huislee@huislee-virtual-machine:~/work/orangepi-build-main$ cd output/debs/u-boot
huislee@huislee-virtual-machine:~/work/orangepi-build-main/output/debs/u-boot$ dpkg -x linux-u-boot-current-orangepi3_2.1.0_arm64.deb .
huislee@huislee-virtual-machine:~/work/orangepi-build-main/output/debs/u-boot$ ls
linux-u-boot-current-orangepi3_2.1.0_arm64.deb  usr
b. 解压后的文件如下所示
huislee@huislee-virtual-machine:~/work/orangepi-build-main/output/debs/u-boot$ tree usr        usr
└── lib
    ├── linux-u-boot-current-orangepi3_2.1.0_arm64
    │   ├── sunxi-spl.bin
    │   └── u-boot.itb
    └── u-boot
        ├── LICENSE
        ├── orangepi_3_defconfig
        └── platform_install.sh

3 directories, 5 files
8) orangepi-bulid 编译系统编译 u-boot 源码时首先会将 u-boot 的源码和 github 服务
器的 u-boot 源码进行同步,所以如果想修改 u-boot 的源码,首先需要关闭源码的下
载更新功能(需要完整编译过一次 u-boot 后才能关闭这个功能,否则会提示找不到
u-boot 的源码),否则所作的修改都会被还原,方法如下:
设置 userpatches/config-default.conf 中的 IGNORE_UPDATES 变量为“yes”
huislee@huislee-virtual-machine:~/work/orangepi-build-main$ vim userpatches/config-default.conf
IGNORE_UPDATES="yes"
9) 调试 u-boot 代码时,可以使用下面的方法来更新 linux 镜像中的 u-boot 进行测试
a. 将编译好的 u-boot 的 deb 包上传到开发板的 linux 系统中
huislee@huislee-virtual-machine:~/work/orangepi-build-main$ cd output/debs/u-boot
huislee@huislee-virtual-machine:~/work/orangepi-build-main/output/debs/u-boot$ scp \
linux-u-boot-legacy-orangepi3_2.1.0_arm64.deb [email protected]:/root
b. 然后登录到开发板,卸载已安装的 u-boot 的 deb 包
root@orangepi:~# apt purge -y linux-u-boot-orangepi3-legacy
c. 再安装刚才上传的新的 u-boot 的 deb 包
root@orangepi:~# dpkg -i linux-u-boot-legacy-orangepi3_2.1.0_arm64.deb
d. 然后运行 nand-sata-install 脚本
root@orangepi:~# nand-sata-install
e. 然后选择 5 Install/Update the bootloader on SD/eMMC
f. 按下回车键后首先会弹出一个 Warring

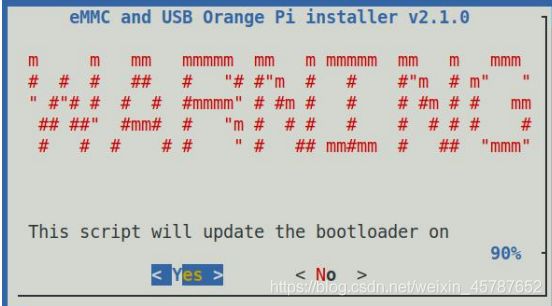
g. 再按下回车键就会开始更新 u-boot,更新完后会显示下面的信息

h. 然后就可以重启开发板来测试 u-boot 的修改是否生效了.
编译 rootfs
1) 运行 build.sh 脚本,记得加 sudo 权限
huislee@huislee-virtual-machine:~/orangepi-build$ sudo ./build.sh
2) 选择 Rootfs and all deb packages,然后回车
3) 接着选择开发板的型号
4) 然后选择 rootfs 的类型
buster Debian 10
bionic Ubuntu 18.04
focal buntu 20.04
a. linux4.9 支持的 linux 发行版如下所示
b. linxu5.4 支持的 linux 发行版如下所示


5) 然后选择镜像的类型
a. Image with console interface (server)表示服务器版的镜像,体积比较小
b. Image with desktop environment 表示带桌面的镜像,体积比较大

6) 如果是编译服务器版的镜像,还可以选择编译 Standard 版本或者 Minimal 版本,
Minimal 版本预装的软件会比 Standard 版本少很多

7) 选择镜像的类型后就会开始编译 rootfs,编译时提示的部分信息说明如下
a. rootfs 的类型
[ o.k. ] local not found [ Creating new rootfs cache for focal ]
b. 编译生成的 rootfs 压缩包的存放路径
[ o.k. ] Target directory [ external/cache/rootfs ]
c. 编译生成的 rootfs 压缩包的名字
[ o.k. ] File name [ focal-cli-arm64.153618961f14c28107ca023429aa0eb9.tar.lz4 ]
d. 编译使用的时间
[ o.k. ] Runtime [ 13 min ]
e. 重复编译 rootfs 的命令,使用下面的命令无需通过图形界面选择,可以直接
开始编译 rootfs
[ o.k. ] Repeat Build Options [ sudo ./build.sh BOARD=orangepi3 BRANCH=legacy
BUILD_OPT=rootfs RELEASE=focal BUILD_MINIMAL=no
BUILD_DESKTOP=no KERNEL_CONFIGURE=yes ]
8) 查看编译生成的 rootfs 压缩包
a. focal-cli-arm64.153618961f14c28107ca023429aa0eb9.tar.lz4 是 rootfs 的 压缩
包,名字各字段的含义为
a) focal 表示 rootfs 的 linux 发行版的类型
b) cli 表示 rootfs 为服务器版的类型,如果为 dekstop 则表示桌面版类型
c) arm64 表示 rootfs 的架构类型
d) 153618961f14c28107ca023429aa0eb9 是由 rootfs 安装的所有软件包的包
名生成的 MD5 哈希值,只要没有修改 rootfs 安装的软件包的列表,那
么这个值就不会变,编译脚本会通过这个 MD5 哈希值来判断是否需要
重新编译 rootfs
b. focal-cli-arm64.153618961f14c28107ca023429aa0eb9.tar.lz4.list 列出了 rootfs
安装的所有软件包的包名
test@test:~/orangepi-build$ ls external/cache/rootfs/
focal-cli-arm64.153618961f14c28107ca023429aa0eb9.tar.lz4
focal-cli-arm64.153618961f14c28107ca023429aa0eb9.tar.lz4.list
9) 如果需要的 rootfs 在 external/cache/rootfs 下已经存在,那么再次编译 rootfs 就会
直 接 跳 过 编 译 过 程 , 不 会 重 新 开 始 编 译 , 编 译 镜 像 的 时 候 也 会 去
external/cache/rootfs 下查找是否已经有缓存可用的 rootfs,如果有就直接使用,这
样可以节省大量的下载编译时间
10) 由于编译 rootfs 的时间较长,如果不想从头开始编译 rootfs,或者编译 rootfs 的
过程有问题,可以直接下载 Orange Pi 缓存的 rootfs 压缩包,rootfs 压缩包百度云盘
的下载链接如下所示,下载好的 rootfs 压缩包(不要解压哦)需要放在 orangepi-build
的 external/cache/rootfs 目录下才能被编译脚本正常使用
编译 linux 镜像
1) 运行 build.sh 脚本,记得加 sudo 权限
huislee@huislee-virtual-machine:~/orangepi-build$ sudo ./build.sh
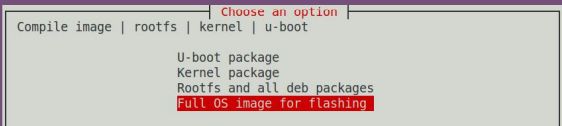
2) 选择 Full OS image for flashing,然后回车
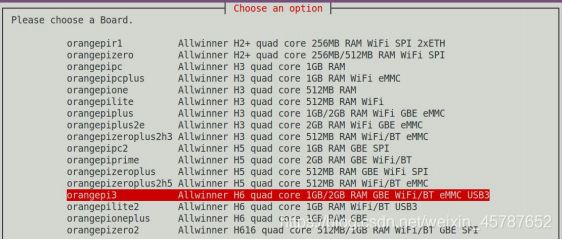
3) 然后选择开发板的型号
4) 然后选择 rootfs 的类型
buster Debian 10
bionic Ubuntu 18.04
focal buntu 20.04
a. linux4.9 支持的 linux 发行版如下所示
b. linxu5.4 支持的 linux 发行版如下所示
5) 然后选择镜像的类型
a. Image with console interface (server)表示服务器版的镜像,体积比较小
b. Image with desktop environment 表示带桌面的镜像,体积比较大
6) 如果是编译服务器版的镜像,还可以选择编译 Standard 版本或者 Minimal 版本,
Minimal 版本预装的软件会比 Standard 版本少很多


7) 选择镜像的类型后就会开始编译 linux 镜像,编译的大致流程如下
a. 初始化 Ubuntu PC 的编译环境,安装编译过程需要的软件包
b. 下载 u-boot 和 linux 内核的源码(如果已经缓存,则只更新代码)
c. 编译 u-boot 源码,生成 u-boot 的 deb 包
d. 编译 linux 源码,生成 linux 相关的 deb 包
e. 制作 linux firmware 的 deb 包
f. 制作 orangepi-config 工具的 deb 包
g. 制作板级支持的 deb 包
h. 如果是编译 desktop 版镜像,还会制作 desktop 相关的 deb 包
i. 检查 rootfs 是否已经缓存,如果没有缓存,则重新制作 rootfs,如果已经缓
存,则直接解压使用
j. 安装前面生成的 deb 包到 rootfs 中
k. 对不同的开发板和不同类型镜像做一些特定的设置,如预装额外的软件包,
修改系统配置等
l. 然后制作镜像文件,并格式化分区,默认类型为 ext4
m. 再将配置好的 rootfs 拷贝到镜像的分区中
n. 然后更新 initramfs
o. 最后将 u-boot 的 bin 文件通过 dd 命令写入到镜像中
8) 编译完镜像后会提示下面的信息(以 legacy 分支为例)
a. 编译生成的镜像的存放路径
[ o.k. ] Done building
[ output/images/orangepi3_2.1.0_ubuntu_focal_server_linux4.9.118/orangepi3_2.1.0
_ubuntu_focal_server_linux4.9.118.img ]
b. 编译使用的时间
[ o.k. ] Runtime [ 19 min ]
c. 重复编译镜像的命令,使用下面的命令无需通过图形界面选择,可以直接开
始编译镜像
[ o.k. ] Repeat Build Options [ sudo ./build.sh BOARD=orangepi3 BRANCH=legacy
BUILD_OPT=image RELEASE=focal BUILD_MINIMAL=no
BUILD_DESKTOP=no KERNEL_CONFIGURE=yes ]