Flutter的踩坑感悟分享,分析Android、iOS的实现异同
![]()
今日科技快讯
3月25日,互联网企业第九城市(纳斯达克:NCTY)宣布,已经透过旗下子公司与总部位于美国加州的法拉第未来公司(Faraday & Future Inc.)签定协议,双方共同建立合资公司,在中国制造、营销及运营电动汽车。
作者简介
本篇文章来自 徐爱卿 的投稿,和大家分享了Flutter开发中OverscrollNotification不起效果原因,希望对大家有所帮助!
徐爱卿的博客地址:
https://www.jianshu.com/u/1c09737416aa
问题
先说下问题与解决思路,以及解决方案。
当我们想要监听一个widget的滑动状态时,可以使用:NotificationListener。在我目前空余时间写的一个flutter项目中,有一个十分复杂的组件,需要用到这东西。
要实现下面这个功能。
(gif过大,所以效果不全,需去原文看)
这个UI由哪些功能点
当listview的第一个条目显示出来的时候,此时继续下拉,整个listview下移
当listview处于最底部时,向上拖拽时,整个listview上移
当手离开屏幕时,如果listview的最高高度处于屏幕高度二分之一以上,整个listview自动滚动到最顶部
当手离开屏幕时,如果listview的最高高度处于屏幕高度二分之一以下,整个listview自动滚动到最底部
这篇博客呢,讲的就是关于功能点一的。当listview的第一个条目显示出来的时候,此时继续下拉。我要处理这个情况的UI。
由这个问题,引发的解决问题的思路,以及关于学习新姿势的一些思考与感悟。
PS: 为了达到完美的效果,这个需求,我搞了一周~~
NotificationListener的使用
final GlobalKey _key = GlobalKey();
  @override
  Widget build(BuildContext context) {
    final Widget child = NotificationListener(
      key: _key,
      child: NotificationListener(
        child: NotificationListener(
          child: NotificationListener(
            child: widget.child,
            onNotification: (ScrollEndNotification notification) {
              return false;
            },
          ),
          onNotification: (OverscrollNotification notification) {
            return false;
          },
        ),
        onNotification: (ScrollUpdateNotification notification) {

          return false;
        },
      ),
      onNotification: (ScrollStartNotification scrollUpdateNotification) {
        return false;
      },
    );

    return child;
  }
其中,
ScrollStartNotification 组件开始滑动
ScrollUpdateNotification 组件位置发生改变
OverscrollNotification 表示窗口小组件未更改它的滚动位置,因为更改会导致滚动位置超出其滚动范围
ScrollEndNotification 组件已经停止滚动
Demo
body: SafeArea(
            child: NotificationListener(
          child: NotificationListener(
            child: ListView.builder(
                itemBuilder: (BuildContext context, int index) {

                  return Text('data=$index');
                },
                itemCount: 100),
            onNotification: (OverscrollNotification notification) {

              print('OverscrollNotification');
            },
          ),
          onNotification: (ScrollStartNotification notification) {

            print('ScrollStartNotification');
          },
        ))
在Android中效果
可以看到刚开始下拉的时候,回调的是ScrollStartNotification的onNotification方法,之后都是OverscrollNotification。
在ios中效果
可以看到OverscrollNotification不会被调用,调用的是ScrollStartNotification
在我的一些复杂UI效果中,需要在OverscrollNotification回调中做一些事情。
当ScrollView滚动到顶部时,继续下拉时。在Android平台中,OverscrollNotification会被调用;在iOS平台的真机中,OverscrollNotification不会被调用,调用的是ScrollStartNotification。这就造成了平台的不一致性。我也尝试了Google一下,但是…我看到这个问题的时候,问题还没解决。后来我就解决了,然后给了他回答。这个后面再说。
问题
OverscrollNotification在Android中正常调用;在iOS的真机中,无法调用。
定位原因
分析NotificationListener的onNotification调用栈。
Step 1 翻源码
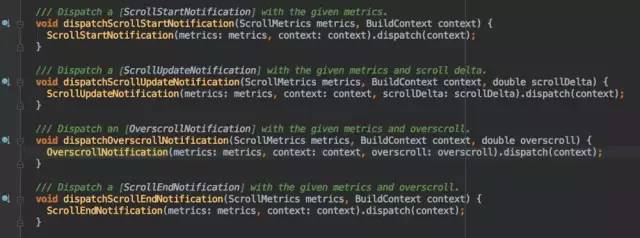
ListView是继承自ScrollView的。我们跟着ScrollView的build方法,一步步向上级查询,可以看到scroll_activity.dart的下面几个跟OverscrollNotification相关的方法:
这就明了多了。
Step 2 翻源码
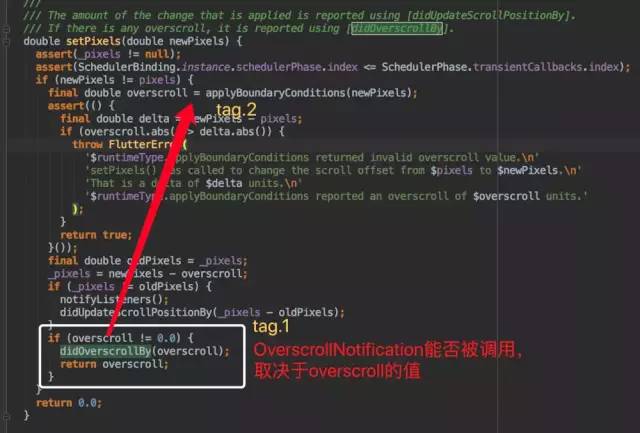
继续上溯,进入到scroll_position.dart,看到OverscrollNotification被实际调用的方法:
Step 3
OverscrollNotification能否被调用的判断位置
OverscrollNotification能否被调用
Step 4 分析applyBoundaryConditions方法
@protected
  double applyBoundaryConditions(double value) {

    final double result = physics.applyBoundaryConditions(this, value);//这里physics来控制返回值
    assert(() {

      final double delta = value - pixels;
      if (result.abs() > delta.abs()) {

        throw FlutterError(
          '${physics.runtimeType}.applyBoundaryConditions returned invalid overscroll value.\n'
          'The method was called to consider a change from $pixels to $value, which is a '
          'delta of ${delta.toStringAsFixed(1)} units. However, it returned an overscroll of '
          '${result.toStringAsFixed(1)} units, which has a greater magnitude than the delta. '
          'The applyBoundaryConditions method is only supposed to reduce the possible range '
          'of movement, not increase it.\n'
          'The scroll extents are $minScrollExtent .. $maxScrollExtent, and the '
          'viewport dimension is $viewportDimension.'
        );
      }
      return true;
    }());
    return result;
  }
而physics是ScrollPhysics的实例。
在进入到physics.applyBoundaryConditions(this, value);的applyBoundaryConditions方法中
 ///
  /// [BouncingScrollPhysics] returns zero. In other words, it allows scrolling
  /// past the boundary unhindered.
  ///
  /// [ClampingScrollPhysics] returns the amount by which the value is beyond
  /// the position or the boundary, whichever is furthest from the content. In
  /// other words, it disallows scrolling past the boundary, but allows
  /// scrolling back from being overscrolled, if for some reason the position
  /// ends up overscrolled.
  double applyBoundaryConditions(ScrollMetrics position, double value) {

    if (parent == null)
      return 0.0;
    return parent.applyBoundaryConditions(position, value);
  }
注释中,写着BouncingScrollPhysics的滑动不受阻碍,可以一直滑动。也就是在iOS平台的ScrollView中,可以一直下拉。也就是,我上面的demo效果。对于ClampingScrollPhysics无法继续下拉。
step 5 parent的具体实现
继续debug源码。
physics在Android中的实现
physics.applyBoundaryConditions在Android中由 ClampingScrollPhysics 完成
ClampingScrollPhysics.applyBoundaryConditions
@override
  double applyBoundaryConditions(ScrollMetrics position, double value) {

    assert(() {

      if (value == position.pixels) {

        throw FlutterError(
          '$runtimeType.applyBoundaryConditions() was called redundantly.\n'
          'The proposed new position, $value, is exactly equal to the current position of the '
          'given ${position.runtimeType}, ${position.pixels}.\n'
          'The applyBoundaryConditions method should only be called when the value is '
          'going to actually change the pixels, otherwise it is redundant.\n'
          'The physics object in question was:\n'
          '  $this\n'
          'The position object in question was:\n'
          '  $position\n'
        );
      }
      return true;
    }());
    if (value < position.pixels && position.pixels <= position.minScrollExtent) // underscroll
      return value - position.pixels;
    if (position.maxScrollExtent <= position.pixels && position.pixels < value) // overscroll
      return value - position.pixels;
    if (value < position.minScrollExtent && position.minScrollExtent < position.pixels) // hit top edge
      return value - position.minScrollExtent;
    if (position.pixels < position.maxScrollExtent && position.maxScrollExtent < value) // hit bottom edge
      return value - position.maxScrollExtent;
    return 0.0;
  }
physics在iOS中的具体实现
physics.applyBoundaryConditions在iOS中由 BouncingScrollPhysics 完成
BouncingScrollPhysics.applyBoundaryConditions
 @override
  double applyBoundaryConditions(ScrollMetrics position, double value) => 0.0;
在Android平台中,会对applyBoundaryConditions的返回值做处理,不为零的时候(看下step3),是会调用OverscrollNotification.onNotification;但是对于iOS平台,由于默认一直返回0.0,故不会调用。
原来如此
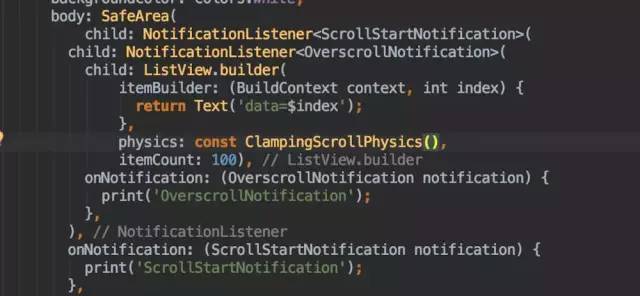
由于我这里需要的是Android的效果,所以需要将physics的具体实现更改为ClampingScrollPhysics即可,正好,
我们将physics的实现变更为ClampingScrollPhysics,完美解决。
拓展思维
如果,我们将physics的实现变更为BouncingScrollPhysics,会发生什么?
完美的在Android上实现了,同iOS一样的可以一直下拉的listview效果。
彩蛋
思考为什么两个平台physics的具体实现不同
这个原因,也就是相当于physics什么时候被初始化的。我就不娓娓道来了,我这边翻阅并且debug源码找到了出处。在scroll_configuration.dart文件中,有下面一段代码:
/// The scroll physics to use for the platform given by [getPlatform].
  ///
  /// Defaults to [BouncingScrollPhysics] on iOS and [ClampingScrollPhysics] on
  /// Android.
  ScrollPhysics getScrollPhysics(BuildContext context) {

    switch (getPlatform(context)) {

      case TargetPlatform.iOS:
        return const BouncingScrollPhysics();
      case TargetPlatform.android:
      case TargetPlatform.fuchsia:
        return const ClampingScrollPhysics();
    }
    return null;
  }
可以看到,不同的平台,返回的值是不用的。返回的结果,也验证了我们刚才debug的结果。小惊喜:,看TargetPlatform.fuchsia,看来fuchsia系统即将到来。
Flutter要统一天下啊~
共勉
学习一门新系统知识,一定要知其然并知其所以然。如果,我直接设置physics的值,不会学习到实质性的知识。明白了原理才能掌控全局。之前看一些Android大神的博客,很多东西,都是翻阅源码debug而来的。况且当下Flutter的相关有深度有见地的资料不多的情况下,我也是被逼的,没办法。只有翻阅源码了。翻过了源码,却获得了意外之喜,收获了更多知识。
最后一句话,与君共勉:勤而学之,柳暗花明又一村。
PS:最终实现的开头效果的源码与思路,里面涉及到手势识别、类似Android的事件分发、动画、滑动监听以及解刨源码等等。估计要写很多字~~有时间再来一篇博客。
项目地址如下所示:
https://github.com/flutter/flutter/issues/17649
推荐阅读:
聊一聊Android中的字体适配
神奇的Hook机制,一文读懂AOP编程
Airbnb开源框架,真响应式架构——MvRx
欢迎关注我的公众号,学习技术或投稿
![]()
![]()
长按上图,识别图中二维码即可关注


