docker -- 了解docker(基础)
- 一、认识docker
- 二、什么是image(镜像)
-
- 1. 获取image
- 2. 构建DockerFile
-
- 2.1. Dockerfile中常用参数
- 2.2. Shell和Exec格式
- 2.3. CMD 和 ENTRYPOINT
- 3. 练习创建一个hellow-world(base-image)
- 三、认识container
-
- 1. 示例:
- 2. 运行一个交互是容器(-it)
- 3. docker常用命令
-
- 3.1. 删除容器
- 3.2. 制作新镜像(基于容器)
- 3.3 制作镜像(基于Dockerfile)
- 四、搭建private registry
- 五、Dockerfile实际应用
-
- 1. 示例1
- 2. 示例2
- 六、容器的资源限制
-
- 1. 内存限制
- 2. CPU限制
一、认识docker

- Docker Engine :
♦ 后台进程(docked)
♦ REST API Server :用于前后端通信
♦ CLI接口(docker)

- Docker架构

- Docker底层技术支持:
♦ Namespaces : 做隔离pid, net , ipc ,mnt , uts
♦ Contro; groups : 做资源限制
♦ Union file systems :Container 和 image 的分层

二、什么是image(镜像)
- 文件和meta data的集合(root filesystem)
- 分层的,并且每一层添加、改变、删除文件,成为一个新的image
- 不同的image可以享用享用的layer
- image本身是readonly的

1. 获取image
方式一:写docerfile构建image
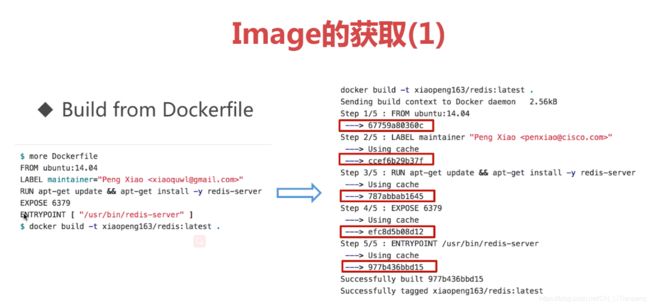
方式二:从Docker Hub 公共仓库中 pull 拉取

2. 构建DockerFile
2.1. Dockerfile中常用参数
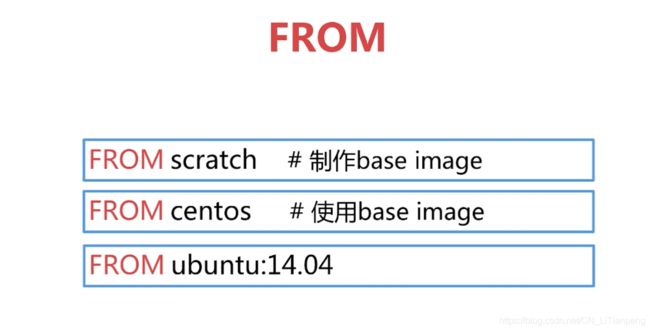
- FROM:拉取基础镜像
- LABEL : 定义了image的meta data


- RUN :执行命令


-
WORKDIR:指定当前工作目录,类似于cd


-
ADD 和 COPY : 将本地的文件添加到镜像中。ADD 更具有解压缩的功能


-
ENV : 设置环境变量(常量)


-
VOLUME 和 EXPOSE : 用于存储和网络(暴露端口)
-
RUN 、CMD 、ENTRYPOINT之间的区别
- RUN:执行命令并创建新的 Image Layer
- CMD:设置容器启动后默认执行的命令和参数
- ENTRYPOINT:设置容器启动时运行的命令

2.2. Shell和Exec格式
# shell格式示例:
RUN yum install -y vim
CMD echo "hello docker"
ENTRYPOINT echo "hello world"
# Exec格式示例:
RUN ["yum","install","-y","vim"]
CMD ["/bin/echo","hello docker"]
ENTRYPOINT ["/bin/echo","hello world"]

示例1(shell格式):
# 编写dockerfile
[root@node01 shell-dockerfile]# vim Dockerfile
FROM centos:7
ENV name "shell-dockerflie"
ENTRYPOINT echo "hello $name"

# 生成镜像
[root@node01 shell-dockerfile]# docker build -t shell/dockerfile .
Sending build context to Docker daemon  2.048kB
Step 1/3 : FROM centos:7
 ---> 8652b9f0cb4c
Step 2/3 : ENV name "shell-dockerflie"
 ---> Running in 35bd462ba3b4
Removing intermediate container 35bd462ba3b4
 ---> 56a993441842
Step 3/3 : CMD echo "hello $name"
 ---> Running in b0ea6f740c1c
Removing intermediate container b0ea6f740c1c
 ---> 823767f40c1b
Successfully built 823767f40c1b
Successfully tagged shell/dockerfile:latest

# 运行镜像
[root@node01 shell-dockerfile]# docker run shell/dockerfile
hello shell-dockerflie
示例2(Exec格式)
# 编写dockerfile
[root@node01 exec-dockerfile]# vim Dockerfile
FROM centos:7
ENV name exec-dockerfile
ENTRYPOINT ["/bin/echo", "hello $name"]

# 生成镜像
[root@node01 exec-dockerfile]# docker build -t exec/dockerfile .
Sending build context to Docker daemon  2.048kB
Step 1/3 : FROM centos:7
 ---> 8652b9f0cb4c
Step 2/3 : ENV name exec-dockerfile
 ---> Running in 6c8143e1a6a3
Removing intermediate container 6c8143e1a6a3
 ---> 2cfbe273723c
Step 3/3 : CMD ["/bin/echo", "hello $name"]
 ---> Running in 7106cd478ecb
Removing intermediate container 7106cd478ecb
 ---> 89df8791f641
Successfully built 89df8791f641
Successfully tagged exec-dockerfile:latest

# 运行镜像
[root@node01 exec-dockerfile]# Ddocker run exec/dockerfile
hello $name            # 发现在exec格式向,env变量没有生效(因为没有在shell环境中执行)
# ------------------- 修改Dockerfile,是env有效 ---------------------

# 修改Dockerfile,是env有效
[root@node01 exec-dockerfile]# vim Dockerfile
FROM centos:7
ENV name exec-dockerfile
# "-c"后面的命令必须在同一个字符串内(即在一个""内)
ENTRYPOINT ["/bin/bash","-c","echo hello $name"]

[root@node01 exec-dockerfile]# docker build -t exec/dockerfile .
Sending build context to Docker daemon  2.048kB
Step 1/3 : FROM centos:7
 ---> 8652b9f0cb4c
Step 2/3 : ENV name "exec-dockerfile"
 ---> Using cache
 ---> 844449214874
Step 3/3 : ENTRYPOINT ["/bin/bash","-c","echo hello $name"]
 ---> Running in 4cb8af80197a
Removing intermediate container 4cb8af80197a
 ---> 24d02c0b0e54
Successfully built 24d02c0b0e54
Successfully tagged exec/dockerfile:latest
[root@node01 exec-dockerfile]# docker run exec/dockerfile
hello exec-dockerfile
2.3. CMD 和 ENTRYPOINT
- CMD 用法:
- 容器启动时默认执行的命令
- 如果docker run指定了其他命令,CMD命令会被忽略
- 如果定义多个CMD,只有最后一个会执行

- ENTRYPOINT 用法:使用较多
- 让容器以应用程序或者服务的形式运行
- 不会被忽略,一定会执行
- 最佳实践:
COPY test.sh /usr/local/bin/
ENTRYPOINT [“test.sh”]
EXPOSE 27017
CMD [“mongod”]

3. 练习创建一个hellow-world(base-image)
[root@node01 ~]# mkdir hello-world
[root@node01 ~]# cd hellow-world/
# 用c语言写一个简单脚本
[root@node01 hello-world]# vim hello.c
# include三、认识container
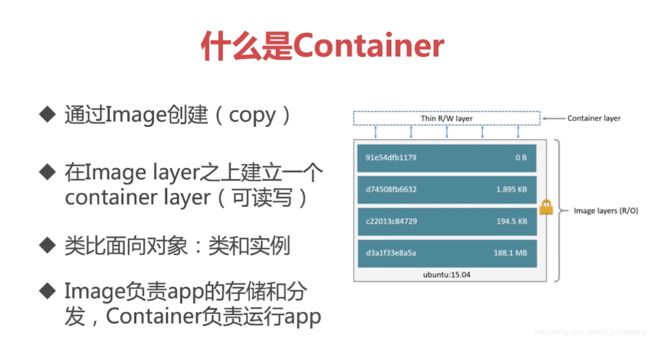
- 通过image创建
- 在image layer之上建立一个container layer(可读写)
- 类比面向对象:类和实例
- image负责APP的存储和分发,container负责运行APP
1. 示例:
# 查看当前本地运行的容器
[root@localhost hello-world]# docker container ls       # 此时没有容器才运行
CONTAINER ID   IMAGE     COMMAND   CREATED   STATUS    PORTS     NAMES

[root@localhost hello-world]# docker run centos:7         # 运行一个centos7基础镜像
Unable to find image 'centos:7' locally
7: Pulling from library/centos
2d473b07cdd5: Pull complete
Digest: sha256:0f4ec88e21daf75124b8a9e5ca03c37a5e937e0e108a255d890492430789b60e
Status: Downloaded newer image for centos:7

[root@localhost hello-world]# docker container ls       # 依旧没有生成容器
CONTAINER ID   IMAGE     COMMAND   CREATED   STATUS    PORTS     NAMES

[root@localhost hello-world]# docker images            # 自动下载了centos7镜像
REPOSITORY   TAG       IMAGE ID       CREATED        SIZE
centos       7         8652b9f0cb4c   6 months ago   204MB

[root@localhost hello-world]# docker ps -a             # 查了运行状态,发现是执行了/bin/bash后退出了
CONTAINER ID   IMAGE      COMMAND       CREATED              STATUS                          PORTS     NAMES
699b3eb3d514   centos:7   "/bin/bash"   About a minute ago   Exited (0) About a minute ago             cool_carver
2. 运行一个交互是容器(-it)
- 交互是容器,运行结束自动退出
[root@localhost hello-world]# docker run -it centos:7     # 运行容器
[root@ea670ae1d89e /]#                                    # 自动进入容器
[root@ea670ae1d89e /]# touch test.txt                     # 可在容器内执行命令
[root@ea670ae1d89e /]# ls
anaconda-post.log  dev  home  lib64  mnt  proc  run   srv  test.txt  usr
bin                etc  lib   media  opt  root  sbin  sys  tmp       var
[root@ea670ae1d89e /]# exit                               # 执行退出后,容器也会自动关闭,变成Exited (0) 状态
exit

[root@localhost hello-world]# docker container ls -a      # 查看所有容器
CONTAINER ID   IMAGE              COMMAND       CREATED         STATUS                      PORTS     NAMES
ea670ae1d89e   centos:7           "/bin/bash"   2 minutes ago   Exited (0) 49 seconds ago             mystifying_jackson
5e537fee1eb9   test/hello-world   "/hello"      3 minutes ago   Exited (12) 3 minutes ago             bold_feynman
55b72b002322   centos:7           "/bin/bash"   5 minutes ago   Exited (0) 5 minutes ago              hardcore_buck
3. docker常用命令
3.1. 删除容器
docker container rm
docker container rm 可以缩写成 docker rm
- 根据容器名称NAMES删除
- 根据容器ID删除
- 根据容器ID的部分字符进行删除(可以不用打全容器ID,只需要打出部分即可,但是前提是这个打出来的部分不能与其他容器ID重复冲突)
[root@localhost hello-world]# docker container ls -a      # 查看当前容器
CONTAINER ID   IMAGE              COMMAND       CREATED         STATUS                      PORTS     NAMES
ea670ae1d89e   centos:7           "/bin/bash"   2 minutes ago   Exited (0) 49 seconds ago             mystifying_jackson
5e537fee1eb9   test/hello-world   "/hello"      3 minutes ago   Exited (12) 3 minutes ago             bold_feynman
55b72b002322   centos:7           "/bin/bash"   5 minutes ago   Exited (0) 5 minutes ago              hardcore_buck
[root@localhost hello-world]# docker container ls -a
CONTAINER ID   IMAGE              COMMAND       CREATED         STATUS                          PORTS     NAMES
ea670ae1d89e   centos:7           "/bin/bash"   3 minutes ago   Exited (0) About a minute ago             mystifying_jackson
5e537fee1eb9   test/hello-world   "/hello"      4 minutes ago   Exited (12) 4 minutes ago                 bold_feynman
55b72b002322   centos:7           "/bin/bash"   6 minutes ago   Exited (0) 6 minutes ago                  hardcore_buck

[root@localhost hello-world]# docker container rm mystifying_jackson   # 根据名称删除
mystifying_jackson
[root@localhost hello-world]# docker container rm 5e5                  # 根据部分容器ID删除
5e5
[root@localhost hello-world]# docker container rm 55b72b002322         # 根据容器ID删除
55b72b002322
[root@localhost hello-world]# docker container ls -a                   # 查看容器,已全部删除
CONTAINER ID   IMAGE     COMMAND   CREATED   STATUS    PORTS     NAMES

# -----------------------------
[root@localhost hello-world]# docker container ls -a       # 查看所有容器
CONTAINER ID   IMAGE              COMMAND    CREATED          STATUS                      PORTS     NAMES
564d19903d8c   test/hello-world   "/hello"   6 seconds ago    Exited (12) 5 seconds ago             intelligent_villani
12bde2762272   test/hello-world   "/hello"   8 seconds ago    Exited (12) 7 seconds ago             magical_beaver
9297d4e27d27   test/hello-world   "/hello"   9 seconds ago    Exited (12) 8 seconds ago             cool_wing
74f4d179f168   test/hello-world   "/hello"   10 seconds ago   Exited (12) 9 seconds ago             adoring_moser

[root@localhost hello-world]# docker container ls -aq    # 查看所有容器的id
564d19903d8c
12bde2762272
9297d4e27d27
74f4d179f168

[root@localhost hello-world]# docker ps -aq              # 和上面命令一样
564d19903d8c
12bde2762272
9297d4e27d27
74f4d179f168

# -----------------------------------------
[root@localhost hello-world]# docker ps -f "status=exited" -a      # 可以列出状态为exited的容器,同样其他字段参数也可以这样筛选
CONTAINER ID   IMAGE              COMMAND    CREATED          STATUS                       PORTS     NAMES
54fb83c8c481   test/hello-world   "/hello"   26 seconds ago   Exited (12) 25 seconds ago             epic_cannon
c25e287bc895   test/hello-world   "/hello"   27 seconds ago   Exited (12) 26 seconds ago             confident_cartwright
e700c1e15335   test/hello-world   "/hello"   28 seconds ago   Exited (12) 27 seconds ago             frosty_haibt
de753ad171ab   test/hello-world   "/hello"   29 seconds ago   Exited (12) 28 seconds ago             dreamy_bassi
[root@localhost hello-world]# docker ps -f "status=exited" -aq
54fb83c8c481
c25e287bc895
e700c1e15335
de753ad171ab

# -----------------------------------
[root@localhost hello-world]# docker ps -aq |xargs docker rm  # 批量删除容器
564d19903d8c
12bde2762272
9297d4e27d27
74f4d179f168
3.2. 制作新镜像(基于容器)
docker container commit 容器名称 仓库名:tag标签
或者
docker commit 容器名称 仓库名:tag标签
- 将一个容器进行操作后重新制作镜像
- 这种创建新的docker image 方式并不提倡
[root@localhost hello-world]# docker run -it centos:7       # 先创建一个交互式容器
[root@5347028f281e /]# mkdir /ltp                           # 进入容器内创建目录
[root@5347028f281e /]# cd /ltp
[root@5347028f281e ltp]# ls
[root@5347028f281e ltp]# echo 'hello world' >test.txt      # 创建一个文件
[root@5347028f281e ltp]# cat test.txt
hello world
[root@5347028f281e ltp]# exit                              # 退出容器
exit

[root@localhost hello-world]# docker ps -a                 # 查看容器,此时成为exited状态
CONTAINER ID   IMAGE      COMMAND       CREATED         STATUS                          PORTS     NAMES
5347028f281e   centos:7   "/bin/bash"   3 minutes ago   Exited (0) About a minute ago             hardcore_almeida

# ---------------------------------------
[root@localhost hello-world]# docker commit hardcore_almeida hardcore/centos_test    # 制作镜像
sha256:f7036afafe7a29e44de1382b26a0f3cc43183fbd100f49e72d89d6ed2c01d6a1

[root@localhost hello-world]# docker run -it hardcore/centos_test   # 运行新制作容器

[root@197067d11f0b /]# ls /ltp/test.txt                             # 发现有新创建的文件
/ltp/test.txt
[root@197067d11f0b /]# cd /ltp/
[root@197067d11f0b ltp]# cat test.txt                               # 进入查看,内容也在
hello world
3.3 制作镜像(基于Dockerfile)
docker image build
或者
docker build
[root@node01 ltp]# mkdir docker-centos-test
[root@node01 ltp]# cd docker-centos-test/

# 编写Dockerfile
[root@node01 docker-centos-test]# vim Dockerfile
FROM centos:7
RUN mkdir /ltp && echo "hello world" > /ltp/test.txt

# 基于Dockerfile制作镜像
[root@node01 docker-centos-test]# docker build -t dockerfile/centos-test .
Sending build context to Docker daemon  2.048kB
Step 1/2 : FROM centos:7
7: Pulling from library/centos
2d473b07cdd5: Pull complete
Digest: sha256:0f4ec88e21daf75124b8a9e5ca03c37a5e937e0e108a255d890492430789b60e
Status: Downloaded newer image for centos:7
 ---> 8652b9f0cb4c
Step 2/2 : RUN mkdir /ltp && echo "hello world" > /ltp/test.txt
 ---> Running in a200145b0873
Removing intermediate container a200145b0873
 ---> 8d75aba54601
Successfully built 8d75aba54601
Successfully tagged dockerfile/centos-test:latest

# 查看镜像
[root@node01 docker-centos-test]# docker image ls
REPOSITORY                                           TAG             IMAGE ID       CREATED         SIZE
dockerfile/centos-test                               latest          8d75aba54601   2 minutes ago   204MB

# 生成容器,并进入查看是否有效
[root@node01 docker-centos-test]# docker run -it dockerfile/centos-test
[root@6209d6603b3e /]# ls /ltp/test.txt
/ltp/test.txt
[root@6209d6603b3e /]# cat /ltp/test.txt
hello world
四、搭建private registry
- 私有的、简单的registry,不提供UI界面
- 但是docker-registry 提供了各种api来查看(可以参照官方文档:https://docs.docker.com/registry/spec/api/)
# 在一台linux机器上(192.168.2.111),创建一个registry容器
[root@master ~]# docker run -d -p 5000:5000 --restart always --name private_registry registry:2

[root@localhost ~]# docker images               # 查看镜像
REPOSITORY   TAG       IMAGE ID       CREATED       SIZE
registry     2         1fd8e1b0bb7e   5 weeks ago   26.2MB


# 在另一台linux机器(192.168.2.101)访问192.168.2.111的5000端口
[root@node01 ~]# telnet 192.168.2.111 5000   # 可以连接上
Trying 192.168.2.111...
Connected to 192.168.2.111.

# 在 192.168.2.101 (非registry机器)上给重新镜像打上仓库地址标签
[root@node01 ~]# docker images
REPOSITORY                                           TAG             IMAGE ID       CREATED         SIZE
test/hello-world                                     latest          613945a88125   24 hours ago    861kB
[root@node01 ~]# docker tag test/hello-world 192.168.2.111:5000/hello-world
# 删除旧镜像标签
[root@node01 ~]# docker rmi test/hello-world
Untagged: test/hello-world:latest
# 查看已打上新标签
[root@node01 ~]# docker images
REPOSITORY                                           TAG             IMAGE ID       CREATED         SIZE
192.168.2.111:5000/hello-world                       latest          613945a88125   24 hours ago    861kB
- 此时直接上传会报不可信任的错误,需要以下步骤来添加信任
- 在/etc/docker/daemon.json文件中加入配置,如下
{
“insecure-registries”:[“192.168.2.111:5000”]
} - 修改 /usr/lib/systemd/system/docker.service 文件,将daemon.json文件变量引入到docker,插入下面内容
EnvironmentFile=-/etc/docker/daemon.josn
- 在/etc/docker/daemon.json文件中加入配置,如下
[root@localhost ~]# cd /etc/docker/
[root@localhost docker]# ls
daemon.json  key.json
[root@localhost docker]# vim daemon.json
{

   # 镜像加速地址(可以在阿里云获取)
  "registry-mirrors": ["https://xxxxxx.mirror.aliyuncs.com"],
   # 私有仓库非安全登入
  "insecure-registries":["192.168.2.111:5000"]
}


[root@localhost docker]# vim /usr/lib/systemd/system/docker.service
# 插入这段内容(注意,前面有横杆-)
EnvironmentFile=-/etc/docker/daemon.josn

# 现在再执行上传打好标签的镜像
[root@localhost docker]# docker push 192.168.2.111:5000/hello-world

# 查看镜像仓库中的镜像列表
[root@localhost docker]# curl -XGET http://192.168.2.111:5000/v2/_catalog
{
     "repositories":["hello-world"]}
五、Dockerfile实际应用
1. 示例1
- 写一个简单的web应用,打包成镜像
- 首先看下这个py文件执行后的效果
[root@localhost flask-hello-world]# pip install flask

[root@localhost flask-hello-world]# vim app.py
#!/bin/env python
from flask import Flask
app = Flask(__name__)

@app.route('/')
def hello():
    return "hello docker"

if __name__ == '__main__':
    app.run()

# 运行脚本
[root@localhost flask-hello-world]# python app.py &
[1] 4503

# 访问 http://127.0.0.1:5000/,返回 hello docker
[root@localhost flask-hello-world]# curl http://127.0.0.1:5000/
127.0.0.1 - - [26/May/2021 06:52:18] "GET / HTTP/1.1" 200 -
hello docker
- 编写Dockerfile
[root@localhost flask-hello-world]# vim Dockerfile
FROM python:2.7
LABEL maintainer="Tian Peng "
RUN pip install flask
# 注意:一定要是/app/,如果写成/app,那将会是一个文件
COPY app.py /app/
WORKDIR /app
EXPOSE 5000
CMD ["python", "app.py" ]

# 构建镜像
[root@localhost flask-hello-world]# docker build -t 192.168.2.111:5000/flask-hello-world .

# 加上-d后台运行
[root@localhost flask-hello-world]docker run -d 192.168.10.30:5000/flask-hello-world

[root@localhost flask-hello-world]# docker ps -a
CONTAINER ID   IMAGE                                  COMMAND           CREATED         STATUS         PORTS      NAMES
54fdb4dc2917   192.168.10.30:5000/flask-hello-world   "python app.py"   4 minutes ago   Up 4 minutes   5000/tcp   nice_brattain

# 进入容器,查看脚本运行状态
[root@localhost flask-hello-world]# docker exec -it 54 sh
# ls /app
app.py
# curl 127.0.0.1:5000
hello docker

# 通过exec还可以直接运行容器内的命令
[root@localhost flask-hello-world]# docker exec -it 54 python
Python 2.7.18 (default, Apr 20 2020, 19:27:10)
[GCC 8.3.0] on linux2
Type "help", "copyright", "credits" or "license" for more information.
>>> print "abc"
abc

[root@localhost flask-hello-world]# docker exec -it 54 ip a
1: lo: <LOOPBACK,UP,LOWER_UP> mtu 65536 qdisc noqueue state UNKNOWN group default qlen 1000
    link/loopback 00:00:00:00:00:00 brd 00:00:00:00:00:00
    inet 127.0.0.1/8 scope host lo
       valid_lft forever preferred_lft forever
22: eth0@if23: <BROADCAST,MULTICAST,UP,LOWER_UP> mtu 1500 qdisc noqueue state UP group default
    link/ether 02:42:ac:11:00:02 brd ff:ff:ff:ff:ff:ff link-netnsid 0
    inet 172.17.0.2/16 brd 172.17.255.255 scope global eth0
       valid_lft forever preferred_lft forever
- 删除容器
# 先停止容器
[root@localhost flask-hello-world]# docker stop 54
54
[root@localhost flask-hello-world]# docker ps -a
CONTAINER ID   IMAGE                                  COMMAND           CREATED          STATUS                        PORTS     NAMES
54fdb4dc2917   192.168.10.30:5000/flask-hello-world   "python app.py"   11 minutes ago   Exited (137) 15 seconds ago             nice_brattain

# 删除容器
[root@localhost flask-hello-world]# docker rm 54
54
- 给容器自定义名称
# 利用--name=名称 来设置容器名称
[root@localhost flask-hello-world]# docker run -d --name=demo 192.168.10.30:5000/flask-hello-world
dbc0c5967975213f9f46aa99aff727adc7cd3c08c6c8314f090d26f726c346cc
[root@localhost flask-hello-world]# docker ps -a
CONTAINER ID   IMAGE                                  COMMAND           CREATED         STATUS         PORTS      NAMES
dbc0c5967975   192.168.10.30:5000/flask-hello-world   "python app.py"   4 seconds ago   Up 4 seconds   5000/tcp   demo
[root@localhost flask-hello-world]#
- 查看容器的详细信息
# 使用 inspect 参数
[root@localhost flask-hello-world]# docker inspect demo
[
    {

        "Id": "dbc0c5967975213f9f46aa99aff727adc7cd3c08c6c8314f090d26f726c346cc",
        "Created": "2021-05-25T23:32:18.037156285Z",
        "Path": "python",
        "Args": [
            "app.py"
        ],
        "State": {

            "Status": "running",
            "Running": true,
            "Paused": false,
            "Restarting": false,
            "OOMKilled": false,
            "Dead": false,
            "Pid": 7071,
            "ExitCode": 0,
            "Error": "",
            "StartedAt": "2021-05-25T23:32:18.421126913Z",
            "FinishedAt": "0001-01-01T00:00:00Z"
        },
……
- 查看容器日志(容器运行产生的输出)
[root@localhost flask-hello-world]#  docker logs demo
 * Serving Flask app "app" (lazy loading)
 * Environment: production
   WARNING: This is a development server. Do not use it in a production deployment.
   Use a production WSGI server instead.
 * Debug mode: off
 * Running on http://127.0.0.1:5000/ (Press CTRL+C to quit)
2. 示例2
- 创建容器,利用Linux的stress进行压力测试
- 首先看下stress的使用
# 创建一个ubuntu的容器
[root@localhost flask-hello-world]# docker run -it ubuntu
# 安装stress工具
root@c697864e899c:/# apt-get update && apt-get install -y stress
# 直接执行stress命令会出现帮助文档
root@c697864e899c:/# stress
`stress' imposes certain types of compute stress on your system

Usage: stress [OPTION [ARG]] ...
 -?, --help         show this help statement
     --version      show version statement
 -v, --verbose      be verbose                       # 会有debug输出
 -q, --quiet        be quiet
 -n, --dry-run      show what would have been done
 -t, --timeout N    timeout after N seconds
     --backoff N    wait factor of N microseconds before work starts
 -c, --cpu N        spawn N workers spinning on sqrt()
 -i, --io N         spawn N workers spinning on sync()
 -m, --vm N         spawn N workers spinning on malloc()/free()   # 创建虚拟的工作进程
     --vm-bytes B   malloc B bytes per vm worker (default is 256MB) # 为每个work分配的内存,默认是256Mb
     --vm-stride B  touch a byte every B bytes (default is 4096)
     --vm-hang N    sleep N secs before free (default none, 0 is inf)
     --vm-keep      redirty memory instead of freeing and reallocating
 -d, --hdd N        spawn N workers spinning on write()/unlink()
     --hdd-bytes B  write B bytes per hdd worker (default is 1GB)

Example: stress --cpu 8 --io 4 --vm 2 --vm-bytes 128M --timeout 10s

Note: Numbers may be suffixed with s,m,h,d,y (time) or B,K,M,G (size).

# 运行stress示例
root@c697864e899c:/# stress --cpu 1 --vm 2 --vm-bytes 5000M --timeout 10s --verbose
stress: info: [270] dispatching hogs: 1 cpu, 0 io, 2 vm, 0 hdd
stress: dbug: [270] using backoff sleep of 9000us
stress: dbug: [270] setting timeout to 10s
stress: dbug: [270] --> hogcpu worker 1 [271] forked
stress: dbug: [270] --> hogvm worker 2 [272] forked
stress: dbug: [270] using backoff sleep of 3000us
stress: dbug: [270] setting timeout to 10s
stress: dbug: [270] --> hogvm worker 1 [273] forked
……
- 编写Dockerfile
- 可以在ENTRYPOINT 的[ ]内传入命令,CMD的[ ]内传入ENTRYPOINT命令的参数
- 并且CMD的[ ]内参数可以在运行容器是传入
[root@localhost ]# vim Dockerfile
FROM ubuntu
LABEL maintainer="Tian Peng "
RUN apt-get update && apt-get install -y stress
ENTRYPOINT ["/usr/bin/stress" ]
CMD []

# 制作镜像
[root@localhost flask-hello-world]# docker build -t demo/stress-ubuntu .

# 直接运行容器,相当于执行了stress命令
[root@localhost flask-hello-world]# docker run -it demo/stress-ubuntu
`stress' imposes certain types of compute stress on your system
Usage: stress [OPTION [ARG]] ...
 -?, --help         show this help statement
……

# 运行容器,并且传入CMD参数
[root@localhost flask-hello-world]# docker run demo/stress-ubuntu --vm 1 --verbose   # --vm 1 和 --verbose 都是直接跟在stress后面的参数
stress: dbug: [8] allocating 268435456 bytes ...
stress: dbug: [8] touching bytes in strides of 4096 bytes ...
stress: dbug: [8] freed 268435456 bytes
stress: dbug: [8] allocating 268435456 bytes ...
……
六、容器的资源限制
1. 内存限制
可以用 docker run --help 来查看运行容器的参数
–memory bytes # 内存限制
–memory-swap bytes # 如果不设置,swap默认和 --memory 的相同
–memory-reservation bytes # 软限制
示例:通过之前的stress镜像容器验证
# 设置--memory=200M 内存限制200M(其实还有swap也是默认和物理内存相等,因此实际是400M),stress测试分配500M内存,发现报错内存超出限制报错
[root@localhost flask-hello-world]# docker run --memory=200M demo/stress-ubuntu --vm-bytes 500M --vm 1 --verbose

stress: info: [1] dispatching hogs: 0 cpu, 0 io, 1 vm, 0 hdd
stress: dbug: [1] using backoff sleep of 3000us
stress: dbug: [1] --> hogvm worker 1 [8] forked
stress: dbug: [8] allocating 524288000 bytes ...
stress: dbug: [8] touching bytes in strides of 4096 bytes ...
stress: FAIL: [1] (415) <-- worker 8 got signal 9
stress: WARN: [1] (417) now reaping child worker processes
stress: FAIL: [1] (421) kill error: No such process
stress: FAIL: [1] (451) failed run completed in 1s
2. CPU限制
可以用 docker run --help 来查看运行容器的参数
–cpu-shares int # 是相对权重,当存在多个容器运行时,会根据权重值分配cpu使用的百分比
–cpus decimal Number of CPUs
–cpuset-cpus string CPUs in which to allow execution (0-3, 0,1)
–cpuset-mems string MEMs in which to allow execution (0-3, 0,1)