- Java-- 异常--try/catch/finally 的执行顺序
刘小炮吖i
Java后端开发面试题Javajava开发语言面试
直接说结论:当catch或者finally中有return语句时,catch和finally代码块之后的程序部分将不会被执行到。如果catch和finally中都存在return语句,最终的返回值将是finally中的return语句所指定的值。无论try代码块中是否出现异常,只要try或catch执行到了return之前,finally代码块都会被执行。为了代码的可读性和健壮性,尽量避免在try
- Java中字符流和字节流的区别
刘小炮吖i
Java后端开发面试题Javajava开发语言
相同点在Java的I/O体系中,字节流和字符流都配备了缓冲机制的实现类,以此显著提升数据读写的效率。字符流:借助BufferedReader和BufferedWriter,它们在处理字符数据时,会将数据先缓存起来,减少与底层数据源或目标的交互次数,从而加速操作。例如,当逐行读取大文本文件时,BufferedReader的缓冲功能能避免频繁的磁盘I/O操作。字节流:BufferedInputStre
- SpringBoot备份神通数据库
松岛的枫叶
springboot数据库后端
SpringBoot备份神通数据库····直接上代码···publicStringbackupOsrdb(){//构建命令Listcommand=newArrayList<>();command.add("osrexp");command.add("-u");command.add("SYSDBA"+"/"+"szoscar55");//用户名/密码command.add("-d");comman
- 【现代前端框架中本地图片资源的处理方案】
Gazer_S
前端框架前端缓存javascriptchrome
现代前端框架中本地图片资源的处理方案前言在前端开发中,正确引用本地图片资源是一个常见但容易被忽视的问题。我们不能像在HTML中那样简单地使用相对路径,因为JavaScript模块中的路径解析规则与HTML不同,且现代构建工具对静态资源有特殊的处理机制。本文将详细探讨在webpack和Vite等构建工具中处理本地图片引用的各种方法。传统方式的局限性在传统开发中,我们可能习惯这样引用图片:constl
- Mysql疑难报错排查 - Field ‘XXX‘ doesn‘t have a default value
m0_74823408
面试学习路线阿里巴巴mysql数据库
项目场景:数据库环境:mysql8;工程使用:MyBatisPlus表情况:问题描述某一个插入语句使用了MyBatisPlus的save方法,因为end_time1end_time2都并没有值,所以在MyBatisPlus默认情况下,并不会在插入语句中提及,最终提取其SQL:INSERTINTOaaaa(serial_no,business_date,market_no,report_code)V
- javaweb将上传的图片保存在项目文件webapp下的upload文件夹下
yuren_xia
后端技术前端技术webappjavatomcateclipse
前端HTML表单(upload.html)首先,创建一个HTML页面,允许用户选择并上传图片。图片上传上传图片注意:表单的method设置为"post",enctype需设置成"multipart/form-data"2.后端Servlet(UploadServlet.java)接下来,创建一个Servlet来处理文件上传请求,并将上传的图片保存到webapp/load目录下。packagecom
- 通俗理解闭包
yuren_xia
前端技术javascript
JavaScript在ES6之前并没有类的概念,但通过原型链和闭包,开发者可以实现类似继承和封装的功能(原型链实现继承,闭包实现封装)。ES6引入了类语法,但闭包仍然是实现私有数据封装的重要手段之一。另外,使用闭包还可用于保存上下文信息等场景。一、定义从函数角度闭包是指有权访问另一个函数作用域中的变量的函数。即使外部函数已经返回,闭包仍然可以访问外部函数内部的变量。例如:functionouter
- 【面试实战】Spring基础、IoC、AOP、MVC、Mybatis、Spring Boot
Sivan_Xin
技术实战专栏(已上云)面试mvcspring
version:1.0文章目录SpringSpring基础/IoC♂️面试官:举例Spring的模块?♂️面试官:Spring、SpringMVC、SpringBoot关系?♂️面试官:说说对SpringIoC的了解?♂️面试官:什么是SpringBean?♂️面试官:Bean的作用域?♂️面试官:Bean的生命周期?♂️面试官:单例Bean的线程安全问题了解吗?♂️面试官:@Co
- 我在广州学 Mysql 系列——存储过程与存储函数详解
练小杰
数据库相关mysqlandroid数据库学习adbsql
ℹ️大家好,我是练小杰,今天周五了,一周就这样从手上溜走了,还有两星期过年!!本文将学习MYSQL中存储过程与存储函数的概念~~回顾:【索引详解】【索引相关练习】数据库专栏【数据库专栏】~想要了解更多内容,主页【练小杰的CSDN】文章目录存储过程与存储函数存储过程(StoredProcedure)存储函数(StoredFunction)⚠️主要区别选择存储过程还是存储函数创建存储过程命令解释创建存
- 我在广州学 Mysql 系列——数据表查询命令详解
练小杰
数据库相关mysql数据库学习经验分享adb后端
ℹ️大家好,我是LXJ,今天星期二了,本文将讲述MYSQL查询数据的详细命令以及相关例题~~复习:《Mysql函数的练习题》同时,数据库相关内容查看专栏【数据库专栏】~想要了解更多内容请点击我的主页:【练小杰的CSDN】“倒霉,倒霉,倒霉!”——龙叔文章目录前言基本查询语句单个表格查询查询所有字段查询指定字段查询指定记录带IN关键字的查询带BETWEENAND的范围查询带LIKE的字符匹配查询查询
- 说说 Spring MVC 的执行流程?
浮生带你学Java
Java面试题Springspringmvcjava
高频面试题:说说SpringMVC的执行流程?大家好,我是浮生,一个工作了十四年的java程序员!昨天,一个工作2年的粉丝在面试的时候,面试官要求他说SpringMVC的执行流程。他没回答上来,错过了这个offer。一、问题解析SpringMVC的执行流程,一个面试频率超级高的问题,但是缺难倒了无数的程序员。这个问题的考察范围主要是3~5年,甚至5年以上都会问到。和它同类型的问题还有Bean的加载
- SpringCloud/Boot集成LogBack
azoon.top
springcloudlogbackspringlog4jslf4j
一.简要介绍什么是SLF4J?官网介绍:SimpleLoggingFacadeforJava(SLF4J)充当简单的各种日志记录框架的Facade或抽象(e.g.java.util.logging、logback、log4j)允许最终用户在部署时插入所需的日志记录框架。类似java中的接口,如果只集成SLF4J,日志只能输出在控制台,并没有输出到文件的能力,要实现真正的日志能力,需要引入其实现层:
- spring boot、spring cloud、spring cloud alibaba 之间的版本对应关系
薄荷街的兔比先生
springbootspringcloudjava
大家在引用pom的时候还是要以官方推荐版本为主,不然容易出现未知的问题。1.springboot和springcloud的版本关系官方提供的版本对照表https://start.spring.io/actuator/info{"git":{"branch":"93e528fc7e79e41a513e493d057499401a15eb67","commit":{"id":"93e528f","ti
- Python连接SQL SEVER数据库全流程
m0_74824865
面试学习路线阿里巴巴数据库pythonsql
背景介绍在数据分析领域,经常需要从数据库中获取数据进行分析和处理。而SQLServer是一种常用的关系型数据库管理系统,因此学习如何使用Python连接SQLServer数据库并获取数据是非常有用的。以下是Python使用pymssql连接SQLServer数据库的全流程:安装pymssql库本地账号设置脚本连接数据导入函数实现一、安装pymssqlpymssql是Python连接SQLServe
- SpringBoot + vue 管理系统
m0_74825565
面试学习路线阿里巴巴springbootvue.js后端
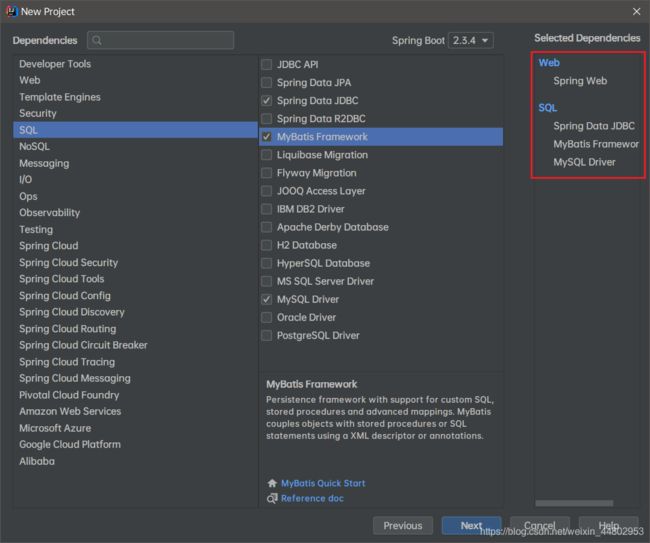
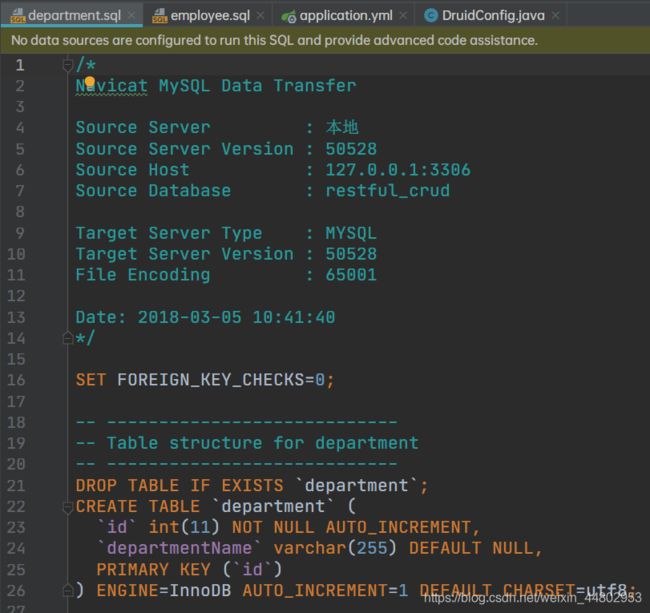
SpringBoot+vue管理系统文章目录SpringBoot+vue管理系统1、成品效果展示2、项目准备3、项目开发3.1、部门管理3.1.1、前端核心代码3.1.2、后端代码实现3.2、员工管理3.2.1、前端核心代码3.2.2、后端代码实现3.3、班级管理3.3.1、前端核心代码3.3.2、后端代码实现3.4、学生管理3.4.1、前端核心代码3.4.2、后端代码实现3.5、数据统计3.5.
- Spring 核心技术解析【纯干货版】- XII:Spring 数据访问模块 Spring-R2dbc 模块精讲
m0_74825003
面试学习路线阿里巴巴springjava后端
在现代应用架构中,高并发、低延迟的需求推动了响应式编程的发展,而传统的JDBC由于其同步阻塞机制,在高吞吐场景下可能成为瓶颈。R2DBC(ReactiveRelationalDatabaseConnectivity)作为响应式关系型数据库访问标准,正是为了解决这一问题而诞生的。SpringR2DBC作为Spring生态对R2DBC的封装,提供了非阻塞、异步的数据库访问能力,并与SpringWebF
- Spring Boot的项目结构
m0_74823983
面试学习路线阿里巴巴springboot后端java
SpringBoot的项目结构技术背景SpringBoot项目结构遵循Maven或Gradle的标准目录结构,同时融入了SpringBoot的特定约定。良好的项目结构不仅有助于代码组织,还能提高开发效率和项目可维护性。了解SpringBoot的项目结构对于开发高质量的应用至关重要。1.基础项目结构1.1标准目录结构基本的SpringBoot项目结构如下:myproject/├──src/│├──m
- 解释SQL和NoSQL数据库的区别,各自的适用场景是什么?
破碎的天堂鸟
学习教程nosql数据库
SQL与NoSQL数据库的深度对比及适用场景分析一、核心定义与数据模型差异1:SQL数据库结构化数据模型:基于关系型模型,数据以表格(行和列)形式存储,表之间通过外键建立关联。例如,客户表与订单表通过客户ID关联,形成严格的逻辑结构。预定义模式(Schema):需提前定义表结构(字段类型、主键、外键等),修改结构需通过ALTER等命令,灵活性较低。标准化查询语言:使用SQL(StructuredQ
- 深入剖析 Weblogic、ThinkPHP、Jboss、Struct2 历史漏洞
阿贾克斯的黎明
网络安全web安全
目录深入剖析Weblogic、ThinkPHP、Jboss、Struct2历史漏洞一、Weblogic漏洞(一)漏洞原理(二)漏洞利用代码(Python示例)(三)防范措施二、ThinkPHP漏洞(一)漏洞原理(二)漏洞利用代码(示例,假设存在漏洞的代码片段)(三)防范措施三、Jboss漏洞(一)漏洞原理(二)漏洞利用代码(Java示例,用于构造恶意序列化数据)(三)防范措施四、Struct2漏洞
- 深入剖析 Java 反序列化:FASTjson 漏洞与 Shiro 漏洞
阿贾克斯的黎明
网络安全phpweb安全开发语言
目录深入剖析Java反序列化:FASTjson漏洞与Shiro漏洞引言Java反序列化原理示例代码FASTjson漏洞分析漏洞成因示例代码防护措施Shiro漏洞分析漏洞成因示例代码(模拟攻击场景)防护措施总结引言在Java应用开发中,反序列化是一项重要的技术,但同时也隐藏着巨大的安全风险。FASTjson和Shiro作为Java开发中常用的工具和框架,其反序列化漏洞曾引发了广泛关注。本文将深入探讨
- 前端开发中的常见问题与疑惑:解析与应对策略
lina_mua
javascriptvue.jshtml前端es6
1.引言1.1前端开发的复杂性前端开发涉及HTML、CSS、JavaScript等多种技术,同时还需要考虑性能优化、跨浏览器兼容性、用户体验等问题。随着前端技术的快速发展,开发者面临的挑战也越来越多。1.2本文的目标本文旨在总结前端开发中常见的问题与疑惑,并提供相应的解决方案和应对策略,帮助开发者更好地应对挑战。2.HTML/CSS常见问题2.1布局问题:如何实现复杂的页面布局?问题描述:实现复杂
- Spring Cloud Alibaba Spring Cloud Spring Boot 版本对应关系
马丁半只瞄
javaspringspringbootspringcloud
版本不对应可能有以下报错:Failedtobindpropertiesundermybatis-plus.configuration.result-maps[0]NoClassDefFoundError:reactor/netty/http/server/WebsocketServerSpec$Builderreactor.netty.resources.ConnectionProvider.el
- Spring Boot@Component注解下的类无法@Autowired的问题
Micrle_007
springbootSpring
这个问题心累(确实)在把我的一个非Web程序迁移从Spring迁移到SpringBoot时,出现了在@Component注解下@Autowired的类为null的情况,也就是没注入成功,或者说是此类在bean加载之前就被调用了。试了各种办法,修改扫描包,修改@Component注解等等,皆未成功,后来看到了一个方法,探究了一下。@ComponentpublicclassComponentClass
- Java微服务的注册中心Nacos
铁锤学代码
微服务java微服务开发语言
文章目录Nacos的主要作用Nacos实现动态配置更新的技术Nacos实现CAPNacos实现CAP原理Nacos使用Distro和Raft分别干什么用?ZAB与Raft的区别Nacos的主要作用配置中心:可以将微服务中的一些配置信息放到Nacos进行统一管理,也可以通过Nacos实现动态配置管理。也可以将不同环境的配置放在不同的Namespace下的group下,实现动态选择配置发布部署。服务注
- spring cloud alibaba版本对应表(2024/6/26)
翻身仗
springcloudspringboot中间件
毕业版本依赖关系(推荐使用)由于SpringBoot3.0,SpringBoot2.7~2.4和2.4以下版本之间变化较大,目前企业级客户老项目相关SpringBoot版本仍停留在SpringBoot2.4以下,为了同时满足存量用户和新用户不同需求,社区以SpringBoot3.0和2.4分别为分界线,同时维护2022.x、2021.x、2.2.x三个分支迭代。如果不想跨分支升级,如需使用新特性,
- Spring Bean 的生命周期全过程
2401_85327573
springjava后端
SpringBean的生命周期是指从Bean的创建到销毁的整个过程。在这个过程中,Spring容器会按照一系列固定的步骤对Bean进行初始化、配置、使用和销毁。了解SpringBean的生命周期可以帮助我们更好地理解和使用Spring框架,尤其是通过自定义生命周期行为来实现特定功能。以下是SpringBean生命周期的全过程,按阶段详细说明:---###**1.实例化(Instantiation)
- ArrayList 源码分析
2401_85327573
java开发语言
ArrayList简介ArrayList的底层是数组队列,相当于动态数组。与Java中的数组相比,它的容量能动态增长。在添加大量元素前,应用程序可以使用ensureCapacity操作来增加ArrayList实例的容量。这可以减少递增式再分配的数量。ArrayList继承于AbstractList,实现了List,RandomAccess,Cloneable,java.io.Serializabl
- javaweb文件上传:@MultipartConfig注解与Apache Commons FileUpload对比
yuren_xia
后端技术apachejavatomcat
在JavaWeb应用中处理文件上传时,可以选择使用@MultipartConfig注解或第三方库如ApacheCommonsFileUpload(通常简称为fileupload)。以下是两者的比较和建议:使用@MultipartConfig注解简介:@MultipartConfig是JavaServlet规范中用于处理multipart/form-data请求(通常是文件上传)的注解。它简化了在S
- Spring Boot @Component注解介绍
CnLg.NJ
Javaspringboot后端java
@Component是Spring中的一个核心注解,用于声明一个类为Spring管理的组件(Bean)。它是一个通用的注解,可以用于任何层次的类(如服务层、控制器层、持久层等)。通过@Component注解,Spring会自动检测并注册该类为一个Bean,从而实现依赖注入和生命周期管理。1.@Component的作用@Component是一个元注解,它本身被@Configuration、@Serv
- Golang的Aes加解密工具类
张声录1
golang开发语言后端
packagemainimport("bytes""crypto/aes""crypto/sha1""encoding/binary""encoding/hex""fmt")//SHA1PRNG模拟Java的SHA1PRNG算法typeSHA1PRNGstruct{state[sha1.Size]bytecounteruint32indexint}//NewSHA1PRNG使用种子初始化SHA1P
- SAX解析xml文件
小猪猪08
xml
1.创建SAXParserFactory实例
2.通过SAXParserFactory对象获取SAXParser实例
3.创建一个类SAXParserHander继续DefaultHandler,并且实例化这个类
4.SAXParser实例的parse来获取文件
public static void main(String[] args) {
//
- 为什么mysql里的ibdata1文件不断的增长?
brotherlamp
linuxlinux运维linux资料linux视频linux运维自学
我们在 Percona 支持栏目经常收到关于 MySQL 的 ibdata1 文件的这个问题。
当监控服务器发送一个关于 MySQL 服务器存储的报警时,恐慌就开始了 —— 就是说磁盘快要满了。
一番调查后你意识到大多数地盘空间被 InnoDB 的共享表空间 ibdata1 使用。而你已经启用了 innodbfileper_table,所以问题是:
ibdata1存了什么?
当你启用了 i
- Quartz-quartz.properties配置
eksliang
quartz
其实Quartz JAR文件的org.quartz包下就包含了一个quartz.properties属性配置文件并提供了默认设置。如果需要调整默认配置,可以在类路径下建立一个新的quartz.properties,它将自动被Quartz加载并覆盖默认的设置。
下面是这些默认值的解释
#-----集群的配置
org.quartz.scheduler.instanceName =
- informatica session的使用
18289753290
workflowsessionlogInformatica
如果希望workflow存储最近20次的log,在session里的Config Object设置,log options做配置,save session log :sessions run ;savesessio log for these runs:20
session下面的source 里面有个tracing
- Scrapy抓取网页时出现CRC check failed 0x471e6e9a != 0x7c07b839L的错误
酷的飞上天空
scrapy
Scrapy版本0.14.4
出现问题现象:
ERROR: Error downloading <GET http://xxxxx CRC check failed
解决方法
1.设置网络请求时的header中的属性'Accept-Encoding': '*;q=0'
明确表示不支持任何形式的压缩格式,避免程序的解压
- java Swing小集锦
永夜-极光
java swing
1.关闭窗体弹出确认对话框
1.1 this.setDefaultCloseOperation (JFrame.DO_NOTHING_ON_CLOSE);
1.2
this.addWindowListener (
new WindowAdapter () {
public void windo
- 强制删除.svn文件夹
随便小屋
java
在windows上,从别处复制的项目中可能带有.svn文件夹,手动删除太麻烦,并且每个文件夹下都有。所以写了个程序进行删除。因为.svn文件夹在windows上是只读的,所以用File中的delete()和deleteOnExist()方法都不能将其删除,所以只能采用windows命令方式进行删除
- GET和POST有什么区别?及为什么网上的多数答案都是错的。
aijuans
get post
如果有人问你,GET和POST,有什么区别?你会如何回答? 我的经历
前几天有人问我这个问题。我说GET是用于获取数据的,POST,一般用于将数据发给服务器之用。
这个答案好像并不是他想要的。于是他继续追问有没有别的区别?我说这就是个名字而已,如果服务器支持,他完全可以把G
- 谈谈新浪微博背后的那些算法
aoyouzi
谈谈新浪微博背后的那些算法
本文对微博中常见的问题的对应算法进行了简单的介绍,在实际应用中的算法比介绍的要复杂的多。当然,本文覆盖的主题并不全,比如好友推荐、热点跟踪等就没有涉及到。但古人云“窥一斑而见全豹”,希望本文的介绍能帮助大家更好的理解微博这样的社交网络应用。
微博是一个很多人都在用的社交应用。天天刷微博的人每天都会进行着这样几个操作:原创、转发、回复、阅读、关注、@等。其中,前四个是针对短博文,最后的关注和@则针
- Connection reset 连接被重置的解决方法
百合不是茶
java字符流连接被重置
流是java的核心部分,,昨天在做android服务器连接服务器的时候出了问题,就将代码放到java中执行,结果还是一样连接被重置
被重置的代码如下;
客户端代码;
package 通信软件服务器;
import java.io.BufferedWriter;
import java.io.OutputStream;
import java.io.O
- web.xml配置详解之filter
bijian1013
javaweb.xmlfilter
一.定义
<filter>
<filter-name>encodingfilter</filter-name>
<filter-class>com.my.app.EncodingFilter</filter-class>
<init-param>
<param-name>encoding<
- Heritrix
Bill_chen
多线程xml算法制造配置管理
作为纯Java语言开发的、功能强大的网络爬虫Heritrix,其功能极其强大,且扩展性良好,深受热爱搜索技术的盆友们的喜爱,但它配置较为复杂,且源码不好理解,最近又使劲看了下,结合自己的学习和理解,跟大家分享Heritrix的点点滴滴。
Heritrix的下载(http://sourceforge.net/projects/archive-crawler/)安装、配置,就不罗嗦了,可以自己找找资
- 【Zookeeper】FAQ
bit1129
zookeeper
1.脱离IDE,运行简单的Java客户端程序
#ZkClient是简单的Zookeeper~$ java -cp "./:zookeeper-3.4.6.jar:./lib/*" ZKClient
1. Zookeeper是的Watcher回调是同步操作,需要添加异步处理的代码
2. 如果Zookeeper集群跨越多个机房,那么Leader/
- The user specified as a definer ('aaa'@'localhost') does not exist
白糖_
localhost
今天遇到一个客户BUG,当前的jdbc连接用户是root,然后部分删除操作都会报下面这个错误:The user specified as a definer ('aaa'@'localhost') does not exist
最后找原因发现删除操作做了触发器,而触发器里面有这样一句
/*!50017 DEFINER = ''aaa@'localhost' */
原来最初
- javascript中showModelDialog刷新父页面
bozch
JavaScript刷新父页面showModalDialog
在页面中使用showModalDialog打开模式子页面窗口的时候,如果想在子页面中操作父页面中的某个节点,可以通过如下的进行:
window.showModalDialog('url',self,‘status...’); // 首先中间参数使用self
在子页面使用w
- 编程之美-买书折扣
bylijinnan
编程之美
import java.util.Arrays;
public class BookDiscount {
/**编程之美 买书折扣
书上的贪心算法的分析很有意思,我看了半天看不懂,结果作者说,贪心算法在这个问题上是不适用的。。
下面用动态规划实现。
哈利波特这本书一共有五卷,每卷都是8欧元,如果读者一次购买不同的两卷可扣除5%的折扣,三卷10%,四卷20%,五卷
- 关于struts2.3.4项目跨站执行脚本以及远程执行漏洞修复概要
chenbowen00
strutsWEB安全
因为近期负责的几个银行系统软件,需要交付客户,因此客户专门请了安全公司对系统进行了安全评测,结果发现了诸如跨站执行脚本,远程执行漏洞以及弱口令等问题。
下面记录下本次解决的过程以便后续
1、首先从最简单的开始处理,服务器的弱口令问题,首先根据安全工具提供的测试描述中发现应用服务器中存在一个匿名用户,默认是不需要密码的,经过分析发现服务器使用了FTP协议,
而使用ftp协议默认会产生一个匿名用
- [电力与暖气]煤炭燃烧与电力加温
comsci
在宇宙中,用贝塔射线观测地球某个部分,看上去,好像一个个马蜂窝,又像珊瑚礁一样,原来是某个国家的采煤区.....
不过,这个采煤区的煤炭看来是要用完了.....那么依赖将起燃烧并取暖的城市,在极度严寒的季节中...该怎么办呢?
&nbs
- oracle O7_DICTIONARY_ACCESSIBILITY参数
daizj
oracle
O7_DICTIONARY_ACCESSIBILITY参数控制对数据字典的访问.设置为true,如果用户被授予了如select any table等any table权限,用户即使不是dba或sysdba用户也可以访问数据字典.在9i及以上版本默认为false,8i及以前版本默认为true.如果设置为true就可能会带来安全上的一些问题.这也就为什么O7_DICTIONARY_ACCESSIBIL
- 比较全面的MySQL优化参考
dengkane
mysql
本文整理了一些MySQL的通用优化方法,做个简单的总结分享,旨在帮助那些没有专职MySQL DBA的企业做好基本的优化工作,至于具体的SQL优化,大部分通过加适当的索引即可达到效果,更复杂的就需要具体分析了,可以参考本站的一些优化案例或者联系我,下方有我的联系方式。这是上篇。
1、硬件层相关优化
1.1、CPU相关
在服务器的BIOS设置中,可
- C语言homework2,有一个逆序打印数字的小算法
dcj3sjt126com
c
#h1#
0、完成课堂例子
1、将一个四位数逆序打印
1234 ==> 4321
实现方法一:
# include <stdio.h>
int main(void)
{
int i = 1234;
int one = i%10;
int two = i / 10 % 10;
int three = i / 100 % 10;
- apacheBench对网站进行压力测试
dcj3sjt126com
apachebench
ab 的全称是 ApacheBench , 是 Apache 附带的一个小工具 , 专门用于 HTTP Server 的 benchmark testing , 可以同时模拟多个并发请求。前段时间看到公司的开发人员也在用它作一些测试,看起来也不错,很简单,也很容易使用,所以今天花一点时间看了一下。
通过下面的一个简单的例子和注释,相信大家可以更容易理解这个工具的使用。
- 2种办法让HashMap线程安全
flyfoxs
javajdkjni
多线程之--2种办法让HashMap线程安全
多线程之--synchronized 和reentrantlock的优缺点
多线程之--2种JAVA乐观锁的比较( NonfairSync VS. FairSync)
HashMap不是线程安全的,往往在写程序时需要通过一些方法来回避.其实JDK原生的提供了2种方法让HashMap支持线程安全.
- Spring Security(04)——认证简介
234390216
Spring Security认证过程
认证简介
目录
1.1 认证过程
1.2 Web应用的认证过程
1.2.1 ExceptionTranslationFilter
1.2.2 在request之间共享SecurityContext
1
- Java 位运算
Javahuhui
java位运算
// 左移( << ) 低位补0
// 0000 0000 0000 0000 0000 0000 0000 0110 然后左移2位后,低位补0:
// 0000 0000 0000 0000 0000 0000 0001 1000
System.out.println(6 << 2);// 运行结果是24
// 右移( >> ) 高位补"
- mysql免安装版配置
ldzyz007
mysql
1、my-small.ini是为了小型数据库而设计的。不应该把这个模型用于含有一些常用项目的数据库。
2、my-medium.ini是为中等规模的数据库而设计的。如果你正在企业中使用RHEL,可能会比这个操作系统的最小RAM需求(256MB)明显多得多的物理内存。由此可见,如果有那么多RAM内存可以使用,自然可以在同一台机器上运行其它服务。
3、my-large.ini是为专用于一个SQL数据
- MFC和ado数据库使用时遇到的问题
你不认识的休道人
sqlC++mfc
===================================================================
第一个
===================================================================
try{
CString sql;
sql.Format("select * from p
- 表单重复提交Double Submits
rensanning
double
可能发生的场景:
*多次点击提交按钮
*刷新页面
*点击浏览器回退按钮
*直接访问收藏夹中的地址
*重复发送HTTP请求(Ajax)
(1)点击按钮后disable该按钮一会儿,这样能避免急躁的用户频繁点击按钮。
这种方法确实有些粗暴,友好一点的可以把按钮的文字变一下做个提示,比如Bootstrap的做法:
http://getbootstrap.co
- Java String 十大常见问题
tomcat_oracle
java正则表达式
1.字符串比较,使用“==”还是equals()? "=="判断两个引用的是不是同一个内存地址(同一个物理对象)。 equals()判断两个字符串的值是否相等。 除非你想判断两个string引用是否同一个对象,否则应该总是使用equals()方法。 如果你了解字符串的驻留(String Interning)则会更好地理解这个问题。
- SpringMVC 登陆拦截器实现登陆控制
xp9802
springMVC
思路,先登陆后,将登陆信息存储在session中,然后通过拦截器,对系统中的页面和资源进行访问拦截,同时对于登陆本身相关的页面和资源不拦截。
实现方法:
1 2 3 4 5 6 7 8 9 10 11 12 13 14 15 16 17 18 19 20 21 22 23
 项目新增的mybatis依赖
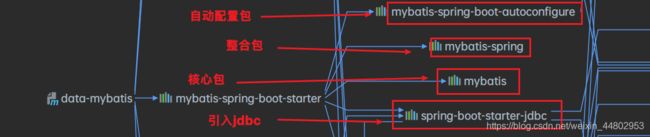
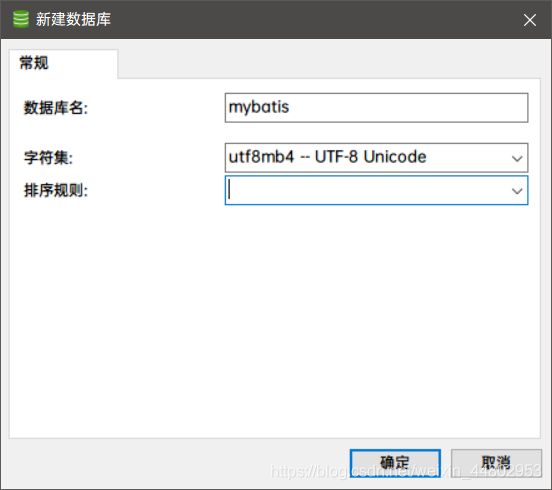


 然后把yml中的schema配置给注释掉


