Spring Boot学习笔记21——安全管理(用户认证)
1. Spring Security介绍
在开发过程中,我们常常涉及用户权限登陆,用来验明身份和赋予指定权限,达到保护项目安全和项目访问效果等。基于此,Spring家族提供了Spring Security用于解决安全访问的框架,在Spring Boot中可以对其进行整合并且还提供了自动化配置
1.1 常见的安全管理功能
- MVC Security:是Spring Boot整合Spring MVC搭建WEB应用的常用安全框架
- WebFlux Security:是Spring Boot整合Spring WebFlux搭建WEB应用的安全框架
- OAuth2:是大型项目的安全管理框架,可实现第三方认证,单点登陆等功能
- Actuator Security:用于对项目的一些运行环境提供安全监控,如Health健康信息,Info运行信息等,多用于运维
2. 快速入门
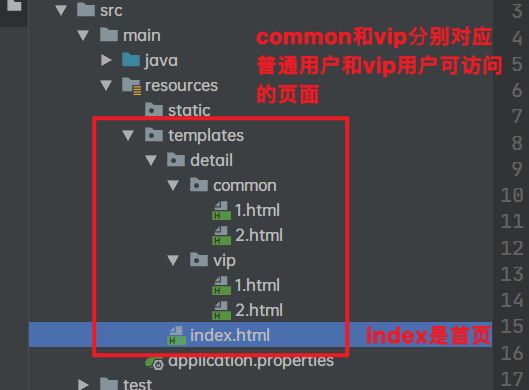
Spring Security主要包含两个内容,Authentication(认证,确认用户是否登陆并进行管控)和Authorization(授权,指定用户有指定权限并对其管控);下面我们通过Spring Boot整合Spring Security实现的MVC Security项目(简单的访问电影列表项目)来快速入门
<html xmlns="http://www.w3.org/1999/xhtml" xmlns:th="http://www.thymeleaf.org" >
<head>
	<meta http-equiv="Content-Type" content="text/html; charset=UTF-8">
	<title>影视直播厅title>
head>
<body>
<h1 align="center">欢迎进入电影网站首页h1>
<div>
	<h2 align="center">游客您好,如果想查看电影<a th:href="@{/userLogin}">请登录a>h2>
div>
<div>
	<h2 align="center"><span style="color: #007bff">span>您好,您的用户权限为<span style="color:darkkhaki">span>,您有权观看以下电影h2>
	<form th:action="@{/mylogout}" method="post">
		<input th:type="submit" th:value="注销" />
	form>
div>
<hr>
<div >
	<h3>普通电影h3>
	<ul>
		<li><a th:href="@{/detail/common/1}">飞驰人生a>li>
		<li><a th:href="@{/detail/common/2}">夏洛特烦恼a>li>
	ul>
div>
<div >
	<h3>VIP专享h3>
	<ul>
		<li><a th:href="@{/detail/vip/1}">速度与激情a>li>
		<li><a th:href="@{/detail/vip/2}">猩球崛起a>li>
	ul>
div>
body>
html>
我们先看一下common/1.html,其中有一个
标签,并配置了属性th:href="@{/}",这是用于配置返回首页的链接
接下来编写web控制层controller.FileController
@Controller
public class FileController {

    @GetMapping("/detail/{type}/{path}")
    public String toDetail(@PathVariable("type") String type,
                           @PathVariable("path") String path){
     //影片详情页
        return "detail/"+type+"/"+path;
    }
}
这里只是写了一个页面跳转请求的方法,还未涉及Spring Security,没有用户登陆提交以及退出操作的控制方法,下面将会讲到
- 开启安全管理效果测试
引入spring-boot-starter-security启动器
<dependency>
     <groupId>org.springframework.bootgroupId>
     <artifactId>spring-boot-starter-securityartifactId>
dependency>
需要注意的是,一旦引入spring-boot-starter-security依赖,MVC Security和WebFlux Security(WebFlux Security生效的另一个前提是项目属于WebFlux Security)所负责的安全功能就会立即生效,对于OAuth2,则还需引入其他安全依赖
启动项目后我们可以看到控制台打印输出了一串字符串,这是security password,每次security项目启动后都会随机生成,用于登陆测试的

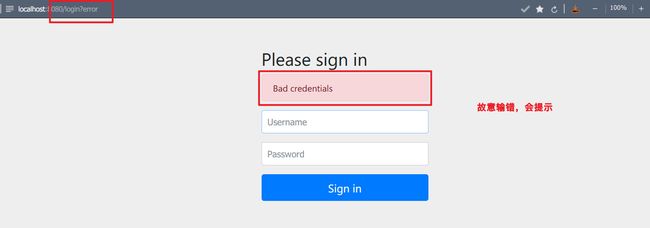
运行项目我们会发现跳转到一个登陆界面,这是加入security启动器后所默认的登陆界面(访问项目会自动跳转到/login),我们只需输入用户名user,密码复制控制台的随机密码即可登陆,否则会提示用户名或密码错误(输入错误则重定向到/login?error)
3. MVC Security安全配置介绍
MVC Security默认安全配置实在SecurityAutoConfiguration(会自动导入并自动化配置SpringBootWebSecurityConfiguration)和UserDetailsServiceAutoConfiguration(用于配置用户身份信息)中实现的
通过自定义WebSecurityConfigurationAdapter类型的Bean组件,可以完全关闭Security提供的web应用默认安全配置,但是不会关闭UserDetailsService用户信息自动配置类。如果要关闭UserDetailsService默认用户信息配置,可以自定义UserDetailsService、AuthenticationProvider或AuthenticationManager类型的Bean组件。另外,可以通过自定义WebSecurityConfigurerAdapter类型的Bean组件覆盖默认的访问规则
3.1 WebSecurityConfigurerAdapter类主要方法
| 方法 | 描述 |
|---|---|
configure(AuthenticationManagerBuilder auth) |
定制用户认证管理器来实现用户认证 |
configure(HttpSecurity http) |
定制基于HTTP请求的用户访问控制 |
4. 自定义用户认证
通过自定义
WebSecurityConfigurerAdapter类型的Bean组件,并重写configure(AuthenticationManagerBuilder auth)方法可以自定义用户认证
针对自定义用户认证,Spring Security提供了多种自定义认证方式
- In-Memory Authentication(内存身份认证)
- JDBC Authentication(JDBC身份认证)
- LDAP Authentication(LDAP身份认证)
- Authentication Provider(身份认证提供商)
- UserDetailService(身份详情服务)
4.1 内存身份认证
In-Memory Authentication(内存身份认证)是最简单的身份认证方式,主要用于Security安全认证体验和测试。自定义内存身份认证时,只需在重写的
configure(AuthenticationManagerBuilder auth)方法中定义测试用户即可
4.1.1 实现步骤
- 自定义
WebSecurityConfigurerAdapter配置类
创建config.SecurityConfig配置类,用于进行MVC Security自定义配置
@EnableWebSecurity//开去NVC Security安全支持
public class SecurityConfig extends WebSecurityConfigurerAdapter {

}
其中的@EnableWebSecurity注解≈@Configuration+Import+EnableGlobalAuthentication
@Configuration:酱当前自定义的SecurityConfig类作为SpringBoot的配置类Import:根据pom所导入的Web模块和Security模块进行自定义配置EnableGlobalAuthentication:开启自定义的全局认证
需要注意的时如果式Spring WebFlux框架,则需要导入Reactive Web模块和Security模块,并使用
EnableWebFluxSecurity开启基于WebFlux Security的安全支持
- 使用内存进行身份认证
重写configure(AuthenticationManagerBuilder auth)方法,并在该方法中使用内存身份认证的方式进行自定义用户认证
config.SecurityConfig
/**
 * 该方法中使用内存身份认证的方式自定义了认证用户信息
 * 定义用户认证信息时,设置了两个用户,包括用户名、密码和角色
 */
@EnableWebSecurity//开去NVC Security安全支持
public class SecurityConfig extends WebSecurityConfigurerAdapter {

    @Override
    protected void configure(AuthenticationManagerBuilder auth) throws Exception {

        //密码需要设置编码器
        BCryptPasswordEncoder encoder = new BCryptPasswordEncoder();
        //1.使用内存用户信息,作为测试使用
        auth.inMemoryAuthentication().passwordEncoder(encoder)
                .withUser("tiaotiao").password(encoder.encode("123456"))
                .roles("common").and().withUser("条条")
                .password(encoder.encode("123456")).roles("vip");
    }
}
进行自定义用户认证时,需要注意以下几个点
- 从Spring Security5以后,自定义i用户认证必须设置密码编码器用于保护密码,否则会报异常
- 密码编码器有多种,如BcryptPasswordEncoder、Pbkdf2PasswordEncoder、ScryptPasswordEncoder等,不限于上面所展示的
- 可定义用户角色roles,也可定义权限authorities。在进行赋值时,权限通常实在角色值的基础上添加
ROLE_前缀。如authorities("ROLE_common")和roles("common")是等效的- 可以为某个用户一次定义多个权限/角色,如
authorities("ROLE_common","ROLE_common")和roles("common","vip")
需要注意的是,在实际开发过程中,用户都是在页面注册和登陆时进行认证管理的,而非在程序内部使用内存管理的方式手动控制注册用户,所以 上面的内存身份认证方式无法用于实际中,我们只是初学拿来练手哦

跳转成功(大家可以看控制台是没有打印随机密码的)
5. JDBC身份认证
JDBC身份认证是通过JDBC连接数据库对已有的用户身份进行认证
- 数据准备
我们需要先创建好名为springbootdata的数据库,并创建好三个表(t_customer(用户表)、t_authority(权限表)和t_customer_authority(用户权限关联表))和添加数据
security.sql语句如下
# 选择使用数据库
USE springbootdata;
# 创建表t_customer并插入相关数据
DROP TABLE IF EXISTS `t_customer`;
CREATE TABLE `t_customer` (
  `id` int(20) NOT NULL AUTO_INCREMENT,
  `username` varchar(200) DEFAULT NULL,
  `password` varchar(200) DEFAULT NULL,
  `valid` tinyint(1) NOT NULL DEFAULT '1',
  PRIMARY KEY (`id`)
) ENGINE=InnoDB AUTO_INCREMENT=4 DEFAULT CHARSET=utf8;
INSERT INTO `t_customer` VALUES ('1', 'tiaotiao', '$2a$10$5ooQI8dir8jv0/gCa1Six.GpzAdIPf6pMqdminZ/3ijYzivCyPlfK', '1');
INSERT INTO `t_customer` VALUES ('2', '条条', '$2a$10$5ooQI8dir8jv0/gCa1Six.GpzAdIPf6pMqdminZ/3ijYzivCyPlfK', '1');
# 创建表t_authority并插入相关数据
DROP TABLE IF EXISTS `t_authority`;
CREATE TABLE `t_authority` (
  `id` int(20) NOT NULL AUTO_INCREMENT,
  `authority` varchar(20) DEFAULT NULL,
  PRIMARY KEY (`id`)
) ENGINE=InnoDB AUTO_INCREMENT=3 DEFAULT CHARSET=utf8;
INSERT INTO `t_authority` VALUES ('1', 'ROLE_common');
INSERT INTO `t_authority` VALUES ('2', 'ROLE_vip');
# 创建表t_customer_authority并插入相关数据
DROP TABLE IF EXISTS `t_customer_authority`;
CREATE TABLE `t_customer_authority` (
  `id` int(20) NOT NULL AUTO_INCREMENT,
  `customer_id` int(20) DEFAULT NULL,
  `authority_id` int(20) DEFAULT NULL,
  PRIMARY KEY (`id`)
) ENGINE=InnoDB AUTO_INCREMENT=5 DEFAULT CHARSET=utf8;
INSERT INTO `t_customer_authority` VALUES ('1', '1', '1');
INSERT INTO `t_customer_authority` VALUES ('2', '2', '2');

# 记住我功能中创建持久化Token存储的数据表
create table persistent_logins (username varchar(64) not null,
								series varchar(64) primary key,
								token varchar(64) not null,
								last_used timestamp not null);
在使用JDBC身份认证时要注意以下几点
- 创建用户表t_customer时,用户名username必须唯一,因为Security在进行用户查询时先判断username是否唯一
- 创建t_customer时,必须额外定义一个tinyint类型的字段(对应boolean),用于校验用户是否合法(默认合法)
- 初始化t_customer数据时,插入的用户密码password必须是对应编码器编码后的密码
- 初始化权限表t_authority数据时,t_authority值必须带有“ROLE_”前缀,而默认的用户角色值则是对应权限值去掉“ROLE_”前缀
- 添加JDBC连接数据库的依赖启动器
<dependency>
      <groupId>org.springframework.bootgroupId>
      <artifactId>spring-boot-starter-jdbcartifactId>
dependency>

<dependency>
      <groupId>mysqlgroupId>
      <artifactId>mysql-connector-javaartifactId>
dependency>
3.进行数据库连接配置
# mysql数据库连接配置
spring.datasource.url=jdbc:mysql://localhost:3306/springbootdata?serverTimezone=UTC
spring.datasource.username=root
spring.datasource.password=root
- 使用JDBC进行身份认证
SecurityConfig
@EnableWebSecurity//开去NVC Security安全支持
public class SecurityConfig extends WebSecurityConfigurerAdapter {

    @Autowired
    private DataSource dataSource;
    @Override
    protected void configure(AuthenticationManagerBuilder auth) throws Exception {

        //密码需要设置编码器
        BCryptPasswordEncoder encoder = new BCryptPasswordEncoder();
        //1.使用内存用户信息,作为测试使用
//        auth.inMemoryAuthentication().passwordEncoder(encoder)
//                .withUser("tiaotiao").password(encoder.encode("123456"))
//                .roles("common").and().withUser("条条")
//                .password(encoder.encode("123456")).roles("vip");

        // 2、使用JDBC进行身份认证
        String userSQL ="select username,password,valid from t_customer " +
                "where username = ?";
        String authoritySQL="select c.username,a.authority from t_customer c,t_authority a,"+
                "t_customer_authority ca where ca.customer_id=c.id " +
                "and ca.authority_id=a.id and c.username =?";
        auth.jdbcAuthentication().passwordEncoder(encoder)
                .dataSource(dataSource)
                .usersByUsernameQuery(userSQL)
                .authoritiesByUsernameQuery(authoritySQL);
    }
}
- 效果测试(略,效果和使用内存进行身份认证一致)
6. UserDetailsService身份认证
对于用户流量较大的项目,频繁的使用JDBC身份认证查询不仅操作麻烦,而且会降低网站相应速度。对于一个完善的项目来讲,如果某些业务已经实现类用户信息查询的服务,就没不要再使用JDBC身份认证了。下面假设当前项目中已经有用户信息查询的业务方法,在此基础上使用UserDetailsService进行自定义 身份认证
- 其他代码准备
导入依赖
<dependency>
      <groupId>org.springframework.bootgroupId>
      <artifactId>spring-boot-starter-data-redisartifactId>
dependency>

<dependency>
      <groupId>org.springframework.bootgroupId>
      <artifactId>spring-boot-starter-data-jpaartifactId>
dependency>
创建RedisConfig
@Configuration
public class RedisConfig {

    /**
     *  定制Redis API模板RedisTemplate
     * @param redisConnectionFactory
     * @return
     */
    @Bean
    public RedisTemplate<Object, Object> redisTemplate(RedisConnectionFactory redisConnectionFactory) {

        RedisTemplate<Object, Object> template = new RedisTemplate();
        template.setConnectionFactory(redisConnectionFactory);
        // 使用JSON格式序列化对象,对缓存数据key和value进行转换
        Jackson2JsonRedisSerializer jacksonSeial = new Jackson2JsonRedisSerializer(Object.class);
        // 解决查询缓存转换异常的问题
        ObjectMapper om = new ObjectMapper();
        // 指定要序列化的域,field,get和set,以及修饰符范围,ANY是都有包括private和public
        om.setVisibility(PropertyAccessor.ALL, JsonAutoDetect.Visibility.ANY);
        // 指定序列化输入的类型,类必须是非final修饰的,final修饰的类,比如String,Integer等会跑出异常
        om.enableDefaultTyping(ObjectMapper.DefaultTyping.NON_FINAL);
        jacksonSeial.setObjectMapper(om);
        // 设置RedisTemplate模板API的序列化方式为JSON
        template.setDefaultSerializer(jacksonSeial);
        return template;
    }

    /**
     * 定制Redis缓存管理器RedisCacheManager,实现自定义序列化并设置缓存时效
     * @param redisConnectionFactory
     * @return
     */
    @Bean
    public RedisCacheManager cacheManager(RedisConnectionFactory redisConnectionFactory) {

        // 分别创建String和JSON格式序列化对象,对缓存数据key和value进行转换
        RedisSerializer<String> strSerializer = new StringRedisSerializer();
        Jackson2JsonRedisSerializer jacksonSeial = new Jackson2JsonRedisSerializer(Object.class);
        // 解决查询缓存转换异常的问题
        ObjectMapper om = new ObjectMapper();
        om.setVisibility(PropertyAccessor.ALL, JsonAutoDetect.Visibility.ANY);
        om.enableDefaultTyping(ObjectMapper.DefaultTyping.NON_FINAL);
        jacksonSeial.setObjectMapper(om);
        // 定制缓存数据序列化方式及时效
        RedisCacheConfiguration config = RedisCacheConfiguration.defaultCacheConfig()
                .entryTtl(Duration.ofDays(1))   // 设置缓存有效期为1天
                .serializeKeysWith(RedisSerializationContext.SerializationPair.fromSerializer(strSerializer))
                .serializeValuesWith(RedisSerializationContext.SerializationPair.fromSerializer(jacksonSeial))
                .disableCachingNullValues();   // 对空数据不进行缓存
        RedisCacheManager cacheManager = RedisCacheManager.builder(redisConnectionFactory).cacheDefaults(config).build();
        return cacheManager;
    }
}
在domain下创建实体类
@Entity(name = "t_customer")
public class Customer {

    @Id
    @GeneratedValue(strategy = GenerationType.IDENTITY)
    private Integer id;
    private String username;
    private String password;
    //省略getset、toString和构造方法
    }
@Entity(name = "t_authority ")
public class Authority {

    @Id
    @GeneratedValue(strategy = GenerationType.IDENTITY)
    private Integer id;
    private String authority ;
    //省略getset、toString和构造方法
    }
在repository包中创建AuthorityRepository和CustomerRepository
AuthorityRepository
public interface AuthorityRepository extends JpaRepository<Authority,Integer> {

    @Query(value = "select a.* from t_customer c,t_authority a,t_customer_authority ca where ca.customer_id=c.id and ca.authority_id=a.id and c.username =?1",nativeQuery = true)
    public List<Authority> findAuthoritiesByUsername(String username);
}
CustomerRepository
public interface CustomerRepository extends JpaRepository<Customer,Integer> {

    Customer findByUsername(String username);
}
- 定义查询用户及角色信息的服务接口
为了方便演示,假设项目重存在一个CustomerService业务处理类,用来通过用户名查询用户信息及权限信息
CustomerService
@Service
public class CustomerService {
     //对用户数据结合redis缓存进行查询

    @Autowired
    private CustomerRepository customerRepository;
    @Autowired
    private AuthorityRepository authorityRepository;
    @Autowired
    private RedisTemplate redisTemplate;

    public Customer getCustomer(String username){
     //业务控制:使用唯一用户名查询用户信息
        Customer customer = null;
        Object o = redisTemplate.opsForValue().get("customer_"+username);
        if(o != null){

            customer=(Customer) o;
        }else {

            customer = customerRepository.findByUsername(username);
            if(customer != null){

                redisTemplate.opsForValue().set("customer_"+username,customer);
            }
        }
        return customer;
    }

    public List<Authority> getCustomerAuthority(String username){
     //业务控制:使用唯一用户名查询用户权限
        List<Authority> authorities = null;
        Object o = redisTemplate.opsForValue().get("authorities_"+username);
        if(o != null){

            authorities=(List<Authority>) o;
        }else {

            authorities = authorityRepository.findAuthoritiesByUsername(username);
            if(authorities != null){

                redisTemplate.opsForValue().set("authorities_"+username,authorities);
            }
        }
        return authorities;
    }
}
- 定义UserDetailsService用于封装认证用户信息
UserDetailsService是Security提供的用于封装认证用户信息的接口,该接口提供的
loadUserByUsername(String s)方法用于通用户名加载信息。使用UserDetailsService进行身份认证时,自定义一个UserDetailsService接口的实现类,通过loadUserByUsername(String s)方法封装用户详情信息并返回UserDetails对象供Security认证使用
UserDetailsServiceImpl
/**
 * 重写了UserDetailsService接口的loadUserByUsername(String s)方法,
 * 用于借助CustomerService业务处理类获取用户信息和权限信息,并通过UserDetails进行认证用户信息封装
 *
 * 需要注意的是,CustomerService业务处理类获取User实体类时,必须对当前用户进行非空判断,这里使用throw进行异常处理,
 * 如果没有使用throw异常处理,security将无法识别,导致程序报错
 */
@Service//自定义一个UserDetailsService接口实现类进行用户认证信息封装
public class UserDetailsServiceImpl implements UserDetailsService {

    @Autowired
    private CustomerService customerService;
    @Override
    public UserDetails loadUserByUsername(String s) throws UsernameNotFoundException {

        //通过业务方法获取用户及权限信息
        Customer customer = customerService.getCustomer(s);
        List<Authority> authorities = customerService.getCustomerAuthority(s);
        //对用户权限进行封装
        List<SimpleGrantedAuthority> list = authorities.stream()
                .map(authority -> new SimpleGrantedAuthority(authority.getAuthority()))
                .collect(Collectors.toList());
        //返回封装的USerDetails用户详情类
        if(customer != null){

            UserDetails userDetails = new User(customer.getUsername(),customer.getPassword(),list);
            return userDetails;
        }else{

            //如果查询的用户不存在,必须抛出此异常
            throw new UsernameNotFoundException("当前用户不存在");
        }
    }
}
- 使用UserDetailsService进行身份认证
接下来我们在config(AuthrnticationManagerBuilder auth)方法中使用UserDetailsService身份认证
SecurityConfig
@EnableWebSecurity//开去NVC Security安全支持
public class SecurityConfig extends WebSecurityConfigurerAdapter {

    @Autowired
    private UserDetailsService userDetailsService;

    @Override
    protected void configure(AuthenticationManagerBuilder auth) throws Exception {

        //密码需要设置编码器
        BCryptPasswordEncoder encoder = new BCryptPasswordEncoder();
        //3.使用UserDetailsService进行身份认证
        auth.userDetailsService(userDetailsService).passwordEncoder(encoder);
    }
}
- 效果测试(略,效果同上)
关于SpringBoot整合SpringSecurity的自定义用户认证讲解王弼。内存身份认证最简单,JDBC和UserDetailsService实际开发中使用较多,而这两种主要根据实际开发中已有的业务支持来确定
该SpringBoot学习笔记学习自黑马程序员出版的《Spring Boot企业级开发教程》,是对知识点的整理和自我认识的梳理,如有不当之处,欢迎指出


