自己动手开发了一个 SpringMVC 框架,用起来太香了
一、介绍
在日常的 web 开发中,熟悉 java 的同学一定知道,Spring MVC 可以说是目前最流行的框架,之所以如此的流行,原因很简单:编程简洁、上手简单!
我记得刚开始入行的时候,最先接触到的是Struts1 + Hibernate + Spring来web系统的整体开发框架,简单的描述一下当时的编程心情:超难用,各种配置项很多,而且不容易快速入手!
之后,新的项目换成了Struts2 + hibernate + spring来作为主体开发框架,Struts2相比Struts1编程要简单很多,而且加强了对拦截器与IoC的支持,而在Struts1中,这些特性是很难做的的!
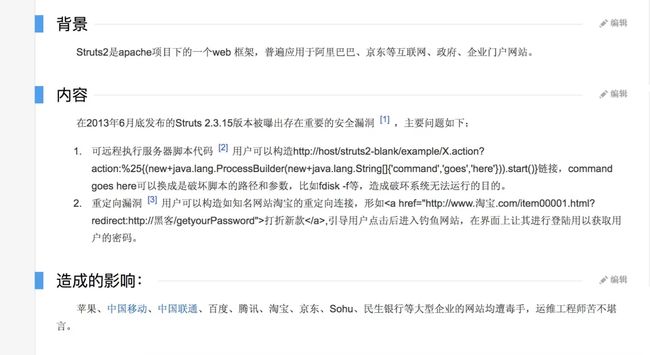
然而随着Struts2的使用量越来越广,业界爆出关于Struts2的bug和安全漏洞却越来越多!
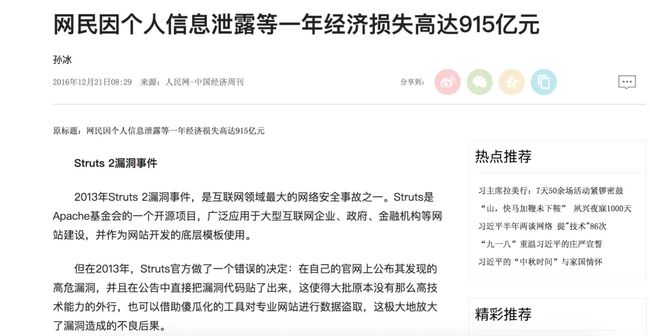
黑客们可以轻易的利用安全漏洞直接绕开安全防线,获取用的隐私数据,网名因个人信息泄露造成的经济损失高达 915 亿元!
至此很多开发者开始转到SpringMVC框架阵营!
今天我们要介绍的主角就是SpringMVC框架,刚开始玩这个的时候,给我最直接的感觉就是:很容易简单!
直接通过几个注解就可以完成方法的暴露,比起Struts2中繁琐的xml配置,SpringMVC的使用可以说更加友好!
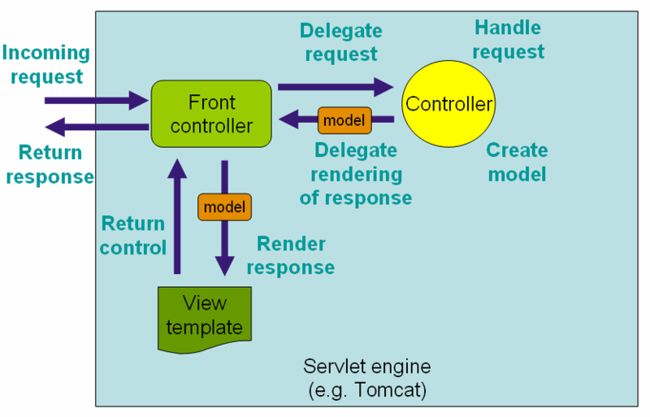
熟悉SpringMVC框架的同学一定清楚下面这张图,
这张图就是 SpringMVC 在处理 http 请求的整个流程中所做的一些事情。
- 1、用户发送请求至前端控制器DispatcherServlet
- 2、DispatcherServlet收到请求调用HandlerMapping处理器映射器。
- 3、处理器映射器根据请求url找到具体的处理器,生成处理器对象及处理器拦截器(如果有则生成)一并返回给DispatcherServlet。
- 4、DispatcherServlet通过HandlerAdapter处理器适配器调用处理器
- 5、执行处理器(Controller,也叫后端控制器)。
- 6、Controller执行完成返回ModelAndView
- 7、HandlerAdapter将controller执行结果ModelAndView返回给DispatcherServlet
- 8、DispatcherServlet将ModelAndView传给ViewReslover视图解析器
- 9、ViewReslover解析后返回具体View
- 10、DispatcherServlet对View进行渲染视图(即将模型数据填充至视图中)。
- 11、DispatcherServlet响应用户。
DispatcherServlet 主要承担接收请求、响应结果、转发等作用,剩下的就交给容器来处理!
基于上面的流程,我们可以编写出一款简化版的Spring MVC框架,话不多说,直接撸起来!
二、程序实践
首先上图!
这个就是我们简易版的Spring MVC框架的实现流程图!
- 1、首先创建一个DispatcherServlet类,在服务启动的时候,读取要扫描的包路径,然后通过反射将类信息存储到ioc容器,同时通过@Autowired注解,实现自动依赖注入,最后读取@RequestMapping注解中的方法,将映射路径与类的关系存储到映射容器中。
- 2、当用户发起请求的时候,通过请求路径到映射容器中找到对应的执行类,然后调用具体的方法,发起逻辑处理,最后将处理结果返回给前端用户!
以下是具体实践过程!
2.1、创建扫描注解
因为Spring MVC基本全部都是基于注解开发,因此我们事先也需要创建对应的注解,各个含义与Spring MVC一致!
- 控制层注解
/**
 * 控制层注解
 * @Controller
 */
@Target({ElementType.TYPE})
@Retention(RetentionPolicy.RUNTIME)
@Documented
public @interface Controller {
String value() default “”;
}
- 请求路径注解
/**

  请求路径注解

  @RequestMapping

 */

@Target({ElementType.METHOD,ElementType.TYPE})

@Retention(RetentionPolicy.RUNTIME)

@Documented

public @interface RequestMapping {
String value() default “”;
}
- 参数注解
/**

  参数注解

  @RequestParam

 */

@Target({ElementType.PARAMETER})

@Retention(RetentionPolicy.RUNTIME)

@Documented

public @interface RequestParam {
String value() default “”;
}
- 服务层注解
/**

  服务层注解

  @Controller

 */

@Target({ElementType.TYPE})

@Retention(RetentionPolicy.RUNTIME)

@Documented

public @interface Service {
String value() default “”;
}
- 自动装载注解
/**

  自动装载注解

  @Autowrited

 */

@Target({ElementType.FIELD})

@Retention(RetentionPolicy.RUNTIME)

@Documented

public @interface Autowired {
String value() default “”;
}
2.2、编写 DispatcherServlet 类
DispatcherServlet是一个Servlet类,主要承担的任务是:接受前端用户的请求,然后进行转发,最后响应结果给前端用户!
详细代码如下:
/**

  servlet跳转层

 /

@WebServlet(name = “DispatcherServlet”,urlPatterns = “/*”, loadOnStartup = 1, initParams = {
     @WebInitParam(name=“scanPackage”, value=“com.example.mvc”)})

public class DispatcherServlet extends HttpServlet {
private static final long serialVersionUID = 1L;
private static final Logger logger = LoggerFactory.getLogger(DispatcherServlet.class);
/*请求方法映射容器/
private static List
/**
服务启动的时候,进行初始化,流程如下:
1、扫描指定包下所有的类
2、通过反射将类实例,放入ioc容器
3、通过Autowired注解,实现自动依赖注入,也就是set类中的属性
4、通过RequestMapping注解,获取需要映射的所有方法,然后将类信息存放到容器中
@param config
@throws ServletException
/
public void init(ServletConfig config) throws ServletException {
try {
//1、扫描指定包下所有的类
String scanPackage = config.getInitParameter(“scanPackage”);
//1、扫描指定包下所有的类
List
//2、初始化所有类实例,放入ioc容器,也就是map对象中
Map
//3、实现自动依赖注入
doAutowired(iocMap);
//5、初始化方法mapping
initHandleMapping(iocMap);
} catch (Exception e) {
logger.error(“dispatcher-servlet类初始化失败!”,e);
throw new ServletException(e.getMessage());
}
}
/**
@see HttpServlet#doGet(HttpServletRequest request, HttpServletResponse response)
/
protected void doGet(HttpServletRequest request, HttpServletResponse response) throws IOException {
doPost(request, response);
}
/**
@see HttpServlet#doPost(HttpServletRequest request, HttpServletResponse response)
/
protected void doPost(HttpServletRequest request, HttpServletResponse response) throws IOException {
//跳转
doDispatch(request, response);
}
/**
扫描指定包下的类文件
@param packageName
@return
/
private List
if(StringUtils.isBlank(packageName)){
throw new RuntimeException(“mvc配置文件中指定扫描包名为空!”);
}
return PackageHelper.getClassName(packageName);
}
private Map
Map
if(!CollectionUtils.isNotEmpty(classNames)){
throw new RuntimeException(“获取的类为空!”);
}
for (String className : classNames) {
try {
//通过反射机制构造对象
Class clazz = Class.forName(className);
if(clazz.isAnnotationPresent(Controller.class)){
//将类名第一个字母小写
String baneName = firstLowerCase(clazz.getSimpleName());
iocMap.put(baneName, clazz.newInstance());
}else if(clazz.isAnnotationPresent(Service.class)){
//服务层注解判断
Service service = clazz.getAnnotation(Service.class);
String beanName = service.value();
//如果该注解上没有自定义类名,则默认首字母小写
if(StringUtils.isBlank(beanName)){
beanName = clazz.getName();
}
Object instance = clazz.newInstance();
iocMap.put(beanName, instance);
//如果注入的是接口,可以巧妙的用接口的类型作为key
Class[] interfaces = clazz.getInterfaces();
for (Class clazzInterface : interfaces) {
iocMap.put(clazzInterface.getName(), instance);
}
}
} catch (Exception e) {
logger.error(“初始化mvc-ioc容器失败!”,e);
throw new RuntimeException(“初始化mvc-ioc容器失败!”);
}
}
return iocMap;
}
/**
实现自动依赖注入
@throws Exception
*/
private void doAutowired(Map
if(!MapUtils.isNotEmpty(iocMap)){
throw new RuntimeException(“初始化实现自动依赖失败,ioc为空!”);
}
for(Map.Entry
//获取对象下所有的属性
Field[] fields = entry.getValue().getClass().getDeclaredFields();
for (Field field : fields) {
//判断字段上有没有@Autowried注解,有的话才注入
if(field.isAnnotationPresent(Autowired.class)){
try {
Autowired autowired = field.getAnnotation(Autowired.class);
//获取注解上有没有自定义值
String beanName = autowired.value().trim();
if(StringUtils.isBlank(beanName)){
beanName = field.getType().getName();
}
//如果想要访问到私有的属性,我们要强制授权
field.setAccessible(true);
field.set(entry.getValue(), iocMap.get(beanName));
} catch (Exception e) {
logger.error(“初始化实现自动依赖注入失败!”,e);
throw new RuntimeException(“初始化实现自动依赖注入失败”);
}
}
}
}
}
/**
初始化方法mapping
/
private void initHandleMapping(Map
if(!MapUtils.isNotEmpty(iocMap)){
throw new RuntimeException(“初始化实现自动依赖失败,ioc为空”);
}
for(Map.Entry
Class clazz = entry.getValue().getClass();
//判断是否是controller层
if(!clazz.isAnnotationPresent(Controller.class)){
continue;
}
String baseUrl = null;
//判断类有没有requestMapping注解
if(clazz.isAnnotationPresent(RequestMapping.class)){
RequestMapping requestMapping = clazz.getAnnotation(RequestMapping.class);
baseUrl= requestMapping.value();
}
Method[] methods = clazz.getMethods();
for (Method method : methods) {
//判断方法上有没有requestMapping
if(!method.isAnnotationPresent(RequestMapping.class)){
continue;
}
RequestMapping requestMethodMapping = method.getAnnotation(RequestMapping.class);
//"/+",表示将多个"/“转换成”/"
String regex = (baseUrl + requestMethodMapping.value()).replaceAll("/+", “/”);
Pattern pattern = Pattern.compile(regex);
handlerMapping.add(new RequestHandler(pattern, entry.getValue(), method));
}
}
}
/**
servlet请求跳转
@param request
@param response
@throws IOException
*/
private void doDispatch(HttpServletRequest request, HttpServletResponse response) throws IOException {
try {
request.setCharacterEncoding(“UTF-8”);
response.setHeader(“Cache-Control”, “no-cache”);
response.setHeader(“Pragma”, “no-cache”);
response.setDateHeader(“Expires”, -1);
response.setContentType(“text/html”);
response.setHeader(“content-type”, “text/html;charset=UTF-8”);
response.setCharacterEncoding(“UTF-8”);
RequestHandler handle = getHandleMapping(request);
if(Objects.isNull(handle)){
//异常请求地址
logger.warn(“异常请求地址!地址:” + request.getRequestURI());
response.getWriter().append(“error request url”);
return;
}
//获取参数列表
Object[] paramValues = RequestParamHelper.buildRequestParam(handle, request, response);
Object result = handle.getMethod().invoke(handle.getController(), paramValues);
if(result != null){
PrintWriter out = response.getWriter();
out.println(result);
out.flush();
out.close();
}
} catch (Exception e) {
logger.error(“接口请求失败!”,e);
PrintWriter out = response.getWriter();
out.println(“请求异常,请稍后再试”);
out.flush();
out.close();
}
}
/**
将类名第一个字母小写
@param clazzName
@return
/
private String firstLowerCase(String clazzName){
char[] chars = clazzName.toCharArray();
chars[0] += 32;
return String.valueOf(chars);
}
/**
获取用户请求方法名
与handlerMapping中的路径名进行匹配
@param request
@return
*/
private RequestHandler getHandleMapping(HttpServletRequest request){
if(CollectionUtils.isNotEmpty(handlerMapping)){
//获取用户请求路径
String url = request.getRequestURI();
String contextPath = request.getContextPath();
String serviceUrl = url.replace(contextPath, “”).replaceAll("/+", “/”);
for (RequestHandler handle : handlerMapping) {
//正则匹配请求方法名
Matcher matcher = handle.getPattern().matcher(serviceUrl);
if(matcher.matches()){
return handle;
}
}
}
return null;
}
}
这里要重点介绍一下初始化阶段所做的操作!
DispatcherServlet在服务启动阶段,会调用init方法进行服务初始化,此阶段所做的事情主要有以下内容:
- 1、扫描指定包下所有的类信息,返回的结果主要是包名 + 类名
- 2、通过反射机制,将类进行实例化,将类实例化对象存储到ioc容器中,其中key是类名(小些驼峰),value是类对象
- 3、通过Autowired注解找到类对象中的属性,通过小驼峰从ioc容器中寻找对应的属性值,然后进行set操作
- 4、通过Controller和RequestMapping注解寻找需要暴露的方法,并获取对应的映射路径,最后将映射路径
- 5、最后,当前端用户发起一个请求时,DispatcherServlet获取到请求路径之后,通过与RequestMapping中的路径进行匹配,找到对应的controller类中的方法,然后通过invoke完成方法调用,将调用结果返回给前端!
2.3、编写 controller 类
当DispatcherServlet编写完成之后,紧接着我们需要编写对应的controller控制类来接受前端用户请求,下面我们以用户登录为例,程序示例如下:
- 编写一个LoginController控制类,接受前端用户调用
@Controller

@RequestMapping("/user")

public class LoginController {
private UserService userService;
/**
用户登录
@param request
@param response
@param userName
@param userPwd
@return
*/
public String login(HttpServletRequest request, HttpServletResponse response,
String userName,
String userPwd){
boolean result = userService.login(userName, userPwd);
if(result){
return “登录成功!”;
} else {
return “登录失败!”;
}
}
}
- 编写一个UserService服务类,用于判断账户、密码是否正确
public interface UserService {
/**
登录
@param userName
@param userPwd
@return
*/
boolean login(String userName, String userPwd);
}
@Service

public class UserServiceImpl implements UserService {
public boolean login(String userName, String userPwd) {
if(“zhangsan”.equals(userName) && “123456”.equals(userPwd)){
return true;
} else {
return false;
}
}
}
最后,将项目打包成war,通过tomcat启动服务!
在浏览器中访问http://localhost:8080/user/login?userName=hello&userPwd=123,结果显示如下:
当我们将userName和userPwd换成正确的数据,访问地址如下:http://localhost:8080/user/login?userName=zhangsan&userPwd=123456
可以很清晰的看到,服务调用正常!
三、总结
本文主要以Spring MVC框架为背景,手写了一个简易版的Spring MVC框架,虽然功能简陋了一点,但是基本五脏俱全,里面讲解了ioc和自动依赖注入的实现过程,还有前端发起一个路径请求,是如何映射到对应的controller类中的方法上!
当然实际的Spring MVC框架的跳转流程比这个复杂很多很多,里面包括各种拦截器、权限安全管理等等,在后面的文章,小编也会陆续进行详细介绍!
码字不易,如果觉得本篇文章对你有用的话,请给我一键三连!关注作者,后续会有更多的干货分享,请持续关注!
如果你觉得自己学习效率低,缺乏正确的指导,可以加入资源丰富,学习氛围浓厚的技术圈一起学习交流吧!
[Java架构群]
群内有许多来自一线的技术大牛,也有在小厂或外包公司奋斗的码农,我们致力打造一个平等,高质量的JAVA交流圈子,不一定能短期就让每个人的技术突飞猛进,但从长远来说,眼光,格局,长远发展的方向才是最重要的。


