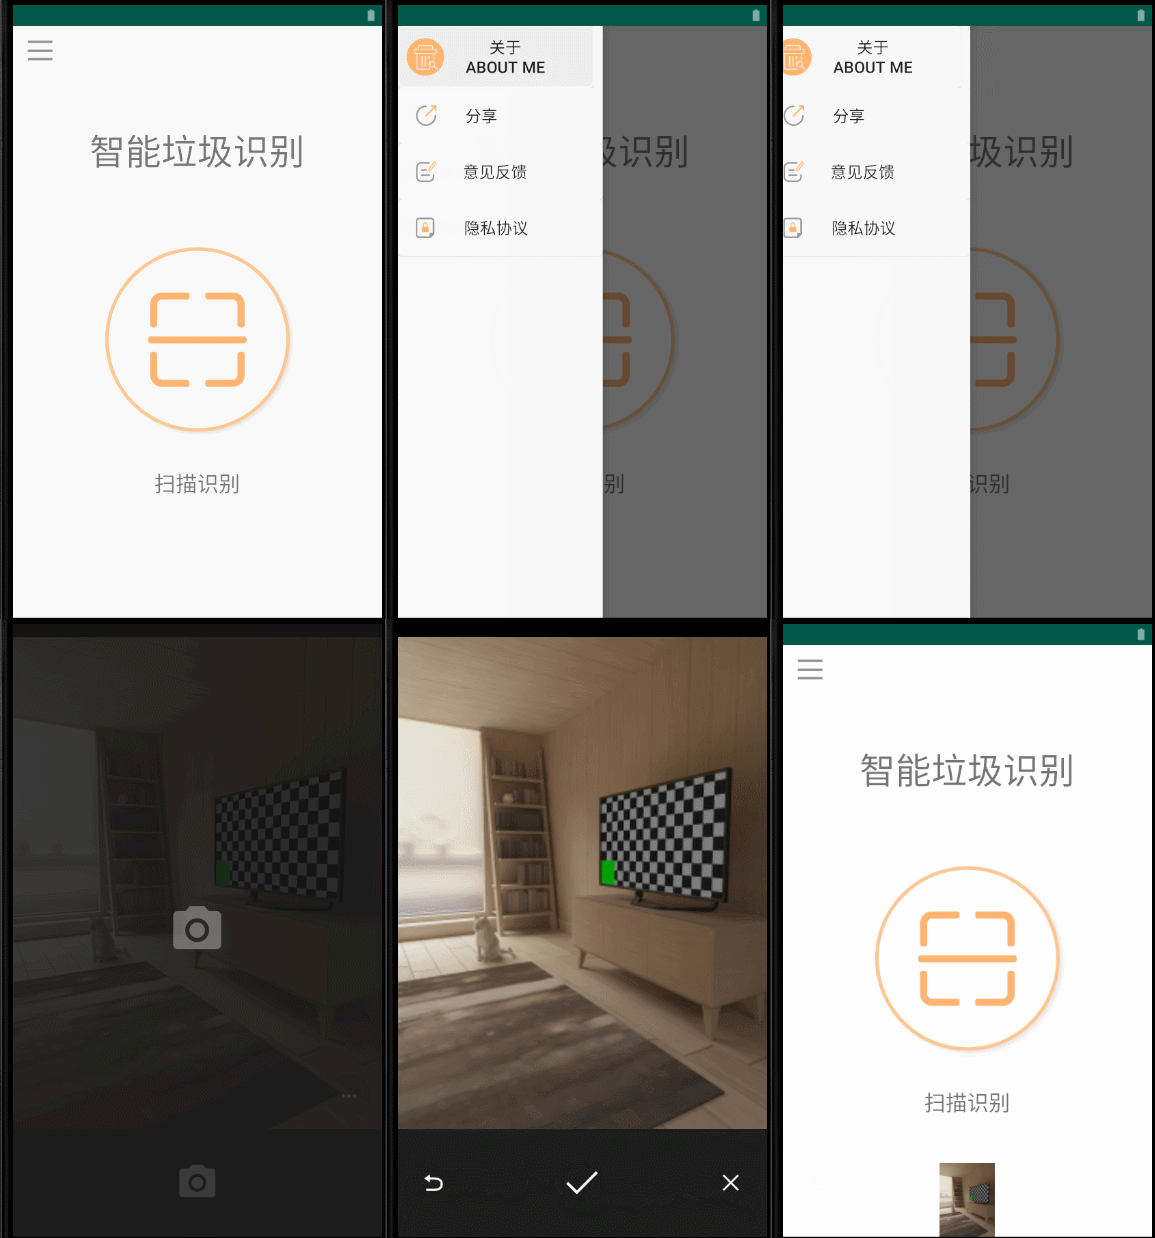
【Android Studio】一款简易appUI界面开发(1)
一款简易垃圾识别app界面设计
本人萌新,由于某位大佬弄学术基金想做个垃圾识别app的原因,就被迫为这款app整个UI界面,然鹅又因为学院并没有开设java课程的原因,只好自学加上东拼西凑,恰逢疫情不用开学,便用在家里的时间做了一款简易界面
(图片是另一位负责美工的同学做的)

由于是自学,中途实在遇到太多坑,在这里便记录下来方便大家学习
侧边栏
在寻找侧边栏这方面的资料时,发现大多数博客都是基于
android.support.v4.widget.DrawerLayout
这个官方包去做的,但不知是新版本不适用还是其他原因,博主并不能导入这个包,在v4这里会出错。在尝试各种方法去找这个包都无法成功后,就放弃了导入这个包的想法;在找了很久博客后终于发现另一个能导入的包
androidx.drawerlayout.widget.DrawerLayout
另外附加一篇博主参考过的博客
侧滑菜单简单实现
调用摄像头
在调用摄像头这块,博主刚开始是参考大神博客上的方式去仿照,获取摄像头权限,点击按钮调用摄像头

结果虽然程序没有错误,但每次点击调用摄像头的按钮程序都会闪退,后来上网一查发现是Android 7.0以上的版本摄像头权限方面有了改变,需要做调整。于是博主又找了许多博客找相关问题,很多都是在onCreate方法里增加代码,又或者是长篇大论的,博主虽然看不懂,但每一个都试了一下,都对博主不行;最后在绝望关头,发现一篇博客
Android 7.0以后相机闪退解决方法
原来问题出在**
最后贴一下各部分的代码图供大家学习,本人萌新,望海涵
activity_main.xml
xml version="1.0" encoding="utf-8"?>
<androidx.drawerlayout.widget.DrawerLayout
    xmlns:android="http://schemas.android.com/apk/res/android"
    android:layout_width="match_parent"
    android:layout_height="match_parent"
    android:id="@+id/main_drawer_layout">


    <LinearLayout
        android:id="@+id/main_content"
        android:layout_width="match_parent"
        android:layout_height="match_parent"
        android:background="#FFFFFF"
        android:orientation="vertical">
        <!--顶部栏-->
        <include layout="@layout/top_bar"
            android:id="@+id/top_view_bar"/>

        <TextView
            android:id="@+id/title"
            android:layout_marginTop="64dp"
            android:layout_width="wrap_content"
            android:layout_height="wrap_content"
            android:text="智能垃圾识别"
            android:textSize="40dp"
            android:layout_gravity="center"/>

        <!--摄像头按钮-->

        <ImageButton
            android:id="@+id/camerabutton"
            android:layout_width="240dp"
            android:layout_height="240dp"
            android:layout_gravity="center"
            android:layout_marginTop="64dp"
            android:background="@null"
            android:src="@mipmap/main_saomiao" />

        <TextView
            android:id="@+id/search"
            android:layout_width="wrap_content"
            android:layout_height="84dp"
            android:layout_gravity="center"
            android:layout_marginTop="24dp"
            android:text="扫描识别"
            android:textSize="24sp" />

    </LinearLayout>

    <!--左侧滑动栏-->
    <LinearLayout
        android:id="@+id/left_layout"
        android:layout_width="600px"
        android:layout_height="match_parent"
        android:layout_gravity="start"
        android:background="#FFFFFF"
        android:orientation="vertical">

        <Button
            android:layout_width="match_parent"
            android:layout_height="180px"
            android:id="@+id/guanyu"
            android:background="@drawable/selector"
            android:layout_marginRight="10dp"
            android:text="关于\nAbout me"
            android:drawableLeft="@mipmap/guanyu"
            android:paddingRight="30dp"
            android:paddingLeft="10dp"
            android:textSize="18dp"/>

        <Button
            android:id="@+id/fenxiang"
            android:layout_width="match_parent"
            android:layout_height="164px"
            android:background="@drawable/selector"
            android:drawableLeft="@mipmap/fenxiang"
            android:text="分享"
            android:paddingRight="85dp"
            android:paddingLeft="20dp"
            android:textSize="18dp"/>
        <Button
            android:layout_width="match_parent"
            android:layout_height="164px"
            android:id="@+id/yijian"
            android:background="@drawable/selector"
            android:drawableLeft="@mipmap/yijian"
            android:text="意见反馈"
            android:paddingRight="55dp"
            android:paddingLeft="20dp"
            android:textSize="18dp"/>
        <Button
            android:layout_width="match_parent"
            android:layout_height="164px"
            android:id="@+id/yinsi"
            android:background="@drawable/selector"
            android:drawableLeft="@mipmap/yinsi"
            android:text="隐私协议"
            android:paddingRight="50dp"
            android:paddingLeft="20dp"
            android:textSize="18dp"/>
    </LinearLayout>

</androidx.drawerlayout.widget.DrawerLayout>
tor_bar.xml
xml version="1.0" encoding="utf-8"?>
<LinearLayout xmlns:android="http://schemas.android.com/apk/res/android"
    android:orientation="horizontal" android:layout_width="match_parent"
    android:id="@+id/top_view_bar"
    android:layout_height="48dp">
    <ImageView
        android:id="@+id/top_view_left_iv"
        android:layout_gravity="center"
        android:paddingLeft="-20dp"
        android:layout_width="80dp"
        android:layout_height="80dp"
        android:src="@mipmap/main_menu"/>

    <ImageView
        android:layout_width="48dp"
        android:layout_height="48dp"
        />
</LinearLayout>
MainActivity.java
package com.example.myapplication1;

import android.app.Activity;
import android.content.Intent;
import android.graphics.Bitmap;
import android.os.Bundle;
import android.provider.MediaStore;
import android.view.View;
import android.widget.Button;
import android.widget.ImageView;

import androidx.core.view.GravityCompat;
import androidx.drawerlayout.widget.DrawerLayout;


public class MainActivity extends Activity {


    //侧面栏
    private Button mbt1;
    private Button mbt2;
    private Button mbt3;
    private Button mbt4;

    private static int REQ_1=1;
    private ImageView mImageView;

    @Override
    protected void onCreate(Bundle savedInstanceState) {

        super.onCreate(savedInstanceState);
        setContentView(R.layout.activity_main);

        mImageView= findViewById(R.id.show_image);


        mbt1=findViewById(R.id.guanyu);
        mbt2=findViewById(R.id.fenxiang);
        mbt3=findViewById(R.id.yijian);
        mbt4=findViewById(R.id.yinsi);


        final DrawerLayout drawerLayout = findViewById(R.id.main_drawer_layout);
        findViewById(R.id.top_view_left_iv).setOnClickListener(new View.OnClickListener() {

            @Override
            public void onClick(View view) {

                //打开侧滑菜单
                drawerLayout.openDrawer(GravityCompat.START);

        }
        });

        //为侧面栏按钮添加点击事件
        mbt1.setOnClickListener(new View.OnClickListener() {

            @Override
            public void onClick(View v) {

                v.setFocusable(true);
                v.requestFocus();
                v.requestFocusFromTouch();

            }
        });
        mbt2.setOnClickListener(new View.OnClickListener() {

            @Override
            public void onClick(View v) {

                v.setFocusable(true);
                v.requestFocus();
                v.requestFocusFromTouch();
            }
        });
        mbt3.setOnClickListener(new View.OnClickListener() {

            @Override
            public void onClick(View v) {

                v.setFocusable(true);
                v.requestFocus();
                v.requestFocusFromTouch();
            }
        });
        mbt4.setOnClickListener(new View.OnClickListener() {

            @Override
            public void onClick(View v) {

                v.setFocusable(true);
                v.requestFocus();
                v.requestFocusFromTouch();
            }
        });

    }

    public void startCamera(View view){

        Intent intent=new Intent(MediaStore.ACTION_IMAGE_CAPTURE);
        startActivityForResult(intent,REQ_1);
    }


    @Override
    protected void onActivityResult(int requestCode, int resultCode, Intent data) {

        super.onActivityResult(requestCode, resultCode, data);
        if (resultCode==RESULT_OK){

            if (requestCode==REQ_1){

                Bundle bundle=data.getExtras();
                Bitmap bitmap=(Bitmap)bundle.get("data");
                mImageView.setImageBitmap(bitmap);
            }
        }
    }


}
AndroidManifest.xml
<?xml version="1.0" encoding="utf-8"?>
<manifest xmlns:android="http://schemas.android.com/apk/res/android"
    package="com.example.detectiondemo">
    <uses-permission android:name="android.permission.CAMERA" />
    <uses-permission android:name="android.permission.WRITE_EXTERNAL_STORAGE"/>
    <application
        android:allowBackup="true"
        android:icon="@mipmap/ic_launcher"
        android:label="@string/app_name"
        android:roundIcon="@mipmap/ic_launcher_round"
        android:supportsRtl="true"
        android:theme="@style/AppTheme">
        <activity android:name=".MainActivity">
            <intent-filter>
                <action android:name="android.intent.action.MAIN" />

                <category android:name="android.intent.category.LAUNCHER" />
            </intent-filter>
        </activity>
        <activity android:name=".ShowImage" />

        <provider
            android:name="androidx.core.content.FileProvider"
            android:authorities="${applicationId}.provider"
            android:exported="false"
            android:grantUriPermissions="true">
            <meta-data
                android:name="android.support.FILE_PROVIDER_PATHS"
                android:resource="@xml/file_paths" />
        </provider>
    </application>

</manifest>
结语
后面如果更改的话,估计会增加自定义相机这部分的内容,到时候改的话再更新
最后呈上另外参考过的博客并感谢
点击Button更换颜色
以及一个博主认为超实用的查看Android Studio各颜色代码的博客
Android Studio颜色码