按照eact-native-zss-rich-text-editor 操作先下载这个模块
1、npm i --save react-native-zss-rich-text-editor
2、安装README.md说明:
修改安卓项目下的android/app/build.gradle文件:
project.afterEvaluate {
    apply from: '../../node_modules/react-native-zss-rich-text-editor/htmlCopy.gradle';
    copyEditorHtmlToAppAssets(file('../../node_modules/react-native-zss-rich-text-editor'))
}
这时如果你直接用了这个模块的话,你会发现他一直报无法读取NavigationType属性。(因为它依赖于react-native-webview-bridge-updated这个库)
解决办法:
iOS
- 用 xcode's 打开你自己的IOS项目
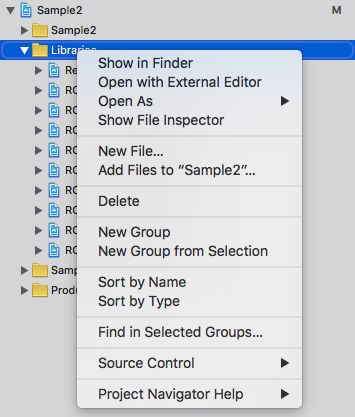
image
- 点击你项目的Libraries目录
- 选择 Add Files to ..
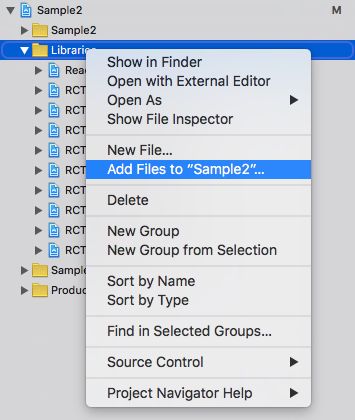
image
4.找到你项目的node_modules目录下得response -native-webview-bridge中IOS目录,把React-Native-Webview-Bridge.xcodeproj添加IOS项目中
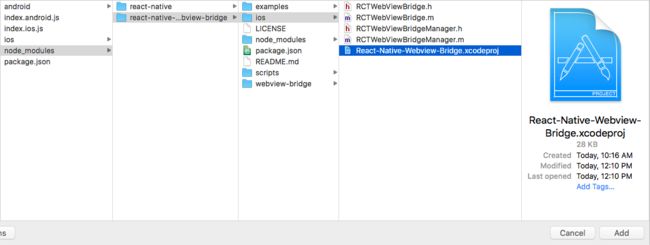
image
5.点击你的IOS根目录,选到Build Phases下

image
- 添加你刚刚导入的那个库
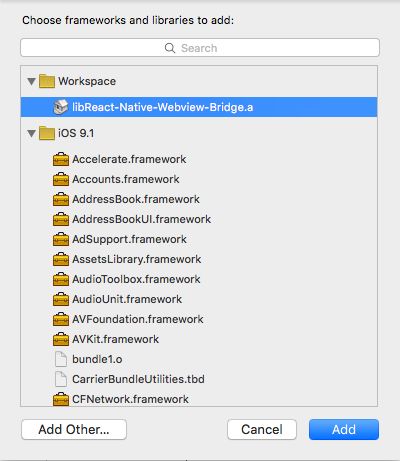
image
- 重新编译,IOS就可以用了
Android
- 添加以下代码到MainApplication.java`文件下(RN 小于 0.29的)
import com.github.alinz.reactnativewebviewbridge.WebViewBridgePackage;
- 添加以下代码到MainApplication.java文件下
protected List getPackages() {
        return Arrays.asList(
            new MainReactPackage(),
                new WebViewBridgePackage() //<- this
        );
    }
- 添加以下代码到你的android/setting.gradle文件下,记得有项目依赖的话,就不用重复添加了
include ':app', ':react-native-webview-bridge'
project(':react-native-webview-bridge').projectDir = new File(rootProject.projectDir, '../node_modules/react-native-webview-bridge/android')
- 添加以下代码到你的android/app/build.gradle文件下
compile project(':react-native-webview-bridge')
- 全部完成,你可以用安卓接着飙车了
你在使用官方的示例时会发现以下问题
1、输入框滚动条
修改node_modules下的editor.html文件,修改样式:
html,body{
            overflow-x: hidden;
            overflow-y: auto;
            width: 97%;
            height: 100%;
        }

        div.zss_editor_content {
            font-family: Arial, Helvetica, sans-serif;
            color: #000;
            width: 100%;
            height: 100%;
            -webkit-overflow-scrolling: touch;
            overflow-x: hidden;
            overflow-y: auto;
        }
 #zss_editor_content {
            /*padding-left: 20px;*///注释掉,不然会出排版问题
            /*padding-right: 10px;*///注释掉,不然会出排版问题
        }
2、 内容后滚问题,下沉问题
this.richtext = r}
style={styles.richText}
initialContentHTML={'Hello World this is a new paragraph
this is another new paragraph
'}
editorInitializedCallback={() => this.onEditorInitialized()}
editorInitializedCallback={() => {
//解决内容后滚问题
this.richtext.setEditorHeight(75);
//打开后直接聚焦输入框
this.richtext.focusContent(true)
}}
/>
3、使用了隐藏标题方法,但是每次打开还是会有一闪而过的标题输入框,修改editor.html的样式
 #separatorContainer {
            display: none;//默认隐藏
            -webkit-user-select: none;
            padding-left: 10px;
            padding-right: 10px;
        }

 #zss_editor_title {
            display: none;//默认隐藏
            padding-left: 10px;
            padding-right: 10px;
        }
4 、安卓运行很缓慢啥问题,比如删一个字或者写一个字或者添加图片剧慢
修改包的src/editor.html文件,添加下面这个方法
function getMirrorInfo(element) {
                if (element.mirrorInfo) {
                    return element.mirrorInfo;
                }
                var div = document.createElement('div');
                var style = div.style;
                var hidden = 'hidden';
                var focusOut = 'focusout';
                style.whiteSpace = 'pre-wrap';
                style.wordWrap = 'break-word';
                style.position = 'absolute';
                style.visibility = hidden;
                style.overflow = hidden;
                document.body.appendChild(div);
                element.mirrorInfo = { div: div, span: document.createElement('span') };
                element.addEventListener(focusOut, function cleanup() {
                    delete element.mirrorInfo;
                    document.body.removeChild(div);
                    element.removeEventListener(focusOut, cleanup);
                });
                return element.mirrorInfo;
            }
修改包的src/editor.html文件,zss_editor.getCaretYPosition 方法
原来的代码
zss_editor.getCaretYPosition = function() {
    var sel = window.getSelection();
                // Next line is comented to prevent deselecting selection. It looks like work but if there are any issues will appear then uconmment it as well as code above.
                //sel.collapseToStart();
                var range = sel.getRangeAt(0);
                var span = document.createElement('span');// something happening here preventing selection of elements
                range.collapse(false);
                range.insertNode(span);
                var topPosition = span.offsetTop;
                span.parentNode.removeChild(span);
                return topPosition;
}
修改后的代码
zss_editor.getCaretYPosition = function() {
                var selection = window.getSelection();
                var range = selection.getRangeAt(0);
                var container = range.endContainer;
                var selectedNode = container.nodeType === 3 ? container.parentNode : container;
                var position = selectedNode.selectionEnd;
                var _a = getMirrorInfo(selectedNode);
                var div = _a.div;
                var span = _a.span;
                var content = selectedNode.textContent.substring(0, position);
                div.textContent = content;
                span.textContent = (selectedNode.textContent.substring(position)) || '.';
                div.appendChild(span);
                var rect = selectedNode.getBoundingClientRect();
                var top = span.offsetTop - selectedNode.scrollTop + rect.top;
                return top;
            }
5 、 图片无法插入,插入base64编码的图片就行了
ImagePicker.openPicker({
includeBase64: true,
width: 300,
height: 400,
cropping: true
}).then(image => {
console.log(image)
let imageSrc = `data:${image.mime};base64,${image.data}`;
this.richtext.insertImage({src: imageSrc});
console.log(image);
});
暂时就遇到这么多了。
至于api啥的,直接看下面的参数和const.js文件的方法列表
 static propTypes = {
    initialTitleHTML: PropTypes.string,
    initialContentHTML: PropTypes.string,
    titlePlaceholder: PropTypes.string,
    contentPlaceholder: PropTypes.string,
    editorInitializedCallback: PropTypes.func,
    customCSS: PropTypes.string,
    hiddenTitle: PropTypes.bool,
    enableOnChange: PropTypes.bool,
    footerHeight: PropTypes.number,
    contentInset: PropTypes.object
  };