通过之前的知识,我们能够播放一个视频文件中的视频流,那么如何播放音频流呢?
首先来了解一下关于音频的基础知识
在物理学中,声音就是一种波,我们称之为声波,声波的三要素是频率、振幅和波形,频率代表音阶的高低,振幅代表响度,波形代表音色。
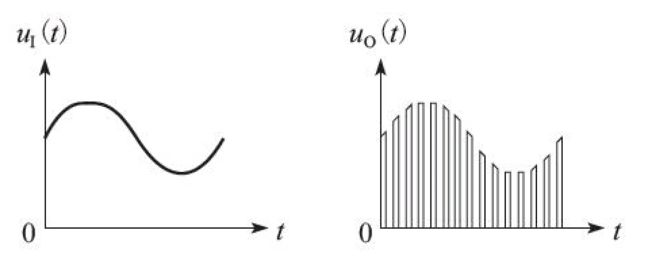
数字音频:在早期声音无法捕获和保存,后面人们发明了模拟信号,将模拟信号数字化,我们称之为数字音频,在我们日常生活中,听歌,电视中的声音等都是数字音频。将模拟信号数字化的过程有3个:采样、量化和编码。
采样:首先要对模拟信号进行采样,所谓采样就是 在时间轴上对信号进行数字化。根据奈奎斯特定理(也称为采样定 理),按比声音最高频率高2倍以上的频率对声音进行采样(也称为AD 转换),,对于高质量的音频信号,其频率范围(人耳 能够听到的频率范围)是20Hz~20kHz,所以采样频率一般为 44.1kHz,这样就可以保证采样声音达到20kHz也能被数字化,从而使得经过数字化处理之后,人耳听到的声音质量不会被降低。而所谓的 44.1kHz就是代表1秒会采样44100次
量化:量化是指在幅度轴上对信号进行数字化,比如用16比特的二进制信号来表示声音的一个采样,而16比特(一个short)所表示的 范围是[-32768,32767],共有65536个可能取值,因此最终模拟的音频信号在幅度上也分为了65536层
编码:所谓编码,就是按照一定的格式记录采样和量化后的数字数据,比如顺序存储或压缩存储,等等。
通常所说的音频的裸数据格式就是脉冲编码调制(Pulse Code Modulation,PCM)数据。描述一段PCM数据一 般需要以下几个概念:量化格式(sampleFormat)、采样率 (sampleRate)、声道数(channel)。以CD的音质为例:量化格式(有的地方描述为位深度)为16比特(2字节),采样率为44100,声道数为 2,这些信息就描述了CD的音质。
而对于声音格式,还有一个概念用来描述它的大小,称为数据比特率,即1秒时间内的比特数目,它用于衡量音频数据单位时间内的容量大小。而对于CD音质的数据,比特率为多少呢?计算如下:
44100 * 16 * 2 = 1378.125kbps
那么在1分钟里,这类CD音质的数据需要占据多大的存储空间呢? 计算如下:
1378.125 * 60 / 8 / 1024 = 10.09MB
当然,如果sampleFormat更加精确(比如用4字节来描述一个采样),或者sampleRate更加密集(比如48kHz的采样率),那么所占的存储空间就会更大,同时能够描述的声音细节就会越精确。存储的这段二进制数据即表示将模拟信号转换为数字信号了,以后就可以对这段二 进制数据进行存储、播放、复制,或者进行其他任何操作。
但是PCM用于网络传输还是体积太大了,所以必须对其进行压缩编码。和视频相同,压缩算法包括有损压缩和无损压缩。根据不同的应用场景(包括存储设备、传输网络环境、播放设备 等),可以选用不同的压缩编码算法,如PCM、WAV、AAC、MP3、 Ogg等。一下介绍几种常用的编码
1.WAV编码
特点:音质非常好,大量软件都支持。
适用场合:多媒体开发的中间文件、保存音乐和音效素材。
2.MP3编码
特点:音质在128Kbit/s以上表现还不错,压缩比比较高,大量软件和硬件都支持,兼容性好。
适用场合:高比特率下对兼容性有要求的音乐欣赏。
3.AAC编码
特点:在小于128Kbit/s的码率下表现优异,并且多用于视频中的音频编码。
适用场合:128Kbit/s以下的音频编码,多用于视频中音频轨的编码。
4.Ogg编码
特点:可以用比MP3更小的码率实现比MP3更好的音质,高中低码率下均有良好的表现,兼容性不够好,流媒体特性不支持。
适用场合:语音聊天的音频消息场景。
音频的基础知识就介绍完了,下面开始实现音频解码
代码和之前也是差不多,不过之前使用的是视频转码组件,现在要换成音频转码组件
#include
#include
#include
#include
#include

extern "C" {
//编码
#include "libavcodec/avcodec.h"
//封装格式处理
#include "libavformat/avformat.h"
#include "libswresample/swresample.h"
//像素处理
#include "libswscale/swscale.h"
}

#define  LOG_TAG    "aruba"
#define  LOGE(...)  __android_log_print(ANDROID_LOG_ERROR,LOG_TAG,__VA_ARGS__)

extern "C"
JNIEXPORT void JNICALL
Java_com_aruba_ffmpegapplication_DecodeActivity_decodeAudio(JNIEnv *env, jobject instance,
                                                            jstring inputFilePath_,
                                                            jstring outputFilePath_) {
    const char *inputFilePath = env->GetStringUTFChars(inputFilePath_, 0);
    const char *outputFilePath = env->GetStringUTFChars(outputFilePath_, 0);

    //注册FFmpeg中各大组件
    av_register_all();

    //打开文件
    AVFormatContext *formatContext = avformat_alloc_context();
    if (avformat_open_input(&formatContext, inputFilePath, NULL, NULL) != 0) {
        LOGE("打开失败");
        avformat_free_context(formatContext);
        env->ReleaseStringUTFChars(inputFilePath_, inputFilePath);
        env->ReleaseStringUTFChars(outputFilePath_, outputFilePath);
        return;
    }

    //将文件信息填充进AVFormatContext
    if (avformat_find_stream_info(formatContext, NULL) < 0) {
        LOGE("获取文件信息失败");
        avformat_free_context(formatContext);
        env->ReleaseStringUTFChars(inputFilePath_, inputFilePath);
        env->ReleaseStringUTFChars(outputFilePath_, outputFilePath);
        return;
    }

    //获取视频流的编解码器上下文
    AVCodecContext *codecContext = NULL;
    int audio_stream_idx = -1;
    for (int i = 0; i < formatContext->nb_streams; ++i) {
        if (formatContext->streams[i]->codec->codec_type == AVMEDIA_TYPE_AUDIO) {//如果是音频流
            codecContext = formatContext->streams[i]->codec;
            audio_stream_idx = i;
            break;
        }
    }

    if (codecContext == NULL) {
        avformat_free_context(formatContext);
        env->ReleaseStringUTFChars(inputFilePath_, inputFilePath);
        env->ReleaseStringUTFChars(outputFilePath_, outputFilePath);
        return;
    }

    //根据编解码器上下文的id获取视频流解码器
    AVCodec *codec = avcodec_find_decoder(codecContext->codec_id);
    //打开解码器
    if (avcodec_open2(codecContext, codec, NULL) < 0) {
        LOGE("解码失败");
        avformat_free_context(formatContext);
        env->ReleaseStringUTFChars(inputFilePath_, inputFilePath);
        env->ReleaseStringUTFChars(outputFilePath_, outputFilePath);
        return;
    }

    //开始读每一帧
    //存放压缩数据
    AVPacket *pkt = (AVPacket *) (av_malloc(sizeof(AVPacket)));
    av_init_packet(pkt);

    //存放解压数据
    AVFrame *picture = av_frame_alloc();

    int picture_ptr = 0;

    //音频转码组件上下文
    SwrContext *swrContext = swr_alloc();
//    struct SwrContext *swr_alloc_set_opts(struct SwrContext *s,
//                                          int64_t out_ch_layout, enum AVSampleFormat out_sample_fmt, int out_sample_rate,
//                                          int64_t  in_ch_layout, enum AVSampleFormat  in_sample_fmt, int  in_sample_rate,
//                                          int log_offset, void *log_ctx);
    //AV_CH_LAYOUT_STEREO:双声道  AV_SAMPLE_FMT_S16:量化格式 16位 codecContext->sample_rate:采样率 Hz
    swr_alloc_set_opts(swrContext, AV_CH_LAYOUT_STEREO, AV_SAMPLE_FMT_S16,
                       codecContext->sample_rate,//输出采样率和输入采样率应相同
                       codecContext->channel_layout, codecContext->sample_fmt,
                       codecContext->sample_rate, 0, NULL
    );
    swr_init(swrContext);

    //原音频通道数
    int channel_count = av_get_channel_layout_nb_channels(codecContext->channel_layout);
    //单通道最大存放转码数据 所占字节 = 采样率*量化格式 / 8
    int out_size = 44100 * 16 / 8;
    uint8_t *out = (uint8_t *) (av_malloc(out_size));

    //文件
    FILE *output_file = fopen(outputFilePath, "wb");

    while (av_read_frame(formatContext, pkt) == 0) {//读到每一帧的压缩数据存放在AVPacket
        if (pkt->stream_index == audio_stream_idx) {
            //解码
            avcodec_decode_audio4(codecContext, picture, &picture_ptr, pkt);

            LOGE("picture_ptr %d", picture_ptr);
            if (picture_ptr > 0) {
                //转码
                swr_convert(swrContext, &out, out_size,
                            (const uint8_t **) (picture->data), picture->nb_samples);

//                int av_samples_get_buffer_size(int *linesize, int nb_channels, int nb_samples,
//                                               enum AVSampleFormat sample_fmt, int align);
                //缓冲区真实大小
                int size = av_samples_get_buffer_size(NULL, channel_count, picture->nb_samples,
                                                      AV_SAMPLE_FMT_S16, 1);
                fwrite(out, sizeof(uint8_t), size, output_file);
            }

        }
        av_free_packet(pkt);
    }

    //关闭文件
    fclose(output_file);
    //释放资源
    av_freep(out);
    swr_free(&swrContext);
    av_frame_free(&picture);
    avcodec_close(codecContext);
    avformat_free_context(formatContext);
    env->ReleaseStringUTFChars(inputFilePath_, inputFilePath);
    env->ReleaseStringUTFChars(outputFilePath_, outputFilePath);
}
下面是转换前MP3和转换后PCM的文件对比
项目地址:https://gitee.com/aruba/FFmpegApplication.git
我的博客即将同步至腾讯云+社区,邀请大家一同入驻:https://cloud.tencent.com/developer/support-plan?invite_code=1v7genpiu1cy3


