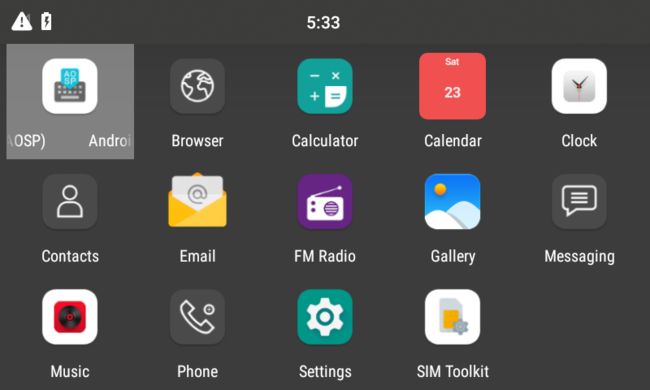
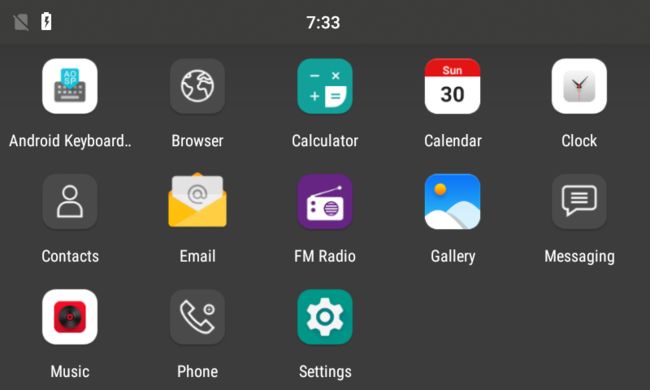
需求是修改日历图标,原生图标如下。
现需要改成显示日期+ 星期几,例如今天4.23,需显示 23 + 星期四。
Android launcher中图标的显示,最终的显示是
BubbleTextView中的
applyIconAndLabel函数。因此,我首先想到了,直接创建新图标替换原有,然后调用setIcon。
//vendor\mediatek\proprietary\packages\apps\Launcher3\src\com\android\launcher3\BubbleTextView.java
    private void applyIconAndLabel(Bitmap icon, ItemInfo info) {
        FastBitmapDrawable iconDrawable = DrawableFactory.get(getContext()).newIcon(icon, info);
        iconDrawable.setIsDisabled(info.isDisabled());
        if (info.getTargetComponent().getPackageName().equals("com.android.calendar")){
            Bitmap bitmap = Utilities.createCalendarIcon(getContext(),mIconSize,mIconSize);
            Drawable drawable = new BitmapDrawable(getResources(),bitmap);
            setIcon(drawable);
        }else{
            setIcon(iconDrawable);
        }
        setText(info.title);
        setTextColor(Color.WHITE);
        if (info.contentDescription != null) {
            setContentDescription(info.isDisabled()
                    ? getContext().getString(R.string.disabled_app_label, info.contentDescription)
                    : info.contentDescription);
        }
    }
//vendor\mediatek\proprietary\packages\apps\Launcher3\src\com\android\launcher3\Utilities.java
  public static Bitmap createCalendarIcon(Context context, int width, int heigth) {
        String[] dayOfWeek = context.getResources().getStringArray(R.array.week_days);
        Bitmap bitmap = Bitmap.createBitmap(width, heigth, Bitmap.Config.ARGB_8888);
        bitmap.eraseColor(Color.TRANSPARENT);//背景色设置为透明
        String day = String.valueOf(Calendar.getInstance().get(Calendar.DAY_OF_MONTH));

        int weekIndex = Calendar.getInstance().get(Calendar.DAY_OF_WEEK);
        String week = dayOfWeek[weekIndex - 1];

        final float mDensity = context.getResources().getDisplayMetrics().density;

        final Canvas canvas = new Canvas();
        Paint paint = new Paint(Paint.ANTI_ALIAS_FLAG);

        canvas.setBitmap(bitmap);


        RectF rectF = new RectF(0 , 0 , width  , heigth );
        paint.setColor(0xFFF05050);
        canvas.drawRoundRect(rectF, 15 * mDensity ,15 * mDensity, paint);

        paint.setColor(Color.WHITE);
        paint.setAlpha(220);
        paint.setTextSize(14f * mDensity);
        paint.setTypeface(Typeface.DEFAULT_BOLD);

        Rect rectWeek = new Rect();
        paint.getTextBounds(week, 0, week.length(), rectWeek);

        int weekWidth = rectWeek.right - rectWeek.left;
        int weekHeigth = rectWeek.bottom - rectWeek.top;

        float weekX = Math.max(0, (width  - weekWidth) / 2 - rectWeek.left);
        float weekY = Math.max(0, weekHeigth - rectWeek.bottom) + 10f * mDensity;

        canvas.drawText(week, weekX, weekY, paint);

        paint.setColor(Color.WHITE);
        paint.setAlpha(220);
        paint.setTextSize(22f * mDensity);

        Rect rectDay = new Rect();
        paint.getTextBounds(day, 0, day.length(), rectDay);

        int dayWidth = rectDay.right - rectDay.left;
        int dayHeigth = rectDay.bottom - rectDay.top;

        float dayX = (width  - dayWidth)/2 - rectDay.left;
        float dayY = (heigth  + weekY + dayHeigth)/2- rectDay.bottom;

        canvas.drawText(day, dayX, dayY, paint);

        return bitmap;
    }
//vendor\mediatek\proprietary\packages\apps\Launcher3\res\values\strings.xml
- Sun
- Mon
- Tue
- Wed
- Thur
- Fri
- Sat
但是这样修改后,发现图标不对齐,日历的图标,明显比旁边的图标大。
当前界面时AllApps,使用的是AllAppsRecyclerView,首先看看分配的BubbleTextView的宽度和高度是否一致。直接的方法就是给BubbleTextView分配不同的背景色。
private void applyIconAndLabel(Bitmap icon, ItemInfo info) {
    if (info.getTargetComponent().getPackageName().equals("com.android.calendar")){
      setBackgroundColor(Color.BLUE);
    }else  if (info.getTargetComponent().getPackageName().equals("com.android.deskclock")){
      setBackgroundColor(Color.GREEN);
    }
}
通过对比发现,两个相邻的BubbleTextView控件大小一致。
那么问题就是出在绘制的图片上了。
//vendor\mediatek\proprietary\packages\apps\Launcher3\res\xml\device_profiles.xml
device_profiles 中定义的iconSize数值,转换成px 即为 56 * density = 56 * 1.5 = 84,
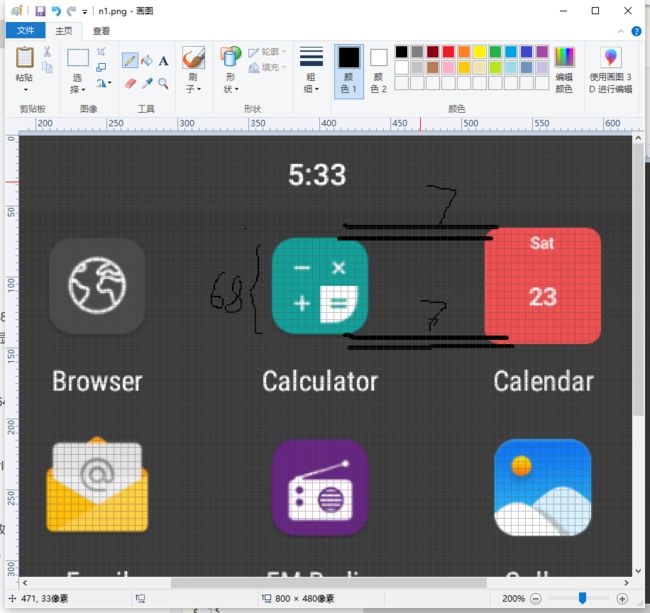
而通过打印log发现,BubbleTextView中设置的setBounds的mIconSize = 82,(setBounds是设置绘制drawable的大小,例如一个drawable原本尺寸是80*80,drawable .setBounds(0, 0, 50, 50);,将drawable大小缩小至为50 * 50 px,然后显示在屏幕上)而显示在屏幕上的图标实际大小是68(通过window自带画图软件手动测量得出)。
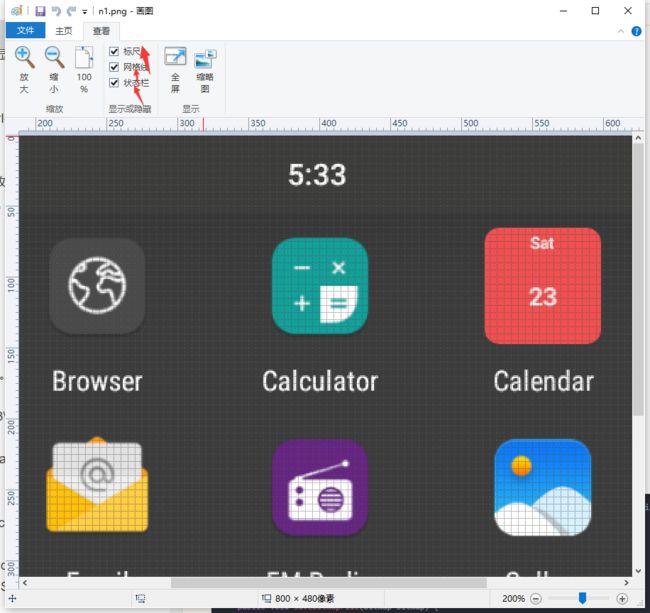
打开画图工具的查看中的网格线等显示就能测量了。
日历的图标通过对比,与左侧图标上下差距大约为7.因此Utilities中createCalendarIcon中的画布的矩形框修改一下数值。
RectF rectF = new RectF(7, 7, 75,75);这样就能正常显示。(82-7 = 75)
但又考虑到,density可能发生改变,而当前density为1.5,而7除以1.5 ≈ 5,因此修改成
RectF rectF = new RectF(0 + 5 * mDensity, 0 + 5 * mDensity, width - 5 * mDensity , heigth - 5 * mDensity );
这样,画出来的图片,就是比canvas比bitmap小,实际布局的时候,就能正常显示了。
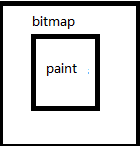
就差不多这个样子。bitmap是个透明的层,canvas画的是红色+文字。
整个图片大小是8282,而canvas部分尺寸为6868.
但是这样,只针对当前布局,如果布局改变(例如从4*5布局改成5 *5)会导致问题,所以还是需要修改别的地方。
首先,我把BubbleTextView中实际使用的图片保存下来,然后通过adb导出到电脑中。
//vendor\mediatek\proprietary\packages\apps\Launcher3\src\com\android\launcher3\BubbleTextView.java
    private void applyIconAndLabel(Bitmap icon, ItemInfo info) {
        if (info.getTargetComponent().getPackageName().equals("com.android.calendar")){
            saveBitmapFile(icon);
        }
        FastBitmapDrawable iconDrawable = DrawableFactory.get(getContext()).newIcon(icon, info);
        iconDrawable.setIsDisabled(info.isDisabled());
        /*if (info.getTargetComponent().getPackageName().equals("com.android.calendar")){
            Bitmap bitmap = Utilities.createCalendarIcon(getContext(),mIconSize,mIconSize);
            Drawable drawable = new BitmapDrawable(getResources(),bitmap);
            setIcon(drawable);
        }else{*/
            setIcon(iconDrawable);
        //}
        setText(info.title);
        setTextColor(Color.WHITE);
        if (info.contentDescription != null) {
            setContentDescription(info.isDisabled()
                    ? getContext().getString(R.string.disabled_app_label, info.contentDescription)
                    : info.contentDescription);
        }
    }


    public void saveBitmapFile(Bitmap bitmap) {
        File file = new File("/storage/emulated/0/1.jpeg");//将要保存图片的路径
        try {
            BufferedOutputStream bos = new BufferedOutputStream(new FileOutputStream(file));
            bitmap.compress(Bitmap.CompressFormat.JPEG, 100, bos);
            bos.flush();
            bos.close();
        } catch (IOException e) {
            e.printStackTrace();
        }
    }
这里由于是存成jpeg格式,所以图片背景色是黑色,实际bitmap中背景色是透明色的,如果存为png格式图片则背景色为透明。
那么所以,这个icon是如何来的呢?
通过在
LauncherIcons类中的所有的函数中加log,发现是调用的
createBadgedIconBitmap。
//vendor\mediatek\proprietary\packages\apps\Launcher3\src\com\android\launcher3\graphics\LauncherIcons.java
    public static Bitmap createBadgedIconBitmap(Drawable icon, UserHandle user, Context context, int iconAppTargetSdk) {
    .....................
  }
就是这个函数是绘制新图片,扩大了画布,并对图片进行了平移。
那么下一步就是要找到哪里调用的createBadgedIconBitmap,结果发现是IconCache。这里有3个地方实际发生了调用。具体修改如下。
//vendor\mediatek\proprietary\packages\apps\Launcher3\src\com\android\launcher3\IconCache.java
    @Thunk synchronized void addIconToDBAndMemCache(LauncherActivityInfo app,
            PackageInfo info, long userSerial, boolean replaceExisting) {
        final ComponentKey key = new ComponentKey(app.getComponentName(), app.getUser());
        CacheEntry entry = null;
       .........
        if (entry == null) {
            entry = new CacheEntry();
            if (info.packageName.equals("com.android.calendar")){
                Bitmap bitmap = Utilities.createCalendarIcon(mContext,getFullResIcon(app).getIntrinsicWidth(),getFullResIcon(app).getIntrinsicHeight());
                Drawable drawable = new BitmapDrawable(mContext.getResources(),bitmap);
                entry.icon = LauncherIcons.createBadgedIconBitmap(drawable, app.getUser(), mContext,  app.getApplicationInfo().targetSdkVersion);
            }else{
                entry.icon = LauncherIcons.createBadgedIconBitmap(getFullResIcon(app), app.getUser(),
                        mContext,  app.getApplicationInfo().targetSdkVersion);
            }
        }
       .........
        addIconToDB(values, app.getComponentName(), info, userSerial);
    }
       .........

    protected CacheEntry cacheLocked(
            @NonNull ComponentName componentName,
            @NonNull Provider infoProvider,
            UserHandle user, boolean usePackageIcon, boolean useLowResIcon) {
           .........
                if (info != null) {
                    if (componentName.getPackageName().equals("com.android.calendar")){
                        Bitmap bitmap = Utilities.createCalendarIcon(mContext,getFullResIcon(info).getIntrinsicWidth(),getFullResIcon(info).getIntrinsicHeight());
                        Drawable drawable = new BitmapDrawable(mContext.getResources(),bitmap);
                        entry.icon = LauncherIcons.createBadgedIconBitmap(
                                drawable, info.getUser(), mContext,
                                infoProvider.get().getApplicationInfo().targetSdkVersion);
                    }else {
                        entry.icon = LauncherIcons.createBadgedIconBitmap(
                                getFullResIcon(info), info.getUser(), mContext,
                                infoProvider.get().getApplicationInfo().targetSdkVersion);
                    }
                }
          .........
    }

    .........

  private CacheEntry getEntryForPackageLocked(String packageName, UserHandle user,
            boolean useLowResIcon) {
          .........
                    Bitmap icon;
                    if (packageName.equals("com.android.calendar")){
                        Bitmap bitmap = Utilities.createCalendarIcon(mContext,appInfo.loadIcon(mPackageManager).getIntrinsicWidth(),appInfo.loadIcon(mPackageManager).getIntrinsicHeight());
                        Drawable drawable = new BitmapDrawable(mContext.getResources(),bitmap);
                        icon = LauncherIcons.createBadgedIconBitmap(
                                drawable, user, mContext, appInfo.targetSdkVersion);
                    }else {
                        icon = LauncherIcons.createBadgedIconBitmap(
                                appInfo.loadIcon(mPackageManager), user, mContext, appInfo.targetSdkVersion);
                    }

}
在给icon赋值的时候,判断是否为日历的包名,如果是,另行赋值。
最后把Utilities中的RectF rectF = new RectF(0 + 5 * mDensity, 0 + 5 * mDensity, width - 5 * mDensity , heigth - 5 * mDensity );改回RectF rectF = new RectF(0 , 0 , width , heigth );
最终只修改IconCache和Utilities,而不修改BubbleTextView中的applyIconAndLabel。
如果不想完全自定义图标,而是只是想在系统图标上绘制文字的话,那么Utilities中的createCalendarIcon还需要做一点修改,不使用canvas.drawRoundRect,而是使用canvas.drawBitmap。
    public static Bitmap createCalendarIcon(Context context, Drawable icon) {
        String[] dayOfWeek = context.getResources().getStringArray(R.array.week_days);

        BitmapDrawable bitmapDrawable = (BitmapDrawable) icon;
        Bitmap calendarBitmap = bitmapDrawable.getBitmap();

        int width = calendarBitmap.getWidth();
        int height = calendarBitmap.getHeight();

        Bitmap bitmap = Bitmap.createBitmap(width, height, Bitmap.Config.ARGB_8888);
        bitmap.eraseColor(Color.TRANSPARENT);//填充颜色

        String day = String.valueOf(Calendar.getInstance().get(Calendar.DAY_OF_MONTH));

        int weekIndex = Calendar.getInstance().get(Calendar.DAY_OF_WEEK);
        String week = dayOfWeek[weekIndex - 1];

        final float mDensity = context.getResources().getDisplayMetrics().density;

        final Canvas canvas = new Canvas();
        Paint paint = new Paint(Paint.ANTI_ALIAS_FLAG);

        canvas.setBitmap(bitmap);

        Rect src = new Rect(0 , 0 , width  , height );
        Rect dst = new Rect(0, 0, width, height);
        paint.setColor(0xFFF05050);
        canvas.drawBitmap(calendarBitmap, src, dst, paint);

        paint.setColor(Color.WHITE);
        paint.setAlpha(220);
        paint.setTextSize(16f * mDensity);
        paint.setTypeface(Typeface.DEFAULT_BOLD);

        Rect rectWeek = new Rect();
        paint.getTextBounds(week, 0, week.length(), rectWeek);

        int weekWidth = rectWeek.right - rectWeek.left;
        int weekHeight = rectWeek.bottom - rectWeek.top;

        float weekX = Math.max(0, (width  - weekWidth) / 2 - rectWeek.left);
        float weekY = Math.max(0, weekHeight - rectWeek.bottom) + 10f * mDensity;

        canvas.drawText(week, weekX, weekY, paint);

        paint.setColor(Color.BLACK);
        paint.setAlpha(220);
        paint.setTextSize(30f * mDensity);

        Rect rectDay = new Rect();
        paint.getTextBounds(day, 0, day.length(), rectDay);

        int dayWidth = rectDay.right - rectDay.left;
        int dayHeight = rectDay.bottom - rectDay.top;

        float dayX = (width  - dayWidth)/2 - rectDay.left;
        float dayY = (height  + weekY + dayHeight)/2- rectDay.bottom;

        canvas.drawText(day, dayX, dayY, paint);

        return bitmap;

    }
然后IconCache中对应的函数调用也需要修改。
最终效果图为
参考链接:
android图片上添加文字
源码分析
解决Android png透明图片转jpg时背景变黑的问题
Android8.0 Launcher3 快捷方式图标的圆角处理
android 日历图标显示星期
android launcher 日历图标显示日期
Android M 6.0 Launcher3 动态改变日历图标
http://lichengfeng.cn/archives/351.html
dynamic cleandar icon
Android Launcher 应用图标大小不一的情况或GirdView Item 不规则处理与解决

