一、处理结构
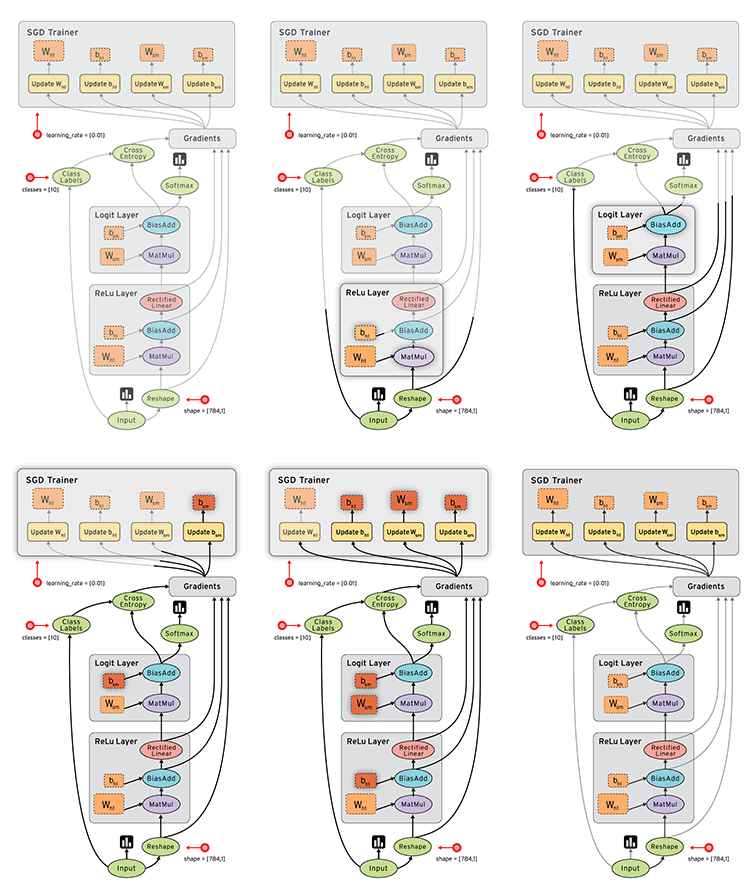
Tensorflow 首先要定义神经网络的结构, 然后再把数据放入结构当中去运算和 training.
因为TensorFlow是采用数据流图(data flow graphs)来计算, 所以首先我们得创建一个数据流图, 然后再将我们的数据(数据以张量(tensor)的形式存在)放在数据流图中计算. 节点(Nodes)在图中表示数学操作,图中的线(edges)则表示在节点间相互联系的多维数据数组, 即张量(tensor). 训练模型时tensor会不断的从数据流图中的一个节点flow到另一节点, 这就是TensorFlow名字的由来.
张量(Tensor):
张量有多种. 零阶张量为 纯量或标量 (scalar) 也就是一个数值. 比如 [1]
一阶张量为 向量 (vector), 比如 一维的 [1, 2, 3]
二阶张量为 矩阵 (matrix), 比如 二维的 [[1, 2, 3],[4, 5, 6],[7, 8, 9]]
以此类推, 还有 三阶 三维的 …
参考链接:https://morvanzhou.github.io/tutorials/machine-learning/tensorflow/2-1-structure/
二、例子
- 创建数据
导入tensorflow和numpy,使用numpy创建 x 和 y 的数据。另外,由于tensorflow中大部分的数据都是float32类型,所以这里使用numpy创建float32类型的数据。
import tensorflow as tf

import numpy as np

# create data

x_data=np.random.rand(100).astype(np.float32)

y_data=x_data*0.1+0.3
2.搭建模型
用 tf.Variable 来创建描述 y 的参数. 我们可以把 y_data = x_data*0.1 + 0.3 想象成 y=Weights * x + biases, 然后神经网络也就是学着把 Weights 变成 0.1, biases 变成 0.3.
Weights = tf.Variable(tf.random_uniform([1], -1.0, 1.0))
biases = tf.Variable(tf.zeros([1]))

y = Weights*x_data + biases
3.计算误差
将残差平方的均值作为误差
loss = tf.reduce_mean(tf.square(y-y_data))
4.传播误差
反向传递误差的工作就交给optimizer了, 我们使用的误差传递方法是梯度下降法: Gradient Descent 让后我们使用 optimizer 来进行参数的更新.
optimizer = tf.train.GradientDescentOptimizer(0.5)
train = optimizer.minimize(loss)
- 训练
到目前为止, 我们只是建立了神经网络的结构, 还没有使用这个结构. 在使用这个结构之前, 我们必须先初始化所有之前定义的Variable, 所以这一步是很重要的!
# init = tf.initialize_all_variables() # tf 马上就要废弃这种写法
init = tf.global_variables_initializer()  # 替换成这样就好
接着,我们再创建会话 Session. 我们用 Session 来执行 init 初始化步骤. 并且, 用 Session 来 run 每一次 training 的数据. 逐步提升神经网络的预测准确性.
sess = tf.Session()
sess.run(init)          # Very important

for step in range(201):
    sess.run(train)
    if step % 20 == 0:
        print(step, sess.run(Weights), sess.run(biases))
参考链接:https://morvanzhou.github.io/tutorials/machine-learning/tensorflow/2-2-example2/
三、Session会话控制
Session 是 Tensorflow 为了控制,和输出文件的执行的语句. 运行 session.run() 可以获得你要得知的运算结果, 或者是你所要运算的部分。
先建立两个矩阵m1和m2,计算它们的乘积product,然后在使用Session来激活product 并得到计算结果. 有两种形式使用会话控制 Session。
import tensorflow as tf

# create two matrices

m1= tf.constant([[3,3]])
m2= tf.constant([[2],
                       [2]])
product = tf.matmul(m1,m2)
# method 1
sess = tf.Session()
result = sess.run(product)
print(result)
sess.close()
# output: [[12]]

# method 2
with tf.Session() as sess:
    result2 = sess.run(product)
    print(result2)
# output: [[12]]
参考链接:https://morvanzhou.github.io/tutorials/machine-learning/tensorflow/2-3-session/
四、Variable变量
tensorflow中需要使用tensorflow.Variable来定义变量
mport tensorflow as tf

state = tf.Variable(0, name='counter')

# 定义常量 one
one = tf.constant(1)

# 定义加法步骤 (注: 此步并没有直接计算)
new_value = tf.add(state, one)

# 将 State 更新成 new_value
update = tf.assign(state, new_value)
如果在 Tensorflow 中设定了变量,那么初始化变量是最重要的!!所以定义了变量以后, 一定要定义tf.global_variables_initializer()。到这里变量还是没有被激活,需要再在 sess 里, sess.run(init) , 激活 init 这一步。
# 如果定义 Variable, 就一定要 initialize
# init = tf.initialize_all_variables() # tf 马上就要废弃这种写法
init = tf.global_variables_initializer()  # 替换成这样就好

# 使用 Session
with tf.Session() as sess:
    sess.run(init)
    for _ in range(3):
        sess.run(update)
        print(sess.run(state))
注意:直接 print(state) 不起作用!!
一定要把 sess 的指针指向 state 再进行 print 才能得到想要的结果!
参考链接:https://morvanzhou.github.io/tutorials/machine-learning/tensorflow/2-4-variable/
五、Placeholder传入值
placeholder 是 Tensorflow 中的占位符,暂时储存变量。
Tensorflow 如果想要从外部传入data, 那就需要用到 tf.placeholder(), 然后以这种形式传输数据 sess.run(***, feed_dict={input: **})。
import tensorflow as tf

#在 Tensorflow 中需要定义 placeholder 的 type ,一般为 float32 形式
input1 = tf.placeholder(tf.float32)
input2 = tf.placeholder(tf.float32)

# mul = multiply 是将input1和input2 做乘法运算,并输出为 output
ouput = tf.multiply(input1, input2)
接下来, 传值的工作交给了 sess.run() , 需要传入的值放在了feed_dict={} 并一一对应每一个 input. placeholder 与 feed_dict={} 是绑定在一起出现的。
with tf.Session() as sess:
    print(sess.run(ouput, feed_dict={input1: [7.], input2: [2.]}))
# output: [ 14.]
参考链接:https://morvanzhou.github.io/tutorials/machine-learning/tensorflow/2-5-placeholde/#%E7%AE%80%E5%8D%95%E8%BF%90%E7%94%A8
六、激励函数
激励函数运行时激活神经网络中某一部分神经元,将激活信息向后传入下一层的神经系统。激励函数的实质是非线性方程。 Tensorflow 的神经网络 里面处理较为复杂的问题时都会需要运用激励函数 activation function 。
参考链接:https://morvanzhou.github.io/tutorials/machine-learning/tensorflow/2-6-activation/
