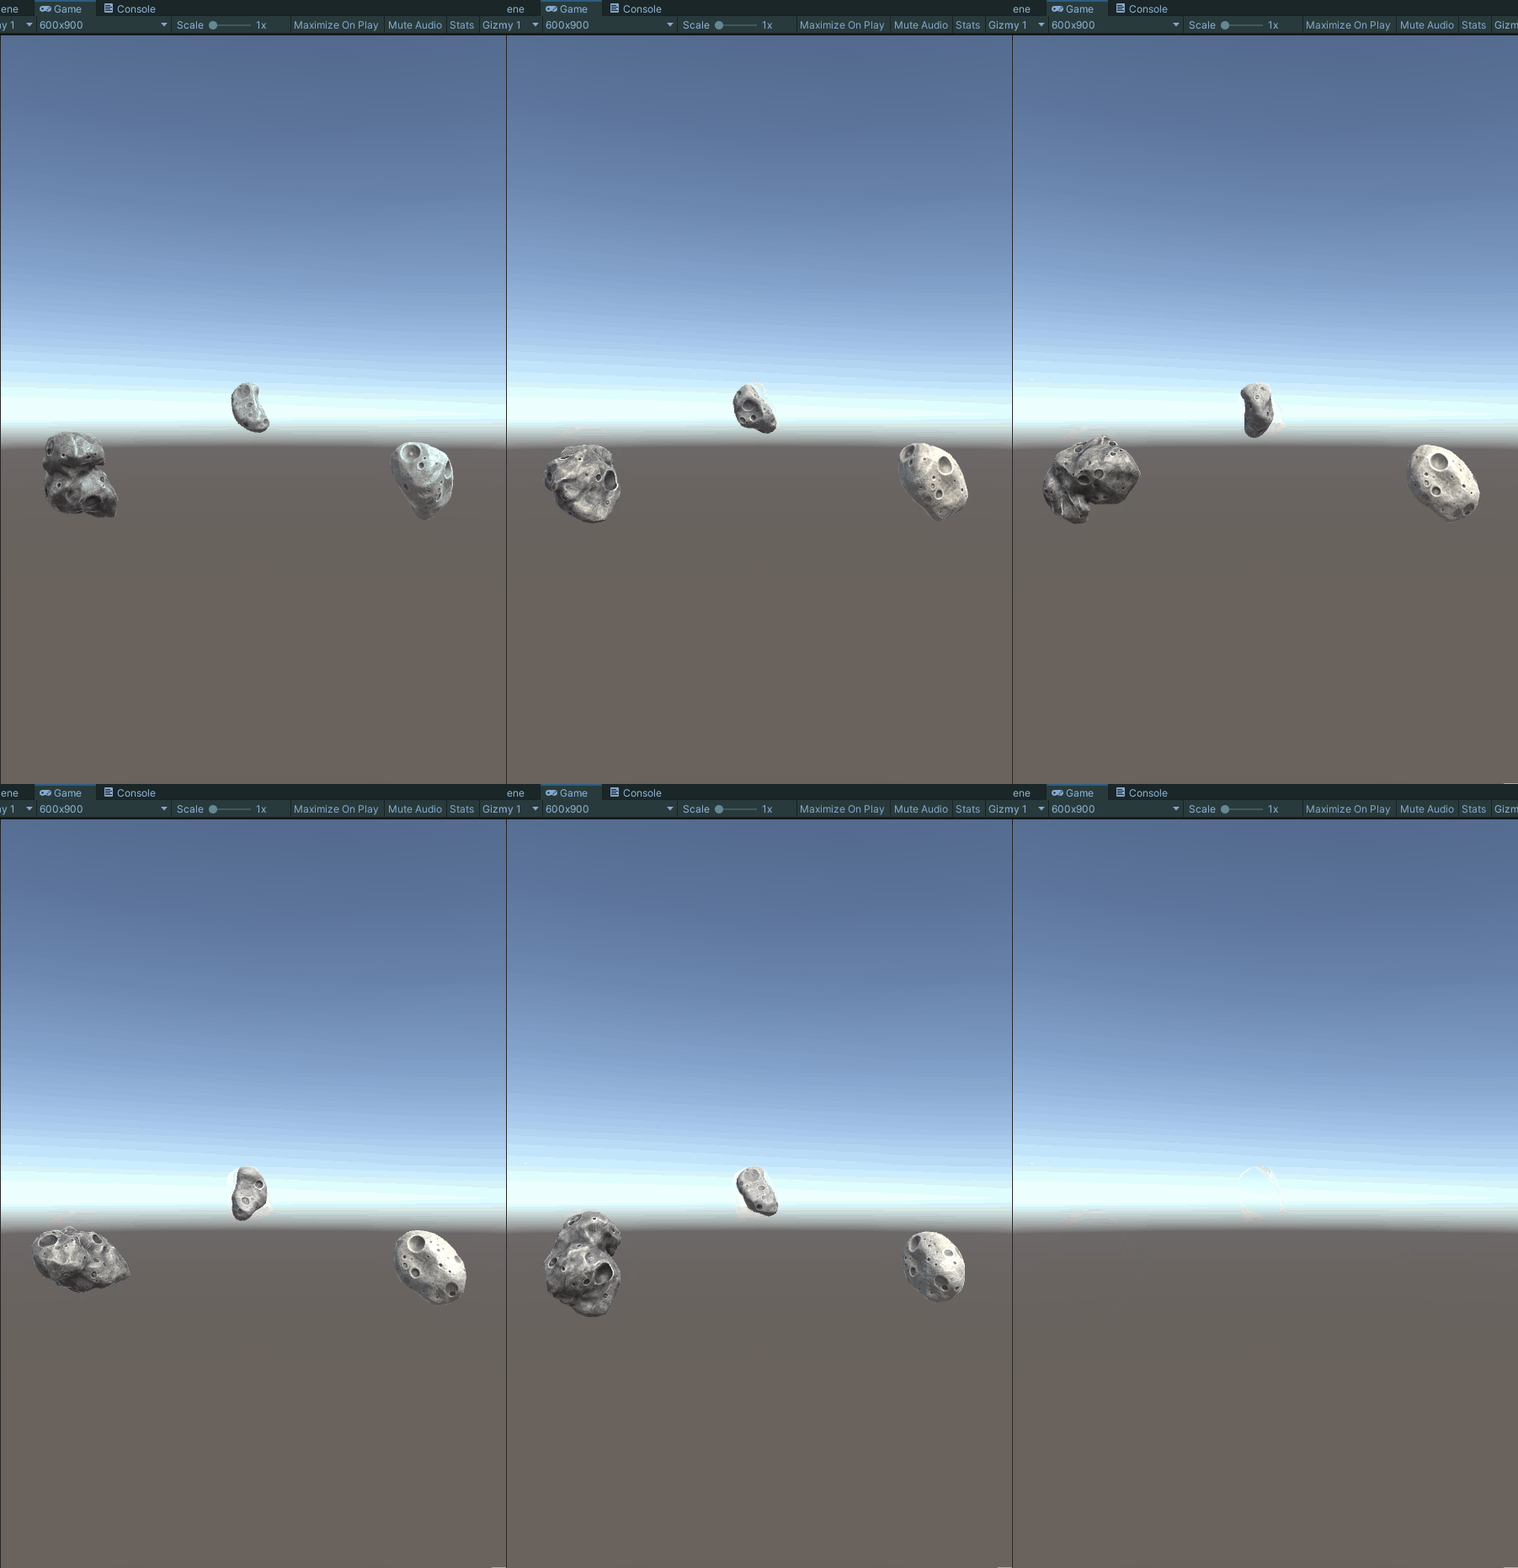
花一天时间做一个高逼格打飞机游戏,过万字Unity完整教程!漂亮学妹看了直呼打飞机666!
- 博客主页:https://blog.csdn.net/zhangay1998
- 欢迎点赞 收藏 ⭐留言 如有错误敬请指正!
- 本文由 God Y.原创,首发于 csdn
- 未来很长,值得我们全力奔赴更美好美好的生活✨
- 打飞机
-
- 正文
-
- 先来理一下思路
- 开始制作
-
-
- 第一步:设置场景
- 第二步:配置我方飞机
- 第三步:设置场景里的相机和光照效果
- 第四步:更换游戏背景
- 第五步:飞机控制脚本的实现
- 第六步:飞机子弹控制
- 第七步:创建敌人
- 第八步:销毁
- 第九步:游戏控制器
- 第十步:UI处理——自由发挥
- 最后一步:游戏展示
-
- 总结
打飞机
- ☀️阳光明媚,司机盎然,空气中充斥着荷尔蒙的气息,又到了万物开始交配的季节了~
- 咦~ 搞错了!重来~
- 一日天气尚好 闲来无事,欲出门吟诗作赋, 偶遇一位漂亮学妹~
- 学妹一脸天真,曰(yūe):“学长 geigei~,你打飞机厉害咩?”
- 我略显尴尬,曰:“咳咳,还行吧…”
- 学妹又曰:“人家也想学打飞机哎,要不然你教教人家嘛~”
- 我曰:“这个…是需要天分的!吾不知你天分如何,先来测测你可好?”
- 学妹跃跃欲试,曰:“好嘛 geigei~ 尽管来!”
- 于是我曰:“打飞机三大要点是什么?请答!”
- 学妹表情坚毅,曰:“首先要快,其次要准,最后要狠!”
- 我曰:“完美通过!那接下来我就教你怎样做一个打飞机的游戏,以及成为一名-打飞机高玩!”
正文
上文为雨后睡前小故事,下面步入正文
- 前段时间看CSDN有个大佬用Java做了一个打飞机的游戏,看着他打飞机打的那么爽,我也想来做一个了。
- 做游戏怎么能少了Unity这位专业人士呢~
- 所以最近利用闲暇时间(摸鱼时间)也来搞一个打飞机的游戏
先来理一下思路
打飞机,顾名思义,我们要围绕飞机来展开思路
- 首先,要创建一个游戏场景,就是我们即将进行"打飞机"的场景!最好能让场景移动来体现真实感~
- 其次,要创建一个我们的主角飞机,当然要显得跟敌人飞机不一样啦。我们的飞机可以上下左右BABA移动,也可以发射炮弹来打飞机!自然也要有血量,不然无敌起来打飞机还有什么乐趣呢,就进不了贤者模式了!
- 然后再就是敌人啦,打飞机打飞机,没有飞机怎么打~,那就来加入敌方飞机,让他们随机加入战斗,再加上一些障碍物,让打飞机的场景更加惊心动魄!
- 再就是游戏对象的销毁,包括敌人被消灭,子弹销毁等等~
- 最后就是要有一个游戏控制器,来控制敌机的生成时间和数量,还有打飞机结束时的胜利和失败等游戏细节控制
好啦,一个简单的游戏思路就构思完成了,那么接下来就是按照这个思路来展开开发计划啦
开始制作
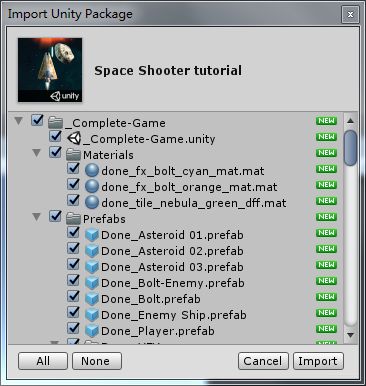
这里我们导入一个Unity官方的飞机大战的资源包,就不用自己用一个简陋的三角裤来当飞机了,可以更高大上一点。
导入后如下图,然后就是按照我们提前想好的思路动手操作啦。
第一步:设置场景
我们导入资源包后第一步是配置游戏场景
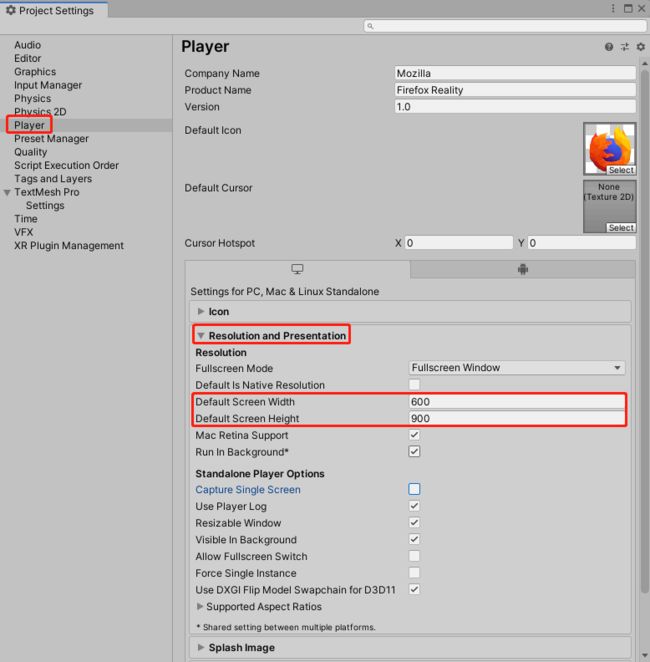
在Game视图点击下图所示地方可以配置游戏视图分辨率,就是我们玩游戏时候的游戏屏幕,将宽高比设置为600×900。 这里只是提供参考,一个竖版的游戏画面。
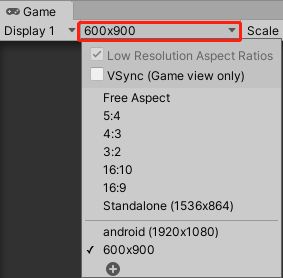
也打开Player Setting进行配置
Player Setting也以在Edit -> Project Settings -> Player中打开,也是将宽高比设置为600×900。两种方法都可以
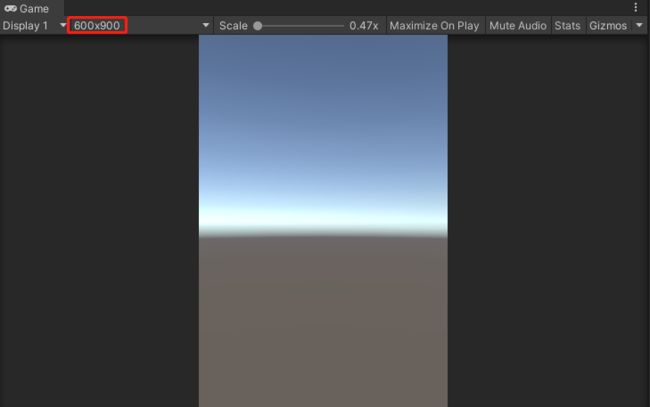
设置完之后Game视图是这样的~,一个简单的游戏屏幕空间设置完成
第二步:配置我方飞机
在这个资源包中已经有飞机了,Assets/Module/Player
所以我们把这个飞机拖到Hierarchy窗口,然后改名为Player
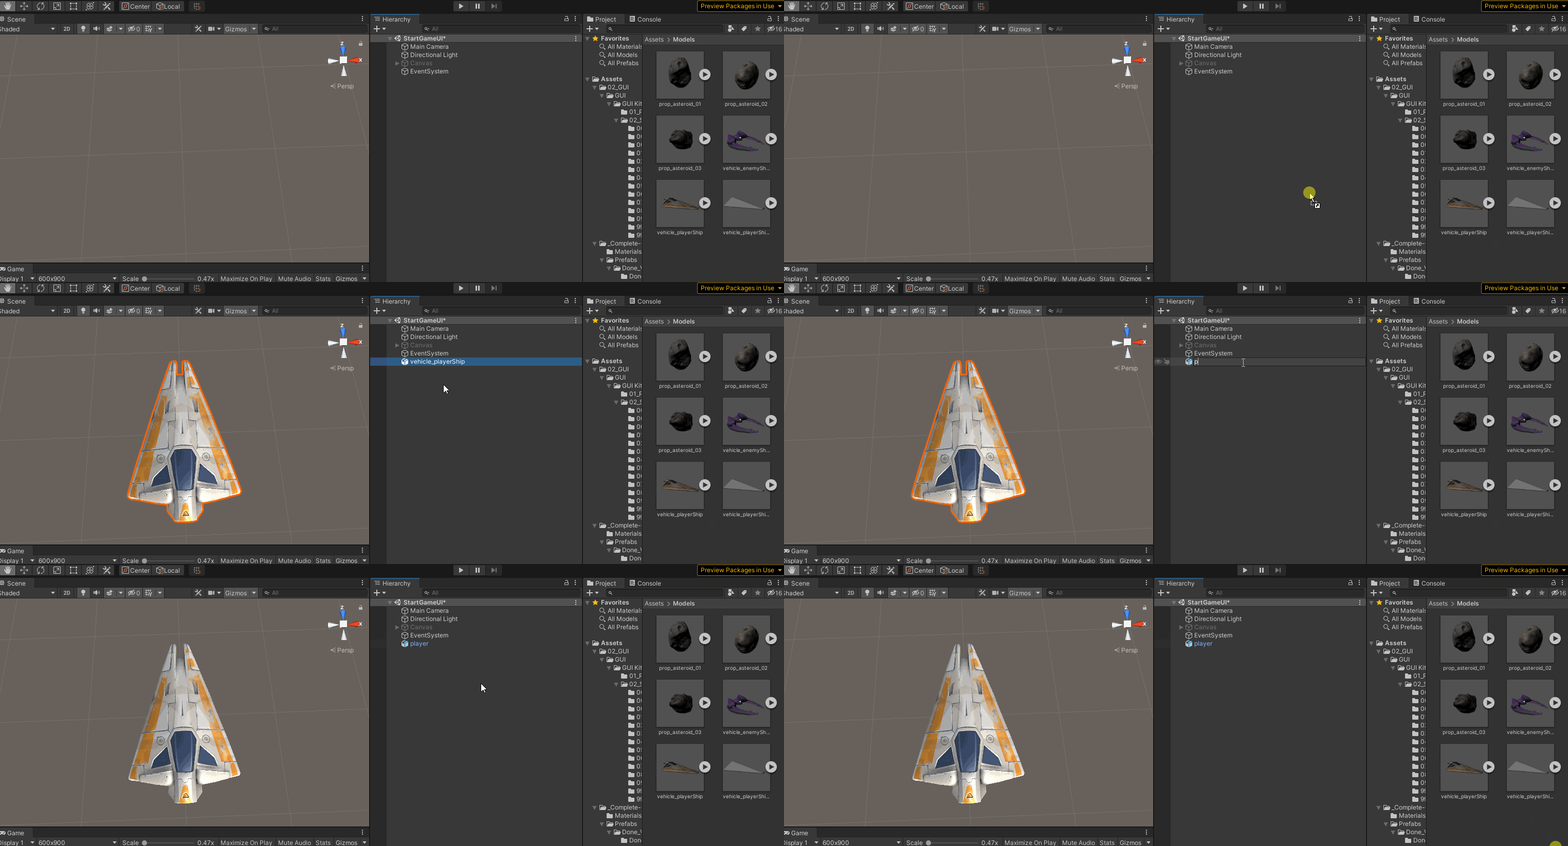
给他加上刚体:Add Component -> Physics -> Rigibody
碰撞体:Add Component -> Physics -> Mesh Collider
加这两个组件是为了实现碰撞效果,所以有必要加上
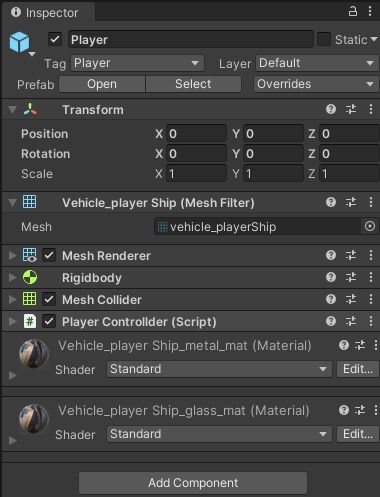
把Player的组件属性设置好,我们不需要飞机有重力,因为这样会掉下去,所以把刚体(Rigibody)的UseGravity选项给关掉,这样就不使用重力效果了。
下图是飞机的Inspector的最终面板属性
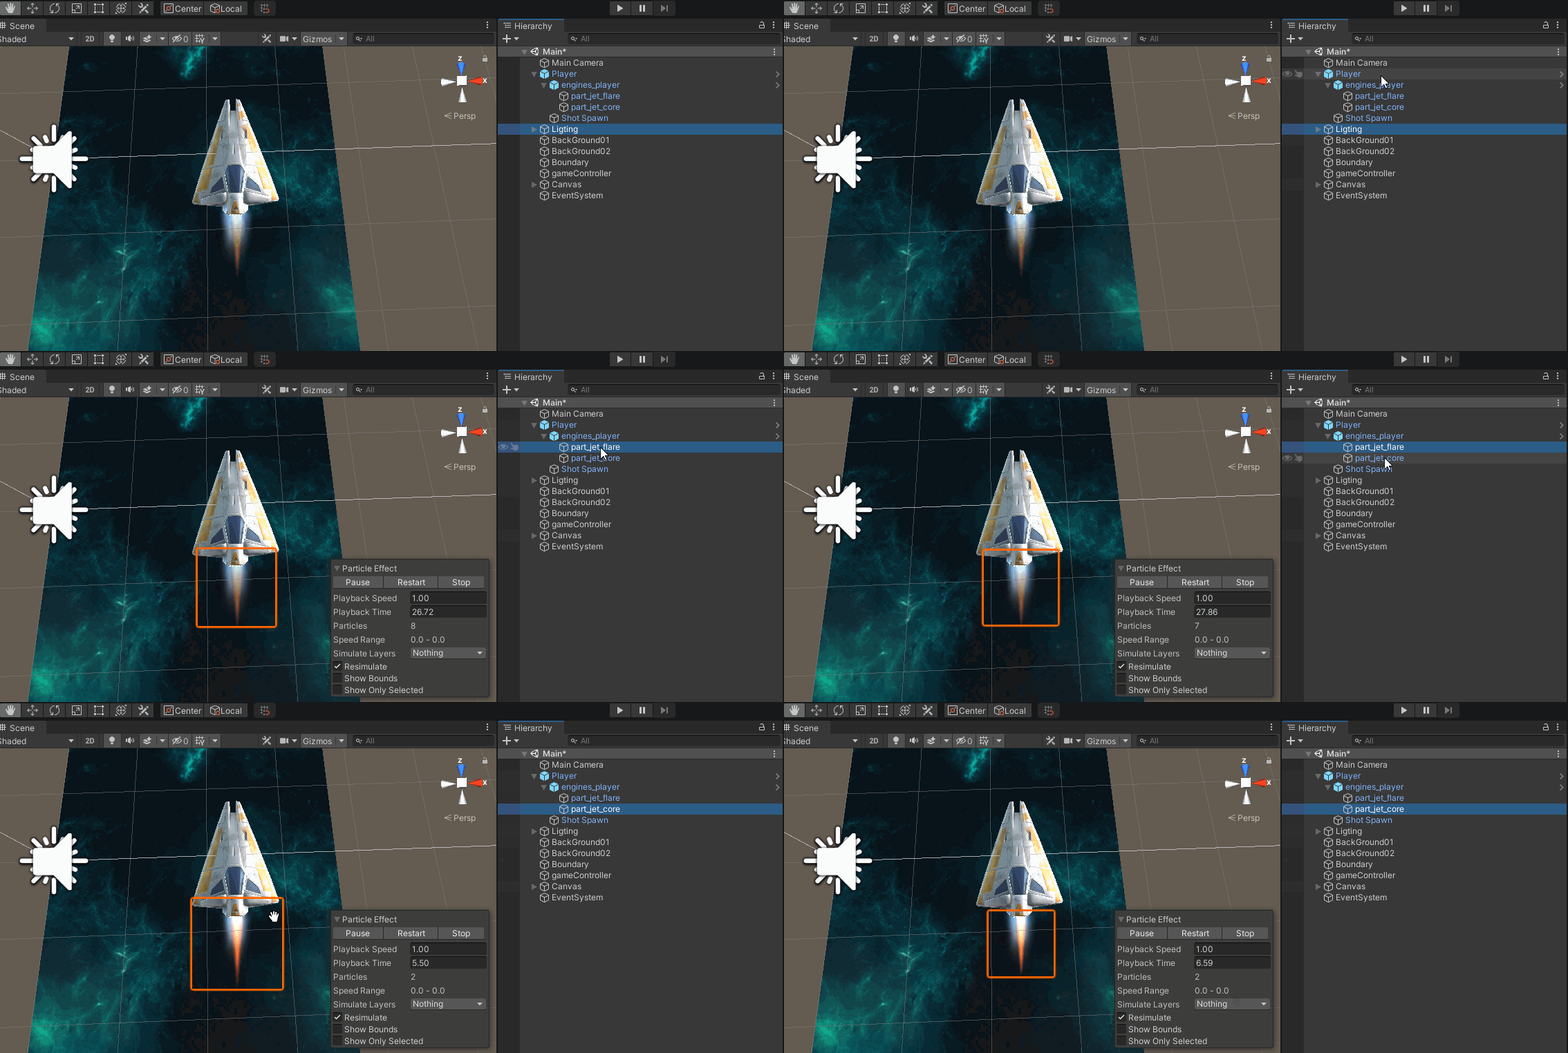
然后资源包里面还有一个飞机尾部喷气的粒子特效,我们给它加到飞机尾部,直接将粒子特效的文件拖到飞机上就行。如下图(游戏背景在下一个步骤,这里录屏了就懒得换啦~):
第三步:设置场景里的相机和光照效果
相机处理
- 我们要把相机放到一个合适的位置才能更好地体验游戏,光照是为了游戏效果更好
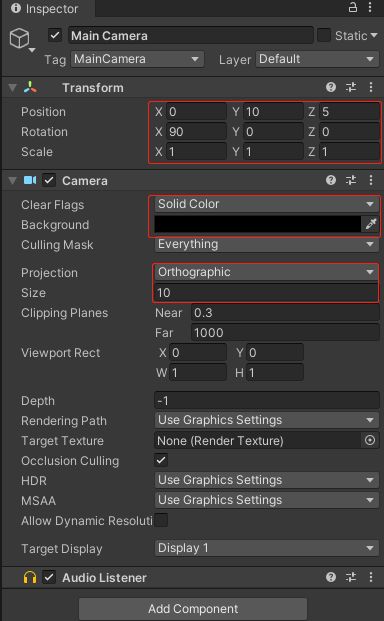
- 直接上数据来设置一下——数据是死的,人是活的,具体怎样设置都行,这里只是提供一个参考数值~
设置相机属性值
- 重置相机的Transform
- Rotation的x设置为90
- Position的y设置为10,z设置为5
- Projections设置为orthographic(正交投影),因为相机俯视整个场景,不需要perspective(透视投影)
- Size设置为10
- Clear Flags设置为Solid Color
- Background设置为黑色
相机Inspector面板属性:
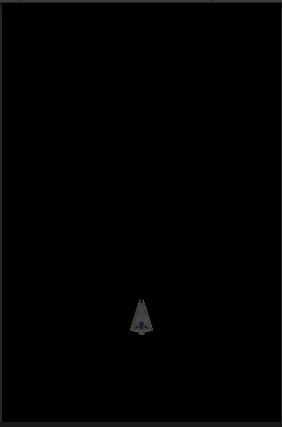
此时的Game视图如下,是不是黑乎乎的呢,因为还没有处理光照,下一步就是光照了
光照处理
- 光照的话主要是为了让场景里面看着更舒服,不那么违和,所以这里也设置一个参考值
- 将场景里的Directional Light改为MainLigjt
- 重置Main Light的属性
- 将Main Light的Rotation的x设置为20,y设置为-115
Main Light最终参数如下:

这样的话相机和光照就简单处理好了,此时的Game视图如下,是不是跟上面的比效果好点了呢~

第四步:更换游戏背景
此时的Game视图黑乎乎的,跟高逼格差十万八千里好吧,最起码游戏背景需要加上才行
步骤如下:
- 新建一个Quad,重命名为Background01。方法:在Hierarchy中右键->3D Object->Quad
- 将tile_nebula_green_dff拖拽到场景中的Background。路径:Assets\Textures\tile_nebula_green_dff
- tile_nebula_green_dff是资源包中的一张图,可以用来做背景
直接来看Background的Inspector面板属性,照着这个属性设置就行,效果图如下:

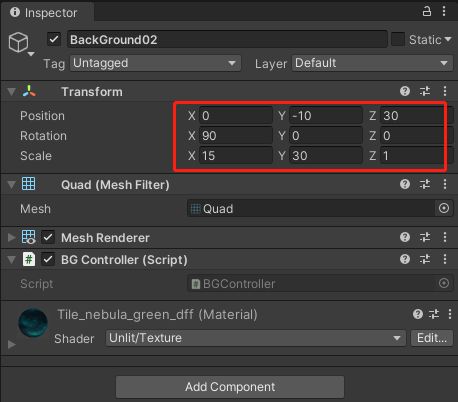
复制一个背景,改名为Backgroun02,然后属性面板设置成这样
-
然后给背景游戏对象加一个脚本,可以让背景动起来
-
一般游戏应该都是让背景动起来,然后主角没动也显得动起来啦~
-
通过判断Z轴参数来让两个背景板替换,形成无限循环的效果~
背景移动看效果(此时飞机应该还不会动,在下一步中,录屏啦就没换~):
上代码:
using System.Collections;
using System.Collections.Generic;
using UnityEngine;

public class BGController : MonoBehaviour
{

    private float MoveSpeed = 1.0f;//背景移动速度
    private void FixedUpdate()
    {

        transform.Translate(Vector3.down * Time.deltaTime * MoveSpeed);//移动
        if (transform.position.z <= -30)//如果z轴小于-30
        {

            transform.position = new Vector3(0, 0, 30);//循环位置
        }
    }
}
这样的话,一个简单的游戏背景就处理好了,接下来就是开始写代码让我们的飞机动起来啦!
第五步:飞机控制脚本的实现
- 现在游戏场景设置完毕,就要来写代码操控飞机啦
- 先让飞机动起来吧,新建一个脚本命名为PlayerController,通过按下键盘上的上下左右键通过Rigidbody控制飞机上下左右移动
- 再加入一个speed参数作为velocity的系数,,可以在面板上调节飞机的飞行速度!
代码如下:
using System.Collections;
using System.Collections.Generic;
using UnityEngine;

public class PlayerController : MonoBehaviour
{

    [Header("移动速度")]
    public float speed;
    private Rigidbody rb;

    void Start()
    {

        rb = GetComponent<Rigidbody>();
    }

    void FixedUpdate()
    {

        float moveHorizontal = Input.GetAxis("Horizontal");
        float moveVertical = Input.GetAxis("Vertical");

        Vector3 movement = new Vector3(moveHorizontal, 0.0f, moveVertical);
        rb.velocity = movement * speed;
    }
}
此时保存代码运行游戏是这样的:
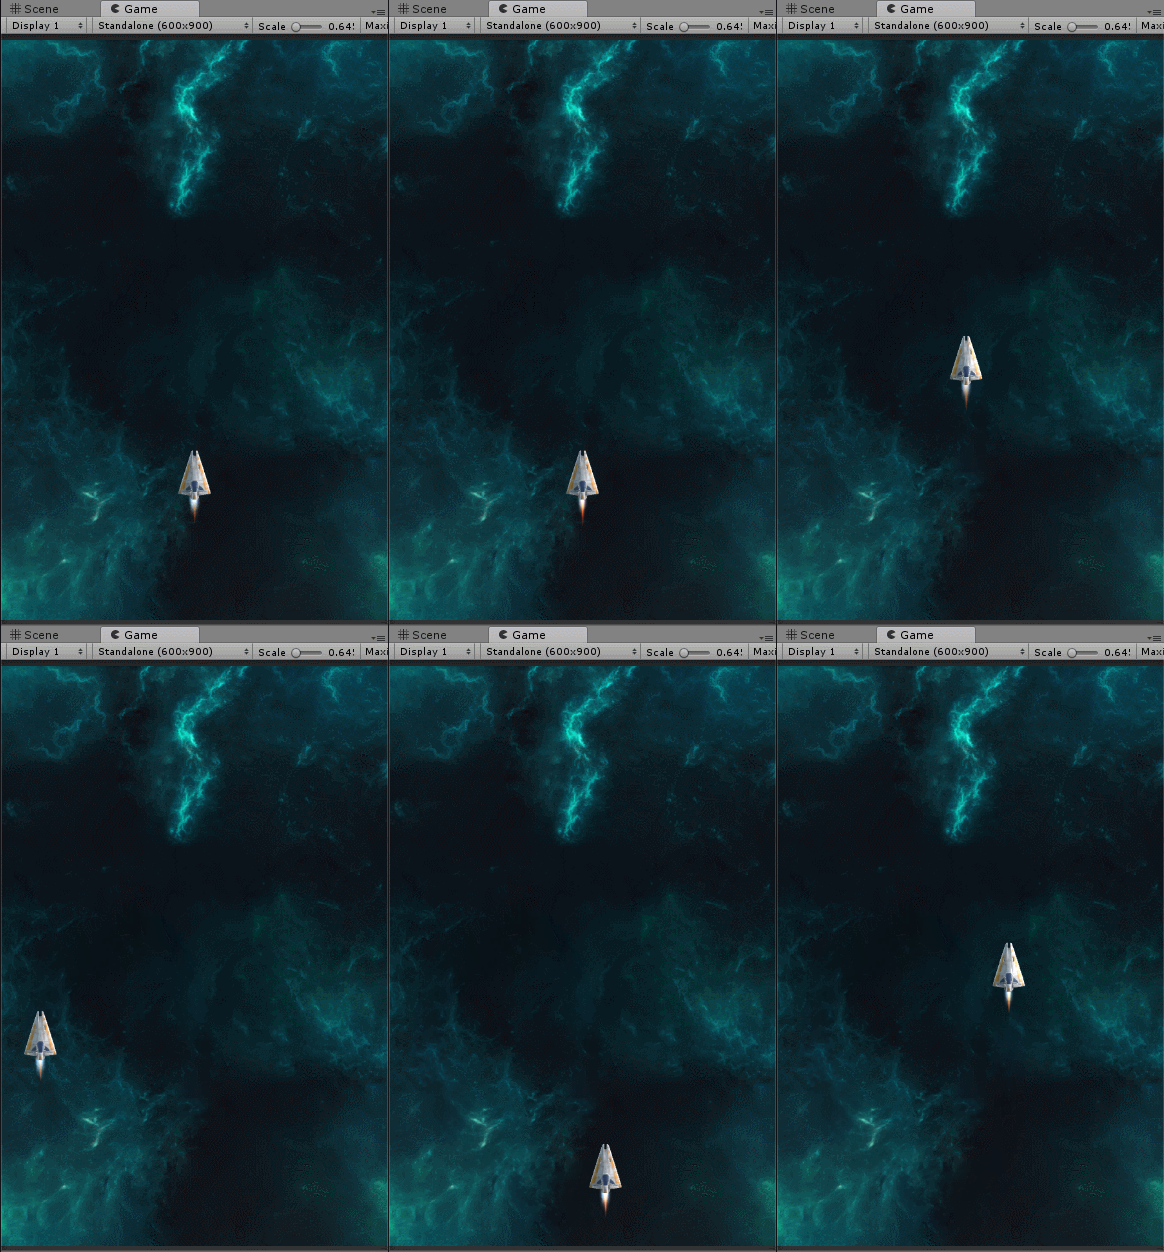
但是此时有个问题就是,飞机操控没有边界,甚至跑出游戏场景外都有可能,那我们就用代码来控制一下
PlayerController脚本修改如下:
using System.Collections;
using System.Collections.Generic;
using UnityEngine;

[System.Serializable]
public class Boundary
{

    [Header("边界控制")]
    public float xMin, xMax, zMin, zMax;
}

public class PlayerControllder : MonoBehaviour
{

    [Header("移动速度")]
    public float Speed = 5f;
    public Boundary boundary;
    private Rigidbody rb;

    void Start()
    {

        rb = GetComponent<Rigidbody>();
    }
    void FixedUpdate()
    {

        float moveHorizontal = Input.GetAxis("Horizontal");
        float moveVertical = Input.GetAxis("Vertical");

        Vector3 movement = new Vector3(moveHorizontal, 0.0f, moveVertical);
        rb.velocity = movement * Speed;

        //飞机边界设置
        rb.position = new Vector3(
            Mathf.Clamp(rb.position.x, boundary.xMin, boundary.xMax),
            0.0f,
            Mathf.Clamp(rb.position.z, boundary.zMin, boundary.zMax)
            );
    }
}
- 代码中增加了一个Boundary类,其中有四个变量用于控制边界的四个顶点
- 还在Boundary类上面加了一个 [System.Serializable] ,加它的目的是让Boundary类能够在Inspector面板上显示
Inspector面板属性设置按照下图所示就可以:
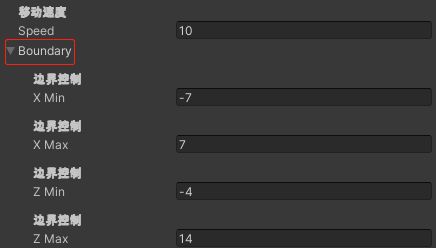
现在飞机可以在边界里自由移动,而且不用担心会跑出边界啦
但是移动的时候感觉很生硬,不够丝滑亮眼呀,这跟我们的高逼格好像又不沾边了…
那我们来给飞机移动的时候加上一个倾斜的效果试试看,说干就干,操作起来:
- 想让飞机倾斜有很多种方法,那我们这里就控制欧拉角,让飞机左右移动的时候绕着Z轴旋转一个角度,就能达到我们想要的效果啦
- 在代码中加一个float参数用于控制倾斜力度,然后在FixedUpdate中加入这行代码控制飞机的rotation
  public float tilt;

rb.rotation = Quaternion.Euler(0.0f, 0.0f, rb.velocity.x * -tilt);
在Inspector中将tilt的值修改为4就可以了

来看一下加了倾斜后的效果图:
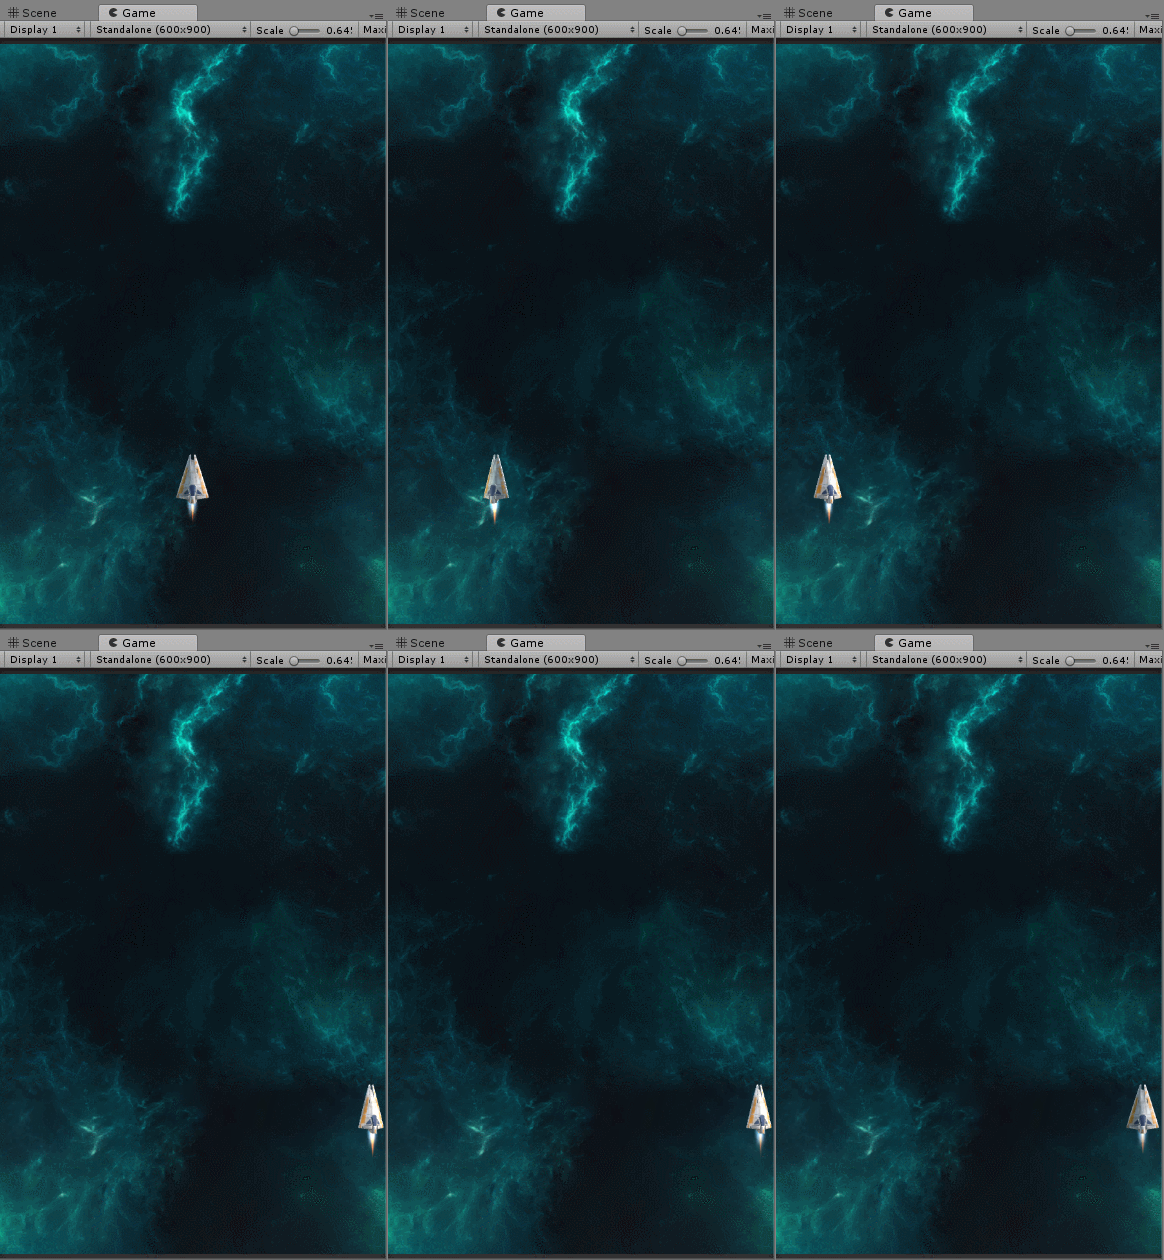
这样在左右移动的时候是不是就显得丝滑多啦,Nice!
第六步:飞机子弹控制
- 现在我们的飞机只能移动,但是还不能发射炮弹呢,不能发射炮弹,还叫什么打飞机啊!
- 那我们就来把炮弹加上,然后使用脚本控制发射炮弹!炮弹的预制体在资源包中路径:Assets/Prefabs/Bolt
- 给炮弹先加上一个简单的脚本,用于控制炮弹发射后可以向前出击!
speed参数是炮弹的飞行速度,可以在面板上自定义修改,这样炮弹在生成之后就会向前发射飞行了
using System.Collections;
using System.Collections.Generic;
using UnityEngine;

public class Mover : MonoBehaviour {

    [Header("炮弹移动速度")]
    public float speed;
    private Rigidbody rb;

	void Start () {

        rb = GetComponent<Rigidbody>();
        rb.velocity = transform.forward * speed;
	}
}
现在炮弹有了,我们给主角飞机Player创建一个子对象,用于控制炮弹发射时候的出生位置
简单来说就是,设置炮弹发射时候的位置,要位于player飞机前面一点。
就比如现实世界上飞机的炮筒,炮弹都是从炮筒发射出去的,总不能从飞机驾驶舱发出去吧~哈哈哈哈嗝
如下图设置,将炮弹发射点放在飞机靠前一部分就行了,这样显得不会太突兀~

- 然后我们来修改PlayerController脚本,新增一个发射炮弹的功能
- Instantiate()方法是Unity中生成预设体的方法,我们把炮弹作为预设体
- 然后利用代码在点击鼠标左键的时候,执行生成炮弹的方法就可以达到我们想要的发射炮弹的方法了
- Input.GetButton(“Fire”) 就是执行点击鼠标左键的时候调用,使用Input.GetMouseButton(0) 效果一样
- 还增加1个private对象nextFire,用于计算炮弹连发时间间隔,一直 秒射 怎么行!加上个时间显得 更 持久~
上代码看一下:
using System.Collections;
using System.Collections.Generic;
using UnityEngine;

[System.Serializable]
public class Boundary
{

    [Header("边界控制")]
    public float xMin, xMax, zMin, zMax;
}

public class PlayerControllder : MonoBehaviour
{

    [Header("炮弹预设体")]
    public GameObject bullet;
    [Header("移动速度")]
    public float Speed = 5f;
    public Boundary boundary;
    public float tilt=4f;
    public Transform shotSpawn;//炮弹发射点

    private GameObject bolt;
    private Rigidbody rb;

    private float fireRate=0.2f;//发射间隔
    private float nextFire;

    void Start()
    {

        rb = GetComponent<Rigidbody>();
    }
    private void Update()
    {

       Fire();
    }
    public void Fire()
    {

        if (Input.GetButton("Fire1") && Time.time>nextFire)
        {

            nextFire = Time.time + fireRate;
            bolt = Instantiate(bullet,transform.position,Quaternion.identity);
        }
    }

    void FixedUpdate()
    {

        float moveHorizontal = Input.GetAxis("Horizontal");
        float moveVertical = Input.GetAxis("Vertical");

        Vector3 movement = new Vector3(moveHorizontal, 0.0f, moveVertical);
        rb.velocity = movement * Speed;

        //飞机边界设置
        rb.position = new Vector3(
            Mathf.Clamp(rb.position.x, boundary.xMin, boundary.xMax),
            0.0f,
            Mathf.Clamp(rb.position.z, boundary.zMin, boundary.zMax)
            );
        //飞机侧身
        rb.rotation = Quaternion.Euler(0.0f, 0.0f, rb.velocity.x * -tilt);
    }
}
在Inspector中指定脚本的public对象,将炮弹和发射点拖过去。方法有多种,这里只演示一种参考
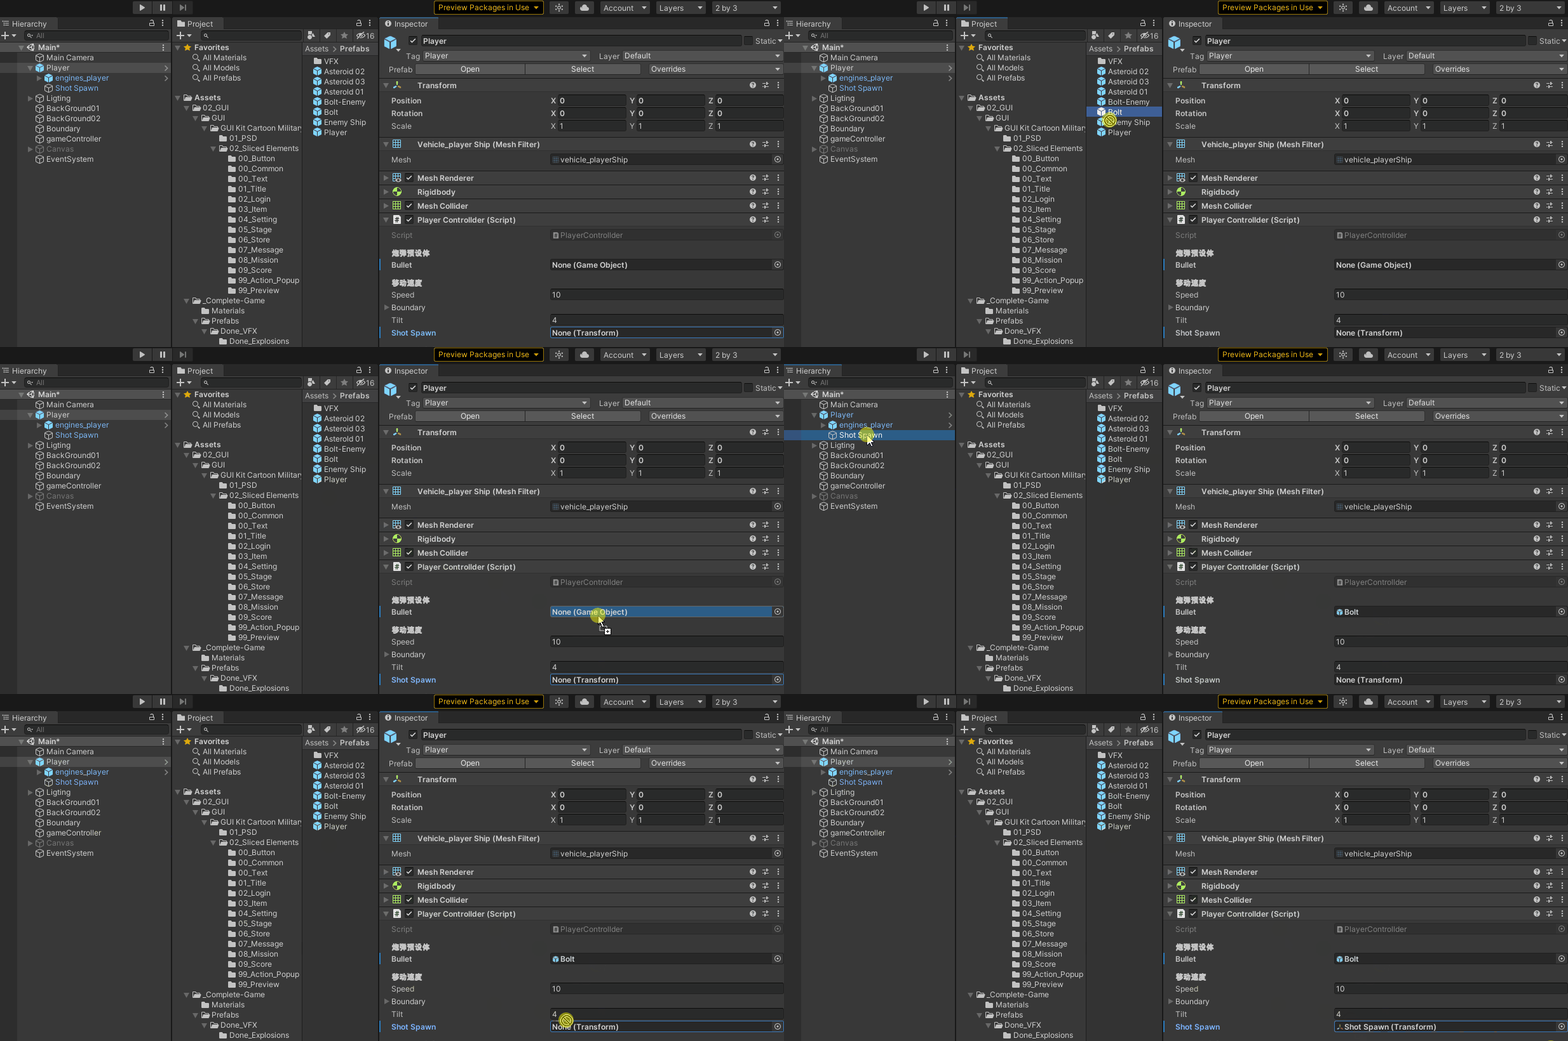
这个时候我们运行游戏,就可以看到下图所示效果啦~
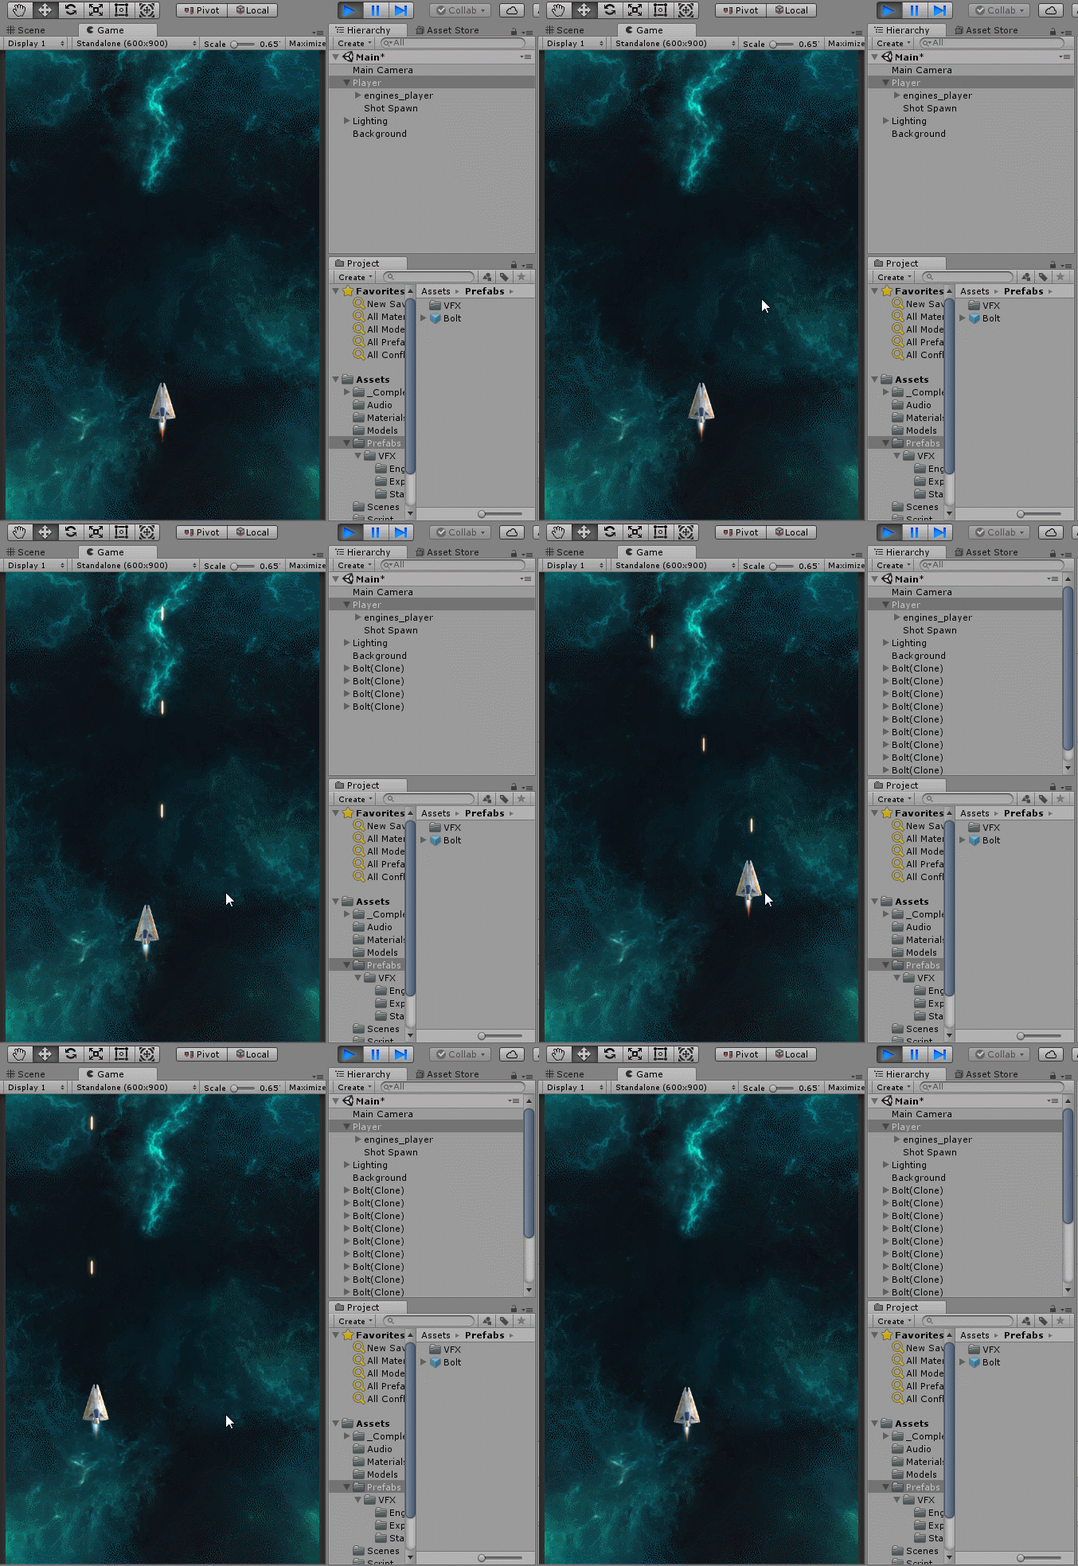
第七步:创建敌人
终于到这一步了,我们的主角飞机都可以自由移动巡逻发炮弹了,那怎么还没有飞机让我打呢,我的大枪都饥渴难耐了!
那我们现在就来加上可以让我们攻击的敌人~
因为资源包内容有限,所以我们这里就加入几种天外陨石来凑数!
操作起来~
创建陨石
陨石的资源路径:Assets/Prefabs/Asteroid 01
这里面的预制体是我添加好的,可以直接拿来用,简单说一下怎样配置的
这个敌人预制体上面都加了刚体(Rigidbody)和碰撞体(Capsule Collider)
- Asteroid -> Add Component -> Rigidbody,取消勾选Use Gravity,以防止陨石掉落地。Angular Drag设置为0,用于忽略空气阻力。
- Asteroid -> Add Component -> Capsule Collider,勾选上Is Trigger,Radius设置为0.45,Height设置为1.5
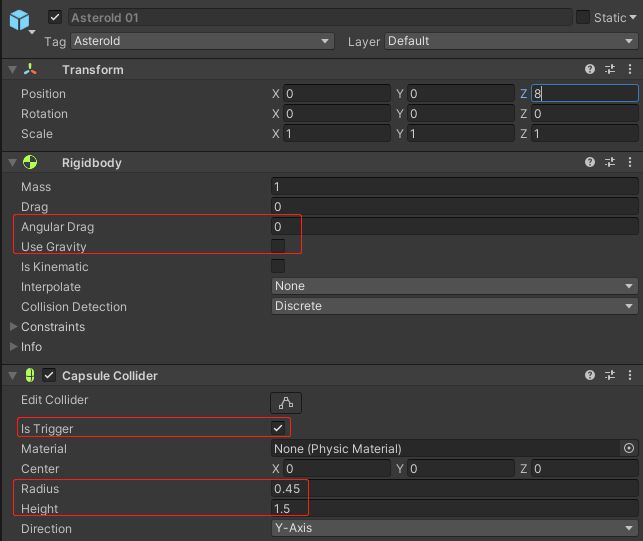
然后给陨石添加上一个可以随机自由翻转的脚本,让游戏加一些亮点。
Random.insideUnitSphere 用于返回一个随机的Vector3变量来让陨石达成随机翻转的效果!
上代码:
using System.Collections;
using System.Collections.Generic;
using UnityEngine;

public class RandomRotator : MonoBehaviour {

	public float tumble;
	private Rigidbody rb;

	void Start () {

        rb = GetComponent<Rigidbody>();
		rb.angularVelocity = Random.insideUnitSphere * tumble;
	}
}
现在我们已经有了陨石了,那就再来加一个敌机。
考虑两个点:
- 1.敌人会发射炮弹攻击我们
- 2.敌人会随机改变游走方向
这样我们的游戏更真实,而且难度会变高
操作起来~
资源包中有敌人素材Assets/Prefabs/Enemy Ship
这个跟陨石一样,参数也差不多,也是我事先做好的预制体
也是都加了刚体(Rigidbody)和碰撞体(Capsule Collider),不多赘述了,直接看参数

这样的话敌人就算有了,但是我们要给他加上发射炮弹和随机移动的脚本
上代码:
发射炮弹的脚本:
using System.Collections;
using System.Collections.Generic;
using UnityEngine;

public class WeaponController : MonoBehaviour
{

	public GameObject shot;
	public Transform shotSpawn;
	public float fireRate;
	public float delay;

	void Start()
	{

		InvokeRepeating("Fire", delay, fireRate);
	}

	void Fire()
	{

		Instantiate(shot, shotSpawn.position, shotSpawn.rotation);

		GetComponent<AudioSource>().Play();
	}
}
控制敌人随机改变方向的脚本:
using System.Collections;
using System.Collections.Generic;
using UnityEngine;

public class EvasiveManeuver : MonoBehaviour
{

    public Boundary boundary;
    public float tilt;
    public float dodge;
    public float smoothing;
    public Vector2 startWait;
    public Vector2 maneuverTime;
    public Vector2 maneuverWait;

    private float currentSpeed;
    private float targetManeuver;

    private void Start()
    {

        currentSpeed = GetComponent<Rigidbody>().velocity.z;
        StartCoroutine(Evade());
    }

    IEnumerator Evade()
    {

        yield return new WaitForSeconds(Random.Range(startWait.x,startWait.y));
        while (true)
        {

            targetManeuver = Random.Range(1, dodge) * -Mathf.Sign(transform.position.x);
            yield return new WaitForSeconds(Random.Range(maneuverTime.x, maneuverTime.y));
            targetManeuver = 0;
            yield return new WaitForSeconds(Random.Range(maneuverTime.x,maneuverTime.y));
        }
    }

    void FixedUpdate()
    {

        float newManeuver = Mathf.MoveTowards(GetComponent<Rigidbody>().velocity.x, targetManeuver, smoothing * Time.deltaTime);
        GetComponent<Rigidbody>().velocity = new Vector3(newManeuver, 0.0f, currentSpeed);
        GetComponent<Rigidbody>().position = new Vector3
        (
            Mathf.Clamp(GetComponent<Rigidbody>().position.x, boundary.xMin, boundary.xMax),
            0.0f,
            Mathf.Clamp(GetComponent<Rigidbody>().position.z, boundary.zMin, boundary.zMax)
        );

        GetComponent<Rigidbody>().rotation = Quaternion.Euler(0, 0, GetComponent<Rigidbody>().velocity.x * -tilt);
    }
}
好了,现在敌人的操作基本是构建好了,下面说一下销毁敌人和炮弹的方法就差不多啦~
第八步:销毁
现在还缺少一个销毁敌人的脚本,敌人销毁有两种可能
- 一种是被我们给打爆,当场销毁
- 另一种是敌人与我们"路过",飞出场外
我们没把他们打死但是他们出了游戏边界以后也会自动销毁,不然就白白消耗性能。
说到销毁,这里还有一个问题。
我们上面给主角飞机发射炮弹的时候,炮弹也还没有加销毁功能,在发出去以后也是白白消耗性能,所以这里一块处理了。
销毁炮弹
-
我们需要子弹离开游戏区的时候销毁它们,所以给整个游戏范围加一个包围盒,让子弹出了包围盒自动销毁就可以了。
-
创建一个Cube,然后将它的Mesh Renderer去掉,就可以形成一个透明的包围盒啦~
-
Hierarchy -> Create -> 3D Object -> Cube,重命名为Boundary,重置Transform,去掉勾选Mesh Renderer,并勾选Box Collider的Is Trigger,用于检测飞出子弹的碰撞。
-
设置Boundary的大小:position = (0,0,5),Scale=(15,1,20)。同时给Boundary添加上标签Tag:Boundary,下面会用到
效果图如下:
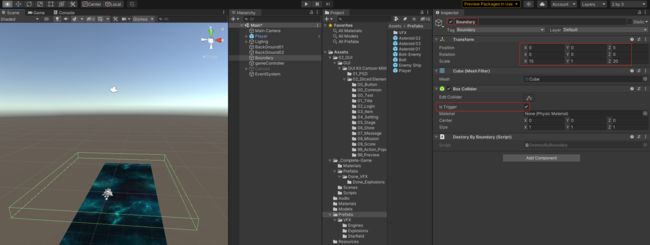
然后给这个Boundary添加上一个脚本用于控制销毁游戏对象
using System.Collections;
using System.Collections.Generic;
using UnityEngine;

public class DestroyByBoundary : MonoBehaviour
{

    void OnTriggerExit(Collider other)
    {

        Destroy(other.gameObject);
    }
}
销毁敌人
上面写了一个包围盒用于控制销毁炮弹,那现在我们的敌人碰到炮弹或者碰到玩家也应该被销毁,所以给敌人也加一个脚本用于控制销毁。
这里给主角炮弹也加一个Tag标签-bullet,用于控制销毁的时候判断当前游戏物体是否应该被销毁。
在敌人被销毁的时候,我们加一个爆炸特效,这样显得逼格就搞起来了,也很简单,只要在触发销毁的时候,生成一个爆炸的特效就可以了。
特效在资源包路径:Assets/Prefabs/VFX/Explosions中
将爆炸特效直接在Inspector面板拖到脚本上就行了

上代码:
using System.Collections;
using System.Collections.Generic;
using UnityEngine;
using UnityEngine.UI;

public class DestroyByContact : MonoBehaviour
{

    public GameObject explosion;
    public GameObject playerExplosion;
    private GameController _gameController;

    private void Awake()
    {

        _gameController = GameObject.Find("gameController").GetComponent<GameController>();
    }
    //当其他碰撞器进入当前GameObject的触发器时,销毁该碰撞器对应的游戏对象,同时销毁该GameObject
    void OnTriggerEnter(Collider other)
    {

        //如果碰到的是玩家子弹
        if ( other.tag == "bullet")
        {

            Instantiate(playerExplosion,transform.position,transform.rotation);
            Destroy(other.gameObject);
            Destroy(gameObject);
        }
        //如果碰到的是玩家
        if (other.tag == "Player")
        {

            Instantiate(playerExplosion, transform.position, transform.rotation);
            Destroy(gameObject);
        }
    }
}
到这里的话,创建敌人和销毁敌人就算简单完成了,还在敌人销毁的时候加了个小特效~
第九步:游戏控制器
以上将游戏的基本要素都操作完了,能到这一步有没有感觉一个小游戏马上就要被我们创造出来了呀~
接下来就是创造一个游戏控制器,用于控制整体敌人的生成啦~
上代码:
using System.Collections;
using System.Collections.Generic;
using UnityEngine;
using UnityEngine.UI;

public class GameController : MonoBehaviour
{

    [Header("敌人的预设体")]
    public GameObject[] hazards;
    public Vector3 spawnValues;
    [Header("一批敌人的数量")]
    public int hazardCound = 10;
    [Header("一批中,单个敌人生成间隔")]
    public float spawnWait = 0.5f;
    [Header("开始的暂停时间")]
    public float startWait = 1f;
    [Header("两批敌人之间的间隔时间")]
    public float waveWait = 4;
    [Header("背景音乐")]
    public AudioSource alarmBGM;

    private Text gameOverText;
    private Transform continues;
    private Text _againText;

    private GameObject player;
    private bool gameOver=false;

    void Start()
    {

        StartCoroutine(SpawnWaves());
        player = GameObject.FindWithTag("Player");
        gameOverText = GameObject.Find("Panel/gameOver").GetComponent<Text>();

        continues = GameObject.Find("Panel/again").transform ;
        _againText= GameObject.Find("again/againText").GetComponent<Text>();
        // alarmBGM.Stop();//音乐停止
        alarmBGM.loop = true;//开启音乐循环
    }
    private void Update()
    {

        fraction.text = crtScore1.ToString();
        hp.value = crtHp;
        Death();
    }
    private void again()
    {

        _againText.text = "是否重来!";
        continues.transform.GetChild(1).gameObject.SetActive(true);
        continues.transform.GetChild(2).gameObject.SetActive(true);
    }

    IEnumerator SpawnWaves()
    {

        int number = 0;
        yield return new WaitForSeconds(startWait);
        while (number<10)
        {

            for (int i=0;i<hazardCound; i++)
            {

                GameObject hazard = hazards[Random.Range(0, hazards.Length)];
                Vector3 spawnPosition = new Vector3(
                Random.Range(-spawnValues.x,spawnValues.x),spawnValues.y,spawnValues.z);
                Instantiate(hazard,spawnPosition,Quaternion.identity);
                yield return new WaitForSeconds(spawnWait);
            }
            number++;
            yield return new WaitForSeconds(waveWait);
            if (gameOver)
            {

                Invoke("again", 2);
                break;
            }
        }
    }
}
- 上面代码增加了hazardCount, spawnWait, startWait, waveWait变量
- 分别用于表示敌人数量,敌人生成的间隔时间,游戏一开始的暂停时间,两批次敌人的间隔时间。
- 利用协程使得一波又一波敌人根据时间来创建,还加入了背景音乐 ~
来看一下效果吧~是不是有那味了呢!
第十步:UI处理——自由发挥
主界面UI
-
既然游戏场景有了,一个小游戏怎么能没有UI界面呢~
-
新建一个游戏场景Scene做UI界面处理,然后点开始游戏的时候进行切换就可以啦~
-
下面我搭建了一个简单的UI场景参考~只是简单的UGUI使用,就不多做赘述了
-
只要能点击开始游戏的时候能切换游戏场景就可以啦~
下面看下我的UI效果 :
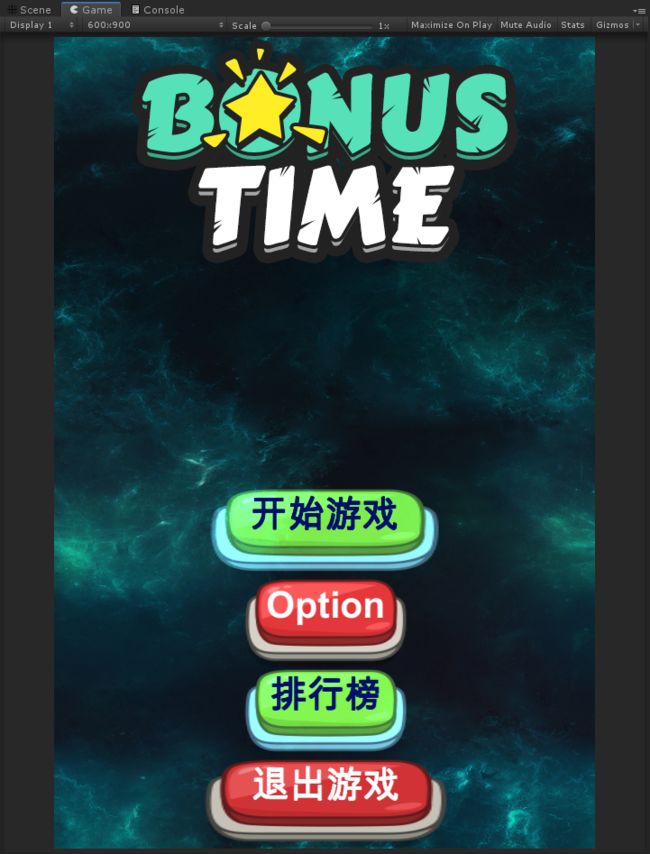
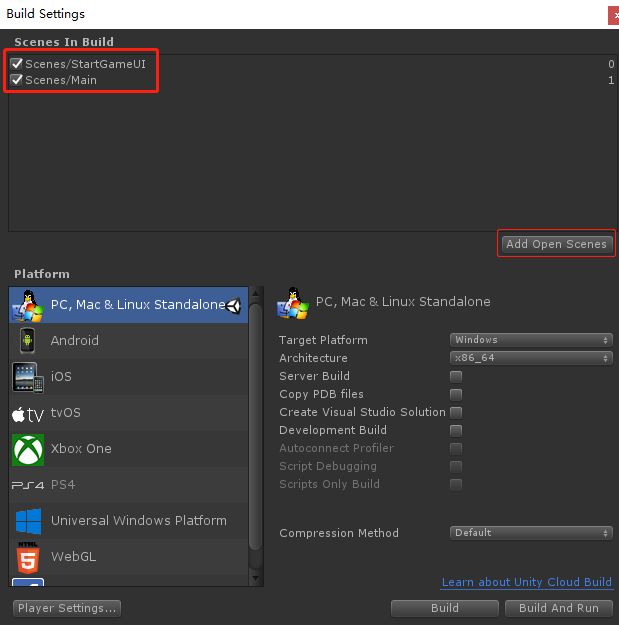
然后点击开始按钮的时候调用切换场景的方法,这里要注意需要把场景添加进去哦
File/Build Setting /Add Open Scene
如下图:
    private void OnClickStartGame()
    {

       //切换场景
        SceneManager.LoadScene("Main");
    }
游戏界面UI
-
既然主界面的UI处理完了,那游戏界面也需要UI呀
-
那我们最好给我们的飞机加上血量,还有击杀敌人加分数~
-
一个正常的游戏逻辑都是这样处理的嘛~
-
这是把游戏控制器的脚本GameController给改了一下,声明了一个Text文本用于记录分数,在击杀敌人的时候调用即可。
-
在PlayerControllder脚本中加入血量,在被敌人攻击或者碰到敌人时调用扣血方法
-
还新加入了炮弹音效,销毁音效等等,在这里不多做介绍啦,后面会单独写声音控制,不然怕大家看的太多都不想看啦~
-
这个也不多做赘述啦,都是个人喜好添加的,直接上代码
游戏控制器代码:
using System.Collections;
using System.Collections.Generic;
using UnityEngine;
using UnityEngine.UI;
public class GameController : MonoBehaviour
{
[Header("敌人的预设体")]
public GameObject[] hazards;
public Vector3 spawnValues;
[Header("一批敌人的数量")]
public int hazardCound = 10;
[Header("一批中,单个敌人生成间隔")]
public float spawnWait = 0.5f;
[Header("开始的暂停时间")]
public float startWait = 1f;
[Header("两批敌人之间的间隔时间")]
public float waveWait = 4;
[Header("背景音乐")]
public AudioSource alarmBGM;
private Text fraction;//记录分数的Text
private Slider hp;
[HideInInspector]
public int crtScore1 = 0;//游戏分数
[HideInInspector]
public int Score=0;//最高分数
private int crtHp=100;//当前血量
private Text gameOverText;
private Transform continues;
private Text _againText;
private GameObject player;
private bool gameOver=false;
void Start()
{
StartCoroutine(SpawnWaves());
fraction = GameObject.Find("Panel/fraction/score").GetComponent<Text>();
hp = GameObject.Find("Panel/HP").GetComponent<Slider>();
player = GameObject.FindWithTag("Player");
gameOverText = GameObject.Find("Panel/gameOver").GetComponent<Text>();
continues = GameObject.Find("Panel/again").transform ;
_againText= GameObject.Find("again/againText").GetComponent<Text>();
// alarmBGM.Stop();//音乐停止
alarmBGM.loop = true;//开启音乐循环
}
private void Update()
{
fraction.text = crtScore1.ToString();
hp.value = crtHp;
Death();
//血量>0时播放背景音乐
// if (Input.GetKeyDown(KeyCode.E))
// alarmBGM.Play();
}
/// 角色控制器PlayerControllder代码:
using System.Collections;
using System.Collections.Generic;
using UnityEngine;


[System.Serializable]
public class Boundary
{

    [Header("边界控制")]
    public float xMin, xMax, zMin, zMax;
}

public class PlayerControllder : MonoBehaviour
{

    [Header("炮弹预设体")]
    public GameObject bullet;
    [Header("移动速度")]
    public float Speed = 5f;
    public Boundary boundary;
    public float tilt=4f;
    public Transform shotSpawn;//炮弹发射点
    [Header("玩家开炮声音")]
    public AudioClip fireClip;

    private GameObject bolt;
    private Rigidbody rb;

    private float fireRate=0.2f;//发射间隔
    private float nextFire;

    void Start()
    {

        rb = GetComponent<Rigidbody>();
    }

    private void Update()
    {

       Fire();
    }
    public void Fire()
    {

        if (Input.GetButton("Fire") && Time.time>nextFire)
        {

            nextFire = Time.time + fireRate;
            bolt = Instantiate(bullet,transform.position,Quaternion.identity);
            AudioSource.PlayClipAtPoint(fireClip,transform.position);
        }
    }

    void FixedUpdate()
    {

        float moveHorizontal = Input.GetAxis("Horizontal");
        float moveVertical = Input.GetAxis("Vertical");

        Vector3 movement = new Vector3(moveHorizontal, 0.0f, moveVertical);
        rb.velocity = movement * Speed;

        //飞机边界设置
        rb.position = new Vector3(
            Mathf.Clamp(rb.position.x, boundary.xMin, boundary.xMax),
            0.0f,
            Mathf.Clamp(rb.position.z, boundary.zMin, boundary.zMax)
            );
        //飞机侧身
        rb.rotation = Quaternion.Euler(0.0f, 0.0f, rb.velocity.x * -tilt);
    }
}
最后一步:游戏展示
-
当当当,游戏展示留到了最后一步,也不枉我做了一天写了一天才弄出来这么个打飞机的游戏~
-
能从头看到这里的大哥都是认真学习的好同志和真爱了,我把整个游戏的思路和做法全写了出来,可能有些细节地方没有注意到,可以评论区说一下,还请谅解啦~
-
由于只能上传5M以内的照片,我把录屏压缩了一下可能卡卡的,这里就简单演示下啦~可以看下面的视频展示!
这个图片看起来卡卡的效果不好,来看看战斗场景内视频演示叭:
飞机大战战斗演示视频
整体游戏演示如下:
飞机大战游戏整体展示视频
总结
- 本篇文章做了一个打飞机的游戏,不知道还合不合诸位胃口呢~
- 如果能跟着博客写的自己动手做出来,Unity入门应该没问题了~不过离大佬还是天差地别!
- 头一次一篇文章写这么多,都有点吧自己绕晕了!
- 可能有些细节地方没有注意到,还请谅解啦~
想要工程源码学习的可以点击链接下载源码工程哦,还有打包好的exe文件可直接试玩!
快来体验一下吧!
也可以在GitHub上下载此工程源码
- 我:怎么样,学妹,看完这篇博客你学会怎样制作打飞机游戏了吗?
- 学妹一脸欣喜,曰:会啦,哥哥你可真棒!你玩打飞机的样子简直帅呆了,下次还要和你一起玩打飞机!
- 我:emm…好咧,记得给我文章三连点个赞支持下就行,下次带你玩更刺激的!
- 学妹:好咧哥哥,那下次再见啦~
