引言
fastJson是阿里巴巴旗下的一个开源项目之一,顾名思义它专门用来做快速操作Json的序列化与反序列化的组件。
本章目标
将fastJson加入到SpringBoot2.x项目内,配置json返回视图使用fastJson解析,本实例基于spring boot版本2.1.3.RELEASE。
本章环境
spring boot 2.1.3.RELEASE
MySQL 5.7
maven 3.5
IntelliJ IDEA 2019.1
创建SpringBoot项目
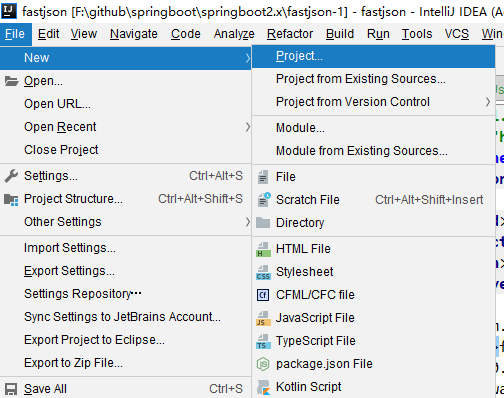
因为是第一篇文章,所以这里我顺便讲解一下通过IntelliJ IDEA工具创建SpringBoot项目。对于maven的安装以及配置这里就不描述了,网上百度很多。好好看哦,下一章节就不会讲了。选择File-->New-->Project
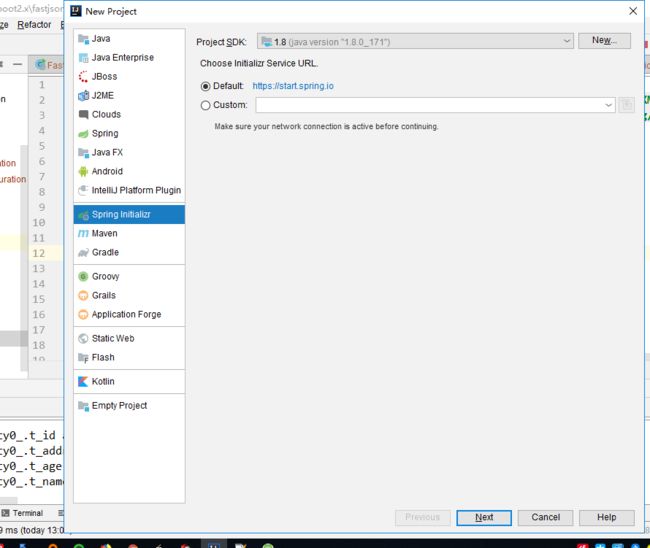
出现下图
下一步 Next
下一步选择对应的依赖,也可以不选择,可以后期在pom.xml文件中自己编写添加的依赖,选择完依赖以后下一步,如
填写项目的名称,对应选择存放的目录,一切就绪以后,选择Finish。如果是第一次添加项目的话,需要等待一会,因为需要下载依赖。
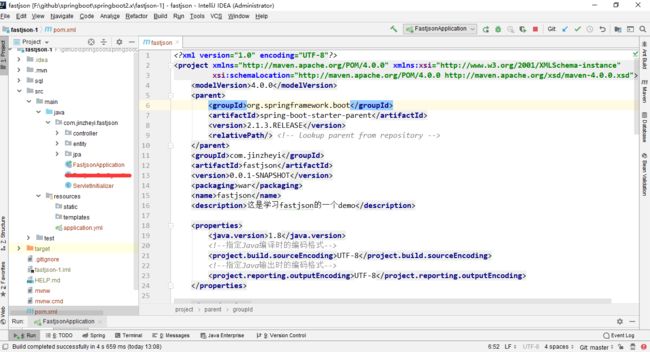
最终项目结构如下图1所示:
图1
图中横线划掉的类是我后期加的,创建好项目后结构是图一的样子,为了避免疑虑所以划掉。
这里我把我的依赖代码贴进来。
    4.0.0

        org.springframework.boot
        spring-boot-starter-parent
        2.1.3.RELEASE


    com.jinzheyi
    fastjson
    0.0.1-SNAPSHOT
    war
    fastjson
    这是学习fastjson的一个demo


        1.8

        UTF-8

        UTF-8


            org.springframework.boot
            spring-boot-starter-data-jpa


            org.springframework.boot
            spring-boot-starter-web


            mysql
            mysql-connector-java
            runtime


            org.springframework.boot
            spring-boot-starter-test
            test


            com.alibaba
            fastjson
            1.2.56


            org.projectlombok
            lombok
            1.18.6


            com.zaxxer
            HikariCP
            3.1.0


                org.springframework.boot
                spring-boot-maven-plugin
注意:这个依赖文件是我已经把所有的需要依赖的文件都依赖好了。包含web[创建web程序需要的]、datajpa[数据持久层]、mysql[连接mysql数据库需要]、fastjson[本章需要讲解的内容]、lombok[比较好的代码优化工具,简化代码]、HikariCP[引入日本开发者号称最快连接池hikaricp,springboot2.x已经默认使用这个连接池了]!
本章的
mvnrepository.com/artifact/com.alibaba/fastjson/1.2.56,这里我们使用fastJson最新版本。
添加完成依赖后我们创建实体类,代码:
package com.jinzheyi.fastjson.entity;

import lombok.Data;
import javax.persistence.*;
import javax.validation.constraints.NotNull;
import java.io.Serializable;

/**
 * ========================
 * Created with IntelliJ IDEA.
 * @description:
 * @author:jinzheyi
 * @Date:2019/3/31 21:52
 * 码云:https://gitee.com/jinzheyi
 * ========================
 */
@Data
@Entity
@Table(name = "t_user")
public class UserEntity implements Serializable {

    /**
     * 数据库自增
     */
    @Id
    @GeneratedValue(strategy = GenerationType.IDENTITY)
    @Column(name = "t_id")
    private Long id;

    @Column(name = "t_name")
    private String name;

    @Column(name = "t_age")
    private int age;

    @Column(name = "t_address")
    private String address;

}
因为引用了lombok,所以实体类get,set方法代码不用写了。
数据库访问层,这里用的是jpa
package com.jinzheyi.fastjson.jpa;

import com.jinzheyi.fastjson.entity.UserEntity;
import org.springframework.data.jpa.repository.JpaRepository;
import org.springframework.data.jpa.repository.JpaSpecificationExecutor;
import org.springframework.stereotype.Component;
import org.springframework.stereotype.Repository;

import java.io.Serializable;

/**
 * ========================
 * Created with IntelliJ IDEA.
 * @description:
 * @author:jinzheyi
 * @Date:2019/3/31 22:07
 * 码云:https://gitee.com/jinzheyi
 * ========================
 */
@Component
public interface UserJpa extends JpaRepository,
        JpaSpecificationExecutor, Serializable {

}
控制器controller
package com.jinzheyi.fastjson.controller;

import com.jinzheyi.fastjson.entity.UserEntity;
import com.jinzheyi.fastjson.jpa.UserJpa;
import org.apache.catalina.User;
import org.springframework.beans.factory.annotation.Autowired;
import org.springframework.web.bind.annotation.RequestMapping;
import org.springframework.web.bind.annotation.RequestMethod;
import org.springframework.web.bind.annotation.RestController;

import java.util.List;

/**
 * ========================
 * Created with IntelliJ IDEA.
 * @description: 用户控制器
 * @author:jinzheyi
 * @Date:2019/3/31 22:08
 * 码云:https://gitee.com/jinzheyi
 * ========================
 */
@RestController
@RequestMapping(value = "/user")
public class UserController {

    @Autowired
    private UserJpa userJpa;

    /**
     * 查询用户列表
     * @return
     */
    @RequestMapping(value = "/list",method = RequestMethod.GET)
    public List list(){
        List list=userJpa.findAll();
        return list;
    }

    /**
     * 添加、更新用户方法
     * @param userEntity
     * @return
     */
    @RequestMapping(value = "/save",method = RequestMethod.GET)
    public UserEntity save(UserEntity userEntity){
        UserEntity entity = userJpa.save(userEntity);
        return entity;
    }

    /**
     * 删除单一用户方法
     * @param id 传入的用户id
     * @return
     */
    @RequestMapping(value = "remove",method = RequestMethod.DELETE)
    public List remove(Long id){
        userJpa.deleteById(id);
        return userJpa.findAll();
    }

}
这时候其实我们可以进行测试了,在浏览器中输入127.0.0.1:8080/user/save?name='小明'&age=11&address='中国'
添加完一条数据后,可以进行访问列表。
如果此时添加空的数据,那么列表会返回null,这有时候不是我们业务场景需要的。
我们接下来创建一个FastjsonConfiguration配置信息类,添加@Configuration注解让SpringBoot自动加载类内的配置。
fastJson视图过滤配置详细内容如下图5所示:
package com.jinzheyi.fastjson;

import com.alibaba.fastjson.serializer.SerializerFeature;
import com.alibaba.fastjson.support.config.FastJsonConfig;
import com.alibaba.fastjson.support.spring.FastJsonHttpMessageConverter;
import org.springframework.boot.autoconfigure.condition.ConditionalOnMissingBean;
import org.springframework.boot.autoconfigure.http.HttpMessageConverters;
import org.springframework.context.annotation.Bean;
import org.springframework.context.annotation.Configuration;
import org.springframework.http.MediaType;
import java.util.ArrayList;
import java.util.List;

/**
 * ========================
 * Created with IntelliJ IDEA.
 * @description: 阿里巴巴的fastjon配置文件
 * @author:jinzheyi
 * @Date:2019/4/7 13:12
 * 码云:https://gitee.com/jinzheyi
 * ========================
 */
@Configuration
public class FastjsonConfiguration{

    @Bean
    @ConditionalOnMissingBean
    HttpMessageConverters fastJsonHttpMessageConverters() {
        FastJsonHttpMessageConverter fastConverter = new FastJsonHttpMessageConverter();
        //创建fastJson配置实体类
        FastJsonConfig fastJsonConfig = new FastJsonConfig();
        fastJsonConfig.setSerializerFeatures(
                //消除对同一对象循环引用的问题,默认为false
                SerializerFeature.DisableCircularReferenceDetect,
                //是否输出值为null的字段,默认为false
                SerializerFeature.WriteMapNullValue,
                //List字段如果为null,输出为[],而非null
                SerializerFeature.WriteNullListAsEmpty,
                //字符类型字段如果为null,输出为"",而非null
                SerializerFeature.WriteNullStringAsEmpty,
                //数值字段如果为null,输出为0,而非null
                SerializerFeature.WriteNullNumberAsZero,
                //全局修改日期格式
                SerializerFeature.WriteDateUseDateFormat,
                //Boolean字段如果为null,输出为false,而非null
                SerializerFeature.WriteNullBooleanAsFalse
        );
        List fastMediaTypes = new ArrayList();
        //标准化输出json格式的字符编码,设置为utf-8
        fastMediaTypes.add(MediaType.APPLICATION_JSON_UTF8);
        fastConverter.setSupportedMediaTypes(fastMediaTypes);
        fastConverter.setFastJsonConfig(fastJsonConfig);
        return new HttpMessageConverters(fastConverter);
    }

}
上述fastJson配置实体调用setSerializerFeatures方法可以配置多个过滤方式,下面我们来介绍下常用的SerializerFeatures配置。
FastJson SerializerFeatures
- SerializerFeature.DisableCircularReferenceDetect //消除对同一对象循环引用的问题,默认为false
- SerializerFeature.WriteMapNullValue, //是否输出值为null的字段,默认为false
- SerializerFeature.WriteNullListAsEmpty, //List字段如果为null,输出为[],而非null
- SerializerFeature.WriteNullStringAsEmpty, //字符类型字段如果为null,输出为"",而非null
- SerializerFeature.WriteNullNumberAsZero,//数值字段如果为null,输出为0,而非null
- SerializerFeature.WriteDateUseDateFormat,//全局修改日期格式
- SerializerFeature.WriteNullBooleanAsFalse //Boolean字段如果为null,输出为false,而非null
项目初尝试运行
经过上述的配置我们基本完成对了SpringBoot整合FastJson的内容,我们接下来尝试运行下项目,运行信息如下所示:
  .   ____          _            __ _ _
 /\\ / ___'_ __ _ _(_)_ __  __ _ \ \ \ \
( ( )\___ | '_ | '_| | '_ \/ _` | \ \ \ \
 \\/  ___)| |_)| | | | | || (_| |  ) ) ) )
  '  |____| .__|_| |_|_| |_\__, | / / / /
 =========|_|==============|___/=/_/_/_/
 :: Spring Boot ::        (v2.1.3.RELEASE)

2019-04-07 13:08:38.635  INFO 11176 --- [           main] c.jinzheyi.fastjson.FastjsonApplication  : Starting FastjsonApplication on RNGQE8HC84YUQRO with PID 11176 (F:\github\springboot\springboot2.x\fastjson-1\target\classes started by Administrator in F:\github\springboot\springboot2.x\fastjson-1)
2019-04-07 13:08:38.642  INFO 11176 --- [           main] c.jinzheyi.fastjson.FastjsonApplication  : No active profile set, falling back to default profiles: default
2019-04-07 13:08:40.153  INFO 11176 --- [           main] .s.d.r.c.RepositoryConfigurationDelegate : Bootstrapping Spring Data repositories in DEFAULT mode.
2019-04-07 13:08:40.275  INFO 11176 --- [           main] .s.d.r.c.RepositoryConfigurationDelegate : Finished Spring Data repository scanning in 106ms. Found 1 repository interfaces.
2019-04-07 13:08:40.762  INFO 11176 --- [           main] trationDelegate$BeanPostProcessorChecker : Bean 'org.springframework.transaction.annotation.ProxyTransactionManagementConfiguration' of type [org.springframework.transaction.annotation.ProxyTransactionManagementConfiguration$$EnhancerBySpringCGLIB$$4667790f] is not eligible for getting processed by all BeanPostProcessors (for example: not eligible for auto-proxying)
2019-04-07 13:08:41.490  INFO 11176 --- [           main] o.s.b.w.embedded.tomcat.TomcatWebServer  : Tomcat initialized with port(s): 8080 (http)
2019-04-07 13:08:41.521  INFO 11176 --- [           main] o.apache.catalina.core.StandardService   : Starting service [Tomcat]
2019-04-07 13:08:41.521  INFO 11176 --- [           main] org.apache.catalina.core.StandardEngine  : Starting Servlet engine: [Apache Tomcat/9.0.16]
2019-04-07 13:08:41.536  INFO 11176 --- [           main] o.a.catalina.core.AprLifecycleListener   : The APR based Apache Tomcat Native library which allows optimal performance in production environments was not found on the java.library.path: [D:\soft\Java\jdk1.8.0_171\bin;C:\WINDOWS\Sun\Java\bin;C:\WINDOWS\system32;C:\WINDOWS;D:\soft\app\Administrator\product\11.2.0\dbhome_3\bin;D:\soft\app\Administrator\product\11.2.0\dbhome_2\bin;D:\soft\app\Administrator\product\11.2.0\dbhome_1\bin;C:\Program Files (x86)\Common Files\Oracle\Java\javapath;C:\WINDOWS\system32;C:\WINDOWS;C:\WINDOWS\System32\Wbem;C:\WINDOWS\System32\WindowsPowerShell\v1.0\;D:\soft\Java\jdk1.8.0_171\bin;D:\soft\Java\jdk1.8.0_171\jre\bin;C:\WINDOWS\System32\OpenSSH\;D:\soft\instantclient_11_1;D:\soft\apache-maven-3.5.4\bin;D:\soft\TortoiseSVN\bin;D:\soft\gradle-5.0-all\gradle-5.0\bin;D:\soft\Git\cmd;D:\soft\Redis\;C:\Users\Administrator\AppData\Local\Microsoft\WindowsApps;;D:\soft\IntelliJIDEA20180304\bin;;.]
2019-04-07 13:08:41.757  INFO 11176 --- [           main] o.a.c.c.C.[Tomcat].[localhost].[/]       : Initializing Spring embedded WebApplicationContext
2019-04-07 13:08:41.757  INFO 11176 --- [           main] o.s.web.context.ContextLoader            : Root WebApplicationContext: initialization completed in 2988 ms
Loading class `com.mysql.jdbc.Driver'. This is deprecated. The new driver class is `com.mysql.cj.jdbc.Driver'. The driver is automatically registered via the SPI and manual loading of the driver class is generally unnecessary.
2019-04-07 13:08:41.913  INFO 11176 --- [           main] com.zaxxer.hikari.HikariDataSource       : myHikaricp - Starting...
2019-04-07 13:08:41.913  WARN 11176 --- [           main] com.zaxxer.hikari.util.DriverDataSource  : Registered driver with driverClassName=com.mysql.jdbc.Driver was not found, trying direct instantiation.
2019-04-07 13:08:42.053  INFO 11176 --- [           main] com.zaxxer.hikari.HikariDataSource       : myHikaricp - Start completed.
2019-04-07 13:08:42.210  INFO 11176 --- [           main] o.hibernate.jpa.internal.util.LogHelper  : HHH000204: Processing PersistenceUnitInfo [
    name: default
    ...]
2019-04-07 13:08:42.309  INFO 11176 --- [           main] org.hibernate.Version                    : HHH000412: Hibernate Core {5.3.7.Final}
2019-04-07 13:08:42.309  INFO 11176 --- [           main] org.hibernate.cfg.Environment            : HHH000206: hibernate.properties not found
2019-04-07 13:08:42.471  INFO 11176 --- [           main] o.hibernate.annotations.common.Version   : HCANN000001: Hibernate Commons Annotations {5.0.4.Final}
2019-04-07 13:08:42.674  INFO 11176 --- [           main] org.hibernate.dialect.Dialect            : HHH000400: Using dialect: org.hibernate.dialect.MySQL5Dialect
2019-04-07 13:08:43.324  INFO 11176 --- [           main] j.LocalContainerEntityManagerFactoryBean : Initialized JPA EntityManagerFactory for persistence unit 'default'
2019-04-07 13:08:43.906  WARN 11176 --- [           main] aWebConfiguration$JpaWebMvcConfiguration : spring.jpa.open-in-view is enabled by default. Therefore, database queries may be performed during view rendering. Explicitly configure spring.jpa.open-in-view to disable this warning
2019-04-07 13:08:44.203  INFO 11176 --- [           main] o.s.b.w.embedded.tomcat.TomcatWebServer  : Tomcat started on port(s): 8080 (http) with context path ''
2019-04-07 13:08:44.203  INFO 11176 --- [           main] c.jinzheyi.fastjson.FastjsonApplication  : Started FastjsonApplication in 6.397 seconds (JVM running for 8.059)
2019-04-07 13:09:00.173  INFO 11176 --- [nio-8080-exec-1] o.a.c.c.C.[Tomcat].[localhost].[/]       : Initializing Spring DispatcherServlet 'dispatcherServlet'
2019-04-07 13:09:00.173  INFO 11176 --- [nio-8080-exec-1] o.s.web.servlet.DispatcherServlet        : Initializing Servlet 'dispatcherServlet'
2019-04-07 13:09:00.183  INFO 11176 --- [nio-8080-exec-1] o.s.web.servlet.DispatcherServlet        : Completed initialization in 10 ms
2019-04-07 13:09:00.275  INFO 11176 --- [nio-8080-exec-1] o.h.h.i.QueryTranslatorFactoryInitiator  : HHH000397: Using ASTQueryTranslatorFactory
可以看到我们的项目正常运行了,我们访问之前编写的查询列表的请求,看是否给我返回了相应的数据,访问地址:127.0.0.1:8080/user/list,如下图所示:
可以看到我们得到了我们想要的结果,那么接下来我们该如何去测试 fastJson是否已经生效了呢?
我们上述的配置中添加一个 SerializerFeatures(WriteNullStringAsEmpty)这个配置的含义就是输入为 NULL值的字段,如果我们将代码中这个过滤注释掉会怎样了了,请看截图
我们可以看到我们代码里面有 SerializerFeatures(WriteNullStringAsEmpty)这个过滤方式时截图address字段显示值为“”而不是NULL。如果去掉了 SerializerFeatures(WriteNullStringAsEmpty)这个过滤条件就会显示null,这种需要根据我们实际业务中去考虑使用
总结
以上便是我本章的全部讲解内容,本章主要讲解了SpringBoot项目如何将返回的消息从内部的Json转换变成fastJson转换,如何添加fastJson的转换器过滤配置SerializerFeature。因为@ResultControll注解的Controller本身返回值就是json字符串,我们上述讲解通过两次修改fastJson过滤器配置的方式见证了fastJson的神奇效果。
作者:金哲一(jinzheyi)
本文代码地址:https://gitee.com/jinzheyi/springboot
链接:https://www.jianshu.com/u/25220c962eec


