一、两种技术的比较
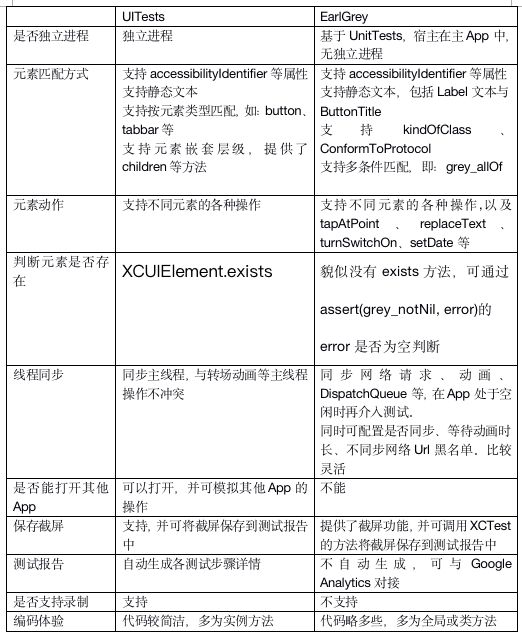
XCode的自动化测试包括:UnitTests与UITests,即:单元测试与界面测试。
EarlGrey是Google在UnitTests的基础上开发的界面测试库,与UITests相似,同时具有一定的优势。具体如下:
二、UITests使用教程
Quick Start
官方文档:(https://developer.apple.com/documentation/xctest)
1、新建项目,在以下界面勾选Unit Tests与UI Tests。
2、如果是老项目:点击菜单-Editor-Add Target,并在以下界面选择iOS UI Testing Bundle
3、给新的Target起名
4、在项目可以看到新添加的Target与对应的文件夹
4.1、添加Scheme
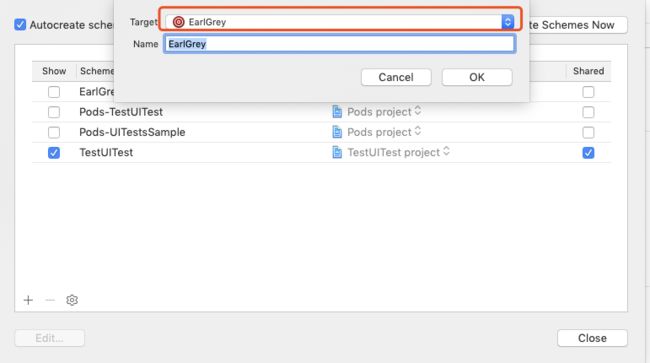
点击菜单-Product-Scheme-Manage Scheme,打开以下界面点击+号按钮
在下图的下拉列表中找到新添加的Target
5、查看自动生成的UITests代码,本例为UITestsSample.swift。默认生成testExample测试方法。注:所有待测试的方法均以test开头
6、编写测试代码,详见下方说明
7、点击Test Navigator,这里将所有Target、其下测试类、以及测试方法列了出来,是按字母排序的。点击右侧的三角形按钮即开始测试,可对指定方法、指定类、指定Target进行测试。按Command+U则依次测试所有Target
8、测试完成后,在以下界面会显示测试结果,绿勾表示成功或红叉表示失败
9、下图为报告,左侧列出了所有测试报告列表(也包括每次的编译报告),右侧为某次测试报告详情。具体每一个测试步骤的情况(时间、截图等)均会显示。
UITests核心类介绍
1、XCUIApplication:对应UIApplication,对App进行操作。主要方法有:
init() / init(bundleID):得到当前App实例,也可通过bundleID得到其他App实例,如:模拟打开微信时需要用到。
launch():启动App
activate():激活App
terminate():中止App
state: runningForeground/runningBackground/notRunning:得到App状态
wait(for state: XCUIApplication.State, timeout: TimeInterval) -> Bool:等待App状态变为某值时,并设置了超时时间
2、XCUIElement:对应界面上的元素。主要方法有:
exists:判断元素是否存在
waitForExistence(timeout:) -> Bool:等待元素出现
children(matching: ElementType) -> XCUIElementQuery:获取一级子元素
descendants(matching: XCUIElement.ElementType) -> XCUIElementQuery:获取所有子元素
typeText(String):模拟键盘输入,并填入文本框中
tap() / doubleTap() / press(forDuration:) / press(forDuration: thenDragTo:) / twoFingerTap() / swipeLeft/Right/Up/Down() / pinch() / rotate():各类操作
3、XCUIElementQuery:查找元素的规则。主要方法有:
allElementsBoundByIndex: [XCUIElement]:返回该规划对应的所有元素集合
count: Int:返回该规划对应的所有元素数量
element: XCUIElement:返回该规划对应的单个元素
element(boundBy: Int) -> XCUIElement:按下标返回该规划对应的元素。boundBy貌似是根据各元素的x、y坐标排序的。(类似先上后下、先左后右,具体排序规则未知)
element(matching: XCUIElement.ElementType, identifier: String?) -> XCUIElement:按元素类型、id返回
children(matching: ElementType) -> XCUIElementQuery:返回指定类型的子元素查询规则
descendants(matching: XCUIElement.ElementType) -> XCUIElementQuery:返回指定类型的后代元素查询规则
4、其他重要类
XCUIScreen:对屏幕的操作,如截屏等
XCTAttachment:附件类,如需要将截屏包装成Attachment才能添加到测试报告中
XCTActivity:上下文,如添加Attachment的方法就在其中
Asynchronous:对异步操作的捕获
    XCTKVOExpectation:对KVO值changed的捕获

    XCTNSNotificationExpectation:对通知的捕获
Assert functions:各种断言方法,如下:
UITests代码实例说明
···
import XCTest
class UITestsSample: XCTestCase {
//自动生成的代码,所有testXXX执行前均会执行它
override func setUp() {
    //出错后是否继续
    continueAfterFailure = false
    XCUIApplication().launch()
}

//自动生成的代码,所有testXXX执行后均会执行它
override func tearDown() {
}

//测试打开微信
func testWeixin() {
    let app = XCUIApplication(bundleIdentifier: "com.tencent.xin")
    app.activate()
    //模拟点击“我”tab
    app.tabBars.buttons["我"].tap()
    //模拟点击“支付”菜单
    app.tables.staticTexts["支付"].tap()
}

func testLoginPerformance() {
    //对sampleFun方法进行性能测试,系统会尝试多次(约10次),并生成性能报告。测试完后,self.measure代码左侧会出现一个灰色按钮,点击查看报告
    self.measure {
        sampleFun()
    }
}

func testAddReminder() {
    sampleFun()
}

func sampleFun() {
    let app = XCUIApplication()
    //查找accessibilityIdentifier=login的按钮,并点击它。注:accessibilityIdentifier需要在App主代码中设置
    app.buttons["login"].tap()
    //查找日期按钮并点击
    app.datePickers["date"].tap()
    //按静态文本查找
    app.staticTexts["登录"].tap()
    //查找第1个UITableView
    app.tables.element(boundBy: 0)

    //是否存在静态文本为“注册”的视图
    if app.staticTexts["注册"].exists {

    }

    //等待“注册”出现,最多等10秒,如果出现了就返回true
    if app.staticTexts["注册"].waitForExistence(timeout: 10) {

    }

    //层层查找。注:这种方法不可靠,主App代码变动会导致视图结构变动
    app.children(matching: .table).children(matching: .button)

    //判断“注册“是否存在,不存在则认为异常,抛出异常信息
    XCTAssertTrue(app.staticTexts["注册"].exists, "注册按钮不存在")
}
}
···
二、EarlGrey使用教程
官方文档
(https://github.com/google/EarlGrey)
(https://github.com/google/EarlGrey/blob/master/docs/install-and-run.md)
Quick Start
1、在项目中安装cocoapods ,详见:(https://www.jianshu.com/p/1bb0ad42cb2e)
2、再通过cocoapods安装earlGrey:
1)、在Podfile文件中添加,注:TEST_TARGET PROJECT_NAME要替换成你的target与project名
target TEST_TARGET do
  project PROJECT_NAME
  use_frameworks! # Required for Swift Test Targets only
  inherit! :search_paths # Required for not double-linking libraries in the app and test targets.
  pod 'EarlGrey'
end
2)、打开命令行工具,进入项目文件夹,运行pod install。安装完成后,项目中将出现以下目录
3、添加UnitTests Target
1)、详见上方UITests教程,添加Target时的UnitTests改为UITests即可。记得在Manage Scheme中添加该Target
2)、在添加的UnitTests类中引用
EarlGrey核心类介绍
1、GREYMatcher:匹配器,用于定位界面上的元素,
1)、通过以下全局方法得到Matcher
grey_accessibilityID
grey_text
grey_buttonTitle
grey_firstResponder
grey_sufficientlyVisible
grey_kindOfClass
grey_conformsToProtocol
grey_ancestor
grey_descendant
……
2)、当匹配到多个元素时:
通过叠加grey_allOf([matcher, grey_sufficientlyVisible()])缩小范围
EarlGrey.selectElement(with: matchers).atIndex(0)
2、GREYAction:要执行的动作
grey_tap
grey_tapAtPoint
grey_typeText
grey_replaceText
grey_clearText
grey_turnSwitchOn
grey_setDate
grey_setPickerColumnToValue
……
3、GREYAssert:断言
GREYAssert
GREYAssertTrue
GREYAssertFalse
GREYAssertNotNil
GREYAssertEqual
4、GREYCondition:用于对特定条件的判断,会在指定时间(Timeout)内尝试多次,直到判断为true或超时。如下:判断是否有"SignIn“视图,超时时间设置为10秒
let condition = GREYCondition(name: "wait for log out") { [unowned self] () -> Bool in
            return self.isExists(matcher: grey_accessibilityID("SignIn"))
        }
        if condition.wait(withTimeout: 10) {
            actionAfterLogout()
        }
核心优势:自动同步
1、自动同步是EarlGrey的核心优势,可确保在网络、动画都执行完成后再模拟测试行为
2、自动同步对象
1)、UI
2)、网络请求
3)、主Dispatch Queue
4)、主NSOperationQueue
5)、……
3、控制同步策略
1)、kGREYConfigKeySynchronizationEnabled:是否开启同步
2)、kGREYConfigKeyCALayerModifyAnimations: =YES表示循环动画只运行一次
3)、kGREYConfigKeyCALayerMaxAnimationDuration:动画最大等待时长
4)、kGREYConfigKeyURLBlacklistRegex:不等待的网络请求黑名单
5)、……
EarlGrey代码实例说明
import XCTest
import EarlGrey

class EaryGreyTest: XCTestCase {

    override class func setUp() {
        //将以下url加入同步黑名单
        let blacklist = [".*crashlytics\\.com", ".*branch\\.io"]
        GREYConfiguration.sharedInstance().setValue(blacklist, forConfigKey: kGREYConfigKeyURLBlacklistRegex)
    }

    func testSample() {
        //找到“登录”,并点击
        EarlGrey.selectElement(with: grey_text("登录")).perform(grey_tap())
        //找到第0个UITableView,并滚动到底部
        EarlGrey.selectElement(with: grey_kindOfClass(UITableView.self)).atIndex(0).perform(grey_scrollToContentEdge(GREYContentEdge.bottom))

        //等待ID为SignIn的按钮出现,超时时间为10秒
        let condition = GREYCondition(name: "等待登录按钮出现") { [unowned self] () -> Bool in
            return self.isExists(matcher: grey_accessibilityID("SignIn"))
        }
        //SignIn出现则返回true,超时返回false
        if condition.wait(withTimeout: 10) {
            //如:执行登录操作
        }
        // The following code will be blocked by condition.wait
        print("The following code will be blocked by condition.wait")
    }

    //判断是否存在指定Matcher的元素
    func isExists(matcher: GREYMatcher) -> Bool {
        var error: NSError?
        let matchers = grey_allOf([matcher, grey_sufficientlyVisible()])
        EarlGrey.selectElement(with: matchers).assert(grey_notNil(), error: &error)
        if (error != nil) && error?.domain == kGREYInteractionErrorDomain && (error?.code == GREYInteractionErrorCode.elementNotFoundErrorCode.rawValue || error?.code == GREYInteractionErrorCode.timeoutErrorCode.rawValue) {
            return false
        } else {
            return true
        }
    }

    //断言,抛出异常,测试将中止
    func throwException(reason: String) {
        addScreenshot()
        GREYAssertTrue(false, reason: reason)
    }

    //生成截图
    func addScreenshot() {
        let image = GREYScreenshotUtil.takeScreenshot()
        let attachment = XCTAttachment(image: image)
        attachment.lifetime = .keepAlways
        add(attachment)
    }
}


