原文链接:https://blog.zhuliang.ltd/2019/02/backend/configurationBuilder-in-netCore.html
以下示例基于 .net core 2.2
ASP.NET MVC示例
asp.net mvc已经内部实现了对配置appsettings.json文件的使用,builder默认支持热更新。
使用示例:
假设appsettings.json内容为:
    {
      "Logging": {
        "LogLevel": {
          "Default": "Warning"
        }
      },
      "AllowedHosts": "*"
    }
- 新建一个跟appsettings.json结构保持一致的类,如:
    namespace webapp.Models
    {
        public class AppsettingsModel
        {
            public Logging Logging { get; set; }

            public string AllowedHosts { get; set; }
        }

        public class Logging
        {
            public LogLevel LogLevel { get; set; }
        }

        public class LogLevel
        {
            public string Default { get; set; }
        }
    }
- 在Startup.cs中进行依赖注入
        public void ConfigureServices(IServiceCollection services)
        {
            services.Configure(options =>
            {
                options.CheckConsentNeeded = context => true;
                options.MinimumSameSitePolicy = SameSiteMode.None;
            });
            // 依赖注入
            services.Configure(Configuration);
            services.AddMvc().SetCompatibilityVersion(CompatibilityVersion.Version_2_1);
        }
- 在controller中调用:
    public class TestController : Controller
    {
        private readonly AppsettingsModel _appsettingsModel;
        //若要使用热更新,则入参调整为 IOptionsSnapshot
        public TestController(IOptions appsettingsModel)
        {
            _appsettingsModel = appsettingsModel.Value;
        }

        public IActionResult Index()
        {
            return View("Index", _appsettingsModel.Logging.LogLevel.Default);
        }
    }
如何覆写默认行为?如取消热更新支持,方法如下:
假设测试controller为
    public class TestController : Controller
    {
        private readonly AppsettingsModel _appsettingsModel;
        //使用的是:IOptionsSnapshot
        public TestController(IOptionsSnapshot appsettingsModel)
        {
            _appsettingsModel = appsettingsModel.Value;
        }

        public IActionResult Index()
        {
            return View("Index", _appsettingsModel.Logging.LogLevel.Default);
        }
    }
    public class Program
    {
        public static void Main(string[] args)
        {
            CreateWebHostBuilder(args).Build().Run();
        }

        public static IWebHostBuilder CreateWebHostBuilder(string[] args) =>
            WebHost.CreateDefaultBuilder(args)
                .ConfigureAppConfiguration((context, config) => //1.通过该方法来覆盖配置
                {
                    //2.重新添加json配置文件
                    config.AddJsonFile("appsettings.json", false, false); //3.最后一个参数就是是否热更新的布尔值
                })
                .UseStartup();
    }
- 这个时候,人为将热更新给关闭了,此时更新json文件后,修改后的内容不会更新到系统中。
控制台示例
对于console项目,默认是没有这个dll的,需要自行从nuget安装
从nuget中安装:Microsoft.AspNetCore.All (注意,末尾不是dll,而是all)
在项目中引入:Microsoft.Extensions.Configuration; 并使用ConfigurationBuilder来构建配置。
使用应用程序参数
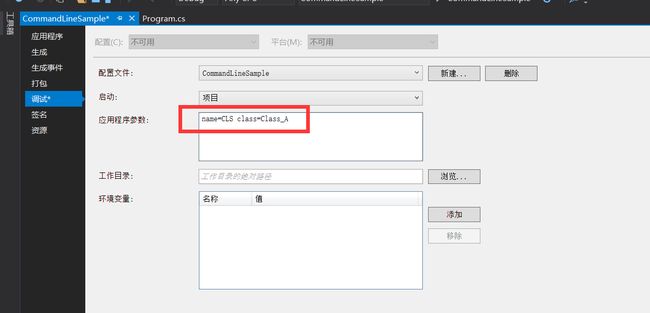
在控制台项目属性中增加name和class参数:
使用:
class Program
{
    static void Main(string[] args)
    {
        var builder = new ConfigurationBuilder()
            .AddCommandLine(args);
        var configuration = builder.Build();

        Console.WriteLine($"name:{configuration["name"]}"); //name:CLS
        Console.WriteLine($"class:{configuration["class"]}");   //class:Class_A

        Console.Read();
    }
}
使用键值对枚举(这里以字典来说明)
    class Program
    {
                static void Main(string[] args)
                {
                    var dict = new Dictionary
                    {
                        {"name","MC"},
                        {"class","CLASS_MC"}
                    };
                    var builder = new ConfigurationBuilder()
//                    .AddCommandLine(args)
                    .AddInMemoryCollection(dict);

                    var configuration = builder.Build();

                    Console.WriteLine($"name:{configuration["name"]}");//name:MC
                    Console.WriteLine($"class:{configuration["class"]}");  //class:CLASS_MC

                    Console.Read();
                }
    }
注意事项:
- 这里需要注意下,虽然 AddCommandLine 和 AddInMemoryCollection 可以同时调用,但不同的使用次序,效果是不一样的(后一个会覆盖前一个的内容---浅覆盖),如:
 /*
    假设 在项目属性中,定义的内容为:name=CLS,class=CLASS_CLS,grade="mygrade"
    在代码中,dict的内容为:name=MC,class=CLASS_MC
 */
//对于代码:
var builder = new ConfigurationBuilder()
                    .AddCommandLine(args)
                    .AddInMemoryCollection(dict);
                    var configuration = builder.Build();

                    Console.WriteLine($"name:{configuration["name"]}");//name:MC
                    Console.WriteLine($"class:{configuration["class"]}");  //class:CLASS_MC
                    Console.WriteLine($"grade:{configuration["grade"]}");  //grade:mygrade

//对于代码:
var builder = new ConfigurationBuilder()
                    .AddInMemoryCollection(dict)
                    .AddCommandLine(args);
                    var configuration = builder.Build();

                    Console.WriteLine($"name:{configuration["name"]}");//name:CLS
                    Console.WriteLine($"class:{configuration["class"]}");  //class:CLASS_CLS
                    Console.WriteLine($"grade:{configuration["grade"]}");  //grade:mygrade
- 另外,需要注意,如果用dotnet命令来执行CommandLineSample.dll,那么“应用程序参数”需要直接跟在命令的后面,如:
- 另外如果AddInMemoryCollection和AddCommandLine同时使用,那么需要将AddCommandLine最后调用,否则一旦被覆盖了,再用dotnet来调用,会没有效果。
dotnet CommandLineSample.dll name=111 class=222 grade="my grade"
使用JSON文件
- 在项目根目录创建“jsconfig1.json”,同时修改该文件的属性:
- 复制到输出目录:始终复制
- 生成操作:内容
JSON文件内容:
{
      "Class": "Class A",
      "PersonInfo": {
            "name": "my name",
            "age": "12"
      },
      "Hobbies": [
            {
                  "Type": "Family",
                  "HobbyName": "Piano"
            },
            {
                  "Type": "Personal",
                  "HobbyName": "Singing"
            }
      ]
}
static void Main(string[] args)
{
    var builder = new ConfigurationBuilder()
        .AddJsonFile("jsconfig1.json");

    var configuration = builder.Build();

    Console.WriteLine($"name:{configuration["PersonInfo:name"]}");
    Console.WriteLine($"class:{configuration["class"]}");
    Console.WriteLine($"age:{configuration["PersonInfo:age"]}");
    //注意下调用参数时的格式:"{参数Key}:{数组索引}:{子项参数Key}"
    Console.WriteLine($"FamilyHobby:{configuration["Hobbies:0:HobbyName"]}");
    Console.WriteLine($"PersonalHobby:{configuration["Hobbies:1:HobbyName"]}");

    Console.Read();
}

