本地运行Hubot
Hubot
Hubot是Github开发并开源的chatbot,但它并不仅仅是一个聊天机器人,Hubot已经广泛应用于Github的日常运维工作,被称为最忙碌的员工。
安装Hubot
Hubot是基于node.js、npm技术体系,使用CoffeeScript语言开发的开源chatbot,github地址:https://github.com/github/hubot
安装 node.js & npm
直接去官网下载安装:https://nodejs.org/
安装Hubot生成器
要运行自己的Hubot,需要通过生成器生成,首先安装generator-hubot
npm install -g yo generator-hubot
生成自己的hubot
mkdir myhubot
cd myhubot
yo hubot
启动myhubot
windows下直接执行hubot命令即可
bin\hubot.cmd
控制台应该可以看到如下信息:
loadDep:basic-auth        ▌
loadDep:base64-url        ▌
loadDep:debug             ▌
loadAllDepsIntoIdealTree  ?
build:. → linkMans        ▄
runTopLevelLifecycles     ?
myhubot> [Mon May 16 2016 14:55:09 GMT+0800 (中国标准时间)] WARNING Loading scripts from hubot-scripts.json is deprecated and will be remove
d in 3.0 (https://github.com/github/hubot-scripts/issues/1113) in favor of packages for each script.

Your hubot-scripts.json is empty, so you just need to remove it.
[Mon May 16 2016 14:55:09 GMT+0800 (中国标准时间)] ERROR hubot-heroku-alive included, but missing HUBOT_HEROKU_KEEPALIVE_URL. `heroku config
:set HUBOT_HEROKU_KEEPALIVE_URL=$(heroku apps:info -s  | grep web-url | cut -d= -f2)`
[Mon May 16 2016 14:55:10 GMT+0800 (中国标准时间)] INFO hubot-redis-brain: Using default redis on localhost:6379

myhubot>
出现的错误信息是因为默认情况下,hubot使用redis做持久化存储,并支持heroku部署。
为了方便起见,我们可以去掉redis和heroku配置,在./external-scripts.json文件中找到"hubot-heroku-keepalive"和"hubot-redis-brain"并删除即可。
也可以忽略这些错误信息,继续使用hubot。
如何使用myhubot
可以通过help查看hubot支持的指令
myhubot help

myhubot> Shell: myhubot adapter - Reply with the adapter
myhubot animate me  - The same thing as `image me`, except adds a few parameters to try to return an animated GIF instead.
myhubot echo  - Reply back with
...
如随机获取一张哈巴狗的图片:
myhubot> myhubot pug me
myhubot> http://26.media.tumblr.com/tumblr_lteebc0WeC1qb08qmo1_500.jpg
至此,本地的myhubot已经可以运行起来,下一步就是扩展myhubot,编写自定义scripts来支持自定义指令。
开发自定义机器人脚本
首先,在决定开发自定义脚本时,可以使用npm search命令看看是不是有类似的脚本可以使用。
$ npm search hubot-scripts github
NAME                  DESCRIPTION
hubot-deployer        Giving Hubot the ability to deploy GitHub repos to PaaS providers hubot hubot-scripts hubot-gith
hubot-gh-release-pr   A hubot script to create GitHub's PR for release
hubot-github          Giving Hubot the ability to be a vital member of your github organization
…
应用NPM 包:
- npm install --save
- 将package-name添加到external-scripts.json
第一个script
myhubot 项目结构
- bin/ myhubot运行脚本
- node_modules/ 引用的包文件
- scripts/ 存放自定义脚本
- external-scripts.json 引用的外部脚本
- package.json 项目全局配置信息
我们编写的自定义脚本要放在scripts中,可以是.coffee或.js文件,你可以用CoffeeScript或纯JS编写他们。
默认情况下,需要导出一个function:
module.exports = (robot) ->
  # your code here
首先我们在scripts中创建第一个脚本,hello.coffee
module.exports = (robot) ->
    robot.respond /greet/i, (res) ->
    res.send 'hello world.'
重启myhubot,输入myhubot greet
myhubot> myhubot greet
myhubot> hello world.
Hubot script语法
Hearing & responding
hearing可以监听房间或群组中任何消息。
respond只监听直接发送给机器人的消息,也就是需要指定机器人名称或别名,加入机器人名称是rob,别名是/,则如下格式会触发脚本:
- rob open the pod bay doors
- ROB: open the pod bay doors
- @ROB open the pod bay doors
- /open the pod bay doors
Send & reply
res参数是Response实例,如果要从机器人返回消息,可以使用send或reply。
send会将消息发送到整个聊天房间或群组。
reply会将消息回复给具体的人。
更多信息请参考官网 https://hubot.github.com/docs/scripting/
复杂一点的例子
Hubot是基于node.js开发的,所以它可以做到node.js所能做的,如:
- 发消息
- 回复消息
- 发起http请求
- 返回http响应
- 在远程服务器上执行shell命令
- ...
例子: 查看服务端日历信息
scripts/calculate.coffee
child_process = require('child_process')
module.exports = (robot) ->
    robot.respond /(cal|日历)( me)?/i, (res) ->
        child_process.exec 'cal', (err, stdout, stderr) ->
            res.send(stdout)
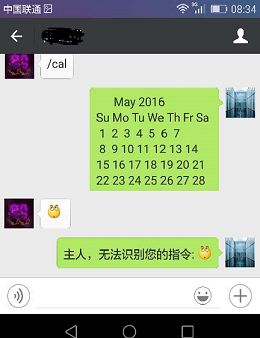
重启myhubot,输入myhubot cal,就可以看到控制台返回服务端日历信息
Su Mo Tu We Th Fr Sa
 1  2  3  4  5  6  7
 8  9 10 11 12 13 14
15 16 17 18 19 20 21
22 23 24 25 26 27 28
29 30 31
捕获所有未处理信息
为了使机器人响应更加友好,对于未能识别的信息,可以设置一个默认返回信息。
scripts/catchAll.coffee
module.exports = (robot) ->
  robot.catchAll (res) ->
    res.send "主人,无法识别您的指令:#{res.message.text}"
集成到微信
hubot默认提供两种adapter,shell和campfile。
shell提供命令行方式,用于开发调试或者运维还可以,用于聊天太逊了。
campfile聊天工具在中国都没几个人听过,不用也罢。
依赖于hubot的灵活扩展机制,社区提供了多种聊天工具的集成adapter。可以在官网上找到。
不过在中国,最流行的聊天软件当然是微信,将自己的聊天机器人绑定到微信账户上,没事调戏下,是不是很有趣。
好在,已经有人做出了微信adapter,地址:https://github.com/KasperDeng/Hubot-WeChat
接下来,我们集成Hub-WeChat到我们的工程中来即可。
npm install hubot-weixin --save
运行myhubot,设置名称为bot,别名/,这样只需要输入/cal就可以激活机器人了。
bin\hubot.cmd -n bot -l / -a weixin
这样运行命令当然会出错,hubot-weixin工作的主要机制是hack网页版微信协议,先用手机登录微信帐号,然后模拟网页版微信登录,这样就可以接受微信消息了。
可以按照如下步骤设置:
1.首先为机器人注册一个新的微信号或者使用已有的微信号;
2.在手机端登录微信;
3.在chrome浏览器打开网页微信:web.weixin.qq.com,F12打开控制台监控请求信息;
4.用手机扫描登录;
5.控制台应该会监控到很多请求信息;
6.从这些请求信息中找出如下信息,并填写到./node_modules/hubot-weixin/config.yaml:
cookie:
Uin:
Sid:
Skey:
DeviceID:
这下,重新运行命令就可以了,如果有错误,就按照刚才的步骤检查这些参数设置是否正确,也可以用postman等工具调试看看。
bin\hubot.cmd -n bot -l / -a weixin
正确启动后,将机器人微信号添加为好友,就可以通过微信发消息给机器人了。
接下来
接下来,可以考虑做些更好玩的事情。
- 比如绑定语音服务,将语音转换成文字指令。这样就可以通过语音指挥机器人做事情了。
- 编写部署运维脚本,使机器人可以真正用于日常的开发运维工作。也就是所谓的chatops。