最近搞图片缩略,总结了几种不同方式的。具体如下
UIKit
UIGraphicsBeginImageContext & drawInRect
- (UIImage*)scaleWithUIKit:(CGSize)size {
    TICK
    CGFloat width = self.size.width;
    CGFloat height = self.size.height;
    if (width * height ==0) {
        return self;
    }

    float verticalRadio  = size.height * 1.0 / height;
    float horizontalRadio = size.width * 1.0 / width;

    floatradio = 1;
    if (verticalRadio <1 || horizontalRadio <1) {
        radio = MIN(verticalRadio, horizontalRadio);
    }

    width = width * radio;
    height = height * radio;

    // 创建一个bitmap的context 并把它设置成为当前正在使用的context
    UIGraphicsBeginImageContext(CGSizeMake(width - 1, height - 1));
    // 绘制改变大小的图片
    [self drawInRect:CGRectMake(0,0, width, height)];
    // 从当前context中创建一个改变大小后的图片
    UIImage *scaledImage = UIGraphicsGetImageFromCurrentImageContext();
    // 使当前的context出堆栈
    UIGraphicsEndImageContext();
    TOCK
    // 返回新的改变大小后的图片
    return scaledImage;
}
PS: 其中的TICK 和 TOCK 定义如下
#define TICK  CFAbsoluteTime before = CFAbsoluteTimeGetCurrent();
#define TOCK  NSLog(@"resize: %.2f ms", (CFAbsoluteTimeGetCurrent() - before) *1000);
// UIKit
NSString*path = [[NSBundlemainBundle]pathForResource:nameofType:exts];
UIImage*image = [UIImageimageWithContentsOfFile:path];
image = [imagescaleWithUIKit:UPLOAD_IMG_SIZE];
使用Time Profiler查看系统的调用过程,结果如下:

可以看出scaleImage方法中,[UIImage imageWithContentOfFile:]方法耗时11.00ms,scaleWithUIKit:方法耗时34.00ms,而[UIImage imageWithContentOfFile:]方法具体做了什么,可以参考我的另一篇文章图片ImageI/O解码探究
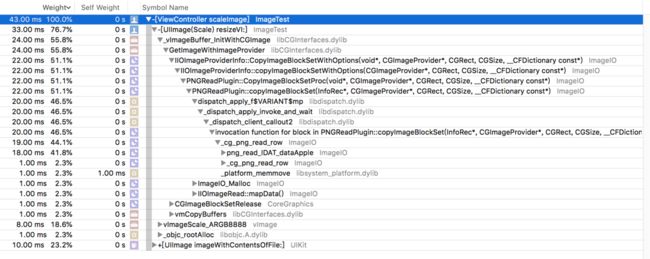
我们看下scaleWithUIKit:方法具体做了什么:
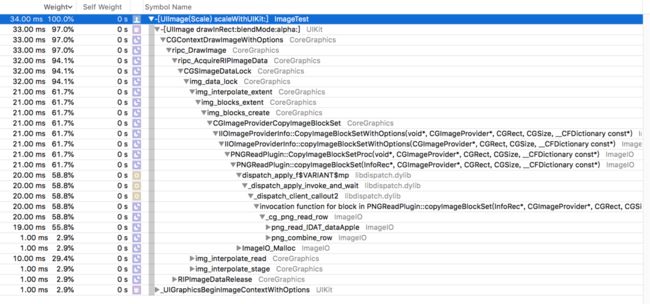
可以看出来,调用了PNGPlugin库中的_cg_png_read_row方法,进行了图片解码。只不过,获取图片的过程在[UIImage imageWithContentOfFile:]方法中,进行了解压缩。
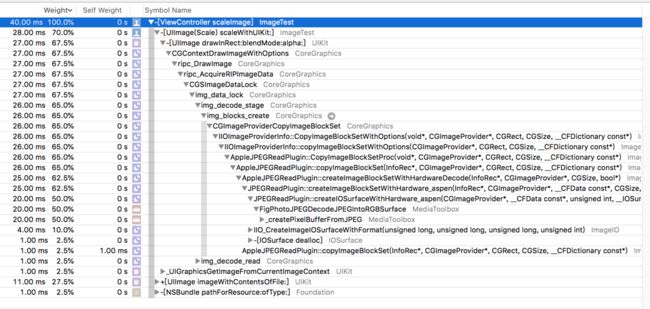
可以看出来,scaleWithUIKit方法中,调用了AppleJPEGPlugin库中的FigPhotoJPEGDecodeJPEGIntoRGBSurface方法进行了解码。
CoreGraphics
CGBitmapContextCreate & CGContextDrawImage & CGBitmapContextCreateImage
- (UIImage*)resizeCG:(CGSize)size {
    TICK
    if (!self) {
        return nil;
    }

    CGFloat width = self.size.width;
    CGFloat height = self.size.height;
    if (width * height == 0) {
        return self;
    }

    float verticalRadio  = size.height * 1.0 / height;
    float horizontalRadio = size.width * 1.0 / width;

    floatradio =1;
    if (verticalRadio <1 || horizontalRadio <1) {
        radio = MIN(verticalRadio, horizontalRadio);
    }

    width = width * radio;
    height = height * radio;

    CGImageRefimageRef = self.CGImage;
    size_t bitsPerComponent = CGImageGetBitsPerComponent(imageRef);
    size_t bytesPerRow = CGImageGetBytesPerRow(imageRef);
    CGColorSpaceRef colorSpaceRef = CGImageGetColorSpace(imageRef);
    CGBitmapInfo bitmapInfo = CGImageGetBitmapInfo(imageRef);

    CGContextRefcontext =CGBitmapContextCreate(NULL, width, height, bitsPerComponent, bytesPerRow, colorSpaceRef, bitmapInfo);
    if (!context) return nil;

    CGContextDrawImage(context,CGRectMake(0,0, width, height), imageRef);// decode
    CGImageRef newImageRef = CGBitmapContextCreateImage(context);
    UIImage *newImage = [UIImageimageWithCGImage:newImageRef];

    CFRelease(context);
    CGImageRelease(newImageRef);
    TOCK
    return newImage;
}
调用过程如下:
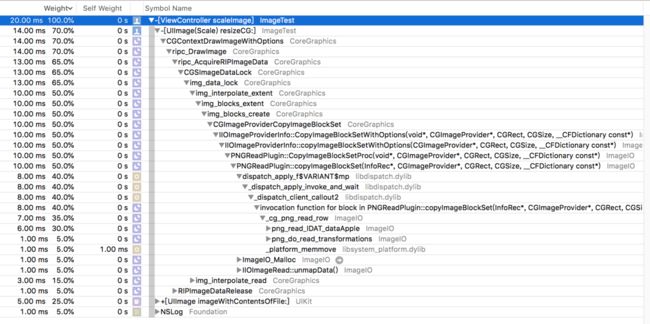
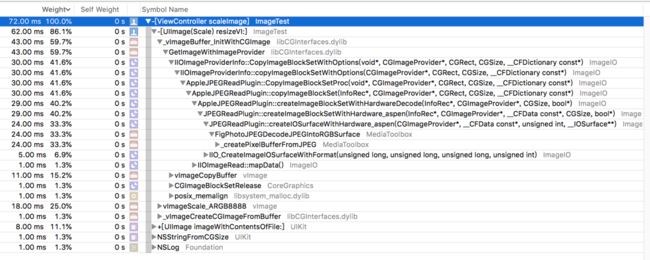
其中的resizeCG耗时14.00ms,其中也进行了解码。

可以看出,resizeCG方法耗时28.00ms,其中也进行了解码。(耗时过程有可能有误差)
PS: 在iOS11.0~iOS11.4版本中,由于苹果手机快捷键屏幕截屏生成的图片中的bitmap信息产生了变化,导致上面的Core Graphics方法使用过程中报错CGBitmapContextCreate: unsupported parameter combination,因此需要作出更改,具体报错分析请移步至CGBitmapContextCreate: unsupported parameter combination问题调查及解决
ImageIO
CGImageSourceCreateThumbnailAtIndex
- (UIImage*)resizeWithData:(NSData*)data scaleSize:(CGSize)size {

    if (!data) {
        returnnil;
    }

    // Create the image source
    CGImageSourceRef imageSourceRef = CGImageSourceCreateWithData((__bridge CFDataRef)data, NULL);
    if (!imageSourceRef) {
        return nil;
    }

    CGFloat maxPixelSize = MAX(size.width, size.height);
    // Create thumbnail options
    CFDictionaryRef options = (__bridge CFDictionaryRef) @{                                                       (__bridgeid)kCGImageSourceShouldCacheImmediately: (__bridgeid)kCFBooleanFalse,

                                                           (__bridgeid)kCGImageSourceShouldCache: (__bridgeid)kCFBooleanFalse,

                                                           (__bridgeid)kCGImageSourceCreateThumbnailFromImageAlways: (__bridgeid)kCFBooleanTrue,

                                                           (__bridgeid)kCGImageSourceThumbnailMaxPixelSize: [NSNumbernumberWithFloat:maxPixelSize]

                                                           };

    // Generate the thumbnail
    CGImageRefimageRef = CGImageSourceCreateThumbnailAtIndex(imageSourceRef, 0, options);

    UIImage*thumbnailImage = [UIImageimageWithCGImage:imageRef];

    CFRelease(imageSourceRef);
    CGImageRelease(imageRef);

    return thumbnailImage;
}
改方法是传入的NSData对象,是未解压的数据,ImageI/O接受未解压的数据,进行decompress,然后再解码进行图片的缩略。针对ImageI/O的解码,请移步至图片ImageI/O解码探究
CoreImage
- (CIContext*)contextWithOptions: & createCGImage: fromRect:
- (UIImage *)resizeCI:(CGSize)size {

    if (!self) {
        return nil;
    }

    CGFloat width = self.size.width;
    CGFloat height = self.size.height;
    if (width * height ==0) {
        return self;
    }

    floatverticalRadio  = size.height * 1.0 / height;
    floathorizontalRadio = size.width * 1.0 / width;

    floatradio =1;
    if (verticalRadio < 1 || horizontalRadio < 1) {
        radio = MIN(verticalRadio, horizontalRadio);
    }

    CIImage *image = [CIImage imageWithCGImage:self.CGImage];
    CIFilter *filter = [CIFilter filterWithName:@"CILanczosScaleTransform"];
    [filter setValue:image forKey:kCIInputImageKey];
    [filter setValue:[NSNumber numberWithFloat:radio] forKey:kCIInputScaleKey];

    [filter setValue:[NSNumber numberWithFloat:1.0] forKey:kCIInputAspectRatioKey];

    CIImage *outputImage = [filtervalueForKey:kCIOutputImageKey];

    if (!outputImage) {
        returnnil;
    }

    CIContext *context = [CIContext contextWithOptions:@{kCIContextUseSoftwareRenderer: @NO}];
    CGImageRefoutputImageRef = [contextcreateCGImage:outputImagefromRect:outputImage.extent];
    UIImage*newImage = [UIImageimageWithCGImage:outputImageRef];
    CGImageRelease(outputImageRef);

    return newImage;
}
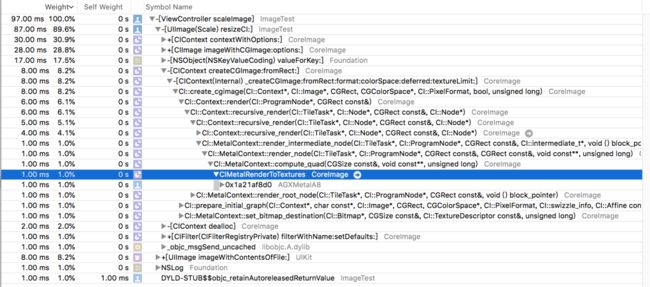
可以看到改方法中调用了CoreImage中的CIMetalRenderToTextures,这句话是将缓冲区的数据渲染到纹理,整个过程是将图片渲染到画布的一环,其中进行了解码操作。

同样看到了JPEG格式的图片,也进行了纹理渲染。
vImage
- (UIImage*)resizeVI:(CGSize)size {
    if (!self) {
        return nil;
    }

    CGFloat width = self.size.width;
    CGFloat height = self.size.height;

    floatverticalRadio  = size.height * 1.0 / self.size.height;
    floathorizontalRadio = size.width * 1.0 / self.size.width;

    floatradio =1;
    if (verticalRadio < 1 || horizontalRadio < 1) {
        radio = MIN(verticalRadio, horizontalRadio);
    }

    width = width * radio;
    height = height * radio;

    CGImageRef imageRef = self.CGImage;
    uint32_t bitsPerComponent = (uint32_t)CGImageGetBitsPerComponent(imageRef);
    uint32_t bitsPerPixel = (uint32_t)CGImageGetBitsPerPixel(imageRef);
    CGColorSpaceRef colorSpaceRef = CGImageGetColorSpace(imageRef);
    CGBitmapInfo bitmapInfo = CGImageGetBitmapInfo(imageRef);
    vImage_CGImageFormat cgfromat = {
        .bitsPerComponent= bitsPerComponent,
        .bitsPerPixel = bitsPerPixel,
        .colorSpace = colorSpaceRef,
        .bitmapInfo = bitmapInfo,
        .version = 0,
        .decode = nil,
        .renderingIntent = kCGRenderingIntentDefault,
    };

    vImage_Buffer sourceBuffer = {};
    // 首先,创建一个buffer,可以用vImage提供的CGImage的便携构造方法,里面需要传入原始数据所需要的format,这里就是ARGB8888
    vImage_Error a_ret = vImageBuffer_InitWithCGImage(&sourceBuffer, &cgfromat, NULL, imageRef, kvImageNoFlags);

    // 所有vImage的方法一般都有一个result,判断是否成功
    if (a_ret != kvImageNoError) return NULL;

    // create a destination buffer
    vImage_Buffer destBuffer = {};

    CGFloatscale =self.scale;
    uint32_t bytesPerPixel = bitsPerPixel / 8;
    uint32_t destBytesPerRow = bytesPerPixel * width;

    destBuffer.width = width;
    destBuffer.height = height;
    destBuffer.rowBytes = destBytesPerRow;
    destBuffer.data = malloc(destBuffer.rowBytes* destBuffer.height);

    vImage_Error ret = vImageScale_ARGB8888(&sourceBuffer, &destBuffer, NULL, kvImageHighQualityResampling);
    if (ret != kvImageNoError) return NULL;

    CGImageRef outputImage = vImageCreateCGImageFromBuffer(&destBuffer, &cgfromat,NULL,NULL,kvImageNoFlags, &ret);
    if (ret != kvImageNoError) return NULL;

    UIImage *image = [[UIImage alloc] initWithCGImage:outputImage scale:scale orientation:self.imageOrientation];

    free(sourceBuffer.data);
    free(destBuffer.data);
    return image;
}
vImage对于大多人来说比较陌生,看下vImage的过程:
同样是经过了解码过程。而且注意,vImage底层解码也是使用的ImageI/O的方法。
由此可见,vImage底层的解码实现也是通过ImageI/O框架的方法。
当然,一些buffer的操作,以及vImageScale等操作是使用的vImage。其中涉及一些buffer的切换等操作。
以上五种方法,分别进行将512x384、1024x768、2048x1536三种尺寸的PNG和JPEG图片缩略至256x192,统计了他们各自的耗时。
因为ImageI/O接受的入参是NSData对象,会经过解压缩并解码缩略,为了实验的公平性,其他四种入参为UIimage对象的方法,会将入参UIimage的生成过程时间也算进去。这样一来,统计了五种从path获取到的图片进行缩略的大致时间,统计如下:
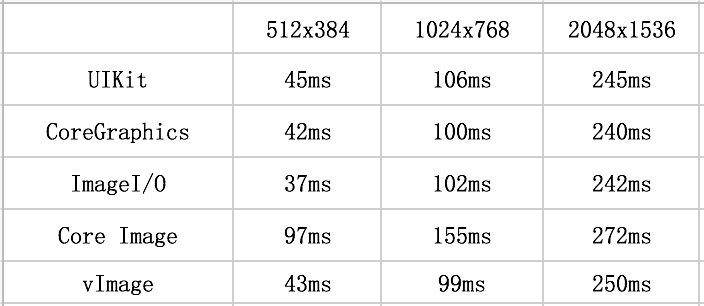
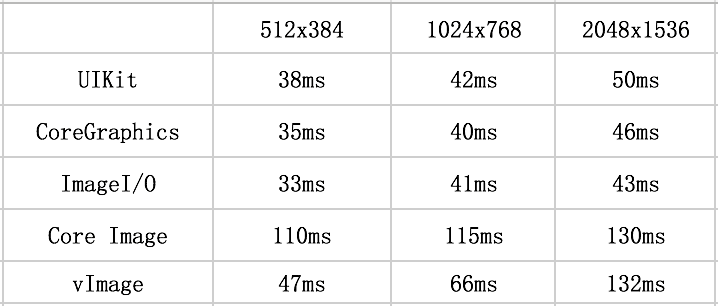
根据统计结果可以看出,CoreImage框架的方法性能相对较差,其中的CoreGraphics和ImageI/O相对比较突出些,由于实验材料不够充分,更大尺寸的图片没有测试,但是UIKit会随着尺寸的增大,耗时会有较大的增加。同时,JPEG格式的图片相对于PNG格式的图片整体性能更好。
苹果官方在Performance Best Practices section of the Core Image Programming Guide部分中特别推荐使用Core Graphics或Image I / O功能预先裁剪或缩小图像。
那么基本确定了最好是使用CoreGraphics或者ImageI/O这两种方案。但是,影响性能并不只是耗时,同时内存的分配也是考量的重要方面。下面,针对CoreGraphics和ImageI/O,我们看一下两者分配内存的区别。
使用Instrments中的Allocations工具,查看内存分配的情况。为了使实验效果明显,我们使用一张12000x12000尺寸的JPEG图片,大小为20.9MB。我们的目标是将这张图片缩略到长宽不能超过256。
CoreGraphics
缩略之前:
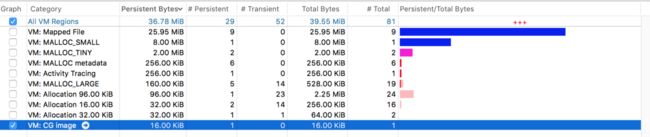
请注意勾选的 VM:CG image 一栏,此时该栏总共分配了16.00KiB的内存空间,此时依然留存16.00KiB的空间。(Total Bytes表示总共分配的内存空间大小,Persistent Bytes表示目前没有被回收的、依然使用的内存空间)
下面进行缩略,缩略之后:

VM:CG image 一栏在缩略之后,虽然最终的Persistent Bytes依然是16KiB,但是这个工程中Total Bytes为11.78MiB,也就是过程中临时分配了11+MiB的空间,虽然最后多余的内存都被回收了,但是证明了在缩略过程中的瞬时消耗内存多大11+MiB。内存的暴涨经常会造成APP闪退。
之所以如此,是因为CGContextDrawImage时,先解码图片,再生成原始分辨率大小的bitmap,这个位图大致相关于 图片像素宽度 x 图片像素高度 x 4。
ImageI/O
那么ImageI/O如何呢?我们来试验下
缩略之前:

缩略之前跟CoreGraphics是一致的,在此不多赘述。
缩略之后:

VM:CG image 一栏在缩略之后,最终的Persistent Bytes依然是16KiB,Total Bytes为仅仅为320.00KiB,相对于使用CoreGraphics,ImageI/O在缩略过程中,不会生成对应的bitmap,大大降低了瞬时峰值,而且图片越大这种效果越明显。
结论:
1、推荐使用CoreGraphics或者ImageI/O进行缩略操作
2、越大的图片,更推荐使用ImageI/O,会大大降低瞬时内存的峰值
参考文献:
https://nshipster.com/image-resizing/
http://www.cocoachina.com/ios/20180305/22458.html