数据集
Kaggle's Dogs and Cats dataset : https://www.microsoft.com/en-us/download/details.aspx?id=54765
【0】 基础版本实现
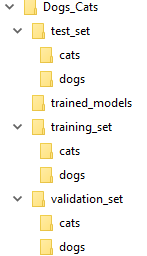
- 将训练数据集分割成训练集、验证集、测试集,目录结构如图所示:
其中,选取了各自的0-1999前2000张作为train-set, 2000-2499该500张作为validation-set,2500-2999该500张作为test-set.
- 简单实现代码
import shutil
import os
import matplotlib.pyplot as plt

train_set_base_dir = 'C:/test/WorkingLogs/20181205/Dogs_Cats/training_set'
validation_set_base_dir = 'C:/test/WorkingLogs/20181205/Dogs_Cats/validation_set'
test_set_base_dir = 'C:/test/WorkingLogs/20181205/Dogs_Cats/test_set'

training_cat_set = 'C:/test/WorkingLogs/20181205/Dogs_Cats/training_set/cats'
validation_cat_set = 'C:/test/WorkingLogs/20181205/Dogs_Cats/validation_set/cats'
test_cat_set = 'C:/test/WorkingLogs/20181205/Dogs_Cats/test_set/cats'

training_dog_set = 'C:/test/WorkingLogs/20181205/Dogs_Cats/training_set/dogs'
validation_dog_set = 'C:/test/WorkingLogs/20181205/Dogs_Cats/validation_set/dogs'
test_dog_set = 'C:/test/WorkingLogs/20181205/Dogs_Cats/test_set/dogs'

# start image preprocess
from keras.preprocessing.image import ImageDataGenerator

train_datagen = ImageDataGenerator(
    rescale=1. / 255
)
train_data_generator = train_datagen.flow_from_directory(
    directory=train_set_base_dir,
    target_size=(150, 150),
    batch_size=20,
    class_mode='binary')

validation_datagen = ImageDataGenerator(
    rescale=1. / 255
)
validation_data_generator = validation_datagen.flow_from_directory(
    directory=validation_set_base_dir,
    target_size=(150, 150),
    batch_size=20,
    class_mode='binary')

test_datagen = ImageDataGenerator(
    rescale=1. / 255
)
test_data_generator = test_datagen.flow_from_directory(
    directory=test_set_base_dir,
    target_size=(150, 150),
    batch_size=20,
    class_mode='binary')

# define a simple CNN network
from keras.models import Sequential
from keras.layers import Conv2D, MaxPool2D, Flatten, Dense

model = Sequential()

# add Con2D layers
model.add(Conv2D(filters=32, kernel_size=(3, 3), activation='relu', input_shape=(150, 150, 3)))
model.add(MaxPool2D(pool_size=(2, 2), padding='valid'))

model.add(Conv2D(filters=64, kernel_size=(3, 3), activation='relu'))
model.add(MaxPool2D(pool_size=(2, 2), padding='valid'))

model.add(Conv2D(filters=128, kernel_size=(3, 3), activation='relu'))
model.add(MaxPool2D(pool_size=(2, 2), padding='valid'))

model.add(Conv2D(filters=128, kernel_size=(3, 3), activation='relu'))
model.add(MaxPool2D(pool_size=(2, 2), padding='valid'))

# flatten
model.add(Flatten())

# add one simple layer for classification
model.add(Dense(units=512, activation='relu'))

# add output layer
model.add(Dense(units=1, activation='sigmoid'))

# compile model
model.compile(loss='binary_crossentropy', optimizer='rmsprop', metrics=['acc'])

# print model info
model.summary()
json_str = model.to_json()
print(json_str)
# fit_generator to fill in the dataset
history = model.fit_generator(
    generator=train_data_generator,
    steps_per_epoch=100,
    epochs=30,
    validation_data=validation_data_generator,
    validation_steps=50)

# train done, save the models
model.save('C:/test/WorkingLogs/20181205/Dogs_Cats/trained_models/dogs_cats_epochs_30_steps-per_epoch_100.h5')

# plot the roc curve
acc = history.history['acc']
val_acc = history.history['val_acc']
loss = history.history['loss']
val_loss = history.history['val_loss']

epochs = range(1, len(acc) + 1)
plt.plot(epochs, acc, 'bo', label='Training acc')
plt.plot(epochs, val_acc, 'b', label='Validation acc')
plt.title('Training and validation accuracy')
plt.legend()

plt.figure()

plt.plot(epochs, loss, 'bo', label='Training loss')
plt.plot(epochs, val_loss, 'b', label='Validation loss')
plt.title('Training and validation loss')
plt.legend()

plt.show()
-
训练结果及分析
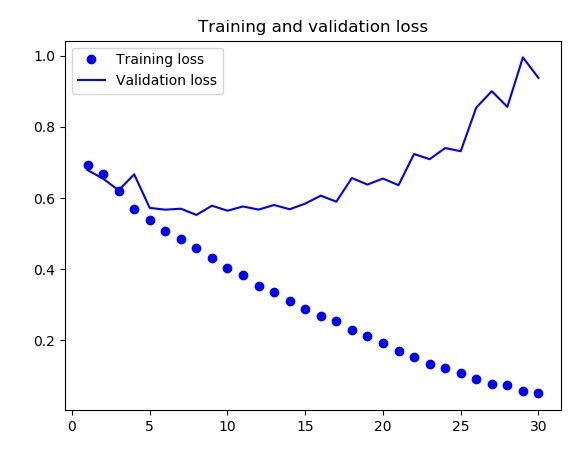
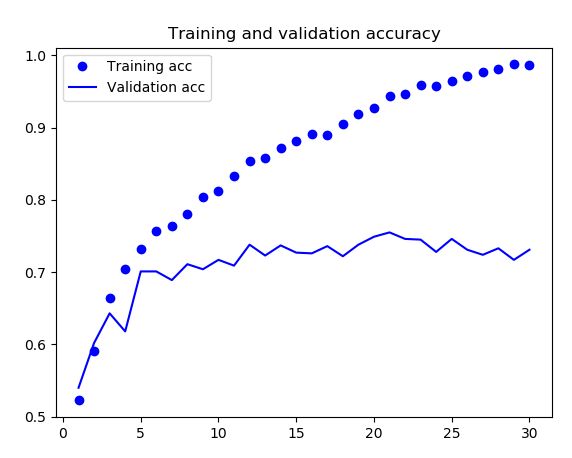
训练曲线的最大特征就是过拟合。训练集上的准确率线性增加,接近100%,而验证集上的准确率是在70%~72%之间。同样的,训练集上的loss线性下降趋于0,而验证集上的loss在迭代5个epoch之后趋于上升。
由于训练样本只选取了2000个,因此数据量不足是过拟合的最大的问题。缓解过拟合的方法有很多,诸如:dropout、L2-norm等等。在这里,我们使用增大数据(data augmentation)的方式来试一试解决过拟合,这种方法也是处理图片分类的通常做法。
【1】 改进版本-1 (data augmentation)
- 增大数据
过拟合是由于学习到样本量过小导致的,使得我们训练的模型对于新的数据没有很好的泛化能力。增大数据(data augmentation)是在已有的训练样本上增加数据的一种最好的方式。增大数据是通过随机的改变那些已经被模型“记住”的图片,通过缩放、裁剪、拉伸图片来使得模型不会两次见到同一张图片。
在Keras中是通过ImageDataGenerator来实现,看一个例子:
train_datagen = ImageDataGenerator(
    rescale=1./255,
    rotation_range=40,
    width_shift_range=0.2,     # 宽度平移
    height_shift_range=0.2,   # 高度平移
    shear_range=0.2,            # 修剪
    zoom_range=0.2,            # 缩放
    horizontal_flip=True,
    fill_mode='nearest')        # 添加新像素
- 缺陷分析及改进点
虽然使用了增大数据,但是从输入数据上看还是有很大一部分是有联系的,是相似的,因为它们均来自同一张原始图片,并没有提供新的信息。为了优化过拟合,我们在模型中增加一层Dropout,并将batch_size调大为32,epoch调大至100,再来看看效果。
import shutil
import os
import matplotlib.pyplot as plt
from keras.preprocessing.image import ImageDataGenerator
from keras.models import Sequential
from keras.layers import Conv2D, MaxPool2D, Flatten, Dense, Dropout

train_set_base_dir = 'G:/dataset/kaggle_dogs_and_cats/subset/train_set/'
validation_set_base_dir = 'G:/dataset/kaggle_dogs_and_cats/subset/validation_set/'
test_set_base_dir = 'G:/dataset/kaggle_dogs_and_cats/subset/test_set/'

# start image preprocess

# generate more augmentation data
train_datagen = ImageDataGenerator(
    rescale=1./255,
    rotation_range=40,
    width_shift_range=0.2,
    height_shift_range=0.2,
    shear_range=0.2,
    zoom_range=0.2,
    horizontal_flip=True)

train_data_generator = train_datagen.flow_from_directory(
    directory=train_set_base_dir,
    target_size=(150, 150),
    batch_size=32,
    class_mode='binary')

validation_datagen = ImageDataGenerator(
    rescale=1. / 255
)
validation_data_generator = validation_datagen.flow_from_directory(
    directory=validation_set_base_dir,
    target_size=(150, 150),
    batch_size=32,
    class_mode='binary')

test_datagen = ImageDataGenerator(rescale=1./255)

test_data_generator = test_datagen.flow_from_directory(
    directory=test_set_base_dir,
    target_size=(150, 150),
    batch_size=32,
    class_mode='binary')

# define a simple CNN network

model = Sequential()

# add Con2D layers : 150 * 150 * 3 -> 32 * 150 * 150
model.add(Conv2D(filters=32, kernel_size=(3, 3), activation='relu', input_shape=(150, 150, 3)))
# pooling layer : 32 * 75 * 75
model.add(MaxPool2D(pool_size=(2, 2), padding='valid'))

# Con2D layer : 64 * 75 * 75
model.add(Conv2D(filters=64, kernel_size=(3, 3), activation='relu'))
# pooling layer : 64 * 38 * 38
model.add(MaxPool2D(pool_size=(2, 2), padding='valid'))

# Con2D layer : 128 * 38 * 38
model.add(Conv2D(filters=128, kernel_size=(3, 3), activation='relu'))
# pooling layer : 128 * 19 * 19
model.add(MaxPool2D(pool_size=(2, 2), padding='valid'))

# Con2D layer : 128 * 19 * 19
model.add(Conv2D(filters=128, kernel_size=(3, 3), activation='relu'))
# pooling layer : 128 * 10 * 10
model.add(MaxPool2D(pool_size=(2, 2), padding='valid'))

# flatten layer :  (1, 128 * 10 * 10)
model.add(Flatten())

# add dropOut layer for this fully connected layer
model.add(Dropout(0.5))

# add one simple layer for classification
model.add(Dense(units=512, activation='relu'))

# add output layer : 1
model.add(Dense(units=1, activation='sigmoid'))

# compile model
model.compile(loss='binary_crossentropy', optimizer='rmsprop', metrics=['acc'])

# print model info
model.summary()
json_str = model.to_json()
print(json_str)
# fit_generator to fill in the dataset
history = model.fit_generator(
    generator=train_data_generator,
    steps_per_epoch=100,
    epochs=100,
    validation_data=validation_data_generator,
    validation_steps=50)

# train done, save the models
model.save('H:/WorkingByDate/20181211/dogs_cats_epochs_100.h5')

# plot the roc curve
acc = history.history['acc']
val_acc = history.history['val_acc']
loss = history.history['loss']
val_loss = history.history['val_loss']

epochs = range(1, len(acc) + 1)
plt.plot(epochs, acc, 'bo', label='Training acc')
plt.plot(epochs, val_acc, 'b', label='Validation acc')
plt.title('Training and validation accuracy')
plt.legend()

plt.figure()

plt.plot(epochs, loss, 'bo', label='Training loss')
plt.plot(epochs, val_loss, 'b', label='Validation loss')
plt.title('Training and validation loss')
plt.legend()

plt.show()
-
优化版本的训练结果
训练结果分析
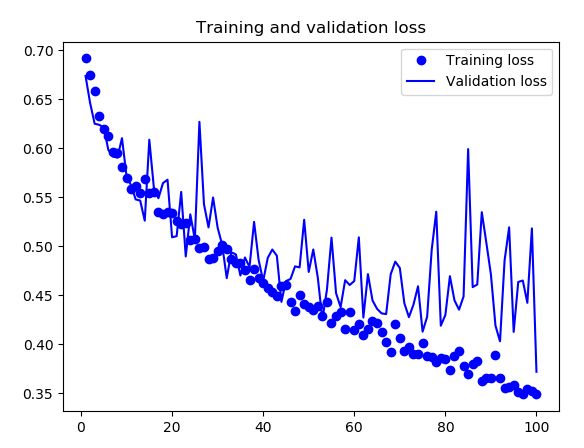
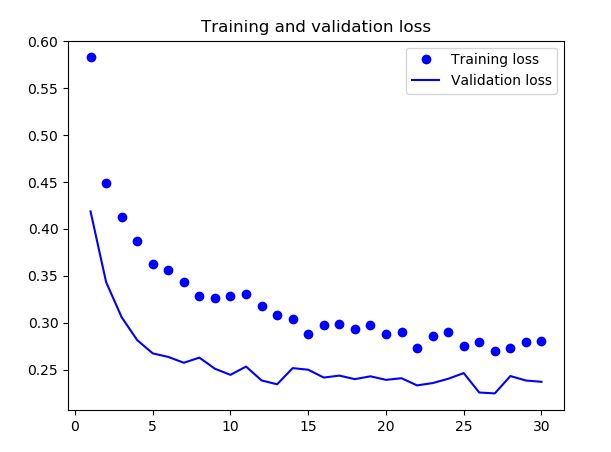
我们可以看出在准确率上有很大的提升,训练集和验证集上的准确率是在85%~86%之间。同样的,训练集和验证集上的loss均趋于0.35以下,未出现大幅度的过拟合。那么我们思考一下,如何将准确率达到90%以上,有一种很好的优化方式就是使用预训练模型。
【2】 改进版本-2 (预训练网络特征提取)
- 预训练卷积网络
由于我们的数据样本本身就少,那么想要追求高准确率,需要基于大数据集图片分类的预先训练好的网络,例如ImageNet。由于ImageNet的数据量无比之大(1.4 million 已经标注的图片,1000个不同的类别),那么我们用ImageNet预先训练好的网络来对我们的猫狗进行提取特征,可见这个预训练网络可以为大多数不同的计算机视觉分类的问题提供很大的帮助。其背后原理是对海量数据的边缘特征、结构特征等已经具备了一定的学习能力,将该能力迁移到我们的实验中也是会有很大的帮助。ImageNet中包含了许多的动物类别,包含不同品种的猫和狗,因此我们期望很够很好的提升猫狗大战的准确率。
我们选用VGG16的结构,得益于它在ImageNet中良好的表现,VGG16不仅简单而且好用,不需要引入其他的概念,还有一些其他的模型,它们都有一些很优雅的名字-VGG,ResNet, Inception-ResNet,Xception等等。
- 预训练网络使用方式
- 特征提取
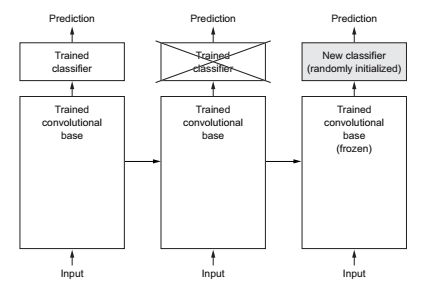
特征提取是用一个之前的已经训练好的网络结构,利用这些已经训练好的参数来对于新的样本提取有趣的特征。之后,将这些提取出的特征送入一个新的分类器。我们将卷积层的模型称之为基线卷积,这一部分是已经有训练好的,算是被冻结了,不需要修改的,我们需要做的就是定义全连接层,定义新的分类器。
在该优化版本中,采取的优化策略是: 不增加训练数据量 + 预训练网络
- 采用VGG-16作为基线卷积
from keras.applications import VGG16
conv_base = VGG16(weights='imagenet',
                  include_top=False,
                  input_shape=(150, 150, 3))
其中include_top = False, 即不包含全连接的output-layer,因为在imagenet上VGG-16有1000种类别(output-dim=1000),我们是不需要的。我们是采用VGG-16提取特征后自建全连接层进行分类。
使用VGG-16预训练的基线卷积层中提取特征并训练:
# using the VGG-16 to extract features
import os
import numpy as np
import matplotlib.pyplot as plt
from keras.preprocessing.image import ImageDataGenerator
from keras.applications.vgg16 import VGG16
from keras.models import Sequential, Model
from keras.layers import Conv2D, MaxPool2D, Flatten, Dense, Dropout
from keras.optimizers import RMSprop


base_dir = 'C:/test/WorkingLogs/20181205/Dogs_Cats/'
train_dir = os.path.join(base_dir, 'training_set')
validation_dir = os.path.join(base_dir, 'validation_set')
test_dir = os.path.join(base_dir, 'test_set')

conv_base = VGG16(weights='imagenet',
                  include_top=False,
                  input_shape=(150, 150, 3))


datagen = ImageDataGenerator(rescale=1./255)
batch_size = 20


def extarct_features(directory, sample_count):
    print('extracting features ==> %s' % directory)
    features = np.zeros(shape=(sample_count, 4, 4, 512))
    labels = np.zeros(shape=sample_count)
    generator = datagen.flow_from_directory(
        directory,
        target_size=(150, 150),
        batch_size=batch_size,
        class_mode='binary')

    i = 0
    for inputs_batch, labels_batch in generator:
        print('extracting features for batch ==> %s' % directory)
        features_batch = conv_base.predict(inputs_batch)
        features[i * batch_size: (i + 1) * batch_size] = features_batch
        labels[i * batch_size: (i + 1) * batch_size] = labels_batch
        i += 1
        if i * batch_size >= sample_count:
            break

    return features, labels


train_features, train_labels = extarct_features(train_dir, 2000)
validation_features, validation_labels = extarct_features(validation_dir, 500)
test_features, test_labels = extarct_features(test_dir, 500)

train_features = np.reshape(train_features, (2000, 4 * 4 * 512))
validation_features = np.reshape(validation_features, (500, 4 * 4 * 512))
test_features = np.reshape(test_features, (500, 4 * 4 * 512))

# define the network :  output fully connected layer
model = Sequential()
model.add(Dense(256, activation='relu', input_dim=4 * 4 * 512))
model.add(Dropout(0.5))
model.add(Dense(1, activation='sigmoid'))

model.compile(optimizer=RMSprop(lr=1e-5),
              loss='binary_crossentropy',
              metrics=['acc'])

print(model.summary())

history = model.fit(train_features, train_labels,
                    epochs=30,
                    batch_size=20,
                    validation_data=(validation_features, validation_labels))


acc = history.history['acc']
val_acc = history.history['val_acc']
loss = history.history['loss']
val_loss = history.history['val_loss']

epochs = range(1, len(acc) + 1)

plt.plot(epochs, acc, 'bo', label='Training acc')
plt.plot(epochs, val_acc, 'b', label='Validation acc')
plt.title('Training and validation accuracy')
plt.legend()

plt.figure()

plt.plot(epochs, loss, 'bo', label='Training loss')
plt.plot(epochs, val_loss, 'b', label='Validation loss')
plt.title('Training and validation loss')
plt.legend()

plt.show()
- 训练结果
- 结果分析
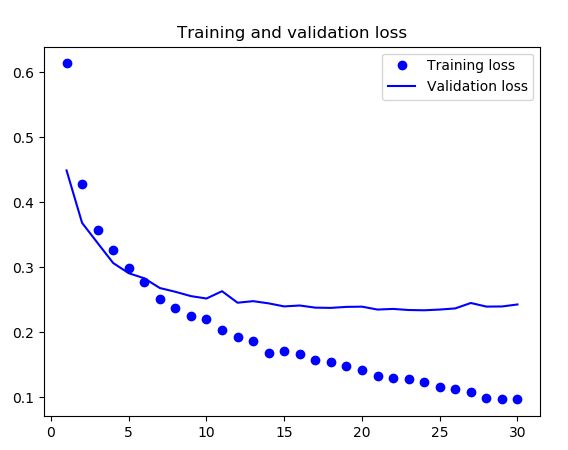
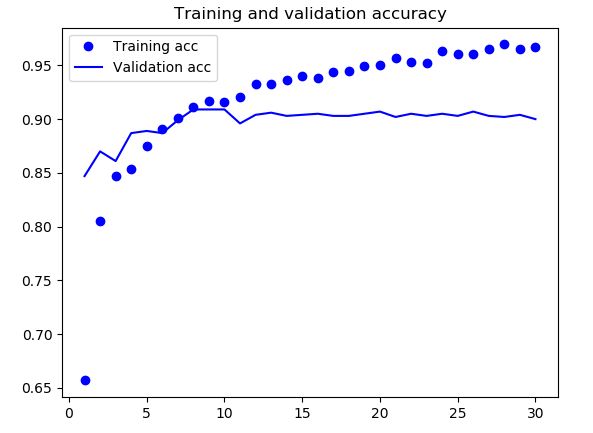
准确率已经达到90%,要好于之前一贯在小的数据集上做训练。由曲线可以看出仍然出现了过拟合这个问题,在训练集上达到了95%以上啊,尽管我们用了dropout以及相对更大的学习率,还是有过拟合的问题,很可能是因为我们并没有用到增加数据量(data augmentation)这个有效的方法,那我们应该加上这个方法,看看效果怎样,是不是可以提升准确率呢?!
【3】 改进版本-3 (增大数据集的预训练网络特征提取)
在优化版本2的基础上,添加data augmentation。完整代码如下:
# using the VGG-16 to extract features
import os
import numpy as np
import matplotlib.pyplot as plt
from keras.preprocessing.image import ImageDataGenerator
from keras.applications.vgg16 import VGG16
from keras.models import Sequential, Model
from keras.layers import Conv2D, MaxPool2D, Flatten, Dense, Dropout
from keras.optimizers import RMSprop


base_dir = 'C:/test/WorkingLogs/20181205/Dogs_Cats/'
train_dir = os.path.join(base_dir, 'training_set')
validation_dir = os.path.join(base_dir, 'validation_set')
test_dir = os.path.join(base_dir, 'test_set')

conv_base = VGG16(weights='imagenet',
                  include_top=False,
                  input_shape=(150, 150, 3))


datagen = ImageDataGenerator(rescale=1./255)
batch_size = 20

train_datagen = ImageDataGenerator(
    rescale=1./255,
    rotation_range=40,
    width_shift_range=0.2,
    height_shift_range=0.2,
    shear_range=0.2,
    zoom_range=0.2,
    horizontal_flip=True,
    fill_mode='nearest'
)


def extarct_features(directory, sample_count, is_train=False):
    print('extracting features ==> %s' % directory)
    features = np.zeros(shape=(sample_count, 4, 4, 512))
    labels = np.zeros(shape=sample_count)
    if not is_train:
        generator = datagen.flow_from_directory(
            directory,
            target_size=(150, 150),
            batch_size=batch_size,
            class_mode='binary')
    else:
        generator = train_datagen.flow_from_directory(
            directory,
            target_size=(150, 150),
            batch_size=batch_size,
            class_mode='binary')

    i = 0
    for inputs_batch, labels_batch in generator:
        print('extracting features for batch ==> %s' % directory)
        features_batch = conv_base.predict(inputs_batch)
        features[i * batch_size: (i + 1) * batch_size] = features_batch
        labels[i * batch_size: (i + 1) * batch_size] = labels_batch
        i += 1
        if i * batch_size >= sample_count:
            break

    return features, labels


train_features, train_labels = extarct_features(train_dir, 2000, True)
validation_features, validation_labels = extarct_features(validation_dir, 500)
test_features, test_labels = extarct_features(test_dir, 500)

train_features = np.reshape(train_features, (2000, 4 * 4 * 512))
validation_features = np.reshape(validation_features, (500, 4 * 4 * 512))
test_features = np.reshape(test_features, (500, 4 * 4 * 512))

# define the network :  output fully connected layer
model = Sequential()
model.add(Dense(256, activation='relu', input_dim=4 * 4 * 512))
model.add(Dropout(0.5))
model.add(Dense(1, activation='sigmoid'))

model.compile(optimizer=RMSprop(lr=1e-5),
              loss='binary_crossentropy',
              metrics=['acc'])

print(model.summary())

history = model.fit(train_features, train_labels,
                    epochs=30,
                    batch_size=20,
                    validation_data=(validation_features, validation_labels))

acc = history.history['acc']
val_acc = history.history['val_acc']
loss = history.history['loss']
val_loss = history.history['val_loss']

epochs = range(1, len(acc) + 1)

plt.plot(epochs, acc, 'bo', label='Training acc')
plt.plot(epochs, val_acc, 'b', label='Validation acc')
plt.title('Training and validation accuracy')
plt.legend()

plt.figure()

plt.plot(epochs, loss, 'bo', label='Training loss')
plt.plot(epochs, val_loss, 'b', label='Validation loss')
plt.title('Training and validation loss')
plt.legend()

plt.show()
- 训练结果
- 结果分析
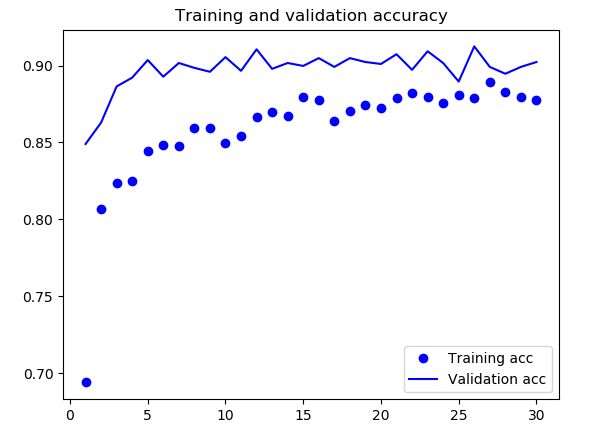
由上图的曲线可以看出,增大数据量很好的并有效的解决了过拟合的问题,准确率稳定在90%以上。但是准确率还是略有下降,接下来就是fine-tuning优化方法。
【4】 改进版本-4 (预训练网络 fine-tuning)
- 微调(Fine-tuning)
这也是另一种重用预训练模型的一种方式,微调就是我们解冻之前固定的VGG16模型,进行细微的调整,使模型与我们的问题更相关。
1.在一个已经训练好的基线网络上添加自定义网络;
2.冻结基线网络;
3.训练我们所添加的部分;
4.解冻一些基线网络中的卷积层;
5.将我们所添加的部分与解冻的卷积层相连接;
- 实验要点及代码
我们将VGG16中的第5大卷积层解冻,和全连接层一起参与训练,更新参数。同样,我们增加了数据量来防止过拟合。
相比优化版本3,新加了对每层是否可训练的设置:
set_trainable = False
for layer in conv_base.layers:
    if layer.name == 'block5_conv1':
        set_trainable = True
    layer.trainable = set_trainable
从VGG-16的网络结构可以看出:
_________________________________________________________________
Layer (type)                 Output Shape              Param #
=================================================================
input_1 (InputLayer)         (None, 224, 224, 3)       0
_________________________________________________________________
block1_conv1 (Conv2D)        (None, 224, 224, 64)      1792
_________________________________________________________________
block1_conv2 (Conv2D)        (None, 224, 224, 64)      36928
_________________________________________________________________
block1_pool (MaxPooling2D)   (None, 112, 112, 64)      0
_________________________________________________________________
block2_conv1 (Conv2D)        (None, 112, 112, 128)     73856
_________________________________________________________________
block2_conv2 (Conv2D)        (None, 112, 112, 128)     147584
_________________________________________________________________
block2_pool (MaxPooling2D)   (None, 56, 56, 128)       0
_________________________________________________________________
block3_conv1 (Conv2D)        (None, 56, 56, 256)       295168
_________________________________________________________________
block3_conv2 (Conv2D)        (None, 56, 56, 256)       590080
_________________________________________________________________
block3_conv3 (Conv2D)        (None, 56, 56, 256)       590080
_________________________________________________________________
block3_pool (MaxPooling2D)   (None, 28, 28, 256)       0
_________________________________________________________________
block4_conv1 (Conv2D)        (None, 28, 28, 512)       1180160
_________________________________________________________________
block4_conv2 (Conv2D)        (None, 28, 28, 512)       2359808
_________________________________________________________________
block4_conv3 (Conv2D)        (None, 28, 28, 512)       2359808
_________________________________________________________________
block4_pool (MaxPooling2D)   (None, 14, 14, 512)       0
_________________________________________________________________
block5_conv1 (Conv2D)        (None, 14, 14, 512)       2359808
_________________________________________________________________
block5_conv2 (Conv2D)        (None, 14, 14, 512)       2359808
_________________________________________________________________
block5_conv3 (Conv2D)        (None, 14, 14, 512)       2359808
_________________________________________________________________
block5_pool (MaxPooling2D)   (None, 7, 7, 512)         0
_________________________________________________________________
flatten (Flatten)            (None, 25088)             0
_________________________________________________________________
fc1 (Dense)                  (None, 4096)              102764544
_________________________________________________________________
fc2 (Dense)                  (None, 4096)              16781312
_________________________________________________________________
predictions (Dense)          (None, 1000)              4097000
=================================================================
Total params: 138,357,544
Trainable params: 138,357,544
Non-trainable params: 0
_________________________________________________________________
完整代码如下:
# using the VGG-16 to extract features
import os
import numpy as np
import matplotlib.pyplot as plt
from keras.preprocessing.image import ImageDataGenerator
from keras.applications.vgg16 import VGG16
from keras.models import Sequential, Model
from keras.layers import Conv2D, MaxPool2D, Flatten, Dense, Dropout
from keras.optimizers import RMSprop


base_dir = 'C:/test/WorkingLogs/20181205/Dogs_Cats/'
train_dir = os.path.join(base_dir, 'training_set')
validation_dir = os.path.join(base_dir, 'validation_set')
test_dir = os.path.join(base_dir, 'test_set')

conv_base = VGG16(weights='imagenet',
                  include_top=False,
                  input_shape=(150, 150, 3))


set_trainable = False
for layer in conv_base.layers:
    if layer.name == 'block5_conv1':
        set_trainable = True
    layer.trainable = set_trainable

train_datagen = ImageDataGenerator(
    rescale=1. / 255,
    rotation_range=40,
    width_shift_range=0.2,
    height_shift_range=0.2,
    shear_range=0.2,
    zoom_range=0.2,
    horizontal_flip=True,
    fill_mode='nearest'
)

train_generator = train_datagen.flow_from_directory(
    directory=train_dir,
    target_size=(150, 150),
    batch_size=32,
    class_mode='binary'
)

validation_datagen = ImageDataGenerator(rescale=1./255)

validation_generator = validation_datagen.flow_from_directory(
    directory=validation_dir,
    target_size=(150, 150),
    batch_size=32,
    class_mode='binary'
)

# define the network :  output fully connected layer
model = Sequential()
model.add(conv_base)
model.add(Flatten())
model.add(Dense(256, activation='relu', input_dim=4 * 4 * 512))
model.add(Dropout(0.5))
model.add(Dense(1, activation='sigmoid'))

model.compile(optimizer=RMSprop(lr=1e-5),
              loss='binary_crossentropy',
              metrics=['acc'])

# print model summary
print(model.summary())

history = model.fit_generator(
    train_generator,
    steps_per_epoch=100,
    epochs=30,
    validation_data=validation_generator,
    validation_steps=50
)


acc = history.history['acc']
val_acc = history.history['val_acc']
loss = history.history['loss']
val_loss = history.history['val_loss']

epochs = range(1, len(acc) + 1)

plt.plot(epochs, acc, 'bo', label='Training acc')
plt.plot(epochs, val_acc, 'b', label='Validation acc')
plt.title('Training and validation accuracy')
plt.legend()

plt.figure()

plt.plot(epochs, loss, 'bo', label='Training loss')
plt.plot(epochs, val_loss, 'b', label='Validation loss')
plt.title('Training and validation loss')
plt.legend()

plt.show()

# evaluate the test set
test_loss, test_acc = model.evaluate(
    test_features, test_labels,
    batch_size=20,
    epochs=30,
    steps=50
)

print('test loss %f and acc %f' % (test_loss, test_acc))
从第5层开始解冻参与训练,将VGG-16作为基线模型加入,得到的网络结构为:
_________________________________________________________________
Layer (type)                 Output Shape              Param #
=================================================================
vgg16 (Model)                (None, 4, 4, 512)         14714688
_________________________________________________________________
flatten_1 (Flatten)          (None, 8192)              0
_________________________________________________________________
dense_1 (Dense)              (None, 256)               2097408
_________________________________________________________________
dropout_1 (Dropout)          (None, 256)               0
_________________________________________________________________
dense_2 (Dense)              (None, 1)                 257
=================================================================
Total params: 16,812,353
Trainable params: 9,177,089
Non-trainable params: 7,635,264
_________________________________________________________________
- 训练结果及分析
测试结果能够保持在90%~91%,并且很好地解决了过拟合问题。但是对本例而言,fine-tuning的作用并不是特别大,建议有资源的话,继续增大训练数据集。
