视频编码的过程就是将YUV的像素格式编码成H264的压缩格式
YUV:视频像素格式
H264:视频压缩数据格式
流程图
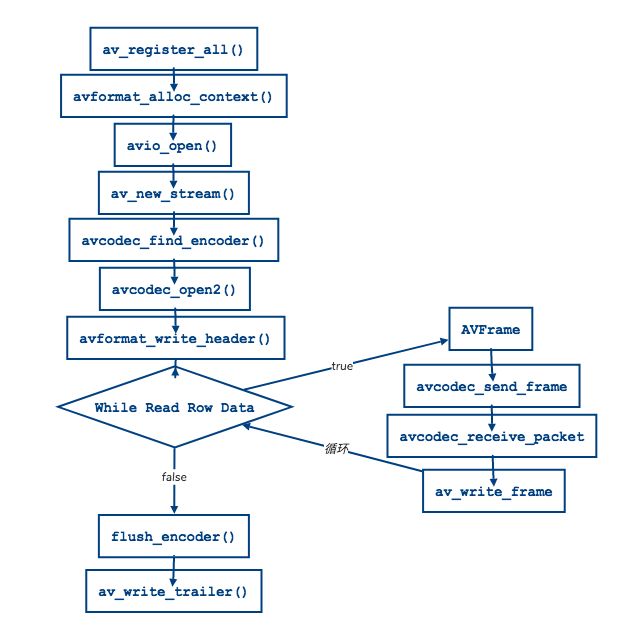
步骤详解
1、注册组件
av_register_all();
2、初始化化封装格式上下文
AVFormatContext* avformat_context = avformat_alloc_context();
获取视频压缩格式类型(h254、h265、mpeg2等)
AVOutputFormat *avoutput_format = av_guess_format(NULL, coutFilePath, NULL);
3、打开输出文件
avio_open(&avformat_context->pb, coutFilePath, AVIO_FLAG_WRITE)
参数一:输出流
参数二:输出文件
参数三:权限->输出到文件中
4、创建输出码流
AVStream* av_video_stream = avformat_new_stream(avformat_context, NULL);
注意:这里只是开辟了一块内存空间,还不知道他是什么类型
5、查找视频编码器(重点)
5.1、获取上下文
AVCodecContext *avcodec_context = av_video_stream->codec;
上下文种类:视频解码器、视频编码器、音频解码器、音频编码器
5.2、设置为视频编码器上下文
1、设置视频编码器ID
avcodec_context->codec_id = avoutput_format->video_codec;
2、设置编码器类型
avcodec_context->codec_type = AVMEDIA_TYPE_VIDEO;
3、设置读取像素格式
//注意:这个类型是根据你解码的时候指定的解码的视频像素数据格式类型
avcodec_context->pix_fmt = AV_PIX_FMT_YUV420P;
4、设置视频宽高
avcodec_context->width = 640;
avcodec_context->height = 352;
这里的尺寸是通过一定工具查看的,不同的视频不一样。
5、设置帧率(重点)
avcodec_context->time_base.num = 1;
avcodec_context->time_base.den = 25;
这两个参数表示帧率为25.000fps
帧率越大越流畅。视频卡顿说明掉帧了。
6、设置码率(重点)
码率:也叫比特率,单位bps。也就是每秒传送的比特数,码率越高传送速度越快。
视频码率:单位为kbps,千位每秒
视频码率的计算方式:视频文件大小/视频时间
注意:一个视频的总文件包括视频文件和音频文件,上面公式中,是指视频文件的大小。
e.g 一个视频,视频文件的大小是1.34MB,时长是24s,那么他的视频帧率为:1.34 * 1024 * 8 / 24 / 1000 = 468 Kbps
每个文件的码率不一样,都要经过计算得到
avcodec_context->bit_rate = 468000;
从上面的分析可以看出:码率越大,视频越大
7、设置GOP(重点)
GOP:画面组,一组连续画面(一个完整的画面)
MPEG格式的画面类型有3种:
I帧:内部编码帧,原始帧,也叫关键帧。视频的第一帧都是I帧,可独立编码。
P帧:向前预测帧。编码需要依赖前一帧。
B帧:前后预测帧,也叫双向预测帧。编码需要依赖本帧与前一帧和后一帧的对比。B帧压缩率高,但对性能要求高

avcodec_context->gop_size = 250;
这里设置250,表示每250帧插入一个I帧。I帧约少,视频越小。但过分的少,会导致视频编码失败,所以要适量。
8、设置量化参数(难点,我们一般设置默认值)
avcodec_context->qmin = 10;
avcodec_context->qmax = 51;
量化系数越小,视频越是清晰。一般情况下都是默认值,最小量化系数默认值是10,最大量化系数默认值是51。
9、设置B帧最大值
avcodec_context->max_b_frames = 0;
我们设置为0,表示不需要B帧
5.3、查找编码器h264
查找编码器h264:找不到???深坑
原因:编译库没有依赖x264库(默认情况下FFmpeg没有编译进行h264库)
如何编译x264库?
1、下载x264的库
2、编译x264的.a静态库,也可以便以动态库,根据需要而定
3、重新编译ffmpeg库,使ffmpeg依赖2中生成的x264库
4、替换代码中之前生成的ffmpeg库
6、打开视频编码器
对于h264解码器,要多设置参数如下
    AVDictionary *param = 0;
    if (avcodec_context->codec_id == AV_CODEC_ID_H264) {
        // 查看h264.c源码
        av_dict_set(¶m, "preset", "slow", 0);
        av_dict_set(¶m, "tune", "zerolatency", 0);
    }
打开视频编码器
if (avcodec_open2(avcodec_context, avcodec, ¶m) < 0) {
    NSLog(@"打开编码器失败");
    return;
}
7、写入头文件信息
avformat_write_header(avformat_context, NULL);
8、循环编码视频像素数据为视频压缩数据(YUV-->h264)-- 视频编码处理
1、申请缓冲区
av_frame_alloc()
av_image_fill_arrays
(AVPacket *)av_malloc(buffer_size)
2、将缓冲区数据填充到AVFrame中
3、avcodec_send_frame
4、avcodec_receive_packet
9、将编码后的视频压缩数据写入文件中
av_packet->stream_index = av_video_stream->index;
result = av_write_frame(avformat_context, av_packet);
10、写入剩余帧数据(可能没有)
int flush_encoder(AVFormatContext *fmt_ctx, unsigned int stream_index) {
    int ret;
    int got_frame;
    AVPacket enc_pkt;
    if (!(fmt_ctx->streams[stream_index]->codec->codec->capabilities &
          CODEC_CAP_DELAY))
        return 0;
    while (1) {
        enc_pkt.data = NULL;
        enc_pkt.size = 0;
        av_init_packet(&enc_pkt);
        ret = avcodec_encode_video2(fmt_ctx->streams[stream_index]->codec, &enc_pkt,
                                    NULL, &got_frame);
        av_frame_free(NULL);
        if (ret < 0)
            break;
        if (!got_frame) {
            ret = 0;
            break;
        }
        NSLog(@"Flush Encoder: Succeed to encode 1 frame!\tsize:%5d\n", enc_pkt.size);
        /* mux encoded frame */
        ret = av_write_frame(fmt_ctx, &enc_pkt);
        if (ret < 0)
            break;
    }
    return ret;
}
11、写入文件尾部信息
av_write_trailer(avformat_context);
12、释放内存,关闭编码器等等
avcodec_close(avcodec_context);
av_free(av_frame);
av_free(out_buffer);
av_packet_free(&av_packet);
avio_close(avformat_context->pb);
avformat_free_context(avformat_context);
fclose(in_file);
代码
- (void)videoEncodeWithInputPath:(NSString *)inputPath outputPath:(NSString *)outputPath {

    //第一步:注册组件->编码器、解码器等等…
    av_register_all();

    //第二步:初始化封装格式上下文
    AVFormatContext* avformat_context = avformat_alloc_context();
    const char* coutFilePath = [outputPath UTF8String];
    AVOutputFormat *avoutput_format = av_guess_format(NULL, coutFilePath, NULL);
    avformat_context->oformat = avoutput_format;

    //第三步:打开输出文件
    if (avio_open(&avformat_context->pb, coutFilePath, AVIO_FLAG_WRITE) < 0){
        NSLog(@"打开输出文件失败");
        return;
    }

    //第四步:创建输出码流
    AVStream* av_video_stream = avformat_new_stream(avformat_context, NULL);

    //第五步:查找视频编码器
    //1、获取编码器上下文
    AVCodecContext *avcodec_context = av_video_stream->codec;

    //2、设置编解码器上下文参数
    avcodec_context->codec_id = avoutput_format->video_codec;
    avcodec_context->codec_type = AVMEDIA_TYPE_VIDEO;
    avcodec_context->pix_fmt = AV_PIX_FMT_YUV420P;
    avcodec_context->width = 640;
    avcodec_context->height = 352;
    // 设置帧率25fps
    avcodec_context->time_base.num = 1;
    avcodec_context->time_base.den = 25;
    // 设置码率
    avcodec_context->bit_rate = 468000;
    // 设置GOP
    avcodec_context->gop_size = 250;
    // 设置量化参数
    avcodec_context->qmin = 10;
    avcodec_context->qmax = 51;

    avcodec_context->max_b_frames = 0;

    // 第六步:打开编码器
    // 1、查找编码器
    AVCodec *avcodec = avcodec_find_encoder(avcodec_context->codec_id);
    if (avcodec == NULL){
        NSLog(@"找不到解码器");
        return;
    }
    NSLog(@"解码器名称为:%s", avcodec->name);

    // 若是h264编码器,要设置一些参数
    AVDictionary *param = 0;
    if (avcodec_context->codec_id == AV_CODEC_ID_H264) {
        // 查看h264.c源码
        av_dict_set(¶m, "preset", "slow", 0);
        av_dict_set(¶m, "tune", "zerolatency", 0);
    }
    // 2、打开编码器
    if (avcodec_open2(avcodec_context, avcodec, ¶m) < 0) {
        NSLog(@"打开编码器失败");
        return;
    }

    // 第七步:写入头文件信息
    int flag = avformat_write_header(avformat_context, NULL);

    // 第八步:循环编码YUV文件为H264
    // 1、开辟缓冲区
    int buffer_size = av_image_get_buffer_size(avcodec_context->pix_fmt,
                                               avcodec_context->width,
                                               avcodec_context->height,
                                               1);

    int y_size = avcodec_context->width * avcodec_context->height;
    uint8_t *out_buffer = (uint8_t *)av_malloc(buffer_size);

    const char *cinFilePath = [inputPath UTF8String];
    FILE *in_file = fopen(cinFilePath, "rb");
    if (in_file == NULL) {
        NSLog(@"输入文件不存在");
        return;
    }

    // 2、内存空间填充
    AVFrame *av_frame = av_frame_alloc();
    av_image_fill_arrays(av_frame->data,
                         av_frame->linesize,
                         out_buffer,
                         avcodec_context->pix_fmt,
                         avcodec_context->width,
                         avcodec_context->height,
                         1);

    // 3、开辟packet
    AVPacket *av_packet = (AVPacket *)av_malloc(buffer_size);

    int i = 0;
    int result = 0;
    int current_frame_index = 0;

    // 4、循环编码
    while (true) {
        // 从yuv文件里面读取缓冲区
        //读取大小:y_size * 3 / 2
        if (fread(out_buffer, 1, y_size * 3 / 2, in_file) <= 0) {
            NSLog(@"读取完毕...");
            break;
        } else if (feof(in_file)) {
            break;
        }

        // 将缓冲区数据转换成AVFrame类型
        //Y值
        av_frame->data[0] = out_buffer;
        //U值
        av_frame->data[1] = out_buffer + y_size;
        //V值
        av_frame->data[2] = out_buffer + y_size * 5 / 4;

        av_frame->pts = i;

        i++;

        // 第九步:视频编码处理
        // 1、发送一帧视频像素数据
        avcodec_send_frame(avcodec_context, av_frame);
        // 2、接收一帧视频压缩数据格式(像素数据编码而来)
        result = avcodec_receive_packet(avcodec_context, av_packet);
        if (result == 0) {
            // 编码成功
            // 第十步:将数据写入到输出文件
            av_packet->stream_index = av_video_stream->index;
            result = av_write_frame(avformat_context, av_packet);
            NSLog(@"当前是第%d帧", current_frame_index);
            current_frame_index++;
            //是否输出成功
            if (result < 0) {
                NSLog(@"输出一帧数据失败");
                return;
            }
        }


    }

    //第11步:写入剩余帧数据->可能没有
    flush_encoder(avformat_context, 0);

    //第12步:写入文件尾部信息
    av_write_trailer(avformat_context);

    //第13步:释放内存
    avcodec_close(avcodec_context);
    av_free(av_frame);
    av_free(out_buffer);
    av_packet_free(&av_packet);
    avio_close(avformat_context->pb);
    avformat_free_context(avformat_context);
    fclose(in_file);
}