spring cloud config-统一配置服务中心
对于较为复杂的分布式系统的配置文件,不可能再像单体项目一样,每个项目的配置文件都放在对应的项目下,对于分布式项目来说一方面由于高可用的原因,同一个项目下的配置文件都是相同的,造成配置的冗余,另一方面如果需要临时修改配置,需要对高可用下的所有项目进行重新的发布,造成效率低下,对于日益复杂的项目,我们需要实现对配置进行集中统一化管理与发布的工具
搭建配置服务中心(config server)
创建一个新的项目作为配置服务中心,该项目可以访问配置在git仓库(github,coding,码云等)配置文件,也可以用svn等
添加maven依赖
            org.springframework.cloud
            spring-cloud-config-server
启动项添加config server注解
@SpringBootApplication
@EnableConfigServer
@EnableDiscoveryClient
public class NewConfigApplication {

    public static void main(String[] args) {
        SpringApplication.run(NewConfigApplication.class, args);
    }

}
对配置文件的请求进行配置
server:
  port: 8400
spring:
  application:
    name: configserver
  cloud:
    config:
      server:
        git:
          uri: https://git.coding.net/****/spring-cloud-conf.git
          username: 50****[email protected]
          password: wu****511
eureka:
  client:
    service-url:
      #将自己注册到peer2这个eureka上面
      defaultZone: http://localhost:8761/eureka/  #指定eureka服务器的地址

#开放刷新等访问端口
management:
  endpoint:
    refresh:
      enabled: true
  endpoints:
    web:
      exposure:
        include: refresh,health,info,bus-refresh
在配置文件中配置git仓库的访问地址和方式用于访问,基础的配置基本已经完成了,可以打包启动项目了
通过指定方式访问git仓库的配置文件
在官方的文档中,提供了如下方式进行访问
/{application}/{profile}[/{label}]
/{application}-{profile}.yml
/{label}/{application}-{profile}.yml
/{application}-{profile}.properties
/{label}/{application}-{profile}.properties
{application}对应的是你应用的spring.application.name
{profile}对应的是该微服务下的某个配置文件
这里需要注意的是,我们的配置文件和对应的微服务项目的命名最好可以遵守一定的规范,比如我消费微服务的spring.application.name=cloud
那么我们配置文件的名称就可以定位cloud-{profile}.yml
假如该微服务下有2个配置文件,{profile}就可以分别对应这两个文件的名称,比如cloud-dev1.yml,cloud-dev2.yml都是cloud下的配置文件,那么我们就可以通过官方的调用方式分别对两个服务进行调用
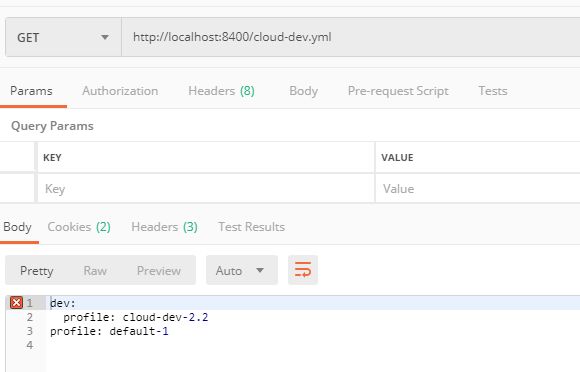
http://localhost:8400/cloud-dev.yml
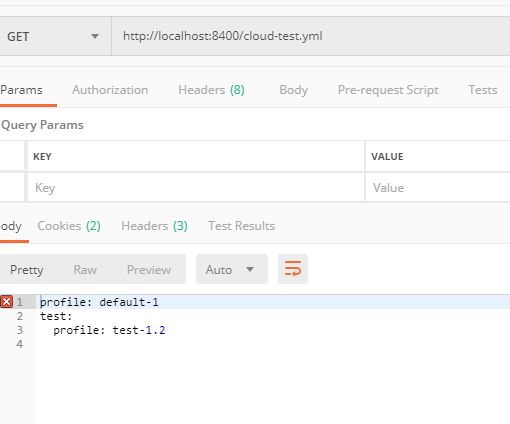
http://localhost:8400/cloud-test.yml
搭建配置服务消费端(config client)
服务的消费端通过对配置服务中心发送请求来获取配置数据
添加maven依赖
            org.springframework.cloud
            spring-cloud-starter-config
创建bootstrap.properties文件
在bootstrap.properties中配置访问配置服务端的信息,关于bootstrap和application的区别详见https://www.cnblogs.com/BlogNetSpace/p/8469033.html
spring.application.name=cloud


spring.cloud.config.name=cloud
spring.cloud.config.profile=dev
spring.cloud.config.label=master
spring.cloud.config.discovery.enabled=true
spring.cloud.config.discovery.serviceId=configserver

eureka.client.serviceUrl.defaultZone=http://localhost:8761/eureka/

management.endpoint.refresh.enabled=true
management.endpoints.web.exposure.include=*
获取配置文件
创建控制器,通过${value}的方式获取配置文件
@RestController
public class UserController {

    @Value("${profile}")
    public String profile;

    @RequestMapping("/profile")
    public String feignsFallBack(
    ) {
        return this.profile;
    }

}
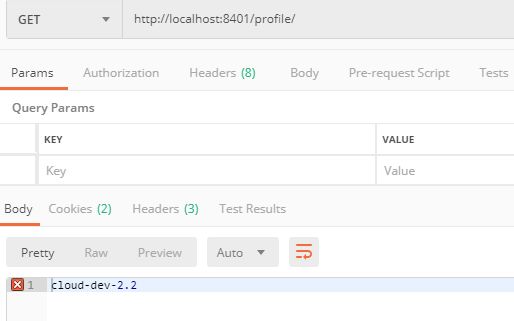
此时我们通过访问该方法,查看获取配置文件数据
http://localhost:8401/profile
实现配置文件的动态更新
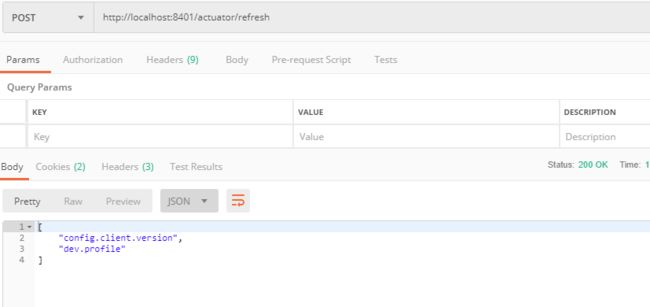
通过上面的请求方式获取到配置文件后,如果在git仓库进行配置文件的修改,再请求路径,会发现请求到的配置并没有被修改,这时候我们需要使用配置文件的动态更新,在控制器中加上@RefreshScope注解,添加该注解在配置得到更改时会得到特殊的我们需要使用cloud的执行器(Actuator),这里只需要在pom文件中添加相关的依赖即可,对于使用F版的童靴来说,还需要在配置文件中开放相关的端口以供调用,配置方式已经在上面的yml中了,这时候,我们就可以通过上面的路径对放在git仓库上的配置文件进行访问了,在更改git仓库配置文件后,通过ip:port/actuator/refresh的方式请求刷新配置文件,再次访问配置,获取的就是修改后的配置信息了,需要注意的是,该请求的方法是Post方法
使用spring cloud bus实现自动刷新配置
对于Spring cloud项目来说,显然不可能通过手动的方式来进行配置文件的刷新,spring cloud bus的作用就是传播更新的配置状态,作用效果和actuator一样,当我们更新配置文件后,可以实现自动刷新最新配置,我们可以使用bus+webhook+mq的方式实现配置文件的自动刷新
添加消息队列进行事件的传播
通过消息队列将消息进行传播,需要添加相关的注解和配置文件,那么配置了mq环境的服务都会进行配置服务更新,这里就不详细说了
    org.springframework.cloud
    spring-cloud-starter-bus-amqp
使用webhook实现更新自动调用
注意这里需要写的是自己的公网IP,作用是当配置文件发生修改时,将会自动触发这个回调方法,在结合mq,达到消息的传播。下面图片中填写的回调地址应填写外网地址
请求地址通过调用bus+mq的方式更新所有配置了mq的微服务,使其可以更新最新的配置,请求地址如下:
https://ip:port/actuator/bus-refresh
config client高可用配置
实际上配置非常简单,但是在这里我是踩了坑的,首先就是就是要确保你的服务已经成功开启eureka,并保证你的config server已经注册到eureka上了,在这里我通过端口的方式模拟两个config client
spring:
  profiles: peer1
  rabbitmq:
      host: 47.100.170.2
      port: 5672
      username: user
      password: 123456
server:
  port: 8401


---
spring:
#  #指定profiles为peer1
  profiles: peer2
  rabbitmq:
      host: 47.100.170.2
      port: 5672
      username: user
      password: 123456
server:
  port: 8402
通过端口模拟两个config client,注意这里的配置文件是配置在application.yml文件中的,但是对于一些需要预先加载的文件,需要配置在bootstrap文件中,否则在你启动的时候,服务器会默认从8888端口下拉去这些配置文件,但是在我写的过程中发现,如果我把配置文件配置在bootstrap.yml文件中了,configserver的地址通过uri的方式写死是可以拉取到配置信息,但是如果configserver地址是从eureka中获取的话,配置并没有起作用,还是会默认从8888端口拉去配置信息,结果就是无法拉去到指定的配置数据导致启动报错,我解决这个问题的办法也比较奇葩,我吧bootstrap.yml改成了bootstrap.properties后,再次启动,配置文件就从eureka上找到config server,并顺利拉去到配置
spring:
  application:
    name: client
  cloud:
    config:
      #默认是8888,并且会覆盖application.yml文件的配置,此处不添加uri,启动日志中会去找8888
      #uri: http://localhost:8400
      #表示开启通过服务发现组件访问config server的功能
      profile: dev
      label: master
      discovery:
        enable: true
        service-id: configserver

eureka:
  client:
    service-url:
      defaultZone: http://localhost:8761/eureka/  #指定eureka服务器的地址
通过上面的配置,当我们修改git仓库的配置文件信息后,configclient可以实时读取到更新的配置信息
到这里关于config就写的差不多了,后期还会对文章进行进一步的完善,不足之处还望指出


