一、准备工作
1.首先试运行Unity导出的工程是否可以运行(这里导出的工程是针对真机的,所以使用真机调试)
2.准备一个Xcode创建的原生工程,这里使用的是一个Single View App。在ViewController 中创建一个按钮,以供点击进入Unity场景。
- (void)viewDidLoad {
    [super viewDidLoad];
    // Do any additional setup after loading the view.

    //这里创建一个button以供跳转进入Unity场景
    self.jumpButton = [[UIButton alloc] initWithFrame:CGRectMake(40, 200, ([UIScreen mainScreen].bounds.size.width)-80, 70)];
    self.jumpButton.backgroundColor = [UIColor cyanColor];
    [self.jumpButton setTitle:@"开启" forState:UIControlStateNormal];
    [self.jumpButton addTarget:self action:@selector(jumpToUnity) forControlEvents:UIControlEventTouchDown];
    [self.view addSubview:self.jumpButton];
}
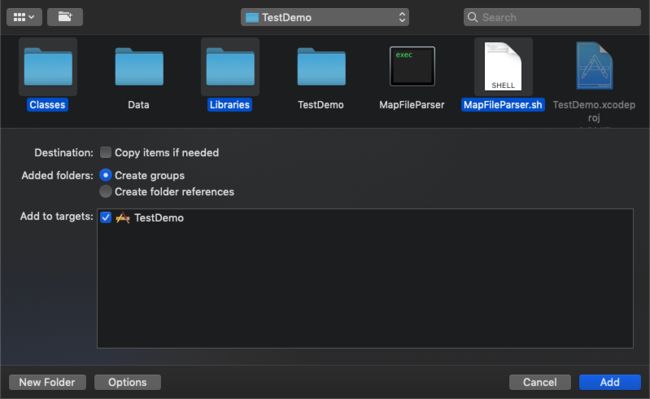
3.嵌入文件准备。在Unity导出的工程根目录下,将图1-1中选中的文件copy进原生工程根目录下,如图1-2。


二、文件导入
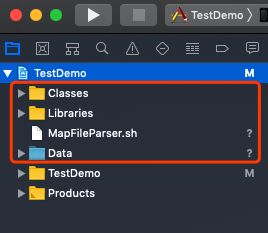
1.Data文件夹以“Create folder references”方式导入。

2.Classes、Libraries、MapFileParser.sh以“Create groups”方式导入。
导入后工程目录如下:
3.删除Libraries->libil2cpp,这个文件的引用。
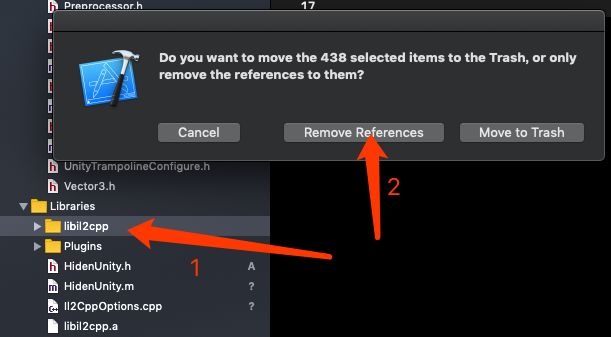
#因为这里是Unity2018导出的工程,所以不需要像2017版本之前那样去Classes->Native下删除“.h”文件的引用。
三、添加Framework,这里参考Unity导出工程,注意每个Framework对应的Status,这里有俩个库的Status是Optional。
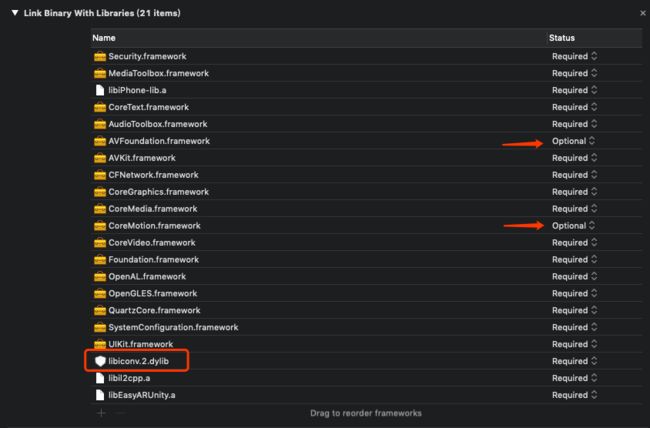
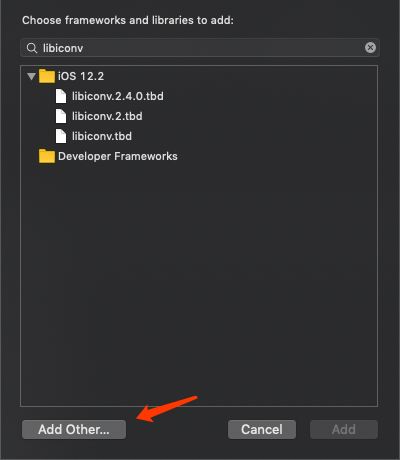
#关于libiconv.2.dylib的添加这里需要说一下,直接搜索,只有libiconv.2.tbd,所以选择“Add Other…”方式添加。
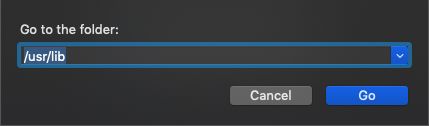
然后键盘快捷键CMD+Shift+G (go to folder) 输入 “/usr/lib”
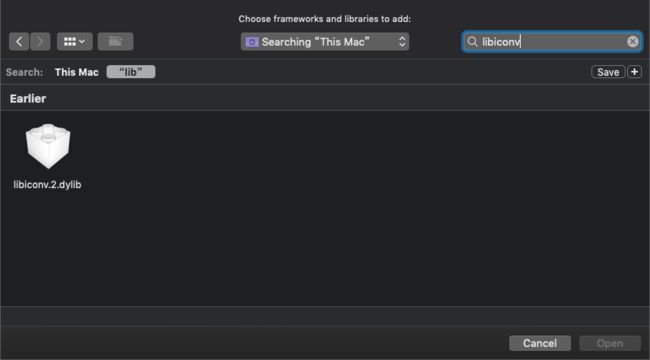
继续搜索“libiconv”
#每个Unity导出的工程依赖的Framework不一样,这里依照需要嵌入的工程为准。
四、buildSettings
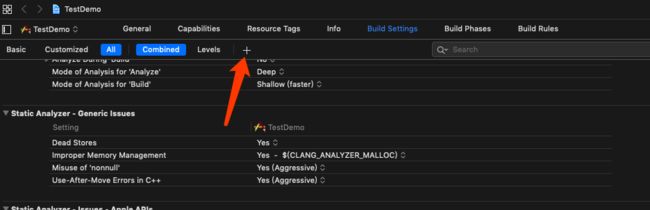
1.添加一个Run Script

点击“+”之后,选择“New Run Script Phase”。

#这里要注意路径,依照脚本文件所在路径为准。我这里是将文件放在工程的根目录下的。
2.Enable BitCode
因为这里Unity导出的工程不支持Bitcode,所以……

3.Search Paths

此三项,从Unity导出工程复制过来,包括顺序!
Framework Search Paths
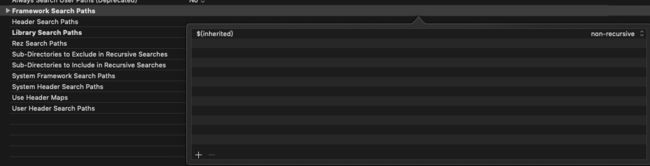
Header Search Paths
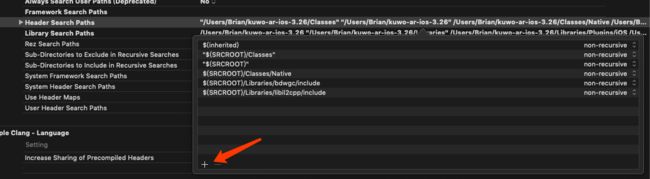
Library Search Paths

#注意的是,不要忽略Framework Search Paths,虽然看起来是空的,然后不要重复。
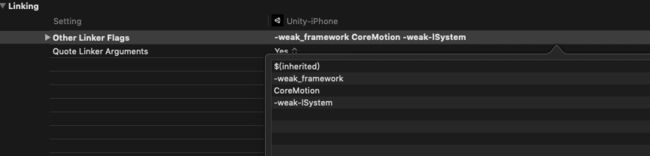
3.Other linker Flags
#特别注意:如iOS原生项目中配置了-all_load 应删除,否则会与Unity3D 项目中的依赖库冲突
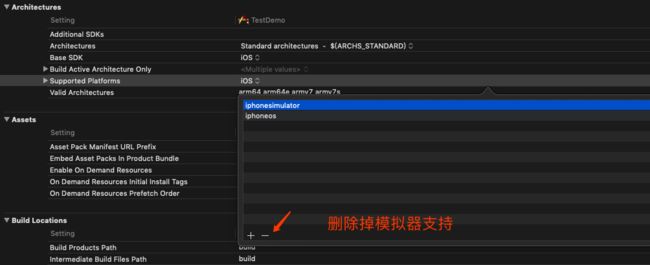
4.Supported Platforms 因为Unity导出工程不支持模拟器

对比以后删除掉模拟器支持
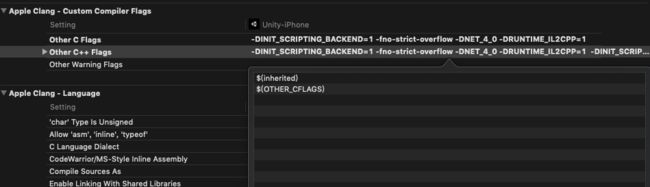
5.Other C Flags、Other C++ Flags

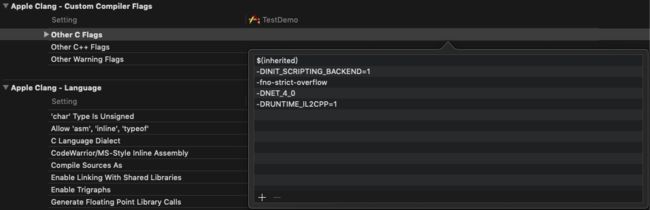
6.C Language Dialect 改为 C99

还有下图中四项,依照导出的工程修改

7.添加User-Defined
点击“+”后,选择 “add User Defined Setting”
参考Unity 导出工程,这里我添加的有:
GCC_THUMB_SUPPORT = NO
PROVISIONING_PROFILE
UNITY_RUNTIME_VERSION = 2018.3.9f1
UNITY_SCRIPTING_BACKEND = il2cpp
如下图,左边是iOS原生工程,右边是Unity导出工程

#鼠标选中需要复制项,键盘按回车,就可以copy了。如图4-17

注意:build Setting,修改主要是对照Unity导出的工程,先看Unity导出的工程的build Setting里那些项目是加粗的,这些就需要你注意对照原生工程修改了。
五、Pch文件合并与代码修改
合并Pch文件,将Classes->Prefix.pch内容拷贝入原生项目的Pch文件内,然后删除掉Classes->Prefix.pch。如果原生工程没有Pch文件,则可以直接使用这个Pch文件,记得去build Setting 里添加pch文件路径。

main文件修改,将Classes->main.mm文件内代码拷贝入原生工程目录下的main.m文件下,并且修改后缀为.mm,然后删除Classes->main.mm
//
//  main.m
//  TestDemo
//
//  Created by Brian on 2019/3/26.
//  Copyright © 2019 Brian. All rights reserved.
//

#include "RegisterMonoModules.h"
#include "RegisterFeatures.h"
#include

#import "AppDelegate.h"

// Hack to work around iOS SDK 4.3 linker problem
// we need at least one __TEXT, __const section entry in main application .o files
// to get this section emitted at right time and so avoid LC_ENCRYPTION_INFO size miscalculation
static const int constsection = 0;

void UnityInitTrampoline();

// WARNING: this MUST be c decl (NSString ctor will be called after +load, so we cant really change its value)
const char* AppControllerClassName = "UnityAppController";

#if UNITY_USES_DYNAMIC_PLAYER_LIB
extern "C" void SetAllUnityFunctionsForDynamicPlayerLib();
#endif

int main(int argc, char* argv[])
{
#if UNITY_USES_DYNAMIC_PLAYER_LIB
    SetAllUnityFunctionsForDynamicPlayerLib();
#endif

    UnityInitStartupTime();
    @autoreleasepool
    {
        UnityInitTrampoline();
        UnityInitRuntime(argc, argv);

        RegisterMonoModules();
        NSLog(@"-> registered mono modules %p\n", &constsection);
        RegisterFeatures();

        // iOS terminates open sockets when an application enters background mode.
        // The next write to any of such socket causes SIGPIPE signal being raised,
        // even if the request has been done from scripting side. This disables the
        // signal and allows Mono to throw a proper C# exception.
        std::signal(SIGPIPE, SIG_IGN);

        UIApplicationMain(argc, argv, nil, NSStringFromClass([AppDelegate class]));

//        UIApplicationMain(argc, argv, nil, [NSString stringWithUTF8String: AppControllerClassName]);
    }

    return 0;
}

#if TARGET_IPHONE_SIMULATOR && TARGET_TVOS_SIMULATOR

#include

extern "C" int pthread_cond_init$UNIX2003(pthread_cond_t *cond, const pthread_condattr_t *attr)
{ return pthread_cond_init(cond, attr); }
extern "C" int pthread_cond_destroy$UNIX2003(pthread_cond_t *cond)
{ return pthread_cond_destroy(cond); }
extern "C" int pthread_cond_wait$UNIX2003(pthread_cond_t *cond, pthread_mutex_t *mutex)
{ return pthread_cond_wait(cond, mutex); }
extern "C" int pthread_cond_timedwait$UNIX2003(pthread_cond_t *cond, pthread_mutex_t *mutex,
                                               const struct timespec *abstime)
{ return pthread_cond_timedwait(cond, mutex, abstime); }

#endif // TARGET_IPHONE_SIMULATOR && TARGET_TVOS_SIMULATOR


//原有的mian函数
//int main(int argc, char * argv[]) {
//    @autoreleasepool {
//        return UIApplicationMain(argc, argv, nil, NSStringFromClass([AppDelegate class]));
//    }
//}
修改UnityAppController.h 中的
//修改前
inline UnityAppController* GetAppController()
{
    return _UnityAppController;
}
为
//修改后
#import "AppDelegate.h"
inline UnityAppController*  GetAppController()
{
    AppDelegate *delegate = (AppDelegate *)[UIApplication sharedApplication].delegate;
    return delegate.unityController;
}
原生 AppDelegate 中的修改
AppDelegate.h文件
//
//  AppDelegate.h
//  TestDemo
//
//  Created by Brian on 2019/3/26.
//  Copyright © 2019 Brian. All rights reserved.
//

#import

@class UnityAppController;

@interface AppDelegate : UIResponder

@property (strong, nonatomic) UIWindow *window;

@property (strong, nonatomic) UIWindow *unityWindow;

@property (strong, nonatomic) UnityAppController *unityController;

-(void)StartMyUnity; //开启unity
- (void)hideUnityWindow; //退出Unity 其实是暂停

@end
AppDelegate.m文件
//
//  AppDelegate.m
//  TestDemo
//
//  Created by Brian on 2019/3/26.
//  Copyright © 2019 Brian. All rights reserved.
//

#import "AppDelegate.h"
#import "ViewController.h"
#import "UnityAppController.h"

@interface AppDelegate ()

@end

@implementation AppDelegate

-(UIWindow *)unityWindow{
    return  UnityGetMainWindow();
}

-(void)showUnityWindow{
    //进入unity界面
    UnityPause(false);
    [self.unityWindow makeKeyAndVisible];
}

-(void)hideUnityWindow{

    //退出Unity界面
    UnityPause(true);
    [self.window makeKeyAndVisible];
}

-(void)StartMyUnity {
    [_unityController applicationDidBecomeActive:[UIApplication sharedApplication]];
    [self showUnityWindow];
}


- (BOOL)application:(UIApplication *)application didFinishLaunchingWithOptions:(NSDictionary *)launchOptions {
    // Override point for customization after application launch.

    self.unityController = [[UnityAppController alloc] init];
    [_unityController application:application didFinishLaunchingWithOptions:launchOptions];


    self.window = [[UIWindow alloc] initWithFrame:[UIScreen mainScreen].bounds];
    self.window.backgroundColor = [UIColor whiteColor];

    ViewController *vc = [[ViewController alloc] init];
    UINavigationController *nav = [[UINavigationController alloc] initWithRootViewController:vc];
    self.window.rootViewController = nav;

    [self.window makeKeyWindow];

    return YES;
}


- (void)applicationWillResignActive:(UIApplication *)application {
    // Sent when the application is about to move from active to inactive state. This can occur for certain types of temporary interruptions (such as an incoming phone call or SMS message) or when the user quits the application and it begins the transition to the background state.
    // Use this method to pause ongoing tasks, disable timers, and invalidate graphics rendering callbacks. Games should use this method to pause the game.
    [_unityController applicationWillResignActive:application];
}


- (void)applicationDidEnterBackground:(UIApplication *)application {
    // Use this method to release shared resources, save user data, invalidate timers, and store enough application state information to restore your application to its current state in case it is terminated later.
    // If your application supports background execution, this method is called instead of applicationWillTerminate: when the user quits.
    [_unityController applicationDidEnterBackground:application];
}


- (void)applicationWillEnterForeground:(UIApplication *)application {
    // Called as part of the transition from the background to the active state; here you can undo many of the changes made on entering the background.
    [_unityController applicationWillEnterForeground:application];
}

static BOOL isFirst = NO;

- (void)applicationDidBecomeActive:(UIApplication *)application {
    // Restart any tasks that were paused (or not yet started) while the application was inactive. If the application was previously in the background, optionally refresh the user interface.
    [_unityController applicationDidBecomeActive:application];
    if (!isFirst) {
        dispatch_after(dispatch_time(DISPATCH_TIME_NOW, (int64_t)(0.5 * NSEC_PER_SEC)), dispatch_get_main_queue(), ^{
            [self hideUnityWindow];
            isFirst = YES;
        });
    }
}


- (void)applicationWillTerminate:(UIApplication *)application {
    // Called when the application is about to terminate. Save data if appropriate. See also applicationDidEnterBackground:.
    [UIApplication sharedApplication].idleTimerDisabled = NO;

    [_unityController applicationWillTerminate:application];
}


@end
修改info.plist
因为Unity场景中使用相机进行扫描,所以需要添加相机权限访问提示。
    NSCameraUsageDescription
    需要访问您的相机,以便扫描文字
以及Unity导出工程中info.plist中的这些(可以忽略)
    UnityCloudProjectID

    UnityCrashSubmissionURL
    https://a:[email protected]/symbolicate
    Unity_LoadingActivityIndicatorStyle
    -1
调用
在需要启动Unity3D 项目的地方调用
[(AppDelegate *)[UIApplication sharedApplication].delegate StartMyUnity];
退出Unity3D(其实是暂停)
[(AppDelegate*)[UIApplication sharedApplication].delegate hideUnityWindow];//隐藏
错误调试
这时候可以编译了,DeviceSettings.mm文件内有一个错误,
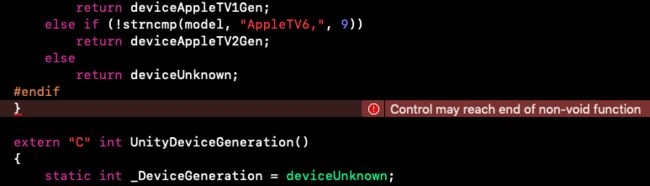
在报错的函数尾部添加 "return deviceUnknown;" 即可。
……
#elif PLATFORM_TVOS
    if (!strncmp(model, "AppleTV5,", 9))
        return deviceAppleTV1Gen;
    else if (!strncmp(model, "AppleTV6,", 9))
        return deviceAppleTV2Gen;
    else
        return deviceUnknown;
#endif
    return deviceUnknown;
}
如果有
Undefined symbols for architecture arm64:
"**********", referenced from:DynamicLibEngineAPI.o
则去 Build Phases 搜索 DynamicLibEngineAPI 然后删除引用
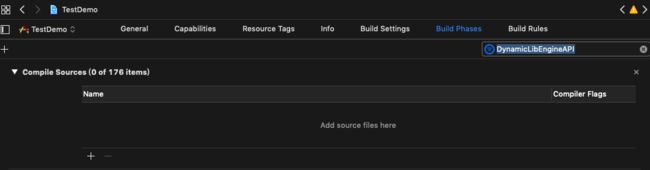
下手太快,这图是已经删除后的。