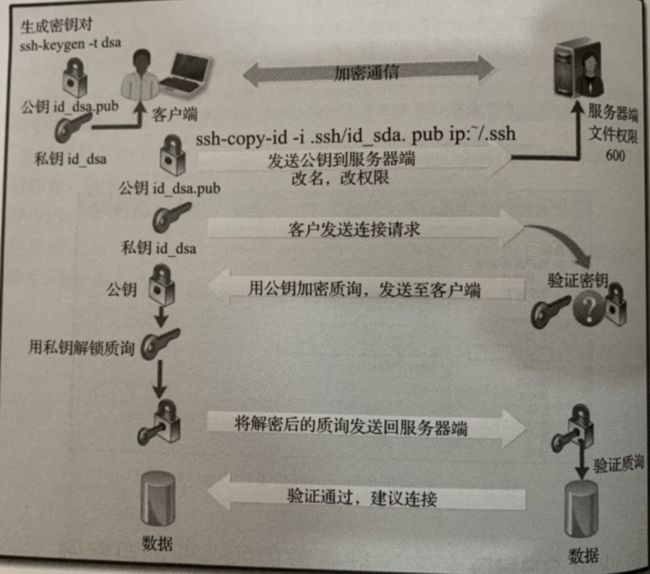
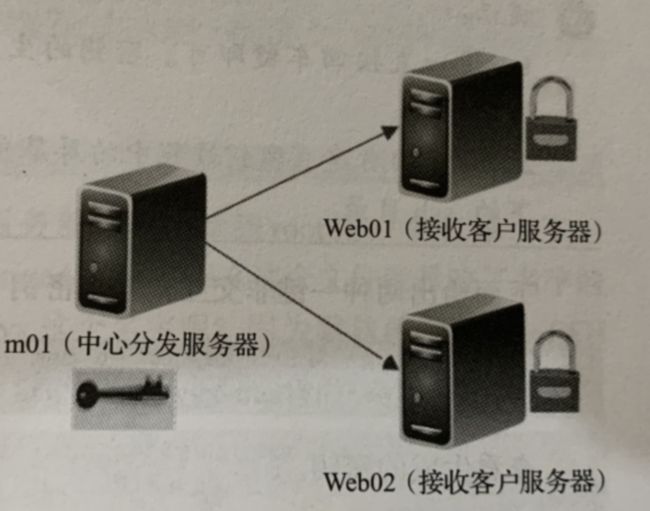
1. 基于密钥认证的SSH批量管理原理
企业级SSHD免密码批量管理企业项目案例的实现思想如下图所示。
2. 项目需求分析
要求所有服务器在同一root系统用户下,实现m01机器从本地分发数据到其他两台机器上,在分发的过程中不需要系统提示输入密码验证,当然,除了分发的功能,还可以批量查看所有客户机上的CPU、LOAD、MEM、系统版本等信息。即实现从m01服务器发布数据到其他客户端服务器以及查看信息的免密码登录验证解决方案。
3. 项目部署说明
在很多企业的工作环境中,直接用root用户进行分发和管理操作,这样很不安全也很不规范,另外,如果做安全优化时禁止了root远程连接,那么使用root进行分发管理的方法就无用了,但是使用root做认证是非常简单、方便的方案,这里也采取了简单方便的root用户免密方案,使用普通用户的方案要复杂很多。
4. 开始项目部署
因为m01服务器为中心管理服务器,所以我们选择在m01端建立Public Key(锁)与Private Key(钥匙)更方便,实际上只需要有一对密钥就可以,在哪个机器上建立都是一样的。
提示:在整个方案实现中,钥匙(Private Key)和锁(Public Key)仅需要建立一次即可在任意机器上执行,这里选择了在m01服务器生成密钥对。
5. 生成密钥对
[root@m01 ~]# ssh-keygen
---执行该命令生成密钥,默认是RSA类型密钥,ssh-keygen是生成密钥的工具,-t参数指建立密钥的类型,默认是建立RSA类型密钥。也可以执行ssh-keygen -t dsa来建立DSA类型密钥。
---RSA与DSA加密算法的区别
---RSA,是一种加密算法(PS:RSA也可以进行数字签名),它的简写的来由是Ron Rivest、Adi Shamir和Leonard Adleman    ---这3个人姓氏的第一个字母
---DSA就是数字签名算法的英文全称的简写,即Digital Signature Algorithm
   RSA既可以进行加密,也可以进行数字签名实现认证,而DSA只能用于数字签名从而实现认证
Generating public/private rsa key pair.    ---一直按回车键
Enter file in which to save the key (/root/.ssh/id_rsa):
Enter passphrase (empty for no passphrase):
Enter same passphrase again:
Your identification has been saved in /root/.ssh/id_rsa.    ---这是Private Key的路径
Your public key has been saved in /root/.ssh/id_rsa.pub.    ---这是Public Key的路径
The key fingerprint is:
SHA256:z7M+gqsZUUcoYX9o5uzT83SkS3EWAFXRB/APWa419Uc root@m01
The key's randomart image is:
+---[RSA 2048]----+
|    o. .ooo.++..E|
|   ....o   . ..=+|
|     .* o   . +o=|
|     * o     . =o|
|    . o S . + . .|
|     o . o *     |
|    . o.o B .    |
|     o...=.=     |
|    o... o=.     |
+----[SHA256]-----+
下面是两种一键非交互式创建密钥(可以用于自动化部署)的方法:
(1)一键生成密钥对ssh-keygen -t dsa -p  '' -f ~/.ssh/id_rsa >/dev/null 2>&1
(2)echo -e "\n"|ssh-keygen -t dsa -N ""
查看生成的密钥。
[root@m01 ~]# ls -l ~/.ssh/
总用量 12
-rw-------  1 root root 1679 3月  14 12:48 id_rsa    ---这是Private Key
-rw-r--r--  1 root root  390 3月  14 12:48 id_rsa.pub    ---这是Public Key
提示:请注意.ssh目录的权限为700,另外,Private Key的id_rsa文件权限为600,Public Key的id_rsa.pub当前文件权限为644。其中Private Key的id_rsa文件权限必须为600。
6. 分发公钥(锁)
把公钥从m01拷贝到WEB01、WEB02服务器各一份,ssh-copy-id为系统自带的Shell脚本,可用来分发公钥,在m01上执行如下命令发送公钥:
[root@m01 ~]# ssh-copy-id -i ~/.ssh/id_rsa.pub 192.168.9.7
/usr/bin/ssh-copy-id: INFO: Source of key(s) to be installed: "/root/.ssh/id_rsa.pub"
The authenticity of host '192.168.9.7 (192.168.9.7)' can't be established.
ECDSA key fingerprint is SHA256:lpAQ77XAqJ/27nex4tZvKv8y9craDayqf12ZB9V3QKk.
ECDSA key fingerprint is MD5:c8:94:09:a2:27:8b:92:6f:b7:60:fc:94:bd:f9:14:88.
Are you sure you want to continue connecting (yes/no)? yes
/usr/bin/ssh-copy-id: INFO: attempting to log in with the new key(s), to filter out any that are already installed
/usr/bin/ssh-copy-id: INFO: 1 key(s) remain to be installed -- if you are prompted now it is to install the new keys
[email protected]'s password:
Number of key(s) added: 1    ---注意这里,提示添加了一个新Key
Now try logging into the machine, with:   "ssh '192.168.9.7'"
and check to make sure that only the key(s) you wanted were added.
同理执行如下命令拷贝公钥,过程省略。
[root@m01 ~]# ssh-copy-id -i ~/.ssh/id_rsa.pub 192.168.9.9
此时通过输出及登录Web01及Web02服务器,可以看到root用户家目录多了一个.ssh目录,.ssh目录里增加了一个文件authorized_keys,那么这个文件就是改了名字的id_rsa.pub文件。为什么要改成authorized_keys这个名字呢?因为默认情况下,SSH的配置文件中默认调用的公钥路径为.ssh,文件名就是authorized_keys。
[root@web01 ~]# grep AuthorizedKeysFile /etc/ssh/sshd_config
AuthorizedKeysFile  .ssh/authorized_keys    ---因为SSHD配置文件里是authorized_keys名字
[root@web01 ~]# ls -ld ~/.ssh
drwx------ 2 root root 29 3月  14 16:19 /root/.ssh    ---注意这里,.ssh权限是700
[root@web01 ~]# ls -l ~/.ssh/
总用量 4
-rw------- 1 root root 390 3月  14 16:19 authorized_keys    ---公钥被改成这个名字了
7. 拷贝SSH密钥对
当要分发的节点机器有数百台时,使用ssh-copy-id就相对麻烦了,因为第一次拷贝时需要人工输入密码。解决这个问题的办法就是用Shell结合expect交互式命令或sshpass等命令来实现。
8. 远程登录执行命令测试
从m01服务器远程连接节点Web01并执行命令测试:
[root@m01 ~]# ssh 192.168.9.7 uptime
 16:50:38 up 10:05,  2 users,  load average: 2.00, 2.01, 1.98
从上面的结果中,我们发现已经无须密码就可以连接节点Web01执行命令了,连接Web02也是如此。
9. 实现批量管理服务器
[root@m01 ~]# cd /server/scripts/
[root@m01 scripts]# vim view.sh
for n in 7 9
do
        echo ------192.168.9.$n------
        ssh 192.168.9.$n $1
done
运行脚本,可以传参任意要执行的命令,注意命令有空格时要用引号引起来。
[root@m01 scripts]# sh view.sh "cat /etc/redhat-release"
------192.168.9.7------
CentOS Linux release 7.6.1810 (Core)
------192.168.9.9------
CentOS Linux release 7.6.1810 (Core)
如果遇到环境变量问题,可以调整环境变量配置到/etc/bashrc里面。
这样一来,即时有几百台服务器,也瞬间就可以查看想要的所有服务器的信息了。
10. 分发任意本地数据到所有节点的任意位置
下面以scp命令为例,并发Shell脚本实现批量免密钥分发文件。
[root@m01 scripts]# cat fenfa.sh
#!/bin/sh
. /etc/init.d/functions    ---引入系统函数库
if [ $# -ne 2 ]    ---参数不为2被提示帮助
then
    echo "usage:$0 localfile remotedir"
    exit 1
fi

for n in 7 9 51
do
    scp -P 22 -rp $1 [email protected].$n:$2 &>/dev/null
    if [ $? -eq 0 ]
    then
        action "192.168.9.$n successful" /bin/true
    else
        action "192.168.9.$n failure" /bin/false
    fi
done
测试结果如下:将本地/etc/hosts分发到其他机器的/tmp下。
[root@m01 scripts]# sh fenfa.sh /etc/hosts /tmp/
192.168.9.7 successful                                     [  确定  ]
192.168.9.9 successful                                     [  确定  ]
192.168.9.51 failure                                       [失败]
至此,本项目案例大功告成。

