一、引入FFmpeg编译好的包
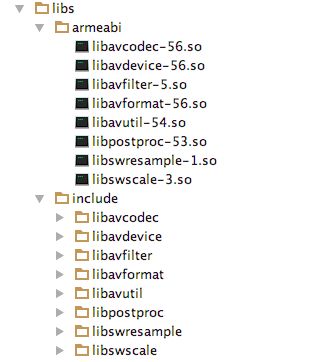
屏幕快照 2017-09-22 下午10.27.27.png
二、配置 CMakeList.txt
cmake_minimum_required(VERSION 3.4.1)

include_directories(libs/include)
set(DIR ../../../../libs)

add_library(ffmpeg
            SHARED
            src/main/jni/ffmpeg.cpp )

add_library(avcodec-56
            SHARED
            IMPORTED )
set_target_properties(avcodec-56
                      PROPERTIES IMPORTED_LOCATION
                      ${DIR}/armeabi/libavcodec-56.so)

add_library(avdevice-56
            SHARED
            IMPORTED )
set_target_properties(avdevice-56
                      PROPERTIES IMPORTED_LOCATION
                      ${DIR}/armeabi/libavdevice-56.so)

add_library(avfilter-5
            SHARED
            IMPORTED )
set_target_properties(avfilter-5
                      PROPERTIES IMPORTED_LOCATION
                      ${DIR}/armeabi/libavfilter-5.so)

add_library(avformat-56
            SHARED
            IMPORTED )
set_target_properties(avformat-56
                      PROPERTIES IMPORTED_LOCATION
                      ${DIR}/armeabi/libavformat-56.so)

add_library(avutil-54
            SHARED
            IMPORTED )
set_target_properties(avutil-54
                      PROPERTIES IMPORTED_LOCATION
                      ${DIR}/armeabi/libavutil-54.so)

add_library(postproc-53
            SHARED
            IMPORTED )
set_target_properties(postproc-53
                      PROPERTIES IMPORTED_LOCATION
                      ${DIR}/armeabi/libpostproc-53.so)

add_library(swresample-1
            SHARED
            IMPORTED )
set_target_properties(swresample-1
                      PROPERTIES IMPORTED_LOCATION
                      ${DIR}/armeabi/libswresample-1.so)

add_library(swscale-3
            SHARED
            IMPORTED )
set_target_properties(swscale-3
                      PROPERTIES IMPORTED_LOCATION
                      ${DIR}/armeabi/libswscale-3.so)

target_link_libraries(ffmpeg
                      avcodec-56
                      avdevice-56
                      avfilter-5
                      avformat-56
                      avutil-54
                      postproc-53
                      swresample-1
                      swscale-3
                      # 查找库路径 /ndk-bundle/platforms/android-9/arch-arm/usr/lib
                      log
                      android)
三、在 build.gradle(app)中加入libs配置:
sourceSets {
        // 配置 ffmpeg 相关 so 的路径
        main.jniLibs.srcDirs 'libs'
    }
二、创建 VideoView,用于播放 视频文件
public class VideoView extends SurfaceView {

    static {
        System.loadLibrary("ffmpeg");
        System.loadLibrary("avcodec-56");
        System.loadLibrary("avformat-56");
        System.loadLibrary("swscale-3");
    }

    public VideoView(Context context) {
        this(context, null);
    }

    public VideoView(Context context, AttributeSet attrs) {
        this(context, attrs, 0);
    }

    public VideoView(Context context, AttributeSet attrs, int defStyleAttr) {
        super(context, attrs, defStyleAttr);
        init();
    }

    private void init() {
        getHolder().setFormat(PixelFormat.RGBA_8888);
    }

    public void play(final String uri) {
        new Thread(new Runnable() {
            @Override
            public void run() {
                render(uri, getHolder().getSurface());
            }
        }).start();
    }

    public native void render(String uri, Surface surface);
}
四、利用 javah 生成头文件
#include
#include
#include
#include
/* Header for class com_andon_lcz_ffmpegdemo_FFmpegHelper */

#ifndef _Included_com_andon_lcz_ffmpegdemo_FFmpegHelper
#define _Included_com_andon_lcz_ffmpegdemo_FFmpegHelper

#define LOG_I(FORMAT, ...) __android_log_print(ANDROID_LOG_INFO,"ffmpeg",FORMAT,##__VA_ARGS__);
#define LOG_E(FORMAT, ...) __android_log_print(ANDROID_LOG_ERROR,"ffmpeg",FORMAT,##__VA_ARGS__);

#ifdef __cplusplus
extern "C" {
// 编码
#include "libavcodec/avcodec.h"
// 解封装
#include "libavformat/avformat.h"
// 像素处理
#include "libswscale/swscale.h"
#endif
JNIEXPORT void JNICALL Java_com_andon_lcz_ffmpegdemo_VideoView_render
        (JNIEnv *env, jobject instance, jstring uri_, jobject surface);

#ifdef __cplusplus
}
#endif
#endif
五、实现 ffmpeg.cpp
#include "com_andon_lcz_ffmpegdemo_FFmpegHelper.h"

JNIEXPORT void JNICALL Java_com_andon_lcz_ffmpegdemo_VideoView_render
        (JNIEnv *env, jobject instance, jstring uri_, jobject surface) {
    const char *c_input_path = env->GetStringUTFChars(uri_, NULL);

    // 注册各大组件
    av_register_all();

    AVFormatContext *pContext = avformat_alloc_context();
    if (avformat_open_input(&pContext, c_input_path, NULL, NULL) < 0) {
        LOG_E("打开文件失败");
        return;
    }

    if (avformat_find_stream_info(pContext, NULL) < 0) {
        LOG_E("获取信息失败");
        return;
    }

    // 找到视频流
    int idx_video_stream = -1;
    for (int i = 0; i < pContext->nb_streams; ++i) {
        // 流的类型-> 视频流 音频流 字幕流
        if (pContext->streams[i]->codec->codec_type == AVMEDIA_TYPE_VIDEO) {
            idx_video_stream = i;
            break;
        }
    }

    if (idx_video_stream == -1) {
        LOG_E("获取视频流失败");
        return;
    }

    // 视频流解码上下文
    AVCodecContext *pCodecCtx = pContext->streams[idx_video_stream]->codec;

    // 查找视频解码器
    AVCodec *pAvCodec = avcodec_find_decoder(pCodecCtx->codec_id);

    // 打开解码器
    if (avcodec_open2(pCodecCtx, pAvCodec, NULL) < 0) {
        LOG_E("打开解码器失败");
    }

    // 分配一帧的内存
    AVPacket *avPacket = (AVPacket *) av_malloc(sizeof(AVPacket));
    // 初始化一帧
    av_init_packet(avPacket);
    // mp4 解封装后的帧数据
    AVFrame *avFrame = av_frame_alloc();
    // 绘制区域
    ANativeWindow *nativeWindow = ANativeWindow_fromSurface(env, surface);
    // 视频缓冲区
    ANativeWindow_Buffer windowBuffer;
    // 绘制区域的宽高
    int windowWidth = ANativeWindow_getWidth(nativeWindow);
    int windowHeight = ANativeWindow_getHeight(nativeWindow);
    // 绘制之前,配置 宽和高 (这里设置为 window 的宽和高,以确定偏移量),绘制格式
    ANativeWindow_setBuffersGeometry(nativeWindow, windowWidth, windowHeight, WINDOW_FORMAT_RGBA_8888);
    // 自适应宽度可以使用下面的代码,上面的代码,配合偏移,实现原画大小播放
    // int win_w = ANativeWindow_getWidth(window);
    // int win_h = ANativeWindow_getHeight(window);
    // ANativeWindow_setBuffersGeometry(window, this->codec_ctx->width,
    //                                     this->codec_ctx->width * win_h /
    //                                      win_w, // 重新计算绘制区域的高度,防止纵向变形
    //                                    WINDOW_FORMAT_RGBA_8888);
    // 确定视频的大小,有可能视频的会大于当前的绘制区域,需要缩放
    int videoWidth = windowWidth > pCodecCtx->width ? pCodecCtx->width : windowWidth;
    int videoHeight = videoWidth * pCodecCtx->height / pCodecCtx->width;
    if (videoHeight > windowHeight) {
        videoHeight = windowHeight;
        videoWidth = windowHeight * pCodecCtx->width / pCodecCtx->height;
    }
    // 转换后的rgb帧数据
    AVFrame *rgbaFrame = av_frame_alloc();
    // 计算rgb帧数据缓冲区的大小
    uint8_t *out_buf = (uint8_t *) av_malloc(
            avpicture_get_size(AV_PIX_FMT_RGBA, videoWidth, videoHeight));
    // 填充 rgba->data 缓冲区
    avpicture_fill((AVPicture *) rgbaFrame, out_buf, AV_PIX_FMT_RGBA, videoWidth, videoHeight);
    // rgba 转换上下文
    SwsContext *swsContext = sws_getContext(pCodecCtx->width,
                                            pCodecCtx->height,
                                            pCodecCtx->pix_fmt,
                                            videoWidth,
                                            videoHeight,
                                            AV_PIX_FMT_RGBA,
                                            SWS_BICUBIC, // 效率高,清晰度降低
                                            NULL,
                                            NULL,
                                            NULL);
    // 读取的帧数量
    int frame_count = 0;
    // 是否解封装完成
    int got_frame;
    // 循环读取每一帧的数据
    while (av_read_frame(pContext, avPacket) >= 0) {
        // < 0 代表读到文件末尾了
        if (avPacket->stream_index == idx_video_stream) {
            // 解封装每一帧的视频数据
            avcodec_decode_video2(pCodecCtx, avFrame, &got_frame, avPacket);
            if (got_frame > 0) {
                // 开始绘制,锁定不让其它的线程绘制
                ANativeWindow_lock(nativeWindow, &windowBuffer, NULL);
                // 解码数据 -> rgba
                sws_scale(swsContext, (const uint8_t *const *) avFrame->data, avFrame->linesize, 0,
                          avFrame->height, rgbaFrame->data, rgbaFrame->linesize);
                // 缓冲区的地址
                uint8_t *dst = (uint8_t *) windowBuffer.bits;
                // 每行的内存大小
                int dstStride = windowBuffer.stride * 4;
                // 像素区的地址
                uint8_t *src = rgbaFrame->data[0];
                int srcStride = rgbaFrame->linesize[0];
                for (int i = 0; i < videoHeight; i++) {
                    // 原画大小播放
                    // 逐行拷贝内存数据,但要进行偏移,否则视频会拉伸变形
                    // (i + (windowHeight - videoHeight) / 2) * dstStride 纵向偏移,确保视频纵向居中播放
                    // (dstStride - srcStride) / 2 横向偏移,确保视频横向居中播放
                    memcpy(dst + (i + (windowHeight - videoHeight) / 2) * dstStride +
                           (dstStride - srcStride) / 2, src + i * srcStride,
                           srcStride);
                }
                ANativeWindow_unlockAndPost(nativeWindow);
                usleep(16 * 1000);
                LOG_I("解码第%d帧", frame_count++);
            }
            av_free_packet(avPacket);
        }
    }
    av_frame_free(&avFrame);
    av_frame_free(&rgbaFrame);
    avcodec_close(pCodecCtx);
    avformat_free_context(pContext);

    env->ReleaseStringUTFChars(uri_, c_input_path);
}
代码:https://gitee.com/chuanzhi/FFPlayer.git