下载iTerm2
iTerm2
检查电脑shell是否是zsh
$ echo $0
-zsh
如果你的输出不是-zsh,需要手动切换一下
chsh -s /bin/zsh
安装oh-my-zsh
git clone git://github.com/robbyrussell/oh-my-zsh.git ~/.oh-my-zsh
cp ~/.zshrc ~/.zshrc.orig
cp ~/.oh-my-zsh/templates/zshrc.zsh-template ~/.zshrc
设置主题 Themes
大多喜欢agnoster,根据自己喜好配置主题
$ wget https://gist.githubusercontent.com/agnoster/3712874/raw/c3107c06c04fb42b0ca27b0a81b15854819969c6/agnoster.zsh-theme
$ mv agnoster.zsh-theme ~/.oh-my-zsh/themes/agnoster.zsh-theme
安装成功后,用vim打开隐藏文件 .zshrc ,修改主题为 agnoster:
ZSH_THEME="agnoster"
应用agnoster这个主题需要特殊的字体支持,否则会出现乱码情况,这时我们来配置字体:
1.使用 Meslo 字体,点开连接点击 view raw 下载字体。
2.安装字体到系统字体册。
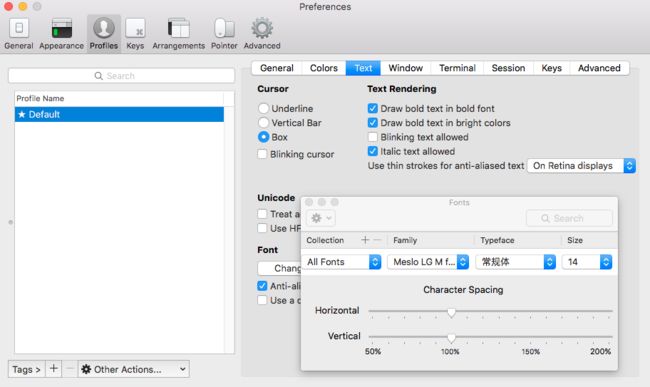
3.应用字体到iTerm2下,将字号设置为16px(iTerm -> Preferences -> Profiles -> Text -> Change Font)。
4.重新打开iTerm2窗口,这时便可以看到效果了。
安装PowerLine设置字体库
powerline的问号就是因为字体没安装,而且注意不只是安装字体就行了,需要配置iTerm2。
方法一:使用命令先安装pip:
sudo easy_install pip
pip install powerline-status --user
方法二:
git clone https://github.com/powerline/fonts.git --depth=1
cd fonts
./install.sh
cd ..
rm -rf fonts
其次,打开iTerm2,按照路径打开:iTerm2 –> Preferences –> Profiles –> text,找到Font处,如图:
全路径问题 隐藏用户名和主机
有的主题默认显示全路径,层次越深显示的越长:
编辑 ~/.zshrc 随便找个位置(最好靠上面一点方便查看)加上一行
DEFAULT_USER=$USER
如果为zsh安装了Oh my zsh这个工具(一般玩zsh第一步就是安装它),这里就不需要单独处理像Bash一样手动编程添加Git名称了,因为会自动出现。进入zsh后,可以看到效果
路径前缀的XX@XX太长,缩短问题:
在~/.oh-my-zsh/themes路径下找到agnoster.zsh-theme文件,可使用文本工具打开,将里面的build_prompt下的prompt_context字段在前面加#注释掉即可。
### Segments of the prompt, default order declaration
typeset -aHg AGNOSTER_PROMPT_SEGMENTS=(
    prompt_status
    #prompt_context
    prompt_virtualenv
    prompt_dir
    prompt_git
    prompt_end
)
显示时间轴线:
commond+shift+e
修改配色
使用的是solarized配色方案
Preferences -> Profiles -> Colors -> Color Presets -> Import
导入iterm2-colors-solarized目录下的两个.itermcolors文件,修改配色方案
Preferences -> Profiles -> Colors -> Color Presets
设置语法高亮
1.使用homebrew安装 zsh-syntax-highlighting 插件。
brew install zsh-syntax-highlighting
2.配置.zshrc文件,插入一行。
source /usr/local/share/zsh-syntax-highlighting/zsh-syntax-highlighting.zsh
3.输入命令。
source ~/.zshrc
或者:
1、git下载并拷贝到oh-my-zsh的插件 :
git clone https://github.com/zsh-users/zsh-syntax-highlighting.git ~/.oh-my-zsh/custom/plugins/zsh-syntax-highlighting
2.修改配置文件~/.zshrc :
# 注意:zsh-syntax-highlighting 必须放在最后面(官方推荐)
plugins=( [plugins...] zsh-syntax-highlighting)
3.激活配置文件 ~/.zshrc :
source ~/.zshrc
设置自动提示命令
当我们输入命令时,终端会自动提示你接下来可能要输入的命令,这时按 → 便可输出这些命令,非常方便。
设置如下:
1.克隆仓库到本地 ~/.oh-my-zsh/custom/plugins 路径下
git clone git://github.com/zsh-users/zsh-autosuggestions $ZSH_CUSTOM/plugins/zsh-autosuggestions
2.用 vim 打开 .zshrc 文件,找到插件设置命令,默认是 plugins=(git) ,我们把它修改为
plugins=(
git
zsh-autosuggestions
)
3.重新打开终端窗口。
PS:当你重新打开终端的时候可能看不到变化,可能你的字体颜色太淡了,我们把其改亮一些:
移动到 ~/.oh-my-zsh/custom/plugins/zsh-autosuggestions 路径下
cd ~/.oh-my-zsh/custom/plugins/zsh-autosuggestions
用 vim 打开 zsh-autosuggestions.zsh 文件,修改
ZSH_AUTOSUGGEST_HIGHLIGHT_STYLE='fg=10'
安装其他常用的快捷键
Preferences -> Profiles -> Keys -> 添加快捷键(+号)
设置光标前进一个单词的快捷键
继续添加快捷键,设置光标回退一个单词的快捷键
于是,当你需要敲一串很长的命令时,不巧其中某个选项需要修改,在配置完以上快捷键后,你可以键入option + f或option + b完成以单词为单位的移动,这样移动速度会快很多。
选中即复制
iterm2 有 2 种好用的选中即复制模式。
一种是用鼠标,在 iterm2 中,选中某个路径或者某个词汇,那么,iterm2 就自动复制了。
另一种是无鼠标模式,command+f,弹出 iterm2 的查找模式,输入要查找并复制的内容的前几个字母,确认找到的是自己的内容之后,输入 tab,查找窗口将自动变化内容,并将其复制。如果输入的是 shift+tab,则自动将查找内容的左边选中并复制。
自动完成
输入打头几个字母,然后输入 command+; iterm2 将自动列出之前输入过的类似命令。
剪切历史
输入 command+shift+h,iterm2 将自动列出剪切板的历史记录。如果需要将剪切板的历史记录保存到磁盘,在 Preferences > General > Save copy/paste history to disk 中设置。
其他常用的快捷键
iTerm2 快捷键大全
command + t 新建标签
command + w 关闭标签
command + 数字 command + 左右方向键    切换标签
command + enter 切换全屏
command + f 查找
command + d 垂直分屏
command + shift + d 水平分屏
command + option + 方向键 command + [ 或 command + ]    切换屏幕
command + ; 查看历史命令
command + shift + h 查看剪贴板历史
ctrl + u    清除当前行
ctrl + l    清屏
ctrl + a    到行首
ctrl + e    到行尾
ctrl + f/b  前进后退
ctrl + p    上一条命令
ctrl + r    搜索命令历史
可能遇到的坑:
坑1:解决Powerline:"pip install powerline-status"安装失败
坑2:如果遇到Could not create /usr/local/Cellar
sudo chown -R $USER /usr/local
vim 配色
vim 配置指南
主要有两种方式安装colorscheme:
自行下载colorscheme安装,下载的文件扩展名通常为.vim。
通过安装相关vim的插件获取。
自行下载colorscheme安装
以mac为例,在系统自带的vim中有个colors文件夹,里面存放的便是各种colorscheme:
系统主题预览,请参考系统版本Themes
在vim的配置文件.vimrc中配色方案的设置colorscheme foo为:
set t_Co=256 " required
colorscheme desert
不过有时候我们对于自带的配色方案不太满意,那要怎么自己安装一些配色方案呢?主要分三步:
1.在当前用户目录 ~/ 下的 .vim 目录(如果没有,mkdir ~/.vim进行新建该目录)。在 ~/.vim/ 下新建一个叫 colors 的目录,我们下一步下载的配色方案.vim文件便放到该目录下。
2.到一个配色网站上选择一个配色方案下载到 ~/.vim/colors 目录下面。这里推荐一个非常好的网站: A ColorScheme Editor for Vim, 这个网站不仅有很多的配色方案可供选择,还能自行进行编辑(比如变亮或变暗)再下载。比如我们看好了一个叫molokai的配色方案,点击下载按钮后下载 molokai.vim 的文件到 ~/.vim/colors 目录下面
3.修改 .vimrc 配置文件:colorscheme molokai,退出再打开vim就能看到效果了。
注:网站上看到的配色方案效果仅供参考,不一定与实际使用的效果一样。
使用插件安装
vim插件,使用插件管理器进行快速安装,安装完成后直接设置即可。
mkdir ~/.vim

git clone https://github.com/flazz/vim-colorschemes.git ~/.vim
if you use vim + pathogen
git submodule add https://github.com/flazz/vim-colorschemes.git ~/.vim/bundle/colorschemes
if you use vim + vundle
" add to .vimrc
Plugin 'flazz/vim-colorschemes'
:PluginInstall
if you aren't so clever just get all the files in colors/*.vim into ~/.vim/colors
# after downloading; unpacking; cd'ing
cp colors/* ~/.vim/colors
Using
To change the colorscheme of Vim, add to your .vimrc:
colorscheme nameofcolorscheme
For example, to change the color scheme to wombat:
colorscheme wombat
主题不能预览,于是去google搜索了一下排名,我用了Gruvbox
改变大小写敏感
对于目录中经常有大写字母的情况,使用tab变得很麻烦。google之后找到了解决办法,取消大小写敏感。代码如下:
echo "set completion-ignore-case On" >> ~/.inputrc
ls配色
mac 终端 使用 gnu coreutils 工具 ls 颜色显示
配置插件
autojump
是一个命令行工具,它允许你可以直接跳到喜欢的目录
brew install autojump
在 .zshrc 中找到 plugins=,在后面添加
plugins=(git autojump)
然后继续在上述文件中添加
[[ -s $(brew --prefix)/etc/profile.d/autojump.sh ]] && . $(brew --prefix)/etc/profile.d/autojump.sh
生效
source ~/.zshrc
高级配置
如:cpu占用,上传/下载速度,搜索框等,拖拽即可
Go to Preferences > Profiles > Session. Turn on Status bar enabled. Then click Configure Status Bar to begin setting up your status bar configuration.
拖拽自己喜欢的,勾选Auto Rainbow自定变彩色
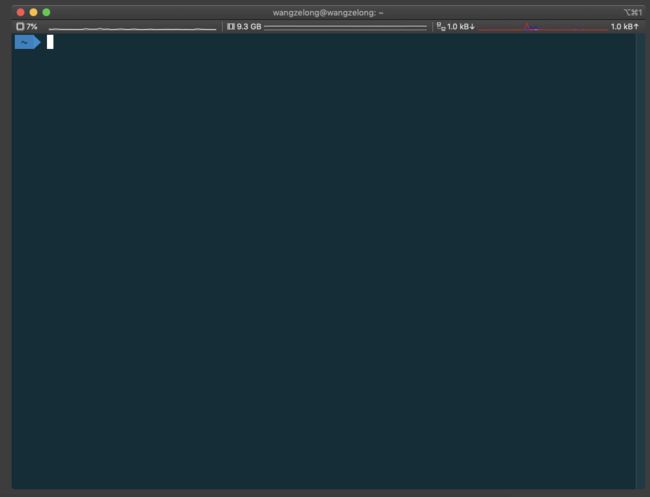
效果图:
参考文章:
Mac下终端配置(item2 + oh-my-zsh + solarized配色方案
Mac上给iTerm2中的vim上点颜色
fonts
oh--my-zsh
brew 安装及卸载
Mac下Ruby版本管理工具RVM的配置和安装
iTerm2 一个好用的功能,显示时间线
设置iterm2相对路径
mac下终端iTerm2配置
autojump的基本用法


