学习的第一步是粗略的看一下MBProgressHUD源码,记录下不懂的知识点和对平常开发有帮助的知识点,学习后,在深入分析源代码.
知识点1 --- #ifndef #define #else #define #endif
MBProgressHUD中示例举例
#ifndef kCFCoreFoundationVersionNumber_iOS_7_0
    #define kCFCoreFoundationVersionNumber_iOS_7_0 847.20
#endif
一般的条件编译语句为
  #ifndef 标识符
    程序段1
    #else
    程序段2
    #endif
作用为如果标识符没有被定义,编译程序段1,否则编译程序段2 。
在MBProgressHUD中这一段表示如果没有定义标识符kCFCoreFoundationVersionNumber_iOS_7_0则编译#define kCFCoreFoundationVersionNumber_iOS_7_0 847.20
知识点2--- static const CGFloat MBDefaultLabelFontSize = 16.f
在书《Effective Objective-C 2.0》中第四条中写到:多用类型常量,少用#define预处理指令。
原因在于
- 预处理指令做字符串的替换,但这样定义出来的常量并不知道类型信息
- 正确的常量定义应使用 static const CGFloat MBDefaultLabelFontSize = 16.f; 或 CGFloat const MBDefaultLabelFontSize = 16.f;定义全局常量
知识点3--- CADisplayLink
特点 : CADisplayLink适合做UI的不停重绘,它是一个能让我们以和屏幕刷新率相同的频率将内容画到屏幕上的定时器。
使用
// 创建方法和NSTimer有点相似( CADisplayLink displayLink...)
self.displayLink = [CADisplayLink displayLinkWithTarget:self selector:@selector(updateTextColor)];

// 和NSTimer一样需要加入runloop
[_displayLink addToRunLoop:[NSRunLoop currentRunLoop] forMode:NSDefaultRunLoopMode];
- 属性
duration : 没帧之间的时间
frameInterval : 多少帧调用一次方法,默认为1 ,iOS设备屏幕的刷新帧率每秒60次,表示每秒调用60次方法,如果设置为3 ,表示每秒调用20次方法。
pause : 控制CADisplayLink的运行。
- 移除
[self.displayLink invalidate];
self.displayLink = nil;
知识点4---reverseObjectEnumerator
reverseObjectEnumerator 为数组的倒序
在这里复习下数组遍历的几个方法。
- for循环 for (int i = 0; i < keysArray.count; i++) 这个没什么好记得
- for in 快速遍历
for (NSString *key in dataDic ) {
NSString *value = dataDic[key];
NSLog(@"%@", value);
}
使用中要注意的是,在循环中如果对原数组作删除操作,会导致crash。第二就是forin的下标是要自己获取的。
- 基于块的遍历方式
[Array enumerateObjectsUsingBlock:^(id  _Nonnull obj, NSUInteger idx, BOOL * _Nonnull stop) {
      //obj是数组内的内容
      if ([obj isEqualToString:@"test"]) {
      //退出循环
      *stop = YES;
      }
}];

array enumerateObjectsWithOptions:(NSEnumerationOptions) usingBlock:<#^(id  _Nonnull obj, NSUInteger idx, BOOL * _Nonnull stop)block#>
NSEnumerationOptions有两个枚举值
NSEnumerationConcurrent = (1UL << 0), //并发遍历
NSEnumerationReverse = (1UL << 1), //反向遍历
经常使用的一般是2>3>1
- NSEnumerator
打开NSEnumerator.h文件发现使用的方法和属性。
- (nullable ObjectType)nextObject;  //迭代器的下个元素
@property (readonly, copy) NSArray*allObjects; //所有元素

//MBProgressHUD中的使用 (获取最上层hud)
+ (MBProgressHUD *)HUDForView:(UIView *)view {
    NSEnumerator *subviewsEnum = [view.subviews reverseObjectEnumerator];
    for (UIView *subview in subviewsEnum) {
        if ([subview isKindOfClass:self]) {
            MBProgressHUD *hud = (MBProgressHUD *)subview;
            if (hud.hasFinished == NO) {
                return hud;
            }
        }
    }
    return nil;
}
知识点5--- Autoresizing
对于Autoresizing我个人理解是用系统的方法帮你做自动布局处理。个人项目纯代码布局用的都是Masonry框架自动布局,所以可以说完全没用过这个属性。当然,这个属性当然有用,只是我应该用不到,作为了解一下。另外,现在的Storyboard&Xib默认是自动布局,不是使用Autoresizing。
- 了解一下属性
typedef NS_OPTIONS(NSUInteger, UIViewAutoresizing) {
    UIViewAutoresizingNone                 = 0,  //不会随父视图的改变而改变
    UIViewAutoresizingFlexibleLeftMargin   = 1 << 0, //自动调整view与父视图左边距,以保证右边距不变
    UIViewAutoresizingFlexibleWidth        = 1 << 1, //自动调整view的宽度,保证左边距和右边距不变
    UIViewAutoresizingFlexibleRightMargin  = 1 << 2, // 自动调整view与父视图右边距,以保证左边距不变
    UIViewAutoresizingFlexibleTopMargin    = 1 << 3, //自动调整view与父视图上边距,以保证下边距不变
    UIViewAutoresizingFlexibleHeight       = 1 << 4, //自动调整view的高度,以保证上边距和下边距不变
    UIViewAutoresizingFlexibleBottomMargin = 1 << 5 //自动调整view与父视图的下边距,以保证上边距不变
};
总结的来说,Autoresizing的设置都是参照父视图来做自动布局,不能参照同级的控件来设置Autoresizing,局限性较大,当也有使用场景。
知识点6--- allowsGroupOpacity(组不透明)
iOS7后默认开启这个属性 : 子视图的透明度上限为父视图的透明度,layer 的 opacity或者UIView的 alpha 。如果想根据自己的需求来写alpha,可以设置为No。或者使用
[[UIColor blackColor]colorWithAlphaComponent:0.7]
知识点7--- NSTimer(定时器)
- 使用
// 创建
 NSTimer *timer = [NSTimer scheduledTimerWithTimeInterval:1.0 target:self selector:@selector(action:) userInfo:nil repeats:NO];

TimerInterval : 每次执行的时间间隔
target : 执行定时方法的对象。
selector : 方法
repeats : 是否循环

// 移除
[timer invalidate];
timer = nil;
使用简单,但需要注意NSTimer的使用必须和RunLoop一起。
[[NSRunLoop mainRunLoop] addTimer:timer forMode:NSDefaultRunLoopMode];
知识点8 ---NSRunLoop
- 了解的runloop特性
runloop想要开始运作,mode必须要有一个item(source,observer或者timer),主线程之所以能够一直存在,并且随时准备被唤醒就是应为系统为其添加了很多Item
主线程的runloop是一直存在的,后台线程刚创建时并没有 RunLoop,如果你不主动获取,那它一直都不会有。
为保证资源的有效利用,后台线程执行完任务就处于死亡状态。 如果要让线程持续运转,就需要加入runloop。
线程的创建主线程消耗的内存为1M,开启一个后台线程需要消耗512KB内存,如果存在runloop会让线程一直存在,所以runloop会在任务结束后让线程进入休眠,释放线程所占用的内存,在有任务的时候再被唤醒。
- 对于RunLoop文章的阅读
1 关于RunLoop中mode是什么?
2 RunLoop 的内部逻辑?
3 AutoreleasePool中RunLoop的使用
4 事件响应,手势识别,界面更新中怎么使用RunLoop
5 定时器,PerformSelecter,GCD 中RunLoop使用。
6 第三方AFNetworking,AsyncDisplayKit中的RunLoop。
cocoa上的这篇我感觉就很好
还可以看看孙源大神的视频
知识点9 --- dispatch_block_t
dispatch_block_t的声明如下,没有参数和返回值。
typedef void (^dispatch_block_t)(void);
我们一般写一个不带参数的block,一般不知道这个函数,我们会
定义 一个空返回值的block
typedef void (^myBlock)();
//声明
-(void)leftButtonAction:(leftBlockAction)leftBlock;
现在我们可以用dispatch_block_t来快速的声明一个block
@property (nonatomic,copy) dispatch_block_t myBlock;
只是代码少了点,其实功能是一样,会上面那种也能开发。
知识点10---CGAffineTransform
- 我们经常用这个属性做transform的二维变换,具体经常使用的函数有
// 添加缩放变换
CGAffineTransformMakeScale(<#CGFloat sx#>, <#CGFloat sy#>)
// 添加旋转变换
CGAffineTransformMakeRotation(<#CGFloat angle#>)
// 添加平移变换
CGAffineTransformMakeTranslation(<#CGFloat tx#>, <#CGFloat ty#>)

// 在一个变换上 再添加缩放变换
CGAffineTransformScale(<#CGAffineTransform t#>, <#CGFloat sx#>, <#CGFloat sy#>)
// 在一个变换上 再添加旋转变换
CGAffineTransformRotate(<#CGAffineTransform t#>, <#CGFloat angle#>)
// 在一个变换上 再添加平移变换
CGAffineTransformTranslate(<#CGAffineTransform t#>, <#CGFloat tx#>, <#CGFloat ty#>)

// 变换还原
CGAffineTransformIdentity
// 两种变换合并
CGAffineTransformConcat(<#CGAffineTransform t1#>, <#CGAffineTransform t2#>)
知识点11 ---#pragma clang diagnostic
使用规范
#pragma clang diagnostic push
#pragma clang diagnostic ignored "-相关命令"
    //需要操作的代码
#pragma clang diagnostic pop
我们可以用这个来忽略编译器中的警告
如 ,消除UIAlertView在iOS9以上的警告。
#pragma clang diagnostic push
#pragma clang diagnostic ignored "-Wdeprecated-declarations"
   UIAlertView *alertViewTmp = [[UIAlertView alloc]initWithTitle:@"" message:@"" delegate:nil cancelButtonTitle:@"" otherButtonTitles:@"", nil];
   [alertViewTmp show];
#pragma clang diagnostic pop
知识点12--- removeFromSuperViewOnHide
设置视图隐藏的时候是否从父视图中移除,默认是NO
知识点13---setContentCompressionResistancePriority: forAxis:
在弄懂这个知识点之前,要先了解几个名词 。
- intrinsic size (固有尺寸)
- Content Compression Resistance Priority 内容压缩阻力优先级,该优先级越高,越不容易被压缩。
3 “Content Hugging Priority” ,内容紧靠优先级,优先级越高,越不容易被拉伸。
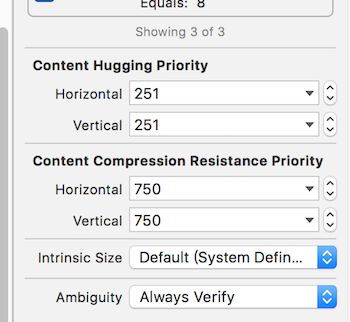
我在storyboard上举个例子,代码类似。开发应该会看到在属性栏有这些设置
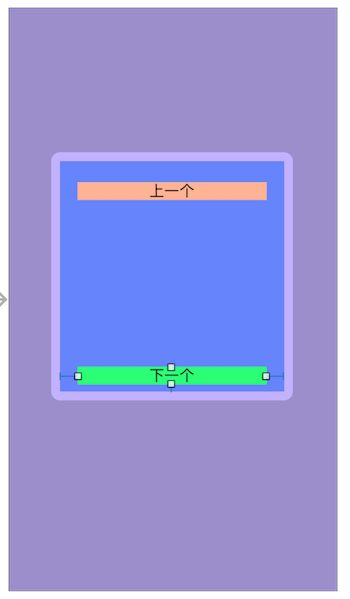
默认拉伸的优先级为250,压缩的优先级为750. 我新建一个view为写死的view。再添加两个label 距两边分别为20,如图。
现在我设置两个label距离为0,再设置上一个label的vertical的拉伸优先级为100,说明上一个label的优先级低于下一个label,上一个label更应该被拉伸,如图
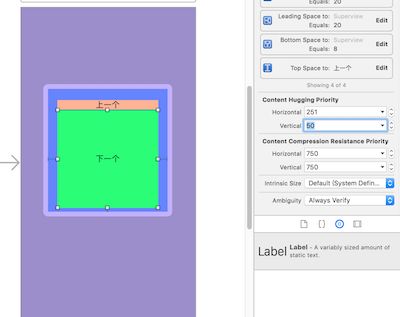
我设置下一个label的优先级为50,变成如图
压缩优先级也相同道理。
代码写优先级
[view setContentCompressionResistancePriority:998.f forAxis:UILayoutConstraintAxisHorizontal];
[view setContentCompressionResistancePriority:998.f forAxis:UILayoutConstraintAxisVertical];
或Masonry
[_nameLabel mas_makeConstraints:^(MASConstraintMaker *make) {
    make.right.equalTo(_sexImageView.mas_left).offset(-5).priority(999);
}];
知识点14 --- UIAppearance的使用
先看看在系统中默认有哪些方法。发现只有下面6个
+ (instancetype)appearance;
+ (instancetype)appearanceWhenContainedIn:(nullable Class )ContainerClass, ... NS_REQUIRES_NIL_TERMINATION NS_DEPRECATED_IOS(5_0, 9_0, "Use +appearanceWhenContainedInInstancesOfClasses: instead") __TVOS_PROHIBITED;
+ (instancetype)appearanceWhenContainedInInstancesOfClasses:(NSArray> *)containerTypes NS_AVAILABLE_IOS(9_0);
+ (instancetype)appearanceForTraitCollection:(UITraitCollection *)trait NS_AVAILABLE_IOS(8_0);
+ (instancetype)appearanceForTraitCollection:(UITraitCollection *)trait whenContainedIn:(nullable Class )ContainerClass, ... NS_REQUIRES_NIL_TERMINATION NS_DEPRECATED_IOS(8_0, 9_0, "Use +appearanceForTraitCollection:whenContainedInInstancesOfClasses: instead") __TVOS_PROHIBITED;
+ (instancetype)appearanceForTraitCollection:(UITraitCollection *)trait whenContainedInInstancesOfClasses:(NSArray> *)containerTypes  NS_AVAILABLE_IOS(9_0);
http://www.cocoachina.com/industry/20140729/9269.html
注意事项 :
UIAppearance本身是一个协议,别被前面带UI两个字给误导了,只有遵循UIAppearance协议的类才可以使用UIAppearance,开发中常用的控件只要是uiview的子类都遵循UIAppearance的协议,例如UIbutton ,UIlabel。使用
 [[UIButton appearance] setBackgroundColor:[UIColor whiteColor]];
    [[UIButton appearance] setTitle:@"123" forState:UIControlStateNormal];
    [[UIButton appearance] setTitleColor:[UIColor redColor] forState:UIControlStateNormal];
//appearance 是给控件所在的所有界面都设置一个统一的属性

if (@available(iOS 9, *)) {
        [UILabel appearanceWhenContainedInInstancesOfClasses:@[[UIView class],[UITableView class]]];
    }  else {
        [UILabel appearanceWhenContainedIn:[UIView class],[UITableView class] nil];
    }
//appearanceWhenContainedInInstancesOfClasses  是iOS9以下使用的 ,是在数组里包含的控件中使用。
知识点15 --- UIInterpolatingMotionEffect和UIMotionEffectGroup
UIInterpolatingMotionEffect可以根据手机的倾斜情况,来做视图的运动。
minimumRelativeValue 和 maximumRelativeValue这两个参数来控制移动的范围。
MBProgressHUD中源码。
 CGFloat effectOffset = 10.f;
//设置x轴方向的移动量
        UIInterpolatingMotionEffect *effectX = [[UIInterpolatingMotionEffect alloc] initWithKeyPath:@"center.x" type:UIInterpolatingMotionEffectTypeTiltAlongHorizontalAxis];
        effectX.maximumRelativeValue = @(effectOffset);
        effectX.minimumRelativeValue = @(-effectOffset);
// 设置y方向上的移动量
        UIInterpolatingMotionEffect *effectY = [[UIInterpolatingMotionEffect alloc] initWithKeyPath:@"center.y" type:UIInterpolatingMotionEffectTypeTiltAlongVerticalAxis];
        effectY.maximumRelativeValue = @(effectOffset);
        effectY.minimumRelativeValue = @(-effectOffset);
// 将移动量添加到数组中
        UIMotionEffectGroup *group = [[UIMotionEffectGroup alloc] init];
        group.motionEffects = @[effectX, effectY];
 //设置
        [bezelView addMotionEffect:group];
知识点16 --- NSLayoutConstraint自动布局几个函数
尽管现在的自动布局框架类似Masonry的很多,但是在一些开源项目中的自动布局很多就是使用系统原生的NSLayoutConstraint来实现,为了读懂这些代码,还是要稍微学习一些原生的NSLayoutConstraint使用的各个参数的含义。
 NSLayoutConstraint constraintWithItem:<#(nonnull id)#>
        attribute:<#(NSLayoutAttribute)#>
        relatedBy:<#(NSLayoutRelation)#>
           toItem:<#(nullable id)#>
        attribute:<#(NSLayoutAttribute)#>
       multiplier:<#(CGFloat)#>
         constant:<#(CGFloat)#>
从上到下参数的含义
item : 第一个视图
attribute : 什么属性(上下左右xy之类的)
relatedBy: 关系 (这里一般为相等 NSLayoutRelationEqual)
toItem : 第二个视图
attribute :什么属性
multiplier : 倍数
constant :相差多少位置
懂这些一般看代码就没什么问题了。
知识点17 --- |= 位操作运算符
MBProgressHUD中使用
hasVisibleAncestors |= secondVisible
|=是位操作运算符的一种,其形式为: a|=b,代表的含义为a=a|b。 wow。 不知道这个位运算符,原来可以这么装b。
知识点18 --- UIApplicationDidChangeStatusBarOrientationNotification
屏幕方向改变的通知,用来适配横竖屏的HUD。我没有适配过估计以后也不会,就不管了。。。
其他的通知有
UIApplicationBackgroundRefreshStatusDidChangeNotification
 // 在后台下载内容的应用程序的状态变化时候通知

 UIApplicationDidBecomeActiveNotification
 // 当程序变的活跃之后

 UIApplicationDidChangeStatusBarFrameNotification
 // 当状态栏frame 改变时候

 UIApplicationDidChangeStatusBarOrientationNotification
 // 当用户方向改变时候

 UIApplicationDidEnterBackgroundNotification
 // 当app已经进入后台之后

 UIApplicationDidFinishLaunchingNotification
 // 当app完全推出之后

 UIApplicationDidReceiveMemoryWarningNotification
 // 当应用内存紧张之后

UIApplicationProtectedDataDidBecomeAvailable
 // 但受保护的文件进入活跃状态

 UIApplicationProtectedDataWillBecomeUnavailable
 // 当被保护的文件进入不活跃状态

 UIApplicationUserDidTakeScreenshotNotification
 // 当截屏的时候

 UIApplicationWillChangeStatusBarOrientationNotification
 // 当应用程序将要改变其接口方向

 UIApplicationWillChangeStatusBarFrameNotification
 // 当应用将要改变状态来frame

 UIApplicationWillEnterForegroundNotification
 // 当应用程序从后台将要进入前台

 UIApplicationWillResignActiveNotification
 // 应用程序不再主动和失去焦点。

 UIApplicationWillTerminateNotification
 // 当应用程序将要终止。

 UIContentSizeCategoryDidChangeNotification
 // 当用户更改内容大小的偏好设置
知识点19 ---drawRect
注意事项:
1. drawRect 是在 控制器的viewDidLoad方法调用之后调用的。
2. 一般自定义控件在初始化设置frame后,addSubview后将自动调用。
3. 调用sizeToFit方法将自动调用。
4. 调用setNeedsDisplay,或者setNeedsDisplayInRect方法触发。
5. 改变frame时候触发。
MBProgressHUD在项目中是使用drawRect用画布去画图。具体画图有哪些方法可以参考这篇文章 。
还可以使用CAShapeLayer+ UIBezierPath 来画图形,这里也推荐一篇文章
知识点20--- UIBlurEffect模糊
我们可以使用系统的UIVisualEffectView来实现模糊。
代码:
 UIImageView *imageView = [[UIImageView alloc]initWithFrame:self.view.frame];
    imageView.image = [UIImage imageNamed:@"timg.jpeg"];
    [self.view addSubview:imageView];

    UIVisualEffectView *visualEffectView = [[UIVisualEffectView alloc] initWithEffect:[UIBlurEffect effectWithStyle:UIBlurEffectStyleLight]];  //Blur 模糊形状,使模糊  Effect结果,效果

    visualEffectView.frame = self.view.bounds;

    [self.view addSubview:visualEffectView];
XIB
总结 : MBProgressHUD的知识点很多,还是要慢慢读。


