最近在研究三维可视化
发现了一堆奇怪的问题
我好菜啊我怎么这么菜
记录一下过程和一些坑
Three.js官网:https://threejs.org/
学犀牛中文论坛:http://www.xuexiniu.com/
最近在研究三维可视化,发现是个水很深的领域。Three.js是一个基于WebGL的三维可视化库,功能很强大,官网上有很多炫酷的例子。Rhino是一个类似3Dmax的建模软件,为什么不用3Dmax……是因为Mac电脑装不了3Dmax ╮(╯_╰)╭
官网的Documentation中对Three.js的基础用法介绍的很详细,这里就不般教程了,只是稍微记录下这两天学习(爬坑)的过程。
警告⚠️:本篇不是个详细的Three.js教程,事实上,Vue,Three.js,Rhino单拎出来都不是很困难,遇到的大部分问题都是因为作者心血来潮要同时用这仨。
一. 环境搭建
Three.js的官网教程是基于html+js的,集成到Vue里直接npm或者yarn装就行了。
npm install three
Vue是我们的老朋友了这里就不讲相关知识啦,在我们的Vue工程里,引入Three,并创建一个简单的场景。
Three.js三要素场景Scene、相机Camera、渲染器Renderer,场景Scene定义了整体空间,用于保存、追踪所渲染物体;相机Camera定义了观察场景的角度;渲染器Renderer最终在浏览器中渲染出画面。所以我们在Vue的data里,先定义好camera, scene, renderer,初值给null即可。
接下来在method里面创建场景,基本是跟在html里写没什么差别。关于相机,渲染器的基本参数请参照官网api。
methods: {
    init() {
        let container = document.getElementById('container');

        this.scene = new THREE.Scene();

        this.camera = new THREE.PerspectiveCamera(45, container.clientWidth/container.clientHeight, 0.1, 1000);
        this.camera.position.x = 40;
        this.camera.position.y = 40;
        this.camera.position.z = 40;
        this.camera.lookAt(this.scene.position);

        this.renderer = new THREE.WebGLRenderer();
        this.renderer.setClearColor(0xEEEEEE); //背景色
        this.renderer.setSize(container.clientWidth, container.clientHeight); //场景大小
        this.renderer.shadowMap.enabled = true; //启用阴影

        console.log(scene);
        console.log(camera);
        console.log(renderer);

        container.appendChild(this.renderer.domElement);
        this.renderer.render(this.scene, this.camera);
    }
  },
  mounted() {
      this.init();
  }
添加完毕后,虽然屏幕上一片灰啥都没有,但我们可以在控制台输出场景、相机、渲染器参数查看。自此,证明我们已经在Vue里成功创建了一个three.js的三维场景。
如果控制台遇到问题
"ReferenceError: THREE is not defined"
请确定导入的时候是不是写对了
import * as THREE from 'three'
二. Three.js基础元素
Step1: 坐标系建立
为了便于查看,先在场景中建立一个直角坐标系,包括坐标轴和平面。
        //添加坐标轴
        let axes = new THREE.AxesHelper(20);
        this.scene.add(axes);

        //平面
        let planeGeometry = new THREE.PlaneGeometry(60,20)
        let planeMaterial = new THREE.MeshLambertMaterial({color: 0xcccccc});
        let plane = new THREE.Mesh(planeGeometry, planeMaterial);
        plane.receiveShadow = true;
        plane.rotation.x = -0.5* Math.PI;
        this.scene.add(plane);
为了渲染,还需要加个光源,不然所有元素都会是一片黑色。
        let spotLight = new THREE.SpotLight(0xffffff);
        spotLight.position.set(40, 80, -20);
        spotLight.castShadow = true;
        this.scene.add(spotLight);
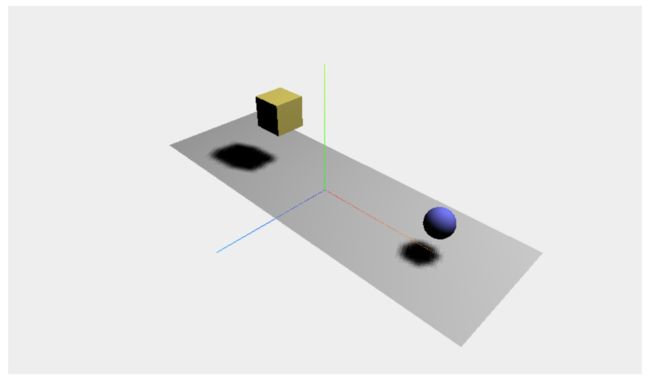
在Three.js的坐标系里,红色是x轴,绿色是y轴,蓝色是z轴。注意这时候根据我们的设定,相机位置在(40,40,40),所以看到的是如下效果。可以适当调整相机位置感受一下坐标变换。
Step2: 添加几何体
下面给这个场景加两个几何体。加一个球和一个方块。
首先在data里加上cube和sphere用来存储球和方块。
data() {
    return {
      ……
      sphere:null,
      cube:null,
    }
  }
然后init方法里定义一下位置
        //方体
        let cubeGeometry = new THREE.BoxGeometry(5, 5, 5);
        let cubeMaterial = new THREE.MeshLambertMaterial({color: 0xffee6b});
        this.cube = new THREE.Mesh(cubeGeometry, cubeMaterial);
        this.cube.castShadow = true;
        this.cube.position.x = -10;
        this.cube.position.y = 10;
        this.scene.add(this.cube);

        //球体
        let sphereGeometry = new THREE.SphereGeometry(2, 20, 20);
        let sphereMaterial = new THREE.MeshLambertMaterial({color: 0x7777ff});
        this.sphere = new THREE.Mesh(sphereGeometry, sphereMaterial);
        this.sphere.castShadow = true;
        this.sphere.position.x = 20;
        this.sphere.position.y = 5;
        this.sphere.position.z = 0;
        this.scene.add(this.sphere);
立体几何学的好,坐标设置无烦恼。
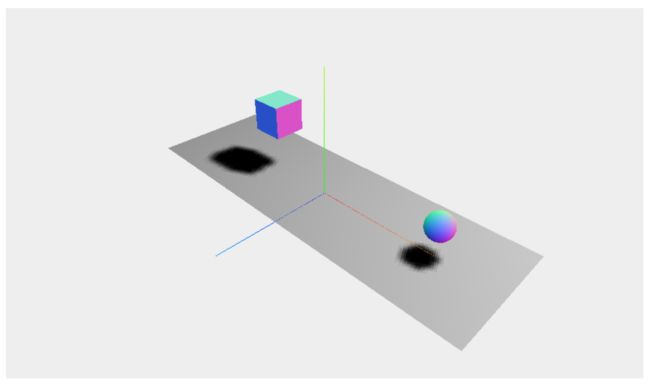
MeshLambertMaterial是Three.js中一种不太亮的纯色材质,Three.js中的材质还有很多,可以去官网文档的Materials那栏多尝试几个。
推荐试一下MeshNormalMaterial,效果非常炫酷。
Step3: 添加动画
现在我们想让这两个元素动一动,所以新建一个animate方法。(记得先在data里定义好step,用来作为球移动的变量。)
    animate() {
        requestAnimationFrame(this.animate);
        //旋转方体
        this.cube.rotation.x += 0.02;
        this.cube.rotation.y += 0.02;

        //弹跳球
        this.step += 0.03;
        this.sphere.position.x = 10 + ( 10 * (Math.cos(this.step)));
        this.sphere.position.y = 2 + ( 10 * Math.abs(Math.sin(this.step)));

        this.renderer.render(this.scene, this.camera);
    }
并且在mounted里把animate加上。
  mounted() {
      this.init();
      this.animate();
  }
为了光效更好一些我们可以在init中刚刚定义光源的地方加个环境光源。
        let ambiColor = "#523318";
        let ambientLight = new THREE.AmbientLight(ambiColor);
        this.scene.add(ambientLight);
这样元素就动起来了,不会上传动图请假装下面是个动图。
Step4: 添加纹理贴图
现在方块和球的颜色都是我们自己定的rgb颜色,但是三维模型一般都是需要贴图的,(我在给外部Obj贴图的时候遇到了个很大的坑!这个第四部分再述。)Three.js中,提供TextureLoader可以直接加载外部纹理图片。
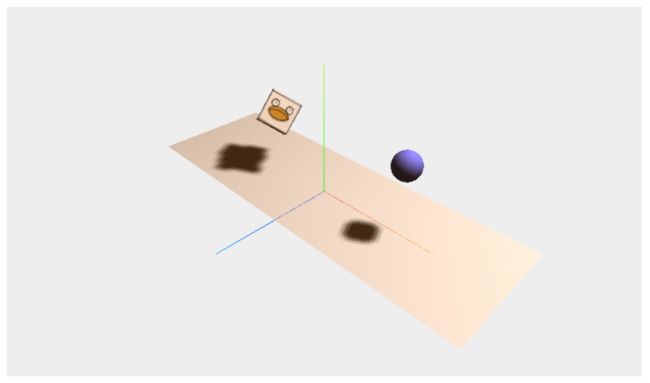
比如我们有一张伊丽莎白痴呆图。在Vue中,需要把它放在public静态资源文件夹下。(Vue3.0之前的工程应该是static文件夹。)这里静态资源不建议跟代码放在同一目录,因为Vue工程会自动变动目录地址,可能会匹配不到。
之后,用TextureLoader加载图片。注意引用静态资源直接加个/就行。
        //加载纹理
        new THREE.TextureLoader().load('/Elizabeth.jpg', texture => {
            this.cube.material = new THREE.MeshLambertMaterial({map: texture});
        });
这时,场景中的方块就贴上了图。
三. 添加Control组件
Three.js里一般用gui.dat作为辅助的控制组件,Vue添加gui.dat基本上没遇到什么坑。Html里怎么写的,除了把控制变量都放Data里定义,其他写法照搬过来就行。
npm install dat.gui
import dat from 'dat.gui'
之后使用方式基本跟在html中一样了,这里就不逐行介绍了。比如希望控制立方体旋转速度和小球弹跳速度,Data里先定义好两个速度变量。
  data() {
    return {
      ……
      step:0,
      controls: {
        rotationSpeed: 0.02,
        bouncingSpeed: 0.03
      }
    }
  },
method里增加方法初始化gui,并在init中调用一下。
    initgui() {
        const gui = new dat.GUI(); // gui监测器
        gui.add(this.controls, 'rotationSpeed', 0, 0.2);
        gui.add(this.controls, 'bouncingSpeed', 0, 0.2);
        this.init();
    },
之后改一下animate,将动画绑定到controls中。
        let { controls } = this
        requestAnimationFrame(this.animate);
        //旋转方体
        this.cube.rotation.x += controls.rotationSpeed;
        this.cube.rotation.y += controls.rotationSpeed;

        //弹跳球
        this.step += controls.bouncingSpeed;
        this.sphere.position.x = 10 + ( 10 * (Math.cos(this.step)));
        this.sphere.position.y = 2 + ( 10 * Math.abs(Math.sin(this.step)));

        this.renderer.render(this.scene, this.camera);
这样,就能通过控制组件改变动画速度。
四. 引入外部三维模型
现在,终于要轮到我们Rhino出场了ヾ(≧▽≦*)o。这一步非常不顺利会有很多坑,我用加粗注明了。
我们首先在Rhino中建个模型。怎么建模的就不讲了,总之我们有了一条草鱼(草纹理的鱼,简称草鱼)。
然后,把这个模型导出成obj文件。会看到包括一个obj,一个mtl和一个png文件。obj是模型的基本轮廓,没有颜色。mtl是相关联的色彩配置文件。png就是mtl里用到的纹理图片。把这三个文件都放到public文件夹下。
这里的第一个坑,是如果不放到public里面,可能会报以下错误,因为vue会编译时会更改资源路径。
Uncaught Error: THREE.OBJLoader: Unexpected line: “”
Three.js可以加载多种3D模型,需要单独引入js文件。但放到Vue里,毕竟不是引个js就能搞定的事,首先要保证npm上有这些加载模型的工具包。好在常见的Obj,Stl加载工具都是有的。
npm install three-obj-mtl-loader
装完后引入。
import { MTLLoader, OBJLoader } from 'three-obj-mtl-loader'
我们去掉刚刚的屏幕,立方体和弹球,或者新建另一个组件,加载这条鱼。
首先data里定义一个数据存放鱼。
data() {
    return {
      camera: null,
      scene: null,
      renderer: null,
      fish: null,
    }
  }
然后method里用MTLLoader和OBJLoader加载鱼。
init() {
        ……
        //加载模型
        let mtlLoader = new MTLLoader();
        let objLoader = new OBJLoader();
        mtlLoader.load('/fish.mtl', (materials) => {
          materials.preload();
          objLoader.setMaterials(materials);
          objLoader.load('/fish.obj', (object) => {
            object.scale.set(1, 1, 1);
            this.fish = object;
            this.scene.add(object);
          })
        })
        ……
    },
    animate() {
      requestAnimationFrame(this.animate);
      if(this.fish){
        this.fish.rotation.y += 0.006;
      }
      this.renderer.render(this.scene, this.camera);
    }
这里的第二个坑是如果模型没有显示,并且控制台也不报错,请先在控制台输出scene,确认模型是不是被加载上了。一般来讲都是因为相机视角不对,把相机位置和模型的缩放比例调一调,理论上就可以看到。
object.scale.set(1, 1, 1); 对于有些模型,可能要放大到100倍才能看到,也有些模型可能要缩小到0.1.
调整完毕后,OK,有一条鱼在动了!
但是为什么是条黑鱼不是草鱼(⊙ˍ⊙)?纹理没有加载上,整个模型呈黑色。
这是第三个坑,经测试,如果用的是html+js,其实是没有任何问题的可以看到草鱼,但是在Vue里,大概又是路径的配置问题,其实mtl并没有获取到对应的png。需要我们打开mtl文件做一些更改。
可以看到最后一行,是匹配到Grass.png中的,我们将它改成
map_Kd /Grass.png
对,就加上一个/路径(°ー°〃)。再回到浏览器里,发现纹理已经加上了。
当然,很多情况下,加载模型的时候会出现各种纹理加载不上的状况,所以这里介绍另一种曲线救国的万能解决方法。
就是只加载obj,然后手动用前文所说的TextureLoader自己加载纹理。
        //曲线救国加载纹理
        new OBJLoader().load('/fish.obj' , obj => {
          let texture = new THREE.TextureLoader().load('/Grass.png');
          let material = new THREE.MeshLambertMaterial( { map: texture } );
          obj.children.forEach(child => {
              child.material = material;
          });
          this.fish = obj;
          this.scene.add(obj);
        })
效果也是一样的!改个背景色,于是:
五. 总结
Three.js很强大,三维可视化还有很大的发展空间,篇幅所限,以后再对材质,纹理,动画做更深入研究。本文中记录的坑希望大家不要遇到。尤其是mtl找不到png这个坑 →_→
就到这里吧,差不多是只咸鱼了<。)#)))≦


