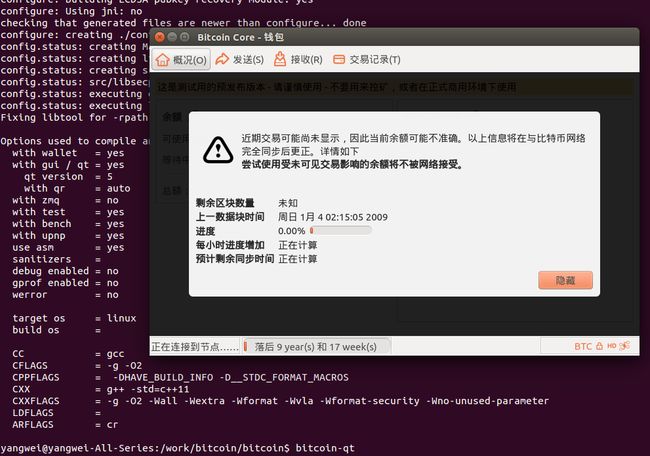
导语:上文我谈了一下对比特币价值几千亿美金的看法,相信读者对价值的理解更加深入了,接下来将真正进入技术系列文章的写作,本文我将介绍如何获取比特币系统的源码,并手把手教读者编译源码并运行。
一、系统环境准备
1. 系统要求
本文讲解的是在Unbutu 14.4 LTS系统上编译系统,所以读者得安装unbutu系统,考虑到读者可能根本没有听说过这个系统,所以读者可以参考在 Windows 中制作 Ubuntu 系统的USB启动盘并安装教程制作系统盘并安装Unbubu系统。
2. 获取比特币源码
读者安装完Unbutu系统后,快捷键Ctrl+Alt+T打开终端,输入如下命令
 cd   //进入主目录
 sudo  apt-get install git //安装git 版本控制工具
 git clone https://github.com/bitcoin/bitcoin.git  //下载比特币源码
二、编译过程
1. 编译环境安装
读者准备好了系统与比特币源码以后就可以正式编译了,先安装编译环境的必要开发包,在终端输入以下命令:
 sudo apt-get install make //安装make
 sudo apt-get install gcc //gcc编译器
 sudo apt-get install libdb-dev
 sudo apt-get install libdb++-dev
 sudo apt-get install libboost-all-dev
 sudo apt-get install zlib1g-dev
 sudo apt-get install libssl-dev
 sudo apt-get install build-essential
 sudo apt-get install libminiupnpc-dev
 sudo apt-get install autoconf
2. 编译配置
读者执行完上述命令后可能有一些因为安装源的问题没有安装成功,但是我们先不管,输入一下命令配置后,缺少补啥。
 cd bitcoin  //进入bitcion目录
./autogen.sh 执行脚步
./configure  //配置
如果你遇到这样的提示:configure: error: Found Berkeley DB other than 4.8, required for portable wallets 那就可以执行如下命令安装DB4.8++-dev:
 sudo apt-get install software-properties-common
 sudo add-apt-repository ppa:bitcoin/bitcoin
 sudo apt-get update
 sudo apt-get install libdb4.8-dev libdb4.8++-dev
如果你遇到提示"error: libevent not found"
sudo apt-get install libevent-dev 安装该库
如果你遇到提示“configure:error:openssl not found”
sudo apt-get install libsll-dev
如果你执行./configure 还是类似这样的错误就是对应的包没有安装,直接百度该包在unbutu上如何安装,然后对应安装就没问题了。
执行如果没有错误的话会如下所示
Options used to compile and link:
  with wallet   = yes
  with gui / qt = no  //图形化qt
  with qr     = auto
  with zmq      = no
  with test     = yes
  with bench    = yes
  with upnp     = yes
  use asm       = yes
  sanitizers    =
  debug enabled = no
  gprof enabled = no
  werror        = no

  target os     = linux
  build os      =

  CC            = gcc
  CFLAGS        = -g -O2
  CPPFLAGS      =  -DHAVE_BUILD_INFO -D__STDC_FORMAT_MACROS
  CXX           = g++ -std=c++11
  CXXFLAGS      = -g -O2 -Wall -Wextra -Wformat -Wvla -Wformat-security -Wno-unused-parameter
  LDFLAGS       =
  ARFLAGS       = cr
你还没有安装比特币的图形化前端qt( with gui / qt = no)执行如下命令安装qt
sudo apt-get install libqt4-core libqt4-gui libqt4-dev
再此执行./configure后with gui / qt = yes说明安装成功了,然后就可以真正编译了,执行如下命令
make 编译
坐等十分钟就编译完了,然后执行如下命令安装
sudo make install 安装
安装完后执行如下命令就能打开比特币钱包前端
bitcoin-qt 运行比特币前端
bitcoind  -server –printtoconcole 运行服务端
3. 安装源问题解决
在此过程中很多读者可能遇到开发包无法安装的问题,这个问题其实是安装源的问题导致,所以建议读者之间修改安装源后再执行上述步骤,办法如下
sudo cp /etc/apt/source.list /etc/apt/source.list.bak       # 将原有的源文件复制保存
sudo gedit /etc/apt/source.list
将以下内容拷贝进入后保存
deb http://mirrors.163.com/ubuntu/ trusty-security main restricted universe multiverse

deb http://mirrors.163.com/ubuntu/ trusty-updates main restricted universe multiverse

deb http://mirrors.163.com/ubuntu/ trusty-proposed main restricted universe multiverse

deb http://mirrors.163.com/ubuntu/ trusty-backports main restricted universe multiverse

deb-src http://mirrors.163.com/ubuntu/ trusty main restricted universe multiverse

deb-src http://mirrors.163.com/ubuntu/ trusty-security main restricted universe multiverse

deb-src http://mirrors.163.com/ubuntu/ trusty-updates main restricted universe multiverse

deb-src http://mirrors.163.com/ubuntu/ trusty-proposed main restricted universe multiverse

deb-src http://mirrors.163.com/ubuntu/ trusty-backports main restricted universe multiverse

deb http://mirrors.aliyun.com/ubuntu/ trusty main restricted universe multiverse

deb http://mirrors.aliyun.com/ubuntu/ trusty-security main restricted universe multiverse

deb http://mirrors.aliyun.com/ubuntu/ trusty-updates main restricted universe multiverse

deb http://mirrors.aliyun.com/ubuntu/ trusty-proposed main restricted universe multiverse

deb http://mirrors.aliyun.com/ubuntu/ trusty-backports main restricted universe multiverse

deb-src http://mirrors.aliyun.com/ubuntu/ trusty main restricted universe multiverse

deb-src http://mirrors.aliyun.com/ubuntu/ trusty-security main restricted universe multiverse

deb-src http://mirrors.aliyun.com/ubuntu/ trusty-updates main restricted universe multiverse

deb-src http://mirrors.aliyun.com/ubuntu/ trusty-proposed main restricted universe multiverse

deb-src http://mirrors.aliyun.com/ubuntu/ trusty-backports main restricted universe multiverse

最后执行
sudo apt-get update 更新源就可以了
读者在编译过程中遇到的什么问题都可以联系我,我很乐意为大家解答,最后读者也可以参考官方指南编译比特币源码
三、后文引入
通过本文就算读者是技术小白,只要愿意花一点时间也是编译成功的,迈出这关键的一步后就是研究整个系统的源码了,欢迎读者跟着我一起打开区块链技术大门,本系列最后会教会读者开发山寨币,写作规划可以读区块链技术学习系列开篇,下一篇文章我将带大家体验比特币钱包,并从交易所提现比特币到自己的钱包里,并完成一次转账。
作者:情诗少年,95后,专注区块链技术研究、产品项目解读,行业深度思考写作,坚持输出有价值的深度思考的好文章,立志成为有思想有优秀人格的有位青年。
微信:953751759
邮箱:[email protected]
:www.jianshu.com/u/d0a20cb6d002
博客:https://blog.csdn.net/qq_15562815
币乎:https://bihu.com/people/309388
24点区块链:24点区块链社区是一批立志在区块链行业探索的90后组建的社区,他们专注区块链行业发展与探索,包括区块链技术、产品项目解读,行业深度思考等方面。其目的是为身处币链圈、以及对区块链行业感兴趣的的人士贡献我们的价值。
专题地址:https://www.jianshu.com/c/0d0c26aaeb42
招募条件:
1.自身专注(或已经准备)区块链的某个方向的研究与探索。
2.有写作的习惯。
3.热爱分享、坚持学习。
你的收获:
1.一群互帮互助,相互信任,志同道合的朋友。
2.一个不断成长的优秀的自己。
3.一群人总比一个人走得快的真理。
加入方式:微信我

