下载centOS 7镜像:下载地址
按着引导一步一步安装配置即可.比较简单,直接说安装完成后的配置.
1 配置网络
三种模式:桥接模式,NAT模式,仅主机模式
这里选用桥接模式
1.2 桥接模式:作为物理机直连路由器,与主机处在一个网络中
vi /etc/sysconfig/network-scripts/ifcfg-ens33
里面的代码解释如下:
TYPE=Ethernet                                 # 网卡类型:为以太网
PROXY_METHOD=none                             # 代理方式:关闭状态
BROWSER_ONLY=no                               # 只是浏览器:否
BOOTPROTO=dhcp                                # 网卡的引导协议:DHCP
DEFROUTE=yes                                  # 默认路由:是
IPV4_FAILURE_FATAL=no                         # 是不开启IPV4致命错误检测:否
IPV6INIT=yes                                  # IPV6是否自动初始化: 是
IPV6_AUTOCONF=yes                             # IPV6是否自动配置:是
IPV6_DEFROUTE=yes                             # IPV6是否可以为默认路由:是
IPV6_FAILURE_FATAL=no                         # 是不开启IPV6致命错误检测:否
IPV6_ADDR_GEN_MODE=stable-privacy             # IPV6地址生成模型:stable-privacy
NAME=ens33                                    # 网卡物理设备名称
UUID=42773503-99ed-443f-a957-66dbc1258347     # 通用唯一识别码
DEVICE=ens33                                  # 网卡设备名称
ONBOOT=no                                     # 是否开机启动, 可用systemctl restart network重启网络
修改ONBOOT=yes并在最后一行增添DNS1=114.114.114.114
重启网络:
systemctl restart network
此时已经连接上网络.
由于虚拟机直接操作起来很麻烦,以下命令使用puTTy连接虚拟机,可以直接复制代码比较方便.
2 更换软件源
首先备份 CentOS-Base.repo
sudo mv /etc/yum.repos.d/CentOS-Base.repo /etc/yum.repos.d/CentOS-Base.repo.bak
vi /etc/yum.repos.d/CentOS-Base.repo
将原内容替换为
# CentOS-Base.repo
#
# The mirror system uses the connecting IP address of the client and the
# update status of each mirror to pick mirrors that are updated to and
# geographically close to the client.  You should use this for CentOS updates
# unless you are manually picking other mirrors.
#
# If the mirrorlist= does not work for you, as a fall back you can try the
# remarked out baseurl= line instead.
#
#

[base]
name=CentOS-$releasever - Base
baseurl=https://mirrors.tuna.tsinghua.edu.cn/centos/$releasever/os/$basearch/
#mirrorlist=http://mirrorlist.centos.org/?release=$releasever&arch=$basearch&repo=os
gpgcheck=1
gpgkey=file:///etc/pki/rpm-gpg/RPM-GPG-KEY-CentOS-7

#released updates
[updates]
name=CentOS-$releasever - Updates
baseurl=https://mirrors.tuna.tsinghua.edu.cn/centos/$releasever/updates/$basearch/
#mirrorlist=http://mirrorlist.centos.org/?release=$releasever&arch=$basearch&repo=updates
gpgcheck=1
gpgkey=file:///etc/pki/rpm-gpg/RPM-GPG-KEY-CentOS-7

#additional packages that may be useful
[extras]
name=CentOS-$releasever - Extras
baseurl=https://mirrors.tuna.tsinghua.edu.cn/centos/$releasever/extras/$basearch/
#mirrorlist=http://mirrorlist.centos.org/?release=$releasever&arch=$basearch&repo=extras
gpgcheck=1
gpgkey=file:///etc/pki/rpm-gpg/RPM-GPG-KEY-CentOS-7

#additional packages that extend functionality of existing packages
[centosplus]
name=CentOS-$releasever - Plus
baseurl=https://mirrors.tuna.tsinghua.edu.cn/centos/$releasever/centosplus/$basearch/
#mirrorlist=http://mirrorlist.centos.org/?release=$releasever&arch=$basearch&repo=centosplus
gpgcheck=1
enabled=0
gpgkey=file:///etc/pki/rpm-gpg/RPM-GPG-KEY-CentOS-7
3 安装nginx
3.1 获取Nginx软件源
rpm -Uvh http://nginx.org/packages/centos/7/noarch/RPMS/nginx-release-centos-7-0.el7.ngx.noarch.rpm
3.2 下载Nginx
yum install nginx -y
3.3 启动Nginx
nginx
此时使用同一个局域网内的电脑访问虚拟机的ip,仍然无法访问到Nginx的默认界面.
使用wget命令获取127.0.0.1的index页面以及虚拟机ip的index页面,均可以获得nginx的默认页面.
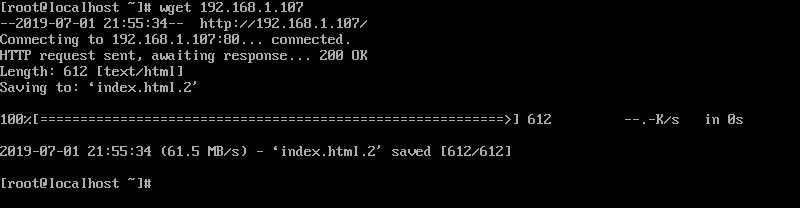

说明本机可以访问,但是同局域网主机无法访问.所以是防火墙的原因.
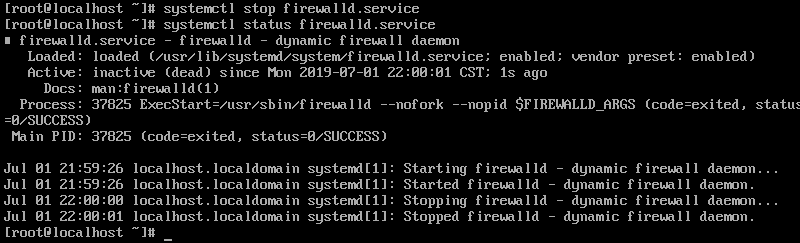
查看防火墙状态:
systemctl status firewalld

因为是在局域网内,不是服务器,所以我就直接把防火墙关了(当然也可以放通某个端口)
systemctl stop firewalld
systemctl status firewalld
4 查看端口
查看端口命令如果无法使用,如图所示:
-bash: netstat: command not found
是因为没有安装网络工具.执行下面命令就可以了.
yum install net-tools
5 安装MySQL
下载mysql的repo源:
wget http://repo.mysql.com/mysql-community-release-el7-5.noarch.rpm
安装mysql-community-release-el7-5.noarch.rpm包:
sudo rpm -ivh mysql-community-release-el7-5.noarch.rpm
注:安装这个包会获得两个mysql的yum repo源:
/etc/yum.repos.d/mysql-community.repo
/etc/yum.repos.d/mysql-community-source.repo
安装mysql:
sudo yum install mysql-server -y
安装完成后查看mysql:
rpm -qa | grep mysql
设置开机自启动:
systemctl enable mysqld
5.1 MySQL忘记密码操作:
修改MySQL的登录设置:
nano /etc/my.cnf
在[mysqld]的段中加上一句:
skip-grant-tables
重新启动mysqld
service mysqld restart
Stopping MySQL: [ OK ]
Starting MySQL: [ OK ]
登录并修改MySQL的root密码
mysql
Welcome to the MySQL monitor. Commands end with ; or \g.
Your MySQL connection id is 3 to server version: 3.23.56
Type 'help;' or '\h' for help. Type '\c' to clear the buffer.
mysql> USE mysql ;
Database changed
mysql> UPDATE user SET Password = password ( 'new-password' ) WHERE User = 'root' ;
Query OK, 0 rows affected (0.00 sec)
Rows matched: 2 Changed: 0 Warnings: 0
mysql> flush privileges ;
Query OK, 0 rows affected (0.01 sec)
mysql> quit
将MySQL的登录设置修改回来
vim /etc/my.cnf
将刚才在[mysqld]的段中加上的skip-grant-tables删除
重新启动mysqld
service mysqld restart
Stopping MySQL: [ OK ]
Starting MySQL: [ OK ]
6 安装PHP
获取yum源:
rpm -Uvh https://dl.fedoraproject.org/pub/epel/epel-release-latest-7.noarch.rpm
rpm -Uvh https://mirror.webtatic.com/yum/el7/webtatic-release.rpm
安装:
yum install php72w-cli.x86_64 php72w-common.x86_64 php72w-gd.x86_64 php72w-ldap.x86_64 php72w-mbstring.x86_64 php72w-mcrypt.x86_64 php72w-mysql.x86_64 php72w-pdo.x86_64 php72w-fpm php72w-opcache
启动php-fpm:
systemctl start php-fpm
设置开机自启:
systemctl enable php-fpm
systemctl daemon-reload
7 安装WordPress:
7.1 下载wordpress
从官方网站获取WordPress压缩包:
wget https://wordpress.org/latest.tar.gz
下载速度会很慢.
安装完成后解压
tar -zxf wordpress-5.2.2.tar.gz
得到wordpress文件夹
7.2 配置nginx
编辑nginx目录下的nginx.conf
nano /etc/nginx.nginx.conf
在http中加入以下代码:
 server {
        listen       80 default_server;
        listen       [::]:80 default_server;
        server_name  _;
        #该目录为wordpress的解压目录
        root /usr/share/wordpress;

        include /etc/nginx/default.d/*.conf;

        location / {
        index index.php index.html index.htm;
        try_files $uri $uri/ /index.php index.php;
        }


# pass the PHP scripts to FastCGI server listening on 127.0.0.1:9000
    location ~ .php$ {
        fastcgi_pass   127.0.0.1:9000;
        fastcgi_index  index.php;
        fastcgi_param  SCRIPT_FILENAME  $document_root$fastcgi_script_name;
        include        fastcgi_params;
    }


        error_page 404 /404.html;
            location = /40x.html {
        }

        error_page 500 502 503 504 /50x.html;
            location = /50x.html {
        }
    }
保存退出.
7.3 配置数据库
7.3.1 登录数据库:
mysql -uroot --password='YOURPWD'
7.3.2 创建名为wordpress的数据库:
CREATE DATABASE wordpress;
7.3.3 退出数据库
exit;
8 将配置同步到wordpress
将wordpress文件夹下的wp-config.samble.php复制一份,并命名为wp-config.php,编辑wp-config.php:
nano wp-config.php
修改其中数据库的部分: