第1章 debian 介绍
维基百科
https://zh.wikipedia.org/wiki/Debian
特点
Debian 是精简的 Linux 发行版,有着干净的作业环境。
安装步骤简易有效,大部分情况下只要、一直按下去便可以顺利安装。
拥有方便高效的软体包管理程序和 deb 软体包,可以让用户容易的查找、安装、移除、更新程序,或系统昇级。
健全的软件管理制度,包括了 Bug 汇报、包维护人等制度,让 Debian 所收集的软件品质在其它的 Linux 发行包之
上。
拥有庞大的包库,令用户只需通过其自身所带的软件管理系统便可下载并安装包,不必再在网络上查找。
包库分类清楚,用户可以明确地选择安装自由软件、半自由软件或闭源软件。
第2章 debian 和 ubnutu 的关系
转自维基百科
Ubuntu 与 Debian 使用相同的 deb 软件包格式,可以安装绝大多数为 Debian 编译的软件包,虽然不
能保证完全兼容,但大多数情况是
派生 Linux 发行版
主条目:Linux 发行版列表 § 基于 Dpkg(Debian 系)
Kanotix——LiveCD 及 Debian 安装程序。
Knoppix——LiveCD,同时亦有数个分支,包括 Morphix、Quantian、Whoppix 及 Xfld。
Stanix——接口像微软 Windows 的 LiveCD。
Libranet——目标是作为更易设置的发行版。
MEPIS——建基于 KDE 桌面环境,以新手为目标的发行版。
CoLinux——将 Debian 融于 Windows 的发行版。
Ubuntu——建基于 Unity 桌面环境的发行版。其亦有不同的分支,而几乎每一个分支都有 LiveCD(LiveCD 也提
供安装的功能)。
Deepin——深度操作系统,由中国武汉深之度科技有限公司开发的国产操作系统,以其特色应用与特色桌面环境
(DDE)闻名。
Xandros——Corel Linux 的商业支持版本。
Linux Mint Debian Edition——基于 Debian Testing 的滚动更新版本。有分别使用 MATE 和 Cinnamon 作为默
认桌面环境的两个版本。
B2D/OB2D Linux——OB2D XFCE 服务器版本,以及 B2D 2018 桌面版,采用快速安装接口,只要 5~15 分钟
即可完成安装。
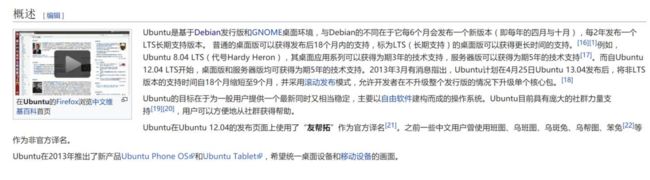
image.png
第3章 debian 和 Centos 的关系
没什么关系.Debian 名字比较难念正确.
Debian 的版本命名更好玩一些,以电影<玩具总动员里>的人物命令
第4章 Debian 的安装
4.1 使用下载镜像
4.1.1 安装 jigdo 工具
参考博客
https://zhuanlan.zhihu.com/p/22383854
jigdo 下载方法,下载后直接 dpkg -i 安装
https://packages.debian.org/jessie/amd64/jigdo-file/download
镜像网站
https://cdimage.debian.org/cdimage/archive/
4.1.2 jigdo 工具下载镜像
软件安装好之后去镜像网站找到对应的 debian 镜像版本目录
http://cdimage.debian.org/mirror/cdimage/archive/8.4.0/amd64/jigdo-dvd/
输入命令:
jigdo-lite
复制对应的 debian 镜像链接地址
按照提示输入对应的内容
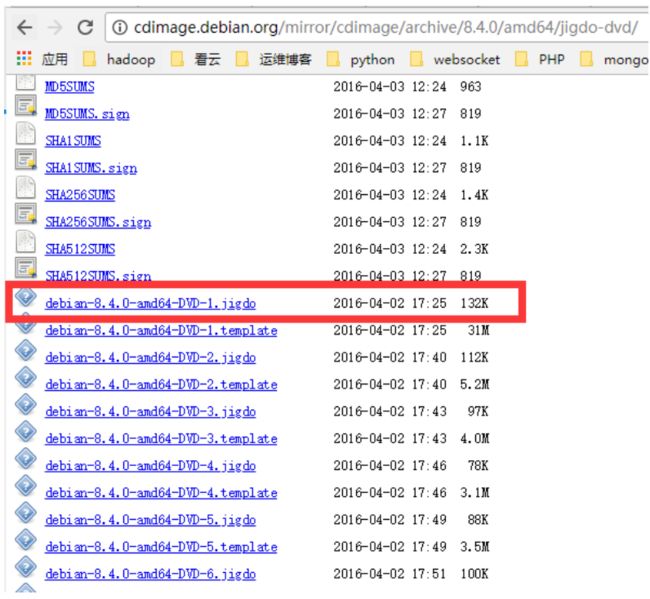
image.png
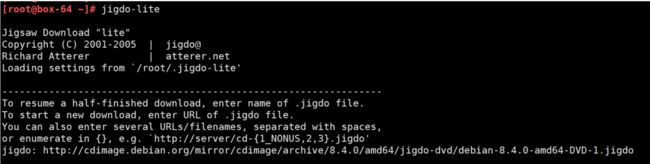
image.png
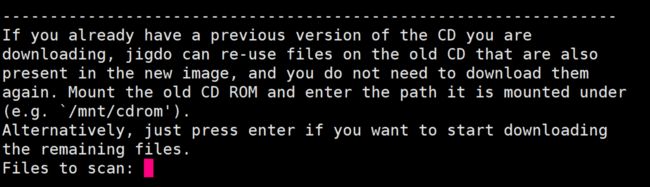
image.png
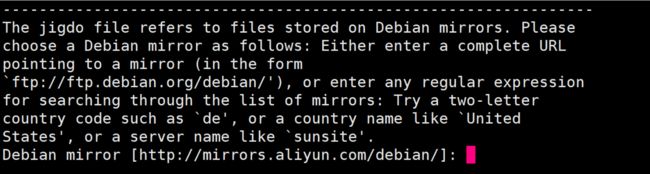
image.png

image.png
4.2 安装部署
见具体安装过程
第5章 Debian 和 Centos 使用上的区别
5.1 常用服务配置文件路径

image.png
5.2 日常使用的区别
5.2.1 查看系统版本号
root@test-100:~# cat /etc/debian_version
8.4
root@test-100:~# uname -a
Linux test-100 3.16.0-4-amd64 #1 SMP Debian 3.16.43-2+deb8u5 (2017-09-19) x86_64 GNU/Linux
5.2.2 useradd 创建用户
useradd 默认不创建家目录,需要手动创建并更改权限
5.2.3 后台运行 nohop 与&与 start-stop-daemon
start-stop-daemon 是 Debian 下的守护进程命令,很多服务的启动脚本都是以 start-stop-daemon 实现的.
https://blog.qiusuo.im/blog/2014/03/15/start-stop-daemon-usage/
5.2.4 系统自启动任务管理
安装工具
apt-get install sysv-rc-conf
运行
sysv-rc-conf
运行界面

image.png
操作指令
键盘上下左右移动
空格开启或关闭
Ctrl+n 下一页
Ctrl+p 上一页
q 退出
+/- 启动或关闭服务
常用服务解释(转发)
debian 下一些服务的名称和基本的解释:
acpi-support:这个是关于电源支持的默认是 1,2,3,4,5 下启动,我认为你可以把它调整到 s 级别。
acpid:acpi 的守护程序,默认是 2-5 开启,我认为可以不用管。
alsa:alsa 声音子系统,应该不用开启它。
alsa-utils:这个服务似乎取代了 alsa,所以开启这个就可以了,我在 S 级别开启它。
anacron:这是一个用于执行到时间没有执行的程序的服务。
apmd:也是一种电源管理,我认为电脑如果不是很老,它就没有开启的必要了。
atd:和 anacron 类似,与定时执行计划任务类似。
bluez-utiles:蓝牙服务,没有的话可以关了。
bootlogd:似乎使用来写 log 的,安全期间开着他也许比较好。
cron:指定时间运行程序的服务,所以开着比较好的。
cupsys:打印机服务,所以如果就开启吧。
dbus:消息总线系统,非常重要,一定要开。
dns-clean:拨号连接用的。
evms:企业卷管理系统。
fetchmail:用于邮件守护。
gdm:gnome 桌面管理器。
halt:关机用的,不要更改。
hdparm:没有 ide 硬盘也就不用开启它。
hotkey-setup:这个是给某些品牌笔记本设计的热键映射,台式机用户请关了它。
hotplug:这个是用于热插拔的,在某些电脑上关闭它会使声卡无效,请在 S 级别开启它。
hplip:hp 打印机专用的,应该可以关了它。
ifrename:网络接口重命名。
ifupdown:这个使用来打开网络的,开着它。
ifupdown-clean:同上。
klogd:linux 守护程序,接受来自内核和发送信息到 syslogd 的记录,并记录为一个文件,所以请开着它。
linux-restricted-modules-common:这个使用来使用受限制的模块的,你可以从/lib/linux-restricted-modules
下查看,如果没有什么,你可以关掉它。
lvm:逻辑卷管理器,如果没有用可以关了它。
makedev:用来创建设备到/dev/请不要动它。
mdamd:管理 raid 用,如果没有请关闭它。
module-init-tools 从/etc/modules:加在扩展模块的,这个一般开着。
networking:增加网络接口和配置 dns 用,将它开启。
ntp-server:与时间服务器进行同步的。
pcmcia:激活 pcmica 设备。
powernowd:用于管理 cpu 的客户端程序,如果有变频功能,比如 amd 的 quite:cool 那么就开启它吧。
ppp:拨号用的。
ppp-dns:同上。
readahead:预加载服务,让我想起了 win 的预读,当然他们不同,它会使启动变慢 3-4 妙,可以关了它。
reboot:重启用的,不要动。
rmnologin:如果发现 nologin,就去除它,在笔记本上不用开启。
rsync:rsync 协议守护,请视情况而定。
screen-cleanup:一个清除开机屏幕的脚本,随便。
sendsigs:重启和关机时向所有进程发送消息。
single:激活但用户模式。
stop-bootlogd:从 2,3,4,5 级别停止 bootlogd。
sudo:这个不用说吧。
sysklogd:用于记录系统日志信息。
udev:用户空间 dev 文件系统。
udev-mab:同上。
umountfs:用来卸载文件卷的。
urandom:生成随机数的。
usplash:那个漂亮的启动画面,但是关了它,所以想关他需要把内核起动参数中的 splash 一句删掉。
vbesave:显卡 bios 配置工具。
xorg-common:设置 x 服务 ice socket。
5.2.5 防火墙和 SElinux
Debian 默认没有 SElinux
防火墙默认没有任何规则
5.2.6 修改网卡
debian 的网卡配置文件语法:
root@test~# cat /etc/network/interfaces
# This file describes the network interfaces available on your system
# and how to activate them. For more information, see interfaces(5).
source /etc/network/interfaces.d/*
# The loopback network interface
auto lo
iface lo inet loopback
auto eth0
iface eth0 inet static
address 210.14.154.115
netmask 255.255.255.224
gateway 210.14.154.113
# The primary network interface
allow-hotplug eth1
iface eth1 inet static
address 192.168.5.21
netmask 255.255.255.0
DNS 配置
root@test:~# cat /etc/resolv.conf
search unassigned-domain
nameserver 114.114.114.114
动态添加删除 IP 地址
网卡上增加一个 IP:
ifconfig eth0:2 192.168.47.123 netmask 255.255.255.0
删除网卡的第二个 IP 地址:
ip addr del 192.168.47.123 dev eth0:2
5.2.7 bash.rc 默认注释了命令别名
root@debian:~# cat .bashrc
# ~/.bashrc: executed by bash(1) for non-login shells.
# Note: PS1 and umask are already set in /etc/profile. You should not
# need this unless you want different defaults for root.
# PS1='${debian_chroot:+($debian_chroot)}\h:\w\$ '
# umask 022
# You may uncomment the following lines if you want `ls' to be colorized:
# export LS_OPTIONS='--color=auto'
# eval "`dircolors`"
# alias ls='ls $LS_OPTIONS'
# alias ll='ls $LS_OPTIONS -l'
# alias l='ls $LS_OPTIONS -lA'
#
# Some more alias to avoid making mistakes:
# alias rm='rm -i'
# alias cp='cp -i'
# alias mv='mv -i'
5.2.8 SSH 默认不允许 root 远程登录
PermitRootLogin yes
5.2.9 默认没有 rsync
但是 apt 安装后会有 init.d 和 systemd 启动脚本
apt-get install rsync
5.3 shell 脚本区别
5.3.1 shell 脚本 function 位置(暂时没研究彻底)
/lib/lsb/init-functions
第6章 Debian 软件包和 Centos 软件包的区别
参考博客:
https://blog.csdn.net/mbxc816/article/details/7473906
CentOS 和 Red Hat 使用 yum 安装,而 Debian 和 ubnutu 使用 apt 工具
6.1 apt 软件源格式介绍
https://blog.csdn.net/yuan13091324/article/details/42419503
6.2 apt 相关的的文件

image.png
6.3 apt-get 子命令

image.png
6.4 apt-get 命令选项

image.png
6.5 apt-cache 命令

image.png
6.6 软件包操作对比
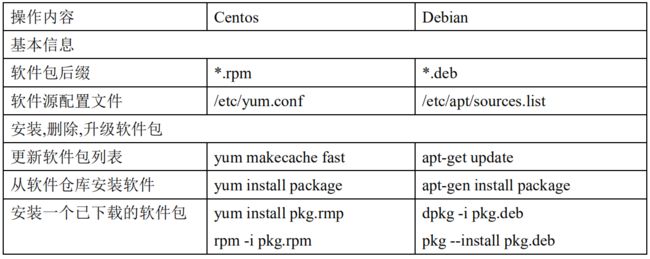
image.png
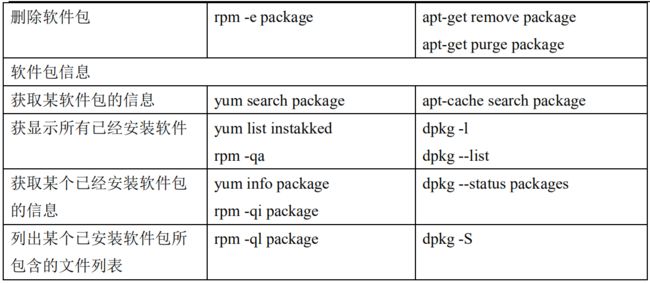
image.png
第7章 Debian 下常用服务的安装配置
7.1 debian 软件源配置
常用源的官方说明地址:
#阿里源
https://opsx.alibaba.com/mirror
#163 源
https://mirrors.163.com/.help/debian.html
7.2 debian 下的 docker 部署
参考清华源安装说明:
https://mirrors.tuna.tsinghua.edu.cn/help/docker-ce/
镜像加速参考阿里云相关说明
第8章 自定义打包 Debian 的 DEB 包
8.1 试验环境介
Debian8.4
8.2 软件介绍
fpm 打包工具
8.3 安装部署
apt-get update
apt-get install ruby-dev ruby-full build-essential libssl-dev
gem sources -a http://mirrors.aliyun.com/rubygems/
gem sources --remove https://rubygems.org/
gem sources --list
gem install fpm
fpm -v
8.4 自定义打包
8.4.1 软件目录规划
软件目录
配置文件
init.d 启动文件
systemd 启动文件
8.4.2 打包命令
使用 fpm 打包 deb 软包,由于 fpm 和 Debian 打包规则不一致,使用 deb-no-default-config-files 禁用这
种默认行为
fpm -s dir -t deb -n mynginx -v 1.6 \
--deb-no-default-config-files \
--description 'nginx' \
-d "gcc,g++,libpcre3,libpcre3-dev,openssl,libssl-dev,libpcrecpp0,zlib1g-dev,libperl-dev,build-essential"
\
--before-install /root/deb_test/init.sh \
--deb-init /root/deb_test/nginx \
--deb-systemd /root/deb_test/nginx.service \
/opt/nginx/
第9章 搭建 Debian 软件仓库
9.1 试验环境介绍
debian8.4
1C 1G 20G
9.2 仓库目录规划
/data/deb
9.3 安装部署
9.3.1 apt-get 安装部署 nginx
创建 www 用户组和 www 用户
groupadd www -g 888
useradd www -u 888 -g 888 -M -s /sbin/nologin
apt 安装 nginx
apt-get install nginx
查看软件包信息
dpkg -S nginx
查看 nginx 配置文件
[root@box-64 nginx]# egrep -v "^#|^.*#|^$" /etc/nginx/nginx.conf
user www;
worker_processes 4;
pid /run/nginx.pid;
events {
worker_connections 768;
}
http {
sendfile on;
tcp_nopush on;
tcp_nodelay on;
keepalive_timeout 65;
types_hash_max_size 2048;
include /etc/nginx/mime.types;
default_type application/octet-stream;
ssl_prefer_server_ciphers on;
access_log /var/log/nginx/access.log;
error_log /var/log/nginx/error.log;
gzip on;
gzip_disable "msie6";
include /etc/nginx/conf.d/*.conf;
#include /etc/nginx/sites-enabled/*; ### 这一行注释掉或者删除这个目录下的文件
}
创建子配置文件
[root@box-64 nginx]# cat > /etc/nginx/conf.d/apt-deb.conf <
9.3.2 编译安装 nginx
安装部署
apt-get -y install build-essential libpcre3 libpcre3-dev zlib1g-dev openssl libssl-dev
mkdir -p /data/soft
cd /data/soft
wget -q http://nginx.org/download/nginx-1.6.3.tar.gz
useradd www -s /sbin/nologin -M -u 888
tar xf nginx-1.6.3.tar.gz
cd nginx-1.6.3
./configure --user=www --group=www --prefix=/opt/nginx-1.6.3 --with-http_stub_status_module
--with-http_ssl_module
make && make install
ln -s /opt/nginx-1.6.3/ /opt/nginx
egrep -v "#|^$" /opt/nginx/conf/nginx.conf.default >/opt/nginx/conf/nginx.conf
/opt/nginx/sbin/nginx
修改配置文件
[root@box-64 ~]# cat /opt/nginx/conf/nginx.conf
user www;
worker_processes 1;
events {
 worker_connections 1024;
}
http {
 include mime.types;
 default_type application/octet-stream;
 sendfile on;
 keepalive_timeout 65;
 server {
 listen 8080;
 server_name localhost;
 location / {
 root /data/mydeb/;
 index index.html index.htm;
 }
 }
}
9.4 只下载不安装软件包
man apt-get
apt-get clean
ls -lh /var/cache/apt/archives/
apt-get install -d screen
ls -lh /var/cache/apt/archives/
9.5 移动自定义的 DEB 安装包到仓库
移动缓存的 deb 包或者自定义的 deb 包到仓库目录
mv /var/cache/apt/archives/screen_4.2.1-3+deb8u1_amd64.deb /data/mydeb/
9.6 更新仓库信息索引
[root@box-64 ~]# apt-get install dpkg-dev
[root@box-64 ~]# cd /data/mydeb
[root@box-64 mydeb]# dpkg-scanpackages ./ /dev/null | gzip -9c > Packages.gz
dpkg-scanpackages: warning: Packages in archive but missing from override file:
dpkg-scanpackages: warning: screen
dpkg-scanpackages: info: Wrote 1 entries to output Packages file.
查看索引压缩包的内容
zcat Packages.gz
9.7 客户机测试
配置软件源
[root@could-100 ~]# cat /etc/apt/sources.list
deb http://192.168.47.64/mydeb /
更新
apt-get update
安装测试
apt-get install screen
注意! 这里如果使用-y 会出错,下面有解决方案
测试安装 docker-ce
9.8 rsync 同步阿里云镜像
不过还是推荐使用什么什么包再复制什么包过去,不然可能会同步很多不需要的文件,
科大源参考网址
https://mirrors.ustc.edu.cn/help/rsync-guide.html
9.9 运维注意事项
9.9.1 不能使用-y 解决
在客户机上创建一个文件,然后写入一句话,再更新一下 apt-update
[root@apt-test ~]# cat /etc/apt/apt.conf.d/02allow-unsigned
APT::Get::AllowUnauthenticated 1;
相关网站:
https://askubuntu.com/questions/74345/how-do-i-bypass-ignore-the-gpg-signature-checks-of-apt
https://stackoverflow.com/questions/31294150/there-are-problems-and-y-was-used-without-force-yes
第10章 Debian 忘记用户名密码处理
和 Centos 处理方式一样,进入单用户模式修改.
第11章 常见错误排查
11.1 service networking restart 重启网卡不生效
service networking 只对添加了 auto 的网卡重启生效
auto eth0