查看仓库版本
sudo apt-cache show mysql-server
安装命令
sudo apt install mysql-server mysql-client mysql-common
运行安全脚本
sudo mysql_secure_installation
第一步 提示是否安装验证插件
# 安全的MySQL服务器部署
Securing the MySQL server deployment.
# 使用空白密码连接到MySQL
Connecting to MySQL using a blank password.
# VALIDATE PASSWORD PLUGIN可用于测试密码并提高安全性
VALIDATE PASSWORD PLUGIN can be used to test passwords
and improve security.
# 它检查密码的强度,并允许用户只设置那些足够安全的密码。
It checks the strength of password
and allows the users to set only those passwords which are
secure enough.
# 你想设置VALIDATE PASSWORD插件吗
Would you like to setup VALIDATE PASSWORD plugin?
# 按y | Y表示是,任何其他键为否
Press y|Y for Yes, any other key for No:
这里我选择不安装:N
第二步 设置root密码
Please set the password for root here.
New password:
Re-enter new password:
第三步 处理匿名账户
# 默认情况下,MySQL安装有一个匿名用户,
# 允许任何人登录MySQL而不必拥有为他们创建的用户帐户。
By default, a MySQL installation has an anonymous user,
allowing anyone to log into MySQL without having to have
a user account created for them.
# 这仅用于测试,并使安装更加顺利
This is intended only for testing, and to make the installation go a bit smoother.
# 您应该在进入生产环境之前将其删除
You should remove them before moving into a production environment.
# 删除匿名用户? (按y | Y表示是,任何其他键表示否):
Remove anonymous users? (Press y|Y for Yes, any other key for No) :
这里我选择Y
第四步 是否允许root管理员从远程登录
# 通常,只允许root连接'localhost'
Normally, root should only be allowed to connect from 'localhost'.
# 这可以确保别人无法猜测来自网络的root密码。
This ensures that someone cannot guess at the root password from the network.
# 禁止远程登录? (按y | Y表示是,任何其他键表示否):
Disallow root login remotely? (Press y|Y for Yes, any other key for No) :
这里我选择N,不禁止
第五步 删除测试数据库
# 默认情况下,MySQL附带一个名为'test'的数据库任何人都可以访问
By default, MySQL comes with a database named 'test' that anyone can access.
# 这也仅用于测试,应在进入生产环境之前删除。
This is also intended only for testing,
and should be removed before moving into a production environment.
# 删除测试数据库并访问它? (按y | Y表示是,任何其他键表示否):
Remove test database and access to it? (Press y|Y for Yes, any other key for No) :
这里我选择Y
第六步 重新加载权限表
# 重新加载权限表将确保到目前为止所做的所有更改都将立即生效
Reloading the privilege tables will ensure that all changes
made so far will take effect immediately.
# 现在重新加载权限表? (按y | Y表示是,任何其他键表示否):
Reload privilege tables now? (Press y|Y for Yes, any other key for No) :
这里我选择YES
查看mysql服务状态
systemctl status mysql
显示如下就OK
开启远程访问
1 打开配置
sudo vim /etc/mysql/mysql.conf.d/mysqld.cnf
2 注释43行 bing-address = 127.0.0.1
授权root及设置密码
# 授权所有库和表的所有操作并设置密码
mysql> grant all on *.* to root@'%' identified by '密码' with grant option;
Query OK, 0 rows affected, 1 warning (0.00 sec)

# 刷新权限
mysql> flush privileges;
Query OK, 0 rows affected (0.00 sec)

# 退款
mysql> quit;
Bye

# 重启Mysql
kong@kabob:~$ sudo systemctl restart mysql
查看Mysql字符编码
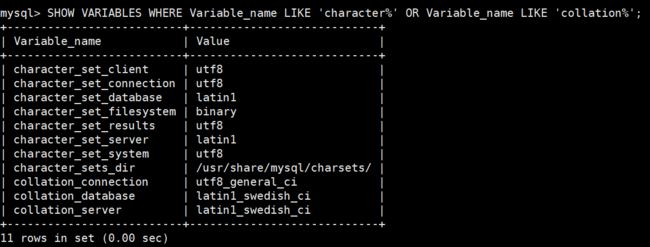
命令:SHOW VARIABLES WHERE Variable_name LIKE 'character%' OR Variable_name LIKE 'collation%';
设置默认字符编码
# 打开配置
sudo vim /etc/mysql/mysql.conf.d/mysqld.cnf

增加如下内容
[client]
default-character-set=utf8mb4
[mysql]
default-character-set=utf8mb4
[mysqld]
character-set-server    = utf8mb4
init_connect            = ’SET NAMES utf8mb4’

