一、负载均衡动静分离实战:
1、根据用户客户端进行转发分流:
1.1 web01、web02基础环境搭建:
[root@web01 ~]# echo this is PC website  >/app/www/lidao.html
[root@web02 ~]# echo  this is Mobile website   >/app/www/lidao.html
[root@lb01 ~]# curl 10.0.0.7/lidao.html
this is PC website
[root@lb01 ~]# curl 10.0.0.8/lidao.html
this is Mobile website
1.2 在lb01上面配置nginx环境:
[root@lb01 ~]# cat  /etc/nginx/nginx.conf

user  nginx;
worker_processes  1;

error_log  /var/log/nginx/error.log warn;
pid        /var/run/nginx.pid;


events {
    worker_connections  1024;
}


http {
    include       /etc/nginx/mime.types;
    default_type  application/octet-stream;

    log_format  main  '$remote_addr - $remote_user [$time_local] "$request" '
                      '$status $body_bytes_sent "$http_referer" '
                      '"$http_user_agent" "$http_x_forwarded_for"';

    access_log  /var/log/nginx/access.log  main;

    sendfile        on;
    #tcp_nopush     on;

    keepalive_timeout  65;

    #gzip  on;
    upstream   default  {
    server  10.0.0.7:80 weight=1  max_fails=3  fail_timeout=10s;
   }
    upstream   mobile  {
    server   10.0.0.8:80 weight=1  max_fails=3  fail_timeout=10s;
    }
#    include /etc/nginx/conf.d/*.conf;
     server  {
     listen   80;
     server_name    www.oldboy.com;
     location    /{
        if  ($http_user_agent  ~*   "Android|IOS")  {
        proxy_pass  http://mobile;
        }
        proxy_pass   http://default;
        proxy_set_header  Host $host;
        proxy_set_header X-Forwarded-For $remote_addr;
     }
   }
}
1.3 用curl命令验证:
[root@lb01 ~]# curl  10.0.0.5/lidao.html
this is PC website
[root@lb01 ~]# curl -A ios  10.0.0.5/lidao.html
this is Mobile website
用火狐浏览器模拟pc端和移动端验证配置:
浏览器验证前需要先进行安装user agent插件,然后设置如下就可验证:
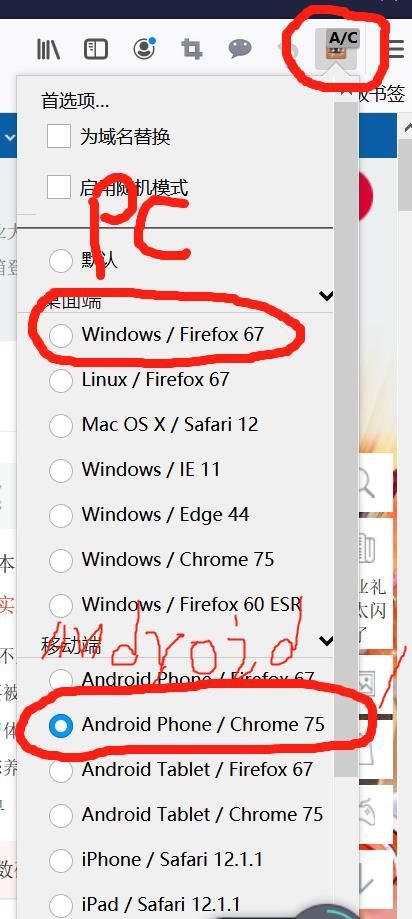
移动端验证.jpg
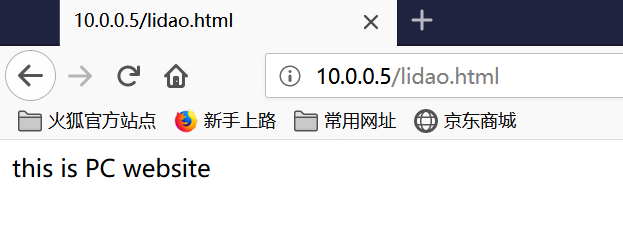
pc端访问.png
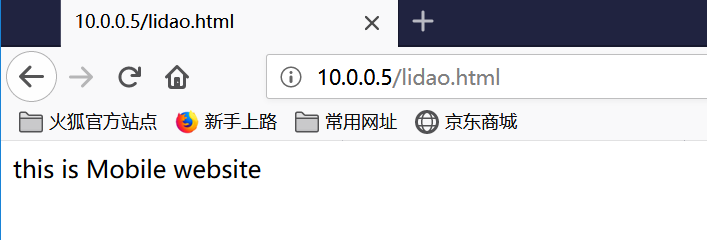
安卓移动端访问.png
2、根据用户的uri进行转发 动静分离实战:
2.1 准备基础环境web01、web02、web03:
#web01
[root@web01 ~]mkdir -p  /app/www/upload/
[root@web01 ~]echo  this is upload  >/app/www/upload/guoav.html

#web02
[root@web02 ~]mkdir -p  /app/www/static/
[root@web02 ~]echo  this is static  >/app/www/static/guoav.html

#web03
[root@web03 ~]mkdir -p  /app/www/
[root@web03 ~]echo  this is default  >/app/www/guoav.html
2.2 在lb01上面配置nginx环境(修改lb01负载均衡配置
nginx.conf核心配置):
[root@lb01 nginx]# cat  nginx.conf

user  nginx;
worker_processes  1;

error_log  /var/log/nginx/error.log warn;
pid        /var/run/nginx.pid;


events {
    worker_connections  1024;
}


http {
    include       /etc/nginx/mime.types;
    default_type  application/octet-stream;

    log_format  main  '$remote_addr - $remote_user [$time_local] "$request" '
                      '$status $body_bytes_sent "$http_referer" '
                      '"$http_user_agent" "$http_x_forwarded_for"';

    access_log  /var/log/nginx/access.log  main;

    sendfile        on;
    #tcp_nopush     on;

    keepalive_timeout  65;

    #gzip  on;
    upstream   upload  {
    server  10.0.0.7:80 weight=1  max_fails=3  fail_timeout=10s;
   }
    upstream   static  {
    server   10.0.0.8:80 weight=1  max_fails=3  fail_timeout=10s;
    }
     upstream   default  {
    server   10.0.0.9:80 weight=1  max_fails=3  fail_timeout=10s;
    }
#    include /etc/nginx/conf.d/*.conf;
     server  {
     listen   80;
     server_name    www.oldboy.com;
     location    /upload{
        proxy_pass   http://upload;
        proxy_set_header  Host $host;
        proxy_set_header X-Forwarded-For $remote_addr;
     }
    location    /static{
        proxy_pass   http://static;
        proxy_set_header  Host $host;
        proxy_set_header X-Forwarded-For $remote_addr;
     }
      location    /{
        proxy_pass   http://default;
        proxy_set_header  Host $host;
        proxy_set_header X-Forwarded-For $remote_addr;
     }
}
}
2.3 浏览器验证:
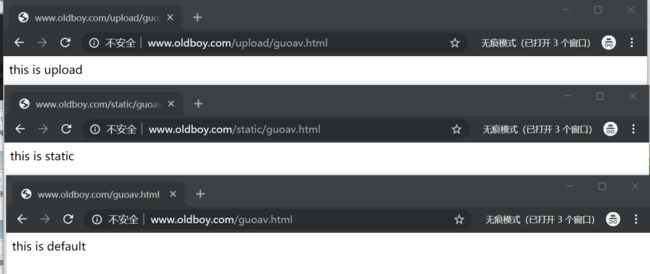
动静分离验证.png
3、ip-bash功能模块实战::
搭建验证环境:
3.1 在lb01上配置nginx主配置文件:
[root@lb01 nginx]# cat  nginx.conf
user  nginx;
worker_processes  1;

error_log  /var/log/nginx/error.log warn;
pid        /var/run/nginx.pid;


events {
    worker_connections  1024;
}


http {
    include       /etc/nginx/mime.types;
    default_type  application/octet-stream;

    log_format  main  '$remote_addr - $remote_user [$time_local] "$request" '
                      '$status $body_bytes_sent "$http_referer" '
                      '"$http_user_agent" "$http_x_forwarded_for"';

    access_log  /var/log/nginx/access.log  main;

    sendfile        on;
    #tcp_nopush     on;

    keepalive_timeout  65;

    #gzip  on;

    upstream   web_pools {
    ip_hash;
    server 10.0.0.7:80 weight=1 max_fails=3 fail_timeout=10s;
    server 10.0.0.8:80 weight=1 max_fails=3 fail_timeout=10s;
    }
#   include /etc/nginx/conf.d/*.conf;
    server  {
    listen 80;
    server_name www.oldboy.com;
    location  / {
       proxy_pass http://web_pools;
       proxy_set_header Host $host;
       proxy_set_header X-Forwarded-For  $remote_addr;
       }
    }

    server  {
    listen 80;
    server_name blog.oldboy.com;
    location  / {
       proxy_pass http://web_pools;
       proxy_set_header Host $host;
       proxy_set_header X-Forwarded-For  $remote_addr;
       }
    }
}
3.2 创建文件:
[root@web01 ~]# cat /app/www/index.html
web01   www.oldboy.com
[root@web02 ~]# cat /app/www/index.html
web02   www.oldboy.com
[root@web01 www]#  cat /etc/nginx/conf.d/01-www.conf
server   {
    listen      80;
    server_name  www.oldboy.com;
    access_log  /var/log/nginx/access_www.log  main  ;
    root   /app/www;
    location / {
    index  index.html index.htm;
    }
}
[root@web02 www]#  cat /etc/nginx/conf.d/01-www.conf
server   {
    listen      80;
    server_name  www.oldboy.com;
    access_log  /var/log/nginx/access_www.log  main  ;
    root   /app/www;
    location / {
    index  index.html index.htm;
    }
}
3.3 验证结果:正常情况下访问www.oldboy.com的时候,负载均衡会平均分配给web01和web02,但是加上ip-bash后,就会记录初次访问情况,以后都只会分发给web01服务器。
二、nginx高可用:
先在lb01和lb02上面安装keepalived,并启动keepalived服务:
yum install -y  keepalived
systemctl  start  keepalived
systemctl  enable  keepalived
1、安装完keepalived后就可以抓包验证2台服务器互相切换的场景(默认运行lb01,当关闭lb01的keepalived服务后,就切换到lb02):
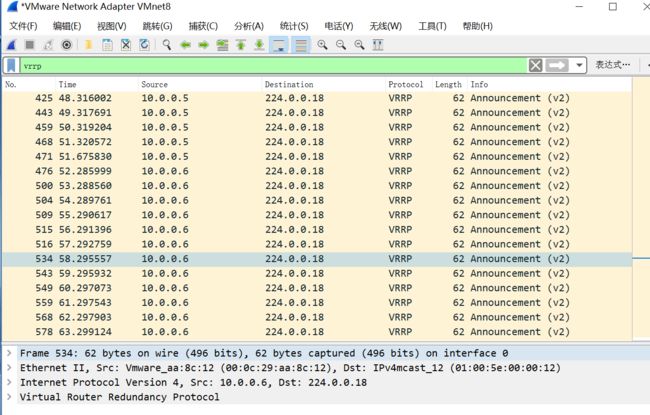
keepalive服务.png
2、高可用项目实战:
2.1 搭建基础环境:
[root@lb01 ~]# cat  /etc/keepalived/keepalived.conf
! Configuration File for keepalived

global_defs {
    router_id lb01
}

vrrp_instance VI_1 {
    state MASTER
    interface eth0
    virtual_router_id 51
    priority 150
    advert_int 1
    authentication {
        auth_type PASS
        auth_pass 1111
    }
    virtual_ipaddress {
     10.0.0.3/24 dev eth0 label eth0:1
    }
}
[root@lb02 ~]# cat  /etc/keepalived/keepalived.conf
! Configuration File for keepalived

global_defs {
    router_id lb02
}

vrrp_instance VI_1 {
    state BACKUP
    interface eth0
    virtual_router_id 51
    priority 100
    advert_int 1
    authentication {
        auth_type PASS
        auth_pass 1111
    }
    virtual_ipaddress {
     10.0.0.3/24 dev eth0 label eth0:1
    }
}
配置完后重启lb01和lb02的keepalived服务: systemctl reload keepalived
2.2 配置文件的配置含义图示:
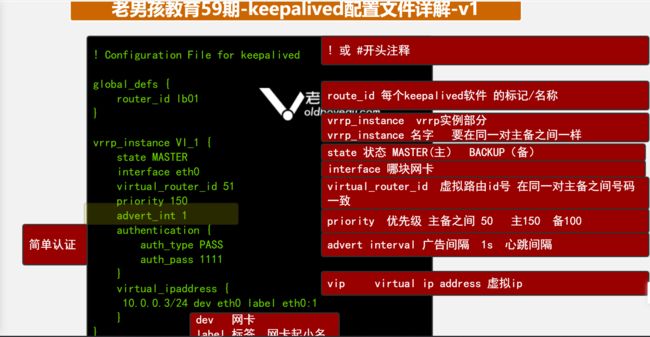
197022F2-9F86-4675-ABD3-648D9F589C89.png
2.3 验证上面文件对准备服务器和优先级进行了配置(刚开始lb01在运行,当把lb01服务关闭后,会发现切换到了lb02上面):
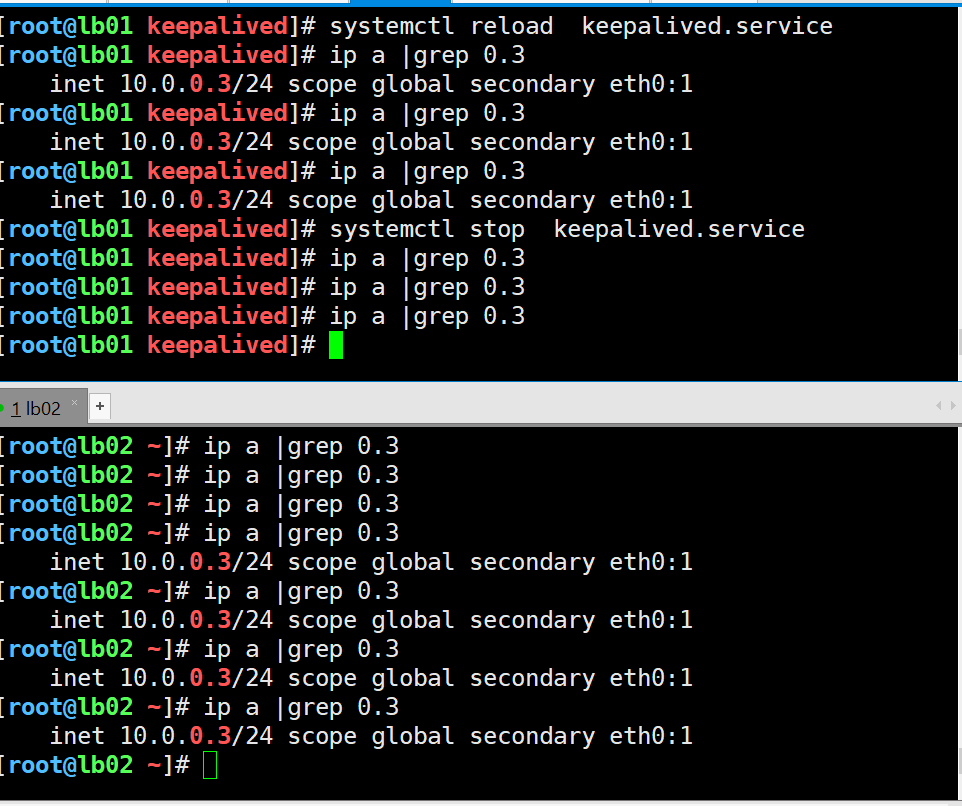
keepalived服务的优先级配置.png