本问主要介绍用excel表格来管理接口用例,采用python+unittest测试框架,结合ddt数据驱动,最后结合BeautifulReport报告插件,生成最终的测试报告
首先,来3张图,了解输入数据,输出结果
1、需要测试的接口case:execel表格管理
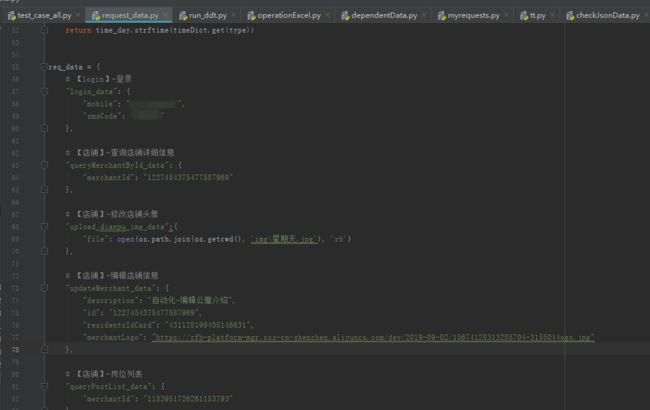
2、请求的body:request_data.py文件中字典req_data,用来存放所有case请求的body
3、利用unittest+ddt+BeautifulReport生成HTML测试报告:
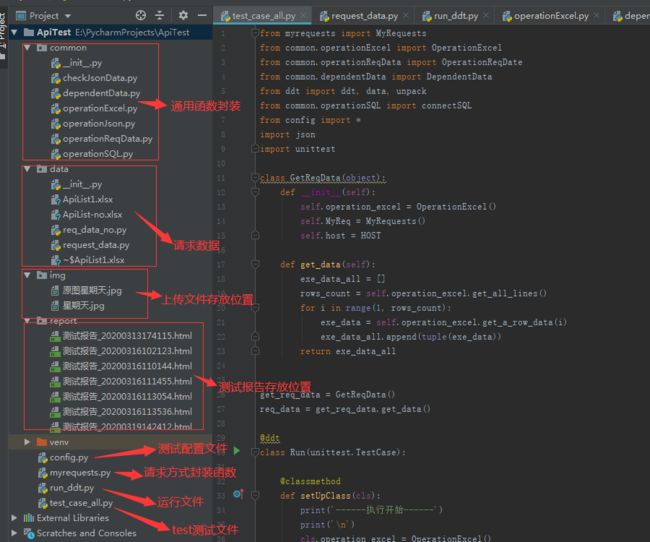
其次,附上整个项目的结构图
最后,分解项目运行的细节内容
1、项目的主运行文件:run_ddt.py
(1)、导入我们run_ddt.py文件运行所需要的第三方包
# coding=utf-8
import unittest
import time
import os
from BeautifulReport import BeautifulReport
(2)、生成我们需要的report路径
curpath = os.path.dirname(os.path.realpath(__file__))
reprot_path = os.path.join(curpath, "report")
(3)、匹配该项目里,以test开头的文件,并添加成一个unittest测试集
def add_case(casepath=curpath, rule="test_*.py"):
discover = unittest.defaultTestLoader.discover(casepath, pattern=rule)
return discover
(4)、得到了测试集,便可以运行整个测试集里面的测试用例
def run_case(all_case, reportpath=reprot_path):
now = time.strftime("%Y%m%d%H%M%S")
print('测试报告生成地址: %s' % reportpath)
BeautifulReport(all_case).report(description='用例执行情况', filename='测试报告_' + str(now), report_dir=reportpath)
# 该文件的main函数入口:
if __name__ == '__main__':
cases = add_case()
run_case(cases)
写到上面第3步的时候,你就会联想到,我们后续肯定会编写一个test_开头的py文件,而里面就是我们的测试内容。
是的,我们第2个文件,就是编写我们的测试代码,也可以说是我们的测试思路或者是测试的步骤。
2、测试思路:test_case_all.py
(1)、导入该文件所运行的包,以及从公用模块导入公用函数
from myrequests import MyRequests
from common.operationExcel import OperationExcel
from common.operationReqData import OperationReqDate
from common.dependentData import DependentData
from ddt import ddt, data, unpack
from common.operationSQL import connectSQL
from config import *
import json
import unittest
(2)、我们是从一个excel的sheet表拿的数据,要想把这些数据利用ddt来驱动,就需要把整个excel表的数据全部拿出来,然后再利用ddt来分割数据,在用切割的数据进行单个case测试
class GetReqData(object):
# 初始化excel操作模块类,才能调用该类下的函数方法
def __init__(self):
self.operation_excel = OperationExcel()
# 利用excel类里面的方法,获取excel表格的所有数据
def get_data(self):
exe_data_all = [] # 定义一个空的列表,存放excel表格的数据
rows_count = self.operation_excel.get_all_lines() # 获取表格中有多少行数据
for i in range(1, rows_count): # 循环遍历取excel表格的数据,去除第一行
exe_data = self.operation_excel.get_a_row_data(i) # 把每一行的数据都取出
exe_data_all.append(tuple(exe_data)) # 取出的数据,都添加到定义空列表中
return exe_data_all # 取值完成后,把所有的数据返回出去
# 单独的把获取数据函数进行调用一次,这样ddt数据驱动,才有数据作为参数传入
get_req_data = GetReqData()
req_data = get_req_data.get_data()
(3)、ddt来驱动excel表的数据,获取到的excel数据是一个list类型,提取每一行的数据就显示轻松多了。提取完数据,就可以进行request请求测试了。
# 采用ddt数据驱动,在运行的类前,就需要先运行ddt的装饰器函数,故需要在Run类前加上@ddt
@ddt
class Run(unittest.TestCase):
# 集成unittest.TestCase方法,然而需要初始化,在unittest里__init__函数无法使用,所以我们就用到unittest里的setUp、 tearDown这样函数来做类函数的初始化,这里初始化只需要运行一次,这里我采用了setUpClass这个函数来实现
@classmethod
def setUpClass(cls):
print('------执行开始------')
cls.operation_excel = OperationExcel()
cls.operation_req_data = OperationReqDate()
cls.dependent_data = DependentData()
cls.m = MyRequests()
cls.host = HOST # 从config文件获取host,这样切换地址不用改excel表的url内容
cls.new_data_dict = {}
@classmethod
def tearDownClass(cls):
print('------执行完毕------')
# 初始化工作已完成,那就进入我们重点、重点、重点了
@data(*req_data) # ddt下data可以把数据进行切分返回数据,具体可参照ddt使用
@unpack # ddt下的一个方法,目的是把每一行数据分开传参,具体使用ddt详解
def test_case(cls, *exe_data):
# 这里是判断需要执行SQL语句
if exe_data[3] == "SQL":
sql = exe_data[5]
connectSQL(exe_data[7], sql, cls.new_data_dict)
'''
这里判断case是都需要执行(运行的流程重点就在此)
我们从每一行数据取出来是一个list,根据list的下标,获取excel表格的值;
1、取决于该case是否运行,如果运行,就往下取值,反之,则不用管;
2、获取该case请求的body值,根据excel的req_data字段,取对应的值
3、如果该case有依赖,就需要走依赖函数,进行键位值的替换,实现实时数据变动;
4、进行接口的请求(如果没有依赖,则可以跳过第3步)
5、进行预期结果与实际结果的对比
6、最后,如果该case需要提取某个字段的值,根据键位,在返回的内容中进行提取
注意:new_data_dict这个字典,是存放替换的值,格式是key=value,key是我们自定义的名称,value则是从返回值提取的值,提取数据必须在替换数据之前就有值,不然会报错,因为提取的数据没有值,替换的时候就无法找到值进行替换。提取值是用了jsonpath的方法提取,替换则是采用了自己定义的,以"."的方式代替层级关系。
'''
elif exe_data[3] == 'YES': # 第1步,判断是否运行
req_data = cls.operation_req_data.get_req_data(exe_data[5]) # 第2步取body
print('执行的用例ID: ', exe_data[0])
data = json.loads(exe_data[9]) # 数据转换,怕数据格式错误。
if exe_data[7] != '': # 判断请求的body是否有依赖,此处判断值为有依赖
req_data = cls.dependent_data.replace_req_data(exe_data[7], req_data, cls.new_data_dict) # 第3步,有依赖,从提取值获取进行替换(注:提取值必须有值)
res = cls.m.myrequests(cls.host + exe_data[2], req_data, exe_data[4], exe_data[6]) # 第4步,进行数据请求
for key, value in data.items(): # 第5步,预期结果与实际结果的对比
res_value = cls.dependent_data.replace_data(key, res)
cls.assertEqual(value, res_value)
if exe_data[8] != '': # 判断是否需要提取
cls.new_data_dict = cls.dependent_data.dependent_data(exe_data[8], res, cls.new_data_dict) # 第6步,根据键位,在返回的内容提取值
else:
res = cls.m.myrequests(cls.host + exe_data[2], req_data, exe_data[4], exe_data[6]) # 第4步,进行无body替换的接口请求
for key, value in data.items(): # 第5步,预期结果与实际结果对比
res_value = cls.dependent_data.replace_data(key, res)
cls.assertEqual(value, res_value)
if exe_data[8] != '': # 判断是否需要提取
cls.new_data_dict = cls.dependent_data.dependent_data(exe_data[8], res, cls.new_data_dict) # 第6步,根据提取的键位,在返回值中提取对应的值
# 该文件的程序入口
if __name__ == '__main__':
unittest.main()
3、整个项目的脊柱已经弄好,现在就需要各个内容来支配整个项目
----从test文件整理出,我们可以察觉到缺少的函数文件,我们一一列出:
---1。excel表格的数据获取方法
---2。请求body的数据获取方法
---3。提取值的方法
---4。替换body的方法
---5。接口请求的方法
从这5点中,我们就来一一编写需要的方法:
3-1、excel的获取数据方法:operationExcel.py
在test文件里,我们发现了这两句代码,属于excel的操作
rows_count = self.operation_excel.get_all_lines()
exe_data = self.operation_excel.get_a_row_data(i)
那么我们就需要在common公用文件下新建一个operationExcel.py文件,来针对excel表格数据的操作
# coding=utf-8
import xlrd, os, time, xlwt
from xlutils.copy import copy
class OperationExcel(object):
def __init__(self, file_name=None, sheet_id=None):
if file_name:
self.file_name = file_name
self.sheet_id = sheet_id
else:
self.file_name = os.path.join(os.path.dirname(os.path.dirname(os.path.abspath(__file__))), 'data/ApiList1.xlsx')
self.data = self.get_data()
# 获取数据
def get_data(self):
data = xlrd.open_workbook(self.file_name)
tables = data.sheets()[self.sheet_id]
return tables
# 获取sheet下的行数
def get_all_lines(self):
tables = self.data
return tables.nrows
# 获取某一行的内容
def get_a_row_data(self, row_num):
tables = self.data
row_data = tables.row_values(row_num)
return row_data
3-2、body的获取数据方法:operationReqData.py
在test文件里,我们会发现以下的代码:
req_data = cls.operation_req_data.get_req_data(exe_data[5])
这样的代码,是我们从excel表取标识字段,到request_data文件里req_data取对应key的value,这样body就能取出来了
from data import request_data
class OperationReqDate(object):
def __init__(self):
self.data = request_data.req_data # 修改req_data的文件名
# 根据关键key来获取req_data文件的内容
def get_req_data(self, key):
if key == '':
return None
return self.data.get(key)
3-3、根据excel的数据,提取返回值的内容:dependentData.py
我们在现实的测试中,往往发现,这个接口运行的时候,会调用上一个接口的数据,而且还有一些数据值,都是重复调用,总不可能请求一个接口,去多次调用其他接口吧,这样就导致了接口的请求量变大了,增加了服务器的负载能力。
解决方案:我们在请求前,我们新建一个空的字典,自定义key来获取对应的value值,成成一个新的字典,请求body需要的时候,就直接从这里取值,这样就减少了请求次数。
然而,在test文件中,我们会发现有这样的代码存在:
if exe_data[8] != '':
cls.new_data_dict = cls.dependent_data.dependent_data(exe_data[8], res, cls.new_data_dict)
这样是进行判断是否有提取值,有则需要提取,反之则不需要,然后我们的提取方法:
提取方法的思路:
1、根据依赖的键位,去遍历返回的res,键位提取的格式:id=(result.id)
2、找到了键位的值后,把键位的key作为字典的key存放,找的值当做value存放,组成一个新的字典
# 根据exe表格中的key=(value)来获取一个新增的dict-data
def dependent_data(self, dependent_data, res, data_dict):
exe_data = dependent_data.split('\n')
# print('11: ', exe_data)
for data in exe_data:
data_value = data.split('=')
# print('data_value:', data_value)
dependent_key = data_value[1]
value = self.replace_data(dependent_key, res)
data_dict[data_value[0]] = value
return data_dict
在此时,就会发现一个新的语句:
value = self.replace_data(dependent_key, res)
然而我们就需要在该文件下再创建一个函数方法,这里提取的方法是采用jsonpath:
def replace_data(self, data_key, data_value):
"""
:param data_key: 依赖的key值
:param data_value: 遍历的返回页面数据
:return:
"""
try:
json_exe = parse(data_key)
madles = json_exe.find(data_value)
except Exception as msg:
print(msg)
return [madle.value for madle in madles][0]
这样我们的程序就不会报错,该方法的用途我也不做多解释,网上有类似的专业讲解。那么我们继续我们项目其他方法解析
3-4、替换请求的body里的键位值:dependentData.py
在3-3中,我已经讲解了提取值的方法,主要是为了便于替换的时候需要,在新的一个字典里,我们只有传入key,就能把之前接口请求返回的value取到,进行替换,就可以直接请求了,我在excel表的替换值的格式:id={{user_id}},格式可以根据自己喜欢来写,切割点就需要重新变化下即可。
# 根据exe的表格key={{value}}去替换值
def replace_req_data(self, dependent_data, req_data, new_data_dict):
exe_data = dependent_data.split('\n')
for data in exe_data:
data_value = data.split('=')
value = new_data_dict.get(data_value[1][2:-2])
req_data = self.check_json_data.check_json_data(req_data, data_value[0], value)
return req_data
在上面的方法中,发现有一行新的代码
req_data = self.check_json_data.check_json_data(req_data, data_value[0], value)
这行代码是进行替换的操作,遍历操作替换的工作量大,因此我们重新编写一个文件来实现此功能:
3-4-1、数据替换方法:checkJsonData.py
遍历我们的请求的body,根据对应的键位,去实现value的一个更新,实现数据更新功能
# coding=utf-8
from httprunner import exceptions, logger
from httprunner.compat import OrderedDict, basestring, is_py2
class Check_Json_Data(object):
# 替换json数据中对应的value
def change_json(self, json_content, query, new, delimiter='.'):
raise_flag = False
response_body = u"response body: {}\n".format(json_content)
try:
keys = query.split(delimiter)
if len(keys) == 1:
if isinstance(json_content, (list, basestring)):
json_content[int(keys[0])] = new
elif isinstance(json_content, dict):
json_content[keys[0]] = new
if len(keys) > 1:
for key in keys:
if isinstance(json_content, (list, basestring)):
return self.change_json(json_content[int(key)], ".".join(keys[1:]), new, delimiter='.')
elif isinstance(json_content, dict):
return self.change_json(json_content[key], ".".join(keys[1:]), new, delimiter='.')
except (KeyError, ValueError, IndexError):
raise_flag = True
if raise_flag:
err_msg = u"Failed to extract! => {}\n".format(query)
err_msg += response_body
logger.log_error(err_msg)
raise exceptions.ExtractFailure(err_msg)
# 数据替换的方法
def check_json_data(self, old_req_data, dependent_key, values):
"""
把旧的请求数据,根据键位,替换掉旧数据
:param old_req_data: json文件的旧数据
:param dependent_key: excel表中的键位值
:param values: 获取依赖的接口返回的键位值,也就是新值
:return: 返回一个替换后的请求数据
"""
self.change_json(old_req_data, dependent_key, values)
return old_req_data
3-5、请求的方法:myrequests.py
我们采用request模块进行url的请求,这里需要更新自己的token,各个平台不同,token的取值也不同,这个因系统而异。
首先,我们需要提取token
# 获取token
def login(self):
global token
if "Authorization" in self.s.headers.keys(): # 判断是否存在token,如果有就直接跳过
# print('--------token is exits!!---------')
return self.s
else:
excel_data = self.operation_excel.get_a_row_data(1)
url = self.host + excel_data[2]
req_data = login_data
res = self.s.post(url, json=req_data)
r = res.content.decode('utf-8')
r = json.loads(r)
token = r['result']['token']
self.s.headers.update({"Authorization": token})
print("----------token create successfully!--------")
return self.s
其次,封装自己的请求方式。网上有很多种封装方式,小伙伴可以选择自己喜欢的封装方式,这里我贴上我自己的封装方式,方法不完美,能实现就好。
# 自定义请求函数
def myrequests(self, url, req_data, req_type, data_type):
"""
自定义请求函数
:param url: 请求的url
:param req_data: 请求的data
:param req_type: 请求方式
:param data_type: 数据的传递格式
:return: res页面结果
"""
if req_type == "POST": # 判断请求方式:POST
if data_type == 'JSON': # 判断请求参数的数据类型
# post_data = json.loads(req_data)
# res = self.login().post(url, json=req_data)
res = self.login().post(url, json=req_data)
elif data_type == '':
res = self.login().post(url, data=req_data)
else:
res = self.login().post(url, data=req_data)
elif req_type == "GET":
if data_type == 'JSON':
get_params = json.loads(req_data)
res = self.login().get(url, params=get_params)
elif data_type == '':
res = self.login().get(url, params=req_data)
else:
res = self.login().get(url, params=req_data)
elif req_type == "DELETE":
if data_type == 'JSON':
get_params = json.loads(req_data)
res = self.login().delete(url, params=get_params)
elif data_type == '':
res = self.login().delete(url, params=req_data)
else:
res = self.login().delete(url, params=req_data)
print("request_req_url: ", res.url)
print("request_req_data: ", req_data)
res = res.content
res = json.loads(res.decode('utf-8'))
print('res: ', res)
return res
在附上配置文件内容:config
# coding=utf-8
HOST = "http://172.16.62.66"
# HOST = "http://172.16.62.71"
SQL_IP = "172.16.62.66"
# SQL_IP = "172.16.62.71"
db_message = {
"host": SQL_IP,
"username": "root",
"password": "123456",
"port": 3306,
"charset": "utf8"
}
login_url = HOST + '/xxx-x'x'x'x/login/login'
login_data = {
"mobile": "18100000000",
"smsCode": "888888"
}
总结:项目的方法封装不是很好,这里介绍我使用的办法,如果有更好的方法,方便留言,多多研究,让自动化测试更加完美。邮件的发送方法,请求头文件的更新,我这边都没做,后期实现了,再更新。。


