这段时间很闲,”领导“便对我们前端提了点要求希望我们能有自己的组件库,美其名曰:开发提高效率,统一样式,减轻负担。 嗯~,确实是很闲!
抱着这是领导的吩咐自己又是小菜鸡想进步的想法,决定试试,哪怕玩玩也好的态度开始了这次的旅程;
在网上闲逛了一上午,博客文章一大堆,多是虎头蛇尾,又来没回的,没办法也许都是大神笔记吧,只能自己来搞搞了,总是要自己弄的,也许我写的还不如人家呢!
闲言少叙,咱们这就开始!
第一步 准备工作
新建一个文件夹,打开命令行输入npm init,
$ npm init
name: (wq-components)
version: (1.0.0) 0.1.0
description: an example component library with React!
entry point: (index.js)
test command:
git repository:
keywords:
Author: machinish_wq
license: (ISC)MIT
About to write to /Users/alanbsmith/personal-projects/trash/package.json:

{
  "name": "wq-components",
  "version": "0.1.0",
  "description": "an example component library with React!",
  "main": "dist/index.js",
  "scripts": {
    "test": "echo \"Error: no test specified\" && exit 1"
  },
  "author": machinish_wq,
  "license": "MIT"
}

Is this ok? (yes)
在根目录下添加以下配置文件
touch pubilc/index.html script/ .babelrc .gitignore .npmignore README.md
- pubilc/index.html 存放root模板
- script/ 文件夹存放webpack.config相关文件
- .babelrc包含编译阶段一些有用的转转码规则(presets)
- .gitignore和.npmignore分别用于忽略来自 git 和 npm 的文件
- README.md也非常重要。这是我们和开源社区交流的主要方式
pubilc/index.html
React
script/webpack.dev.config.js
const path = require('path');
const webpack = require('webpack');
const webpackConfigBase = require('./webpack.base.config');
const HtmlWebpackPlugin = require('html-webpack-plugin');
const { merge } = require('webpack-merge');

function resolve(relatedPath) {
  return path.join(__dirname, relatedPath)
}

const webpackConfigDev = {
  mode: 'development',

  entry: {
    app: [resolve('../src/index.js')],
  },

  output: {
    path: resolve('../lib'),
    filename: 'button.js',
  },

  devtool: 'cheap-module-eval-source-map',

  devServer: { // 本地服务器
    contentBase: resolve('../lib'),
    hot: true,
    open: true,
    host: 'localhost',
    port: 8080,
  },

  plugins: [
    new HtmlWebpackPlugin({template: './public/index.html', }),
    new webpack.NamedModulesPlugin(),
    new webpack.HotModuleReplacementPlugin()
  ]
}

module.exports = merge(webpackConfigBase, webpackConfigDev)
script/webpack.prod.config.js
const path = require('path');
const webpack = require('webpack');
const nodeExternals = require('webpack-node-externals');
const webpackConfigBase = require('./webpack.base.config');
const TerserJSPlugin = require('terser-webpack-plugin');
const OptimizeCSSAssetsPlugin = require('optimize-css-assets-webpack-plugin');
const { CleanWebpackPlugin } = require('clean-webpack-plugin');
const { merge } = require('webpack-merge');

function resolve(relatedPath) {
  return path.join(__dirname, relatedPath)
}

const webpackConfigProd = {
  mode: 'production',

  entry: {
    app: [resolve('../src/components/index.js')],
  },

  output: {
    filename: 'index.js',
    path: resolve('../lib'),
    library: { // 导出的库名
      root: "componentLibrary",
      amd: "component-library",
    },
    libraryTarget: "umd"
  },

  devtool: 'source-map',  //或使用'cheap-module-source-map'、'none'
  optimization: {
    minimizer: [
      // 压缩js代码
      new TerserJSPlugin({// 多进程压缩
        parallel: 4,// 开启多进程压缩
        terserOptions: {
          compress: {
            drop_console: true,   // 删除所有的 `console` 语句
          },
        },
      }),
      //压缩css代码
      new OptimizeCSSAssetsPlugin()
    ],
  },
  externals: [nodeExternals()],

  plugins: [
    new CleanWebpackPlugin() //每次执行都将清空一下./lib目录
  ]
}
module.exports = merge(webpackConfigBase, webpackConfigProd)
注: libraryTarget 和 library 是开发类库必须要用的输出属性。
开发库被引用的方式有一下几种:’
传统的script方式:
AMD方式:
define(['demo'], function(demo) {
demo();
});
commonjs方式:
const demo = require('demo');
demo();
ES6 模块引入
import demo from 'demo';类库为什么支持不同方式的引入?这就是webpack.library和output.libraryTarget提供的功能。
output.libraryTarget 属性是控制webpack打包的内容如何被暴露的。
暴露的方式分为以下三种方式:
- 暴露一个变量
libraryTarget: “var”
webpack打包出来的值赋值给一个变量,该变量名就是output.library指定的值。将打包后的内容复制给一个全局变量,引用类库的时候直接使用该变量,nodejs环境不支持。 - 通过对象属性暴露
libraryTarget: “this”
libraryTarget: "window"
libraryTarget: "global" (此情况支持node)
以上三种方法是在公共对象上export出你的方法函数。
优点:减少变量冲突
缺点:nodejs环境不支持 - 通过模块暴露
1、libraryTarget: "commonjs"
直接在exports对象上导出–定义在library上的变量,node支持,浏览器不支持
2、libraryTarget: "commonjs2"
直接用module.exports导出,会忽略library变量,node支持,浏览器不支持,这个选项可以使用在commonjs环境中。
为什么commonjs不需要单独引入requirejs?
commonjs是服务端模块化语言规范,在node中使用的时候会使用node中的requireJS。
3.libraryTarget: "amd"
amd属于客户端模块语言的规范,需要用户自己引入requirejs才能使用。不支持nodejs环境,支持浏览器环境。
4.libraryTarget: "umd"我们要选用这个
该方案支持commonjs、commonjs2、amd,可以在浏览器、node中通用。它会根据引用该插件的上下文来判断属于什么环境,使其和CommonJS、AMD兼容或者暴露为全局变量
script/webpack.base.config.js loader被抽离档在这里方便管理和配置
const path = require('path');
function resolve(relatedPath) {
  return path.join(__dirname, relatedPath)
}
const webpackConfigBase = {
  resolve: {
    alias: {
      "@": resolve("src")
    },
    // 要解析的文件的拓展名
    extensions: [".js", ".jsx", ".json"],
    // 解析目录时需要使用的文件名
    mainFiles: ["index"]
  },
  //module此处为loader区域,一般文件内容解析,处理放在此处,如babel,less,postcss转换等
  module: {
    rules: [
      {
        test: /\.js[x]?$/,  // 用正则来匹配文件路径,这段意思是匹配 js 或者 jsx
        exclude: /node_modules/,
        use: {
          loader: 'babel-loader',
          options: {
            presets: ['@babel/preset-react'],
          }
        }
      },
      {
        test: /\.less$/,
        use: [
          'style-loader',
          { loader: 'css-loader', options: { importLoaders: 1 } },
          'less-loader',
          { loader: 'less-loader', options: { javascriptEnabled: true } }
        ]
      },
      {
        test: /\.css$/,
        use: [
          'style-loader',
          'css-loader',
          {
            loader: 'postcss-loader',
            options: {
              ident: 'postcss',
              plugins: (loader) => [
                require('autoprefixer')()
              ],
            }
          }
        ]
      }
    ]
  }
}
module.exports = webpackConfigBase;.babelrc这里配置的是antd的按需加载
{
  "presets": ["@babel/preset-env", "@babel/preset-react"],
  "plugins": [
    "@babel/plugin-proposal-class-properties",
    "@babel/plugin-proposal-object-rest-spread",
      ["import", {"libraryName": "antd", "libraryDirectory": "lib", "style":"css"
      }],
  ]
}
.gitignore 添加不需要push的文件
.DS_Store
dist
node_modules
*.log
.npmignore用于忽略不用发布到npm的文件
.babelrc
src
CODE_OF_CONDUCT.md
node_modules
.gitignore
webpack.config.js
yarn.lock
.eslintrc
第二步 添加配置
2.1 配置git和npm
在初始化的package.json文件里添加以下命令
 "scripts": {
    "build": "webpack --config ./scripts/webpack.prod.config.js",
    "dev": "webpack-dev-server --config ./scripts/webpack.dev.config.js",
    "prepublish": "npm run build"
 },
 // "files": [
 //   "lib"
// ],- build将运行scripts目录下webpack.prod.config.js文件对src目录下的内容如何进行转码然后导出到webpack预先配置的打包目录下。需要在webpack.prod.config.js文件设置入口src/index.js。
- npm会在我们运行npm publish之前执行这个脚本。 这将确保我们在dist的资源是最新的版本。
- "files"属性的值是一个数组,内容是模块下文件名或者文件夹名,也可以在模块根目录下创建一个".npmignore"文件(windows下无法直接创建以"."开头的文件,使用linux命令行工具创建如git bash),写在这个文件里边的文件即便被写在files属性里边也会被排除在外,写法与".gitignore"类似(本人并没有使用)
2.2 安装依赖
 "devDependencies": {
    "@babel/cli": "^7.2.3",
    "@babel/core": "^7.10.4",
    "@babel/plugin-proposal-class-properties": "^7.2.3",
    "@babel/plugin-proposal-object-rest-spread": "^7.2.0",
    "@babel/preset-env": "^7.10.4",
    "@babel/preset-react": "^7.10.4",
    "babel-plugin-import": "^1.13.3",
    "@hot-loader/react-dom": "^16.13.0",
    "autoprefixer": "^9.8.4",
    "babel-loader": "^8.1.0",
    "clean-webpack-plugin": "^3.0.0",
    "css-loader": "^3.6.0",
    "html-webpack-plugin": "^4.3.0",
    "optimize-css-assets-webpack-plugin": "^5.0.3",
    "postcss-loader": "^3.0.0",
    "style-loader": "^1.2.1",
    "terser-webpack-plugin": "^3.0.6",
    "less": "^3.10.2",
    "less-loader": "^5.0.0",
    "webpack": "^4.43.0",
    "webpack-cli": "^3.3.12",
    "webpack-dev-server": "^3.11.0",
    "webpack-merge": "^5.0.9",
    "webpack-node-externals": "^2.5.0"
  },
  "dependencies": {
    "react": "^16.14.0",
    "react-dom": "^16.14.0",
    "antd": "^4.15.1"
  },
  "peerDependencies": {
    "prop-types": "^15.7.2",
    "react": "^16.14.0",
    "react-dom": "^16.14.0",
    "antd": "^4.15.1"
},- dependencies字段指定了项目运行所依赖的模块,该类型依赖一般属于运行项目业务逻辑需要依赖的第三方库。
- devDependencies指定项目开发所需要的模块。
- peerDependencies中声明的依赖,如果项目没有显式依赖并安装,则不会被npm 自动安装,转而输出warning日志,告诉项目开发者,你需要显式依赖了,不要再依靠我了。
2.3 添加组件
创建src/components目录,在目录下依次添加button.js、button.css文件
button.js
import React, { useState } from "react";
import { Button } from 'antd'
import "./change_button.less";
import 'antd/dist/antd.less';
const ChangeButton = (props) => {
const [btnTxt, setBtnTxt] = useState("Login");
return (
{ setBtnTxt(btnTxt === "Login" ? "Logout" : "Login"); }} >
{btnTxt}
);
};
export default ChangeButton;
button.less
.button-container {
  width: 100px;
  height: 40px;
  display: flex;
  align-items: center;
  justify-content: center;
  background-color: aquamarine;
  border-radius: 5px;
}

.button-container:hover {
  cursor: pointer;
}
src/index.js
import MyButton from './button';

export default MyButton;
2.4 启动项目
运行npm start启动项目,
项目顺利启动,先一步本地联调
第三步 本地调试
在之前的组件库根目录运行pwd获取项目地址;
然后,我们需要在本地利用脚手架或者手动新建一个小应用项目;并在当前项目根目录运行npm link [组件库地址]
不出以外你会遇到一个 Maximum call stack size exceeded 错误!没遇到那当我没说,手动尴尬!
方法是删除组件的原有依赖,并清空npm全局缓存,再次尝试命令npm link [组件库地址],如多次尝试未果,则需要修改权限:指令sudo chown -R 501:20 "/Users/[用户名]/.npm";
之后你在自己的本地项目的node_modules找到自己的组件库;
这里是我自己在修改那个问题的时候把组件库的名字改了!小细节忽略即可!
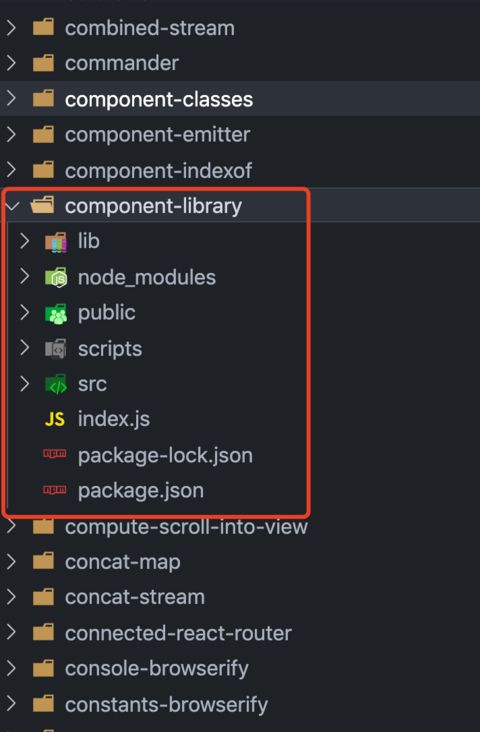
注:这里需要把lib文件下打包后的index挪到跟文件下来,不然在接下来的调试中会报错找不到这个组件库,看了下antd和其他的依赖这里是可以没有的只是我还没去找对应的解决方法
之后我们就可以像引用其他的组件一样正常使用我们的组件了!
第四步 上传npm
运行以下命令将组件发布到npm
npm publish输入npm 账号密码即可, 没有的记得申请一个
看着挺简单,操作起来各种问题频发,就当是个笔记吧欢迎交流指正!