VS Code调试C/C++程序
https://www.kancloud.cn/qinbao/git/706151
VS Code调试C/C++程序
- VS Code调试C/C++程序
- 搭建VS Code C/C++调试环境
- 一个简单的C/C++程序调试
- Makefile构建的C/C++程序调试
- STM32嵌入式程序调试
- 参考资料
记录用VS Code调试C/C++程序的基本流程,加深对工程构建、编译链接的理解。我自己目前的体会是不适合在实际工程中使用,除非对makefile工程构建、C/C++相关的工具链有深刻的认识,否则很难驾驭。
搭建VS Code C/C++调试环境
按照《参考1》搭建VS Code C/C++调试环境,大致的流程如下,
- 安装VS CODE
VSCODE是微软免费的跨平台的开发平台框架,从其官网下载安装即可; - 安装微软的C/C++插件
注意,微软的C/C++插件并不包含C++编译器和调试器,这些需要自己安装,比较常用的C++编译器有Windows下的mingw-w64、macOS下的Clang for XCode和linux下的GCC,Windows需要把工具链的安装地址添加至环境变量PATH里。
- 配置IntelliSense
打开相关文件夹后,微软的C/C++插件会根据系统的编译器尝试提供基本的配置,如果没有成功配置,就需要自己生成一个配置文件c_cpp_properties.json,方法如下:
- 打开命令面板(Ctrl+Shift+P或菜单[查看]->[命令面板])
- 运行命令C/Cpp: Edit configurations...
- 生成c_cpp_properties.json,该配置文件保存于.vscode文件夹下
以下是基于Windows下MinGW C++编译器生成的默认配置文件c_cpp_properties.json.
{
    "configurations": [
        {
            "name": "Win32",
            "includePath": [
                "${workspaceFolder}/**"
            ],
            "defines": [
                "_DEBUG",
                "UNICODE",
                "_UNICODE"
            ],
            "windowsSdkVersion": "",
            "compilerPath": "C:\\MinGW\\bin\\gcc.exe",
            "cStandard": "c11",
            "cppStandard": "c++17",
            "intelliSenseMode": "clang-x64"
        }
    ],
    "version": 4
}
- Build代码
如果你想build代码,你需要配置task.json文件:- 打开命令面板(Ctrl+Shift+P或菜单[查看]->[命令面板])
- 选择命令Tasks: Configure Tasks...,单击创建文件tasks.json,你会看到一系列任务运行模板
- 选择模板Others :运行任意外部命令的示例
- 修改command命令行表达式,以build代码,如g++
- 添加需要的args(如-g用来调试)
- 修改label,使其有描述性
tasks.json示例代码,如下:
{
    "version": "2.0.0",
    "tasks": [
        {
            "label": "build hello world",
            "type": "shell",
            "command": "g++",
            "args": [
                "-g", "helloworld.cpp"
            ]
        }
    ]
}
如果你想通过菜单[任务]->[运行生成任务...]或快捷键(Ctrl+shift+B)build代码,需要在刚才的文件tasks.json添加组build,如下,这样就可以build代码生成可执行的文件了:
{
    "version": "2.0.0",
    "tasks": [
        {
            "label": "build hello world",
            "type": "shell",
            "command": "g++",
            "args": [
                "-g", "helloworld.cpp"
            ],
            "group": {
                "kind": "build",
                "isDefault": true
            }
        }
    ]
}
- 调试代码
调试,需要生成文件launch.json:- 点击左侧工具栏的调试图标
- 在Debug视图,点击Configure图标
- 选择C++ (GDB/LLDB),生成文件launch.json,有两个配置项
- C++ Launch 定义当你启动调试加载你的应用时的属性
- C++ Attach 定义已经运行进程的附加属性
- 更新program属性,添加自己的调试目录
- 如果你想在调试之前build自己的代码,需要添加preLaunchTask属性,该属性的内容为刚才在task.json中创建的任务的label(如之前的 "build hello world")
以下是用MinGW GDB调试器的launch.json配置文件的内容:
{
    "version": "0.2.0",
    "configurations": [
        {
            "name": "(gdb) Launch",
            "type": "cppdbg",
            "request": "launch",
            "program": "${workspaceFolder}/a.exe",
            "args": [],
            "stopAtEntry": false,
            "cwd": "${workspaceFolder}",
            "environment": [],
            "externalConsole": true,
            "MIMode": "gdb",
            "miDebuggerPath": "C:\\mingw\\bin\\gdb.exe",
            "setupCommands": [
                {
                    "description": "Enable pretty-printing for gdb",
                    "text": "-enable-pretty-printing",
                    "ignoreFailures": true
                }
            ],
            "preLaunchTask": "build hello world"
        }
    ]
}
至此,点击左侧工具栏的调试图标,再点击绿色的运行图标,就能build代码->调试程序了,这时,在终端已经可以看到“hello world”了!
一个简单的C/C++程序调试
没有实践的理论就是空中楼阁。
- 新建并打开一个源码文件结构
- 新建一个目录ex
- 目录下新建文件hello.cpp,如下:
#include

int main(int argc, char const *argv[])
{
    printf("hello world!\n");

    printf("hello world!\n");
    getchar();

    return 0;
}
- 打开VSCODE,[File]->[Open Folder]打开文件夹
- 配置IntelliSense
打开命令面板(Ctrl+Shift+P或菜单[查看]->[命令面板]),运行命令C/Cpp: Edit configurations...,生成c_cpp_properties.json,该配置文件保存于.vscode文件夹下,以下是基于linux下GCC编译器生成的默认配置文件c_cpp_properties.json:
{
    "configurations": [
        {
            "name": "Linux",
            "includePath": [
                "${workspaceFolder}/**"
            ],
            "defines": [],
            "compilerPath": "/usr/bin/clang++-3.5",
            "cStandard": "c11",
            "cppStandard": "c++17",
            "intelliSenseMode": "clang-x64"
        }
    ],
    "version": 4
}
需要关注的有两项,"includePath"为包含文件的目录,根据源码结构自行设置,由于该源码就一个hello.cpp文件,不用设置,默认的即可;"compilerPath"为编译器的目录,根据需要修改
- Build代码
- 新建build任务,这个任务的作用是提供编译链接的脚本,个人理解,执行这个任务后会在本地目录生成目标文件
- 菜单[Tasks]->[Run Build Task...],此时会提示没有找到Build任务,是否需要去配置Build任务,只能跟着去做任务了,创建一个以Others为模板的Build任务配置文件tasks.json如下,
{
    "version": "2.0.0",
    "tasks": [
        {
            "label": "build hello",	// 起个自己喜欢的名字
            "type": "shell",
            "command": "g++",	// 编译的命令
            "args": [			// 编译命令的参数,会不会下就看会不会这些编译命令的使用了
                "-g", "ex.cpp", "-o", "qb.out"
            ],
            // 以上是以Others为模板的Build任务配置文件tasks.json的内容
            // 菜单[Tasks]->[Run Build Task...],还是提示在build hello工程里没有build任务,按提示配置即生成如下配置内容
            "group": {
                "kind": "build",
                "isDefault": true
            }
        }
    ]
}
- 菜单[Tasks]->[Run Build Task...],执行以上配置的编译链接的任务,其实就是执行了一条编译命令
g++ -g ex.cpp -o qb.out
这时可以在目录下发现生成的目标文件qb.out
- 调试代码
- 点击左侧工具栏的调试图标->Configure图标->选择C++ (GDB/LLDB),生成文件launch.json,
{
    "version": "0.2.0",
    "configurations": [
        {
            "name": "(gdb) Launch",
            "type": "cppdbg",
            "request": "launch",
            "program": "${workspaceFolder}/qb.out",	// 输出文件
            "args": [],
            "stopAtEntry": false,	// 开始调试时,是否停在程序入口
            "cwd": "${workspaceFolder}",
            "environment": [],
            "externalConsole": true,
            "MIMode": "gdb",	// 调试命令
            "setupCommands": [
                {
                    "description": "Enable pretty-printing for gdb",
                    "text": "-enable-pretty-printing",
                    "ignoreFailures": true
                }
            ],
            // 以下是另添加,作用是调试前的的任务,下面定义的是之前定义的那个build任务
             "preLaunchTask": "build hello"
        }
    ]
}
- 点击绿色的运行图标即可调试,OK!
Makefile构建的C/C++程序调试
VS Code 配合 Makefile 来提高 C/C++ 工程的可移植性,这个方案的思路是:使用 Makefile 来构建工程, VS Code 通过 Tasks 调用 make 工具来编译,通过调用 gdb 来调试。其优点在于不是过分依赖 VS Code 自身的配置,一个合适的 Makefile 可以在各个平台上执行编译,但是在开发过程中又可以用到 VS Code 自身的插件带来的便利,减少命令输入,减少命令行 gdb 调试带来的烦恼。
- 准备工作
准备一套 Makefile 模板,比如说 https://github.com/TheNetAdmin/Makefile-Templates ,或者也可以自行写一套模板,一个好的 Makefile 模板可以省去很多麻烦;
安装编译工具与 make 工具:尤其是在 Windows 下,使用 make 是一个比较麻烦的事情,推荐大家使用 msys 提供的一套工具,这里有一个打包供下载 https://pan.baidu.com/s/1kV5hx3p
- 首先构建一个 Makefile ,如果没有合适的可以到这里找到一些现成模板
这里的makefile文件,如下:
# originating https://github.com/TheNetAdmin/Makefile-Templates
# tool marcros
CC := g++
CCFLAG := -std=c++14
DBGFLAG := -g
CCOBJFLAG := $(CCFLAG) -c

# path marcros
BIN_PATH := bin
OBJ_PATH := obj
SRC_PATH := src
DBG_PATH := debug

# compile marcros
TARGET_NAME := main
ifeq ($(OS),Windows_NT)
    TARGET_NAME := $(addsuffix .exe,$(TARGET_NAME))
endif
TARGET := $(BIN_PATH)/$(TARGET_NAME)
TARGET_DEBUG := $(DBG_PATH)/$(TARGET_NAME)
MAIN_SRC := src/main.cpp

# src files & obj files
SRC := $(foreach x, $(SRC_PATH), $(wildcard $(addprefix $(x)/*,.c*)))
OBJ := $(addprefix $(OBJ_PATH)/, $(addsuffix .o, $(notdir $(basename $(SRC)))))
OBJ_DEBUG := $(addprefix $(DBG_PATH)/, $(addsuffix .o, $(notdir $(basename $(SRC)))))

# clean files list
DISTCLEAN_LIST := $(OBJ) \
                  $(OBJ_DEBUG)
CLEAN_LIST := $(TARGET) \
              $(TARGET_DEBUG) \
              $(DISTCLEAN_LIST)

# default rule
default: all

# non-phony targets
$(TARGET): $(OBJ)
	$(CC) $(CCFLAG) -o $@ $?

$(OBJ_PATH)/%.o: $(SRC_PATH)/%.c*
	$(CC) $(CCOBJFLAG) -o $@ $<

$(DBG_PATH)/%.o: $(SRC_PATH)/%.c*
	$(CC) $(CCOBJFLAG) $(DBGFLAG) -o $@ $<

$(TARGET_DEBUG): $(OBJ_DEBUG)
	$(CC) $(CCFLAG) $(DBGFLAG) $? -o $@

# phony rules
.PHONY: all
all: $(TARGET)

.PHONY: debug
debug: $(TARGET_DEBUG)

.PHONY: clean
clean:
	@echo CLEAN $(CLEAN_LIST)
	@rm -f $(CLEAN_LIST)

.PHONY: distclean
distclean:
	@echo CLEAN $(CLEAN_LIST)
	@rm -f $(DISTCLEAN_LIST)
- 根据这个 Makefile,构建一个目录结构如下的工程目录
- Project
    - Makefile
    - src: 所有源文件 (不得放在子目录)
        - add.cpp
        - add.h
        - sub.cpp
        - sub.h
        - main.cpp
    - obj
        - 空
    - debug
        - 空
    - bin
        - 空
- 然后对于 VS Code 的 tasks.json 和 launch.json 做一些修改
文件tasks.json
{
    "version": "2.0.0",
    "tasks": [
        {
            "label": "build",
            "command": "make",
            "args": [
                "default"
            ],
            "type": "shell"
        },
        {
            "label": "build-debug",
            "command": "make",
            "args": [
                "debug"
            ],
            "type": "shell"
        },
        {
            "label": "clean",
            "command": "make",
            "args": [
                "clean"
            ],
            "type": "shell"
        }
    ]
}
文件launch.json
{
    "version": "0.2.0",
    "configurations": [
        {
            "name": "(gdb) Launch",
            "type": "cppdbg",
            "request": "launch",
            // 修改为新的测试目标文件路径
            "program": "${workspaceRoot}/debug/main",
            "args": [],
            "stopAtEntry": true,
            "cwd": "${workspaceRoot}",
            "environment": [],
            "externalConsole": true,
            "MIMode": "gdb",
            //"miDebuggerPath": "gdb.exe",
            "setupCommands": [
                {
                    "description": "Enable pretty-printing for gdb",
                    "text": "-enable-pretty-printing",
                    "ignoreFailures": true
                }
            ],
            "preLaunchTask": "build-debug"
        }
    ]
}
到此可以按上节的步骤使用编译和调试工具了。
STM32嵌入式程序调试
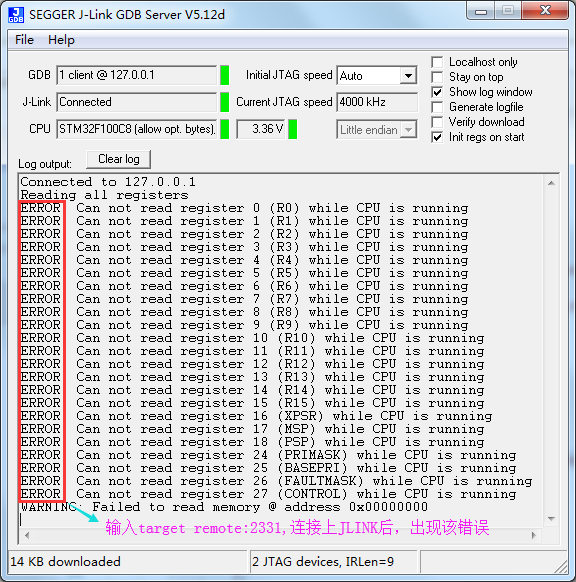
参考使用VSCode和VS2017编译调试STM32程序,能下载运行,不能正常调试。
也许是JLINK不是正版造成的,也许是哪没设置正确,以后再整。
