RHCE8.0-Web服务器及实验
Web服务器
1、 www是world wide web的缩写,即全球广播。www可以结合文字、图形、影像以及声音等多媒体,并通过可以让鼠标单击超链接的方式将信息以Internet传递到世界各地。 网站会提供数据,而你的客户端必须使用可以解析这些数据的软件来处理,那就是浏览器。
2、www所用的协议:浏览器怎样向web服务器请求数据以及服务器怎样把数据文档传给浏览器,由http协议来定(Hyper Text Transport Protocol,HTTP,超文本传输协议)
3、www服务器需要提供可让客户端浏览的平台。目前主流的Web服务器是Apache 、Microsoft的internet信息服务器(IIS)和unix Nginx。
4、服务器所提供的的主要数据是超文本标记语言(Hyper Text Markup Language,HTML)、多媒体文件(图片、影像、声音、文字等,都属于多媒体或称为超媒体)、HtML只是一些纯文本,通过所谓的标识来规范所要显示的数据格式。
网址的意义
web服务器提供的这些数据大部分都是文件,那么我们需要在服务器端先将数据文件写好,并且放置在某个特殊的目录下面,这个目录就是我们整个网站的首页,
网址存放的默认目录:/var/www/html
URL:Uniform Resource Locator,统一资源定位符,对可以从互联网上得到的资源的位置和访问方法的一种简洁的表示,是互联网上标准资源的地址。
网址的写法:
<协议>://<主机地址或主机名>[:port]/<目录资源,路径>*
浏览器支持的协议:http、https、ftp
端口:http:80 、 https:443
IANA:互联网数字分配机构
0-1023:固定的应用程序使用,特权端口(只有管理员权限可监听)
1024-41951:注册端口,分配给程序注册为某应用使用:3306/TCP
41952-60000:客户端程序随机使用端口,动态端口,或私有端口
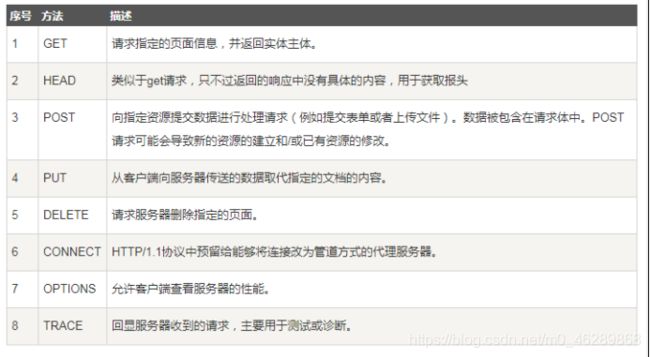
HTTP请求方法:
在http通信中,每个http请求报文都包含一个方法,用以告诉web服务器端需要执行哪些具体的动作,这些动作包括:获取指定web页面、提交内容到服务器、删除服务器上资源文件等。
状态代码
1xx:指示信息 —— 表示请求已接收,继续处理。
2xx:成功 —— 表示请求已被成功接收、理解、接受。
3xx:重定向 —— 要完成请求必须进行更进一步的操作。
4xx:客户端错误 —— 请求有语法错误或请求无法实现。
5xx:服务器端错误 —— 服务器未能实现合法的请求。
常见状态代码、状态描述
200 	OK:客户端请求成功。
400 	Bad Request:客户端请求有语法错误,不能被服务器所理解。
401 	Unauthorized:请求未经授权,这个状态代码必须和 WWW-Authenticate 报头域一起使用。
403		Forbidden:服务器收到请求,但是拒绝提供服务。
404 	Not Found:请求资源不存在,举个例子:输入了错误的URL。
500		Internal Server Error:服务器发生不可预期的错误。
503 	Server Unavailable:服务器当前不能处理客户端的请求,一段时间后可能恢复正常。
HTTP报文
由ASCLL码串组成,各个字段长度不同。
http报文分两种:
http请求报文:

http响应报文;

http协议请求的工作流程
(1)终端客户在web浏览器地址栏输入访问地址http://www.ceshi.com:80/index.html
(2)web浏览器请求DNS服务器把域名www.ceshi.com解析成web服务器的IP地址
(3)web浏览器将端口号(默认是80)从访问地址(URL)中解析出来
(4)web浏览器通过解析后的ip地址及端口号与web服务器之间建立一条TCP连接
(5)建立TCP连接后,web浏览器向web服务器发送一条HTTP请求报文
(6)web服务器响应并读取浏览器的请求信息,然后返回一条HTTP响应报文。
(7)web服务器关闭HTTP连接,关闭TCP连接,web浏览器显示访问的网站内容到屏幕上。
www服务器的类型
1.仅提供用户浏览的单向静态网页
单纯是由服务器单向提供数据给客户端,Server不需要与client端有互动,所以你可以到该网站上去浏览,但是无法进行数据的上传。
2.提供用户互动接口的动态网站
这种类型的网站可以让服务器与用户互动,常见的例如留言板,博客。
这种类型的网站需要通过“网页程序语言”来实现与用户互动的行为。
3、另外一种交互式的动态网页
主要是在客户端实现。
服务端将可执行的程序代码(JavaScript)传送给客户端,客户端的浏览器如果提供JavaScript的功能,那么该程序就可以在客户端的计算机上面工作了;
另外一种可在客户端执行的就是flash动画格式,在这种动画格式内还可以进行程序设计。
搭建动态网站的需求:
1、可支持的操作系统:让所有需要的软件都能够进行安装。
2、可运行的www服务器:例如Apache。
3、网页程序语言:
Perl(Practical Extraction and Report Language,实用报表提取语言)、
PHP(Hypertext Preprocessor,超文本预处理器,是一种通用开源脚本语言)、
JSP(Java Server Pages,java服务器页面)、
CGI(Common Gateway Interface,公共网关接口)、
ASP(Active Server Pages,动态服务器页面)。
4、数据存储的数据库系统 :MySQL、MSSQL、Oracle等。
LAMP(linux+Apache+MySQL+PHP)
Apache:主要提供www的服务器平台
MySQL:传统的文件读取是很麻烦的,如果你只要读取该文件当中的一小部分,系统还是会将整个文件读出来,若又有人同时读取同一个文件时,那就会造成效率与系统上的问题,所以才会有数据库系统的推出。数据库其实是一种特殊格式的文件,这种文件要通过特殊接口(数据库软件)来进行读写。由于这个特殊接口已经针对数据的查询、写入做过优化设计,因此很适合多人同时写入与查询工作。
PHP:PHP可以被用来建立动态网页,PHP程序代码可以直接在HTML网页当中嵌入,就像编辑HTML网页一样简单。PHP是一种“程序语言”,这种程序语言可以直接在网页当中编写,不需要经过编译即可执行。
www服务器的基本配置
服务器端:在linux上面实现网页服务器需要Apache这套服务器软件,httpd提供Apache主程http://httpd.apache.org/docs/2.4/
配置yum源:使用阿里云的源
[root@redhat ~]# curl -o /etc/yum.repos.d/CentOS-Base.repo https://mirrors.aliyun.com/repo/Centos-7.repo
修改文件:
[root@redhat yum.repos.d]# vim CentOS-Base.repo
:%s/$releasever/8/g
: %s/$basearch/x86_64/g
![]()
安装httpd协议包:
[root@redhat ~]# yum install  -y httpd
查看装了哪些文件:
[root@redhat yum.repos.d]# rpm -ql httpd

[root@redhat yum.repos.d]# tree /etc/httpd
/etc/httpd
├── conf         #主配置文件 只加载httpd.conf
│   ├── httpd.conf
│   └── magic
├── conf.d       #子配置文件  所以文件都加载
│   ├── autoindex.conf
│   ├── README
│   ├── userdir.conf
│   └── welcome.conf
├── conf.modules.d
│   ├── 00-base.conf
│   ├── 00-dav.conf
│   ├── 00-lua.conf
│   ├── 00-mpm.conf
│   ├── 00-optional.conf
│   ├── 00-proxy.conf
│   ├── 00-systemd.conf
│   ├── 01-cgi.conf
│   ├── 10-h2.conf
│   ├── 10-proxy_h2.conf
│   └── README
├── logs -> ../../var/log/httpd
├── modules -> ../../usr/lib64/httpd/modules
├── run -> /run/httpd
└── state -> ../../var/lib/httpd

[root@redhat ~]# systemctl start httpd
[root@redhat html]# systemctl status httpd
#查看httpd的状态
[root@redhat ~]# systemctl stop firewalld.service
#关闭防火墙
[root@redhat ~]# systemctl is-active firewalld.service
#查看防火墙状态
[root@redhat ~]# systemctl disable firewalld.service
#关闭开机自启动
[root@redhat ~]# setenforce 0
相关文件
/etc/httpd/conf/httpd.conf
#主要的配置文件

/etc/httpd/conf.d/*.conf
#额外的参数文件。若不修改原始配置文件httpd.conf,可将额外参数文件独到/etc/httpd/conf.d/目录下

/var/www/html/
#默认的首页所在目录,当输入网址时所显示的数据,就是放在这个目录当中的首页文件(默认为index.html)

/var/www/cgi-bin/
#默认给一些可执行的CGI(网页程序)程序放置的目录,当输入网址/cgi-bin/时所显示的数据所在

/var/log/httpd/
#默认的Apache日志文件都放在这里,对于流量比较大的网站来说,一个星期的日志文件的数据可以达到1GB左右
在windows的浏览器访问IP地址:192.168.16.3

主配置文件参数说明
[root@localhost ~]# vim /etc/httpd/conf/httpd.conf

ServerRoot "/etc/httpd"   			服务的根目录
Listen 80							监听端口
Include conf.modules.d/*.conf		包括所有的 .conf文件并加载
User apache							执行用户
Group apache						执行组
ServerAdmin root@localhost			邮箱地址
ServerName 0.0.0.0:80				服务名

DocumentRoot "/var/www/html"        网页文件存放的目录

"/var/www">
    AllowOverride None #不允许这个目录下的访问控制文件来改变这里的配置,这也意味着不用查看这个目录下的访问控制文件。
    Require all granted
</Directory>

"/var/www/html">
    Options Indexes FollowSymLinks   #索引,跟踪软链接
    AllowOverride None
    Require all granted
</Directory>

           	 #加载一个目录模块
    DirectoryIndex index.html        #定义静态页面的命名为index.html
</IfModule>

".ht*">       				 #访问控制文件
    Require all denied
</Files>

ErrorLog "logs/error_log"			#错误日志
LogLevel warn						#日志等级
#等级种类:debug, info, notice, warn, error, crit,alert, emerg.


 		#日志配置模块
    LogFormat "%h %l %u %t \"%r\" %>s %b \"%{
         Referer}i\" \"%{
     User-Agent}i\"" combined
    LogFormat "%h %l %u %t \"%r\" %>s %b" com    mon


     LogFormat "%h %l %u %t \"%r\" %>s %b \"    %{
     Referer}i\" \"%{
     User-Agent}i\" %I %O" combi    nedio
    </IfModule>
    CustomLog "logs/access_log" combined  	#访客日志文件
</IfModule>

   			#别名模块
     ScriptAlias /cgi-bin/ "/var/www/cgi-bin/"
</IfModule>

cgi(通用网关接口)是web服务器运行时外部程序的规范,按cgi编写的程序可以扩展服务器的功能。cgi应用程序能与浏览器进行交互,还可通过数据库API与数据库服务器等外部数据源进行通信,从数据库服务器中获取数据

"/var/www/cgi-bin">
    AllowOverride None
     Options None
    Require all granted
</Directory>

    #多用途互联网邮件扩展模块
    TypesConfig /etc/mime.types
    AddType application/x-compress .Z
    AddType application/x-gzip .gz .tgz
    AddType text/html .shtml
    AddOutputFilter INCLUDES .shtml
</IfModule>

mime多用途互联网邮件扩展类型,是设定某种扩展名的文件用一种应用程序来打开的方式类型,当该扩展名文件被访问时,浏览器会自动使用指定应用程序来打开。多用于指定一些客户端自定义的文件名,以及一些媒体文件打开方式。

AddDefaultCharset UTF-8     #默认字符集


     MIMEMagicFile conf/magic
</IfModule>

EnableSendfile on
IncludeOptional conf.d/*.conf  #加载conf.d目录下的所有.conf文件
错误状态及处理
错误状态:
Aug 31 03:35:09 localhost.localdomain httpd[7374]: AH00558: httpd: Could not reliably determine the server's fully qualified domain name, using localhost.localdomain. Set the 'ServerName' directive globally to suppress this message
httpd:无法使用localhost.localdomain可靠地确定服务器的完全限定域名。 全局设置“ServerName”指令以禁止显示此消息

处理:
[root@redhat ~]#cd /etc/httpd/conf/
[root@redhat conf]# vim httpd.conf
添加:ServerName 0.0.0.0:80  保存退出
[root@redhat conf]# systemctl restart httpd
相关问题
1.apache欢迎界面的配置文件是:/etc/httpd/conf.d/welcome.conf
2. apache欢迎界面的具体文件是:/usr/share/httpd/noindex/index.html
3.为什么自己定义的静态页面是在/var/www/html目录?主配置文件中的 DocumentRoot "/var/www/html" 定义
4.为什么静态网页的名字是index.html? 由主配置文件DirectoryIndex index.html 定义
实验
实验一:搭建一个web服务器,访问该服务器时显示“hello world”欢迎界面。
解题步骤:
[root@redhat noindex]# cd /var/www/html/
[root@redhat html]# echo "hello word" >index.html

实验二:建立两个基于ip地址访问的网站,要求如下:
1、该网站ip地址的主机位为100,设置DocumentRoot为/www/ip/100,网页内容为:this is 100。
2、该网站ip地址主机位为200,设置DocumentRoot为/www/ip/200,网页内容为:this is 200。
解题步骤:
[root@redhat ~]# systemctl status firewalld.service
[root@redhat ~]# getenforce
Permissive
[root@redhat ~]# rpm -q httpd
[root@redhat ~]# nmcli device show ens160
[root@redhat ~]# cat /etc/resolv.conf
[root@redhat network-scripts]# cd /etc/sysconfig/network-scripts/
[root@redhat network-scripts]# cat ifcfg-配置_1
[root@redhat ~]# nmcli connection modify 配置\ 1 ipv4.addresses 192.168.16.100/24 ipv4.gateway 192.168.16.2 ipv4.dns 223.5.5.5 ipv4.method manual
[root@redhat ~]# nmcli connection up 配置\ 1
[root@redhat ~]# nmcli connection modify 配置\ 1  +ipv4.addresses 192.168.16.200/24
[root@redhat ~]# cat /etc/sysconfig/network-scripts/ifcfg-配置_1
[root@redhat ~]# nmcli connection up 配置\ 1
[root@redhat ~]# mkdir -p /www/ip/100
[root@redhat ~]# cd /www/ip/100/
[root@redhat 100]# echo  this is 100 > index.html
[root@redhat 100]# cat index.html
this is 100
[root@redhat ~]# vim /usr/share/doc/httpd/httpd-vhosts.conf
xx.conf文件的参考文件
[root@redhat ~]# cd /etc/httpd/conf.d/
[root@redhat conf.d]# vim xx.conf

.168.16.100:80>
    DocumentRoot /www/ip/100
    ServerName 192.168.16.100
    ErrorLog   /var/log/httpd/100_log
    CustomLog /var/log/httpd/100-access_log common
</VirtualHost>

#参考 /etc/httpd/conf/httpd.conf文件
#允许别人访问文件的权限
/www/ip/100>
        allowoverride none
        require all granted
</directory>

[root@redhat conf]# systemctl restart httpd
#重启服务
[root@redhat conf.d]# systemctl status httpd
#查看服务状态

[root@redhat conf]# curl 192.168.16.100
this is 100
#本机测试
网页测试:

实验三:建立两个基于不同端口访问的网站,要求如下:
1、建立一个使用web服务器默认端口的网站,设置DocumentRoot为/www/port/80,网页内容为:the port is 80。
2、建立一个使用10000端口的网站,设置DocumentRoot为/www/port/10000,网页内容为:the port is 10000。
解题步骤:
[root@redhat ~]# mkdir -p /www/port/100
[root@redhat ~]# mkdir -p /www/port/10000
[root@redhat ~]# vim /etc/httpd/conf.d/xx.conf
.168.16.100:80>
DocumentRoot /www/port/100
ServerName 192.168.16.100
ErrorLog /var/log/httpd/100_log
CustomLog /var/log/httpd/100-access_log common
</VirtualHost>
.168.16.100:10000>
DocumentRoot /www/port/10000
ServerName 192.168.16.100
ErrorLog /var/log/httpd/10000_log
CustomLog /var/log/httpd/10000-access_log common
</VirtualHost>
/www/port/100>
allowoverride none
require all granted
</directory>
/www/port/10000>
allowoverride none
require all granted
</directory>
[root@redhat ~]# vim /etc/httpd/conf/httpd.conf
Listen 10000
[root@redhat ~]# echo this port is 80 > /www/port/100/index.html
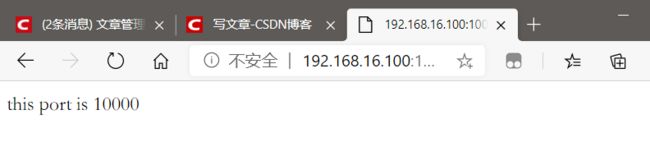
[root@redhat ~]# echo this port is 10000 > /www/port/10000/index.html
本机测试:
[root@redhat ~]# curl 192.168.16.100
this port is 80
[root@redhat ~]# curl 192.168.16.100:10000
this port is 10000

实验四:建立两个基于域名访问的网站
要求如下:
1、新建一个网站,域名为www.ceshi.com,设置DocumentRoot为/www/name,网页内容为this is test。
2、新建一个网站,域名为rhce.first.day,同时可通过ce.first.day访问,设置DocumentRoot为/www/ce,网页内容为:today is first day of class。
基于域名的网站,需要用到域名解析
浏览器如何通过域名去查询URL对应的IP(对应服务器地址):
1、浏览器缓存:浏览器会按照一定的频率缓存DNS记录。
2、操作系统缓存:如果浏览器缓存中找不到需要的DNS记录,那就去操作系统中的hosts文件找。hosts是一个没有扩展名的系统文件,其作用就是将一些常用的网址域名与其对应的IP地址建立一个关联"数据库",当用户在浏览器中输入一个需要登录的网址时,系统会首先自动从Hosts文件中寻找对应的IP地址,一旦找到,系统会立即打开对应网页,如果没有找到,则系统会再将网址提交DNS域名解析服务器进行IP地址的解析。
windows下的hosts文件路径:C:\Windows\System32\drivers\etc\hosts
Linux下的hosts文件路径:/etc/hosts
3、路由缓存:路由器也有DNS缓存。
4、ISP的DNS服务器:ISP是互联网服务提供商(Internet Service Provider)的简称,ISP有专门的DNS服务器应对DNS查询请求。
5、根服务器:ISP的DNS服务器还找不到的话,它就会向根服务器发出请求,进行递归查询(DNS服务器先问根域名服务器.com域名服务器的IP地址,然后再问.com域名服务器,依次类推)。
配置步骤:
[root@redhat ~]# systemctl stop firewalld.service
[root@redhat ~]# setenforce 0
[root@redhat ~]# getenforce
Permissive

1、创建两个网页文件根目录,并定义网页内容
[root@redhat ~]# mkdir /www/name
[root@redhat ~]# mkdir /www/ce
[root@redhat ~]# echo this is test > /www/name/index.html
[root@redhat ~]# echo today is first day of class > /www/ce/index.html

2、定义基于域名访问的网站的配置文件
[root@redhat ~]# vim /etc/httpd/conf.d/host.conf
.168.16.100:80>
        DocumentRoot /www/name
        ServerName www.ceshi.com
</Virtualhost>

.168.16.200:80>
        DocumentRoot /www/ce
        ServerName rhce.first.day
        ServerAlias cd.first.day
</Virtualhost>

/www/name/>
        allowoverride none
        require all granted
</Directory>

/www/ce/>
        allowoverride none
        require all granted
</Directory>

3、重启httpd服务
[root@redhat ~]# systemctl restart httpd

4、配置hosts文件,实现域名解析
[root@redhat ~]# more /etc/hosts
127.0.0.1   localhost localhost.localdomain localhost4 localhost4.localdomain4
::1         localhost localhost.localdomain localhost6 localhost6.localdomain6
192.168.16.100 www.ceshi.com
192.168.16.200 ce.first.com
192.168.16.200 rhce.first.com

5、本机测试
[root@redhat ~]# curl www.ceshi.com
this is test
[root@redhat ~]# curl ce.first.com
today is first day of class
[root@redhat ~]# curl rhce.first.com
today is first day of class
实验五:搭建两个web网站
要求如下:
1、在rhel8的系统上搭建网站:该网站ip地址主机位为11,设置documentroot为/www/你的名字拼音的缩写,网页内容为:my name is…
2、在rhel8的系统上搭建网站:该网站ip地址主机位为12,设置documentroot为/www/12,网页内容为:wo shi 你的姓名的拼音。
一题解:
1、关闭防火墙,关闭SELinux
[root@redhat ~]# systemctl stop firewalld.service
[root@redhat ~]# systemctl is-active firewalld.service
inactive
[root@redhat ~]# setenforce 0
[root@redhat ~]# getenforce
Permissive

2、查看本机IP地址
[root@redhat ~]# ip a

3、修改主机的IP地址
[root@redhat ~]# nmcli connection modify 配置\ 1 ipv4.addresses 192.168.16.11/24 ipv4.gateway 192.168.16.2 ipv4.dns 223.5.5.5 ipv4.method manual

4、激活IP地址
[root@redhat ~]# nmcli connection up 配置\ 1
连接已成功激活(D-Bus 活动路径:/org/freedesktop/NetworkManager/ActiveConnection/5)

5、创建目录
[root@redhat ~]# mkdir -p /www/xx

6、编辑欢迎界面的配置文件
[root@redhat ~]# vim /etc/httpd/conf.d/xx.conf
.168.16.11:80>
    DocumentRoot /www/xx/
    ServerName 192.168.16.11
    ErrorLog   /var/log/httpd/xx_log
    CustomLog /var/log/httpd/xx-access_log common
</VirtualHost>

/www/xx/>
        allowoverride none
        require all granted
</directory>

7、编辑欢迎界面的具体文件
[root@redhat ~]# echo 'my name is xx' > /www/xx/index.html

8、重启httpd服务
[root@redhat ~]# systemctl restart httpd

9、测试
[root@redhat www]# curl 192.168.16.11
my name is xx

二题解
1、关闭防火墙,关闭SELinux
[root@redhat ~]# systemctl stop firewalld.service
[root@redhat ~]# systemctl is-active firewalld.service
inactive
[root@redhat ~]# setenforce 0
[root@redhat ~]# getenforce
Permissive

2、查看本机IP地址
[root@redhat ~]# ip a

3、添加主机的IP地址
[root@redhat ~]# nmcli connection modify 配置\ 1 +ipv4.addresses 192.168.16.12/24

4、激活网络接口
[root@redhat ~]# nmcli connection up 配置\ 1
连接已成功激活(D-Bus 活动路径:/org/freedesktop/NetworkManager/ActiveConnection/6)

5、创建界面内容文件所放置的目录
[root@redhat ~]# mkdir /www/12

6、编辑欢迎界面的配置文件
[root@redhat ~]# vim /etc/httpd/conf.d/xx.conf
.168.16.>
    DocumentRoot /www/12
    ServerName 192.168.16.12
    ErrorLog   /var/log/httpd/12_log
    CustomLog /var/log/httpd/12-access_log common
</VirtualHost>

/www/12/>
        allowoverride none
        require all granted
</directory>

7、编辑具体界面内容文件
[root@redhat www]# echo "wo shi xuexi" > /www/12/index.html

8、重启httpd服务
[root@redhat www]# systemctl restart httpd

9、本机测试
[root@redhat www]# curl 192.168.16.12
wo shi xuexi
