如何使用Let's Encrypt在WordPress中添加免费SSL
When we first covered how to add SSL in WordPress, a lot of our readers asked for a free SSL solution. Unfortunately nothing existed at that time. However that has changed now thanks to Let’s Encrypt. In this article, we will show you how to add free SSL in WordPress with Let’s Encrypt.
当我们第一次介绍如何在WordPress中添加SSL时 ,许多读者都要求提供免费的SSL解决方案。 不幸的是,当时不存在任何东西。 但是,现在有了改变,这要归功于Let's Encrypt。 在本文中,我们将向您展示如何使用Let's Encrypt在WordPress中添加免费的SSL。
什么是SSL和加密? (What is SSL and Let’s Encrypt?)
Every internet user shares lots of personal information each day. We do that when shopping online, creating accounts, signing into different websites, etc.
每个互联网用户每天都共享大量个人信息。 我们在网上购物,创建帐户,登录其他网站等时会这样做。
If not properly encrypted, then this information can be spied upon and stolen. This is where SSL comes in. It provides the encryption technology to secure the connection between a user’s browser and the web server.
如果未正确加密,则该信息可能会被窃取和窃取。 这就是SSL的用武之地。它提供了加密技术来保护用户浏览器和Web服务器之间的连接。
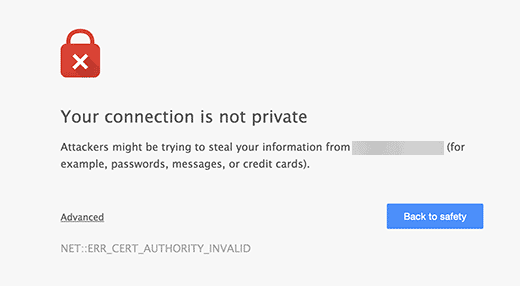
Each site is issued a unique SSL certificate for identification purposes. If a server is pretending to be on HTTPS, and it’s certificate doesn’t match, then most modern browsers will warn the user from connecting to the site.
每个站点都会获得一个唯一的SSL证书以用于识别。 如果服务器假装使用HTTPS,并且其证书不匹配,则大多数现代浏览器都会警告用户不要连接到该站点。
Previously, the only way to secure sites with SSL was by using a paid SSL certificate.
以前,使用SSL保护网站的唯一方法是使用付费SSL证书 。
Let’s Encrypt is a free open certificate authority that aims to provide SSL certificate for general public. It is a project of Internet Research Group, a public service corporation. Let’s Encrypt is sponsored by many companies including Google, Facebook, Sucuri, Mozilla, Cisco, etc.
让我们加密是一个免费的开放证书颁发机构,旨在为普通大众提供SSL证书。 它是公共服务公司Internet Research Group的一个项目。 Let's Encrypt由许多公司赞助,包括Google,Facebook, Sucuri ,Mozilla,Cisco等。
Having said that, let’s take a look at how you can add free SSL certificate to your WordPress site with Let’s Encrypt.
话虽如此,让我们看一下如何使用Let's Encrypt向您的WordPress网站添加免费的SSL证书。
简单方法–使用提供内置免费SSL的主机 (Easy Way – Using a Host That Offers Built-in Free SSL)
As Let’s Encrypt is becoming popular, some WordPress hosting companies have already started offering built-in easy SSL set up.
随着“加密”的流行,一些WordPress托管公司已经开始提供内置的简易SSL设置。
The easiest way to add Let’s Encrypt free SSL to WordPress is by signing up with a hosting company that offers a built-in integration.
向WordPress添加“让我们加密免费SSL”的最简单方法是通过与提供内置集成的托管公司注册。
在SiteGround上使用“让我们加密”设置免费SSL (Setting up Free SSL with Let’s Encrypt on SiteGround)
SiteGround is one of the most trusted and well-known hosting companies offering built-in integration of free SSL. We use Siteground for our List25 website.
SiteGround是提供免费SSL的内置集成的最受信任和知名的托管公司之一。 我们将Siteground用于List25网站 。
Here is how to enable Let’s Encrypt free SSL in SiteGround.
这是在SiteGround中启用“让我们加密免费SSL”的方法。
Simply login to your cPanel dashboard and scroll down to the security section. There you will need to click on the Let’s Encrypt icon.
只需登录到cPanel仪表板并向下滚动到“安全性”部分。 在那里,您需要单击“加密”图标。
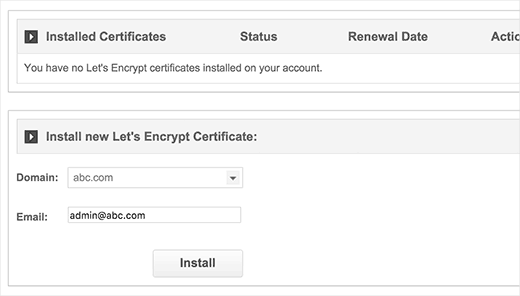
This will bring you to the Let’s Encrypt install page. You will need to select the domain name where you want to use the free SSL, and then provide a valid email address.
这将带您进入“让我们加密”安装页面。 您将需要选择要使用免费SSL的域名,然后提供有效的电子邮件地址。
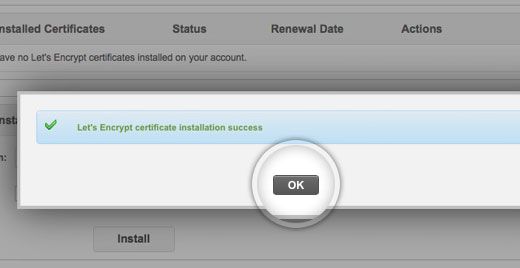
You can now click on the install button. Let’s encrypt will now issue a unique SSL certificate for your website. Once it’s finished, you will see a success message.
您现在可以单击安装按钮。 现在让我们加密将为您的网站颁发唯一的SSL证书。 完成后,您将看到一条成功消息。
That’s all, you have successfully integrated Let’s Encrypt free SSL to your WordPress site.
就是这样,您已经成功地将Let's Encrypt免费SSL集成到WordPress网站。
However, your WordPress site is not yet ready to use it. First you will need to update your WordPress URLs and then fix insecure content issue.
但是,您的WordPress网站尚未准备好使用它。 首先,您将需要更新WordPress URL,然后解决不安全的内容问题。
Don’t worry we will show you how to do that. Skip to the section on updating URLs and fixing insecure content issues.
不用担心,我们将向您展示如何做到这一点。 跳至有关更新URL和解决不安全内容问题的部分。
在DreamHost上使用“让我们加密”设置免费SSL (Setting up Free SSL with Let’s Encrypt on DreamHost)
DreamHost is another popular WordPress hosting service provider that’s offering built-in integration to setup free SSL on any of your domains hosted with them.
DreamHost是另一家流行的WordPress托管服务提供商,它提供内置集成以在与它们托管的任何域上设置免费SSL。
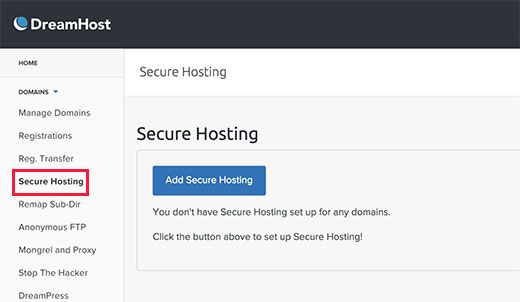
First you need to login to your Dreamhost dashboard. Under the Domains section, you need to click on secure hosting.
首先,您需要登录到Dreamhost仪表板。 在“域”部分下,您需要单击安全托管。
On the secure hosting page, you need to click on ‘Add Secure Hosting’ button to continue.
在安全托管页面上,您需要单击“添加安全托管”按钮以继续。
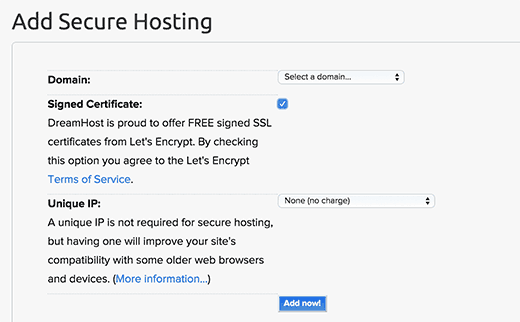
Dreamhost will now ask you to select your domain. Below that it will give you an option to add free SSL certificate from Let’s Encrypt. You need to make sure that this checkbox is checked.
Dreamhost现在将要求您选择域。 在此之下,它将为您提供从Let's Encrypt添加免费SSL证书的选项。 您需要确保选中此复选框。
You can optionally choose to add a unique IP to your domain name. It is not required, but will improve compatibility with older versions of Internet Explorer on Windows XP.
您可以选择将唯一IP添加到您的域名。 它不是必需的,但是它将改善与Windows XP上较旧版本的Internet Explorer的兼容性。
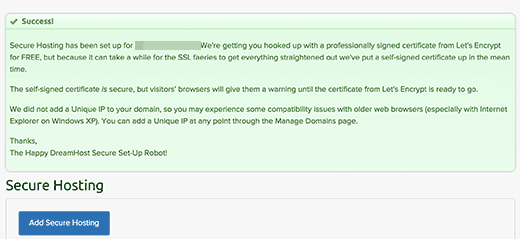
Click on Add Now button to finish the setup. DreamHost will now start setting up your Free SSL certificate with Let’s encrypt. You will see a success message like this:
单击立即添加按钮以完成设置。 DreamHost现在将使用“让我们加密”开始设置您的免费SSL证书。 您将看到类似以下的成功消息:
You have successfully added a free SSL certificate with Let’s Encrypt to your WordPress site on DreamHost.
您已成功将带有Let's Encrypt的免费SSL证书添加到DreamHost上的WordPress站点。
You still need to update WordPress URLs and fix insecure content issue. Jump to the section, updating WordPress URLs after setting up SSL.
您仍然需要更新WordPress URL并解决不安全的内容问题。 设置SSL后,跳至更新WordPress URL的部分。
在其他Web主机上安装Let's Encrypt Free SSL (Installing Let’s Encrypt Free SSL on Other Web Hosts)
Let’s Encrypt free SSL is a domain based SSL certificate. This means that if you have a domain name, then you can add it on any web host.
让我们加密免费SSL是基于域的SSL证书。 这意味着,如果您有一个域名 ,则可以将其添加到任何Web主机上。
However, if your web host does not offer an easy integration like SiteGround or DreamHost, then you will need to go through a somewhat lengthy procedure.
但是,如果您的虚拟主机没有像SiteGround或DreamHost这样的简单集成,那么您将需要进行一些漫长的过程。
This procedure differs from one web host to another. Most hosting companies have a support document explaining how to do that. You can also contact their support staff for detailed instructions.
此过程从一个虚拟主机到另一个虚拟主机不同。 大多数托管公司都有一份支持文档,说明如何执行此操作。 您也可以联系其支持人员以获取详细说明。
BlueHost one of the official WordPress hosting providers allows you to add third-party SSL to your domains hosted with them. For detailed instructions, take a look at their SSL installation of 3rd party certificate page.
BlueHost是官方的WordPress托管提供商之一,可让您向与它们托管的域中添加第三方SSL。 有关详细说明,请查看其第三方证书的SSL安装页面。
设置SSL后更新WordPress URL (Updating WordPress URLs After Setting up SSL)
After setting up the Free SSL certificate with Let’s Encrypt, the next step is to move your WordPress URL from HTTP to HTTPS.
使用“让我们加密”设置免费SSL证书后,下一步是将WordPress URL从HTTP移到HTTPS。
A normal site without SSL certificate uses HTTP protocol. This is usually highlighted with http prefix in web addresses, like this:
没有SSL证书的普通站点使用HTTP协议。 通常在网址中以http前缀突出显示,例如:
http://www.example.com
http://www.example.com
Secure websites with SSL certificates use HTTPS protocol. This means that their addresses look like this:
具有SSL证书的安全网站使用HTTPS协议。 这意味着他们的地址如下所示:
https://www.example.com
https://www.example.com
Without changing the URLs in your WordPress site, you will not be using SSL and your site will not be secure for collecting sensitive data.
如果不更改WordPress网站中的URL,您将不会使用SSL,并且您的网站将无法安全地收集敏感数据。
Having said, let’s see how to move WordPress URLs from http to https:
说了这么多,让我们看看如何将WordPress URL从http移到https:
For Brand New WordPress Website
对于全新的WordPress网站
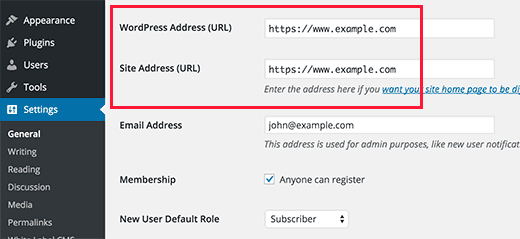
If you are working on a brand new website, then you can just go to your WordPress admin area and click on settings. There you will need to update the WordPress URL and Site URL fields to use https.
如果您在一个全新的网站上工作,则可以转到WordPress管理区域并单击设置。 在那里,您将需要更新WordPress URL和Site URL字段以使用https。
Don’t forget to save your changes.
不要忘记保存您的更改。
For Existing WordPress Sites
对于现有的WordPress网站
If your site has been live for a while, then chances are that it is indexed by search engines. Other people may have linked to it using http in the URL. You need to make sure that all traffic is redirected to the https URL.
如果您的网站已经存在了一段时间,那么很有可能被搜索引擎索引。 其他人可能已使用URL中的http链接到它。 您需要确保所有流量都重定向到https URL。
First thing you need to do is install and activate the Really Simple SSL plugin. For more details, see our step by step guide on how to install a WordPress plugin.
您需要做的第一件事是安装并激活Really Simple SSL插件。 有关更多详细信息,请参阅有关如何安装WordPress插件的分步指南。
The plugin will automatically detect your SSL certificate and set up your website to use it. In most cases, you will not have to make any more changes. The plugin will also fix insecure content issue.
该插件将自动检测您的SSL证书并设置您的网站以使用它。 在大多数情况下,您将无需进行任何其他更改。 该插件还将修复不安全的内容问题。
更新Google Analytics(分析)设置 (Update Google Analytics Settings)
If you have Google Analytics installed on your WordPress site, then you need to update its settings and add your new url with https.
如果您在WordPress网站上安装了Google Analytics(分析) ,则需要更新其设置并使用https添加新的网址。
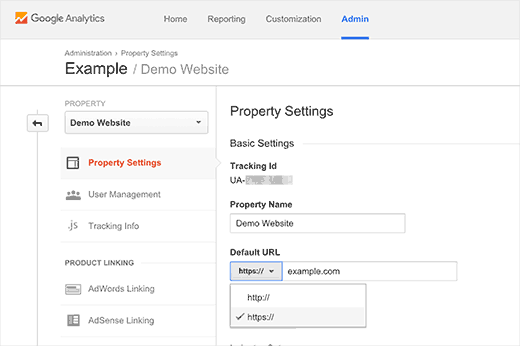
Login to your Google Analytics dashboard and click on ‘Admin’ at the top menu. Next, you need to click on property settings under your website.
登录到您的Google Analytics(分析)信息中心,然后点击顶部菜单中的“管理”。 接下来,您需要单击网站下的属性设置。
There you will see the default URL option. Click on http and then select https.
在那里,您将看到默认的URL选项。 单击http,然后选择https。
Don’t forget to click on the save button to store your settings.
不要忘记单击保存按钮来存储您的设置。
That’s all, we hope this article helped you add Free SSL in WordPress with Let’s Encrypt. You may also want to see our list of 40 useful tools to manage and grow your WordPress blog.
仅此而已,我们希望本文能帮助您通过Let's Encrypt在WordPress中添加免费SSL。 您可能还想查看我们的40种有用工具的列表, 这些工具可以管理和发展WordPress博客 。
If you liked this article, then please subscribe to our YouTube Channel for WordPress video tutorials. You can also find us on Twitter and Facebook.
如果您喜欢这篇文章,请订阅我们的YouTube频道 WordPress视频教程。 您也可以在Twitter和Facebook上找到我们。
翻译自: https://www.wpbeginner.com/wp-tutorials/how-to-add-free-ssl-in-wordpress-with-lets-encrypt/

