编译全志V3S(荔枝派zero)整个系统流程及后续故障答疑使用技巧等
全志V3S(荔枝派zero)学习
- 购买到的硬件
- 声明一下用的主线Uboot + 主线linux,如果你是小白不幸买到了本产品建议弃坑既浪费时间,又浪费生命,香橙派树莓派是你更好的选择
-
- Uboot 编译与烧录
- 烧录TF卡之前需要分区,安装GParted后如下分区
- 全志sunxi-tools烧录工具安装(fex文件转为二进制bin文件,主线版本可以跳过这一步)
- 下载编译Uboot
- 烧录u-boot到TF卡
- 写入并编译bootargs引导参数
- 编译Linux内核
- emdebian根文件系统构建,使用 debootstrap/multistrap 交叉安装 Debian
- Debian buster (10) rootfs 制作
- Buildroot 根文件系统构建
- 编译
- 烧录
- 复制到TF卡
- 最后终于到了激动人心的环节了,插上TF卡电源启动
- 故障答疑
-
- 无法识别复合设备虚拟串口CDC Composite Device
- 添加Serial + RNDIS的功能
- 串口输出和屏幕显示问题
- 使用技巧
-
- 适配Ethernet
- 添加USB UVC摄像头
- 添加ssh
- 模拟鼠标键盘usb hid gadget
- 模拟U盘 g_mass_storage.ko
- usb虚拟串口实现
- 添加wifi驱动及配置
- 使用sunxi-fel 借 u-boot ram启动 Linux系统, 无需 spi flash / TF 卡
- 荔枝派等ARM嵌入式移植QT5.15.2以上版本
- 关于提取编译后的Image,u-boot,设备树,基础信息汇编信息
- Linux堆利用
购买到的硬件
全志V3S(荔枝派zero)
官方5寸液晶屏
声明一下用的主线Uboot + 主线linux,如果你是小白不幸买到了本产品建议弃坑既浪费时间,又浪费生命,香橙派树莓派是你更好的选择
如果想使用主线的特性,可以使用 主线Uboot + 主线linux 开发环境。系统配置为dts设备树配置。
主线uboot: https://github.com/Lichee-Pi/u-boot
主线linux: https://github.com/Lichee-Pi/linux
官网教程 http://zero.lichee.pro/
全志官方移植wiki https://linux-sunxi.org/Main_Page
板子资料 http://cn.dl.sipeed.com/shareURL/LICHEE/Zero
如何制作rootfs的基础说明debootstrap
https://wiki.debian.org/EmDebian/CrossDebootstrap
https://wiki.debian.org/Debootstrap
https://linux-sunxi.org/Debootstrap
USB Guest configuration
https://openwrt.org/docs/guide-user/hardware/usb_gadget
http://trac.gateworks.com/wiki/linux/OTG
linux官方文档
https://github.com/Lichee-Pi//tree/zero-5.2.y/Documentation
Uboot 编译与烧录
安装交叉编译器
wget https://releases.linaro.org/components/toolchain/binaries/latest-7/arm-linux-gnueabihf/gcc-linaro-7.5.0-2019.12-x86_64_arm-linux-gnueabihf.tar.xz
tar xvf gcc-linaro-7.5.0-2019.12-x86_64_arm-linux-gnueabihf.tar.xz
mv gcc-linaro-7.5.0-2019.12-x86_64_arm-linux-gnueabihf /opt/
vim /etc/bash.bashrc
# add: PATH="$PATH:/opt/gcc-linaro-7.5.0-2019.12-x86_64_arm-linux-gnueabihf/bin"
source /etc/bash.bashrc
arm-linux-gnueabihf-gcc -v
sudo apt-get install device-tree-compiler
烧录TF卡之前需要分区,安装GParted后如下分区
全志sunxi-tools烧录工具安装(fex文件转为二进制bin文件,主线版本可以跳过这一步)
//安装依赖包(不安装会报错)
sudo apt-get install pkg-config pkgconf zlib1g-dev libusb-1.0-0-dev

//获取源码
//v3s 分支
git clone -b v3s https://github.com/Icenowy/sunxi-tools.git
//f1c100s-spiflash 分支
git clone -b f1c100s-spiflash https://github.com/Icenowy/sunxi-tools.git

//进入源码文件夹
cd sunxi-tools
//编译和安装
make && sudo make install
下载编译Uboot
git clone https://github.com/Lichee-Pi/u-boot.git -b v3s-current
#or git clone https://github.com/Lichee-Pi/u-boot.git -b v3s-spi-experimental
cd u-boot
make ARCH=arm CROSS_COMPILE=arm-linux-gnueabihf- LicheePi_Zero_800x480LCD_defconfig
#or make ARCH=arm CROSS_COMPILE=arm-linux-gnueabihf- LicheePi_Zero_480x272LCD_defconfig
#or make ARCH=arm CROSS_COMPILE=arm-linux-gnueabihf- LicheePi_Zero_defconfig
make ARCH=arm menuconfig
time make ARCH=arm CROSS_COMPILE=arm-linux-gnueabihf- 2>&1 | tee build.log
- 编译完成后当前目录下会生成boot引导文件 u-boot-sunxi-with-spl.bin
可以添加以太网补丁
Device Drivers > Network device support
添加 Allwinner Sun8i Ethernet MAC support (NEW)
烧录u-boot到TF卡
将u-boot-sunxi-with-spl.bin烧录到TF卡中
//插入TF卡前后查询,确认设备名称
ls /dev/sd*

//删除TF/SD的分区信息
sudo dd if=/dev/zero of=/dev/sdb bs=512K count=1

//烧录到TF卡(`u-boot-sunxi-with-spl.bin`在uboot根目录下)
sudo dd if=u-boot-sunxi-with-spl.bin of=/dev/sdb bs=1024 seek=8
/dev/sdb 名称不固定根据自己的u盘名字改
写入并编译bootargs引导参数
在uboot根目录下新建 boot.cmd
vim boot.cmd
# 写入以下内容
setenv bootargs console=ttyS0,115200 panic=5 console=tty0 rootwait root=/dev/mmcblk0p2 earlyprintk rw vt.global_cursor_default=0
load mmc 0:1 0x41000000 zImage
load mmc 0:1 0x41800000 sun8i-v3s-licheepi-zero.dtb
bootz 0x41000000 - 0x41800000


第一行setenv命令,设定了变量bootargs(启动参数)为:通过tty0和ttyS0串口输出启动信息;启动失败延迟5秒重启,根文件在TF卡的第二分区,可读写;

第二行指定了从TF中将设备树的dtb文件加载到0x80C00000的位置(地址参考自官方SDK)

第三行指定了将压缩后的内核zImage加载到0x80008000的位置

第四行为从加载地址启动内核的命令

#console=ttyS[,options] 使用特定的串口
# mmcblk0p2
# mmc TF卡
# blk(block,块设备)
# 0(第一个块设备,也就是第一张sd卡)
# p(partition,分区)
# 通过设置early_printk选项,可以在内核串口设备初始化之前,看到打印输出
mkimage工具在uboot/tools文件夹下
sudo cp ./tools/mkimage /usr/local/bin/mkimage # 拷贝到用户文件夹下,方便以后可以直接使用
mkimage -C none -A arm -T script -d boot.cmd boot.scr # 生成`boot.scr`,然后将其放入第一分区
编译Linux内核
sudo apt-get install module-init-tools
使用最新的内核:
git clone -b zero-5.2.y https://github.com/Lichee-Pi/linux.git
cd linux
make ARCH=arm licheepi_zero_defconfig
make ARCH=arm menuconfig   #add bluethooth, etc.
make ARCH=arm CROSS_COMPILE=arm-linux-gnueabihf- -j16
ARCH=arm CROSS_COMPILE=arm-linux-gnueabi- make modules_install INSTALL_MOD_PATH=`pwd`/output/
ARCH=arm CROSS_COMPILE=arm-linux-gnueabi- make modules_install INSTALL_MOD_PATH=/media/zzt/d1d3824d-62b2-417d-81ee-4a6e2750bc601
- 编译完成后,zImage在arch/arm/boot/下,驱动模块在out/下
- 设备树文件 linux内核编译中arch/arm/boot/dts/sun8i-v3s-licheepi-zero.dtb 5寸显示屏请选择sun8i-v3s-licheepi-zero-with-800x480-lcd.dtb
emdebian根文件系统构建,使用 debootstrap/multistrap 交叉安装 Debian
debootstrap是debian/ubuntu下的一个工具,用来构建一套基本的系统
任何第三方编写教程都不如" 源 "官方来个正确和及时
https://wiki.debian.org/EmDebian/CrossDebootstrap#QEMU.2Fdebootstrap_approach
以上经博主测试功能均正常成功进入系统
Debian buster (10) rootfs 制作
1. debootstrap

sudo apt install qemu-user-static -y
sudo apt install debootstrap -y
mkdir rootfs

wget https://ftp-master.debian.org/keys/release-10.asc -qO- | gpg --import --no-default-keyring --keyring ./debian-release-10.gpg

#debootstrap --keyring=./debian-release-10.gpg --variant=minbase buster buster http://ftp.cn.debian.org/debian/
debootstrap --keyring=./debian-release-10.gpg --foreign --verbose --arch=armhf  stretch rootfs http://ftp2.cn.debian.org/debian

#debootstrap --foreign --verbose --arch=armhf  stretch rootfs http://ftp2.cn.debian.org/debian //Debian 9.9 (stretch)


2.
cd rootfs
   mount --bind /dev dev/
   mount --bind /sys sys/
   mount --bind /proc proc/
   mount --bind /dev/pts dev/pts/
   cd ..
3.
cp /usr/bin/qemu-arm-static rootfs/usr/bin/
   chmod +x rootfs/usr/bin/qemu-arm-static
4. 解压

LC_ALL=C LANGUAGE=C LANG=C chroot rootfs /debootstrap/debootstrap --second-stage --verbose
可以在这个时候

LC_ALL=C LANGUAGE=C LANG=C chroot rootfs
   安装任何东西

5.
passwd ###设置roofs root密码
apt-cache clean #删除安装包
exit
rm rootfs/usr/bin/qemu-arm-static

6. 在rootfs下面 运行 tar cvzf debian10.rootfs.gz .
    可以生成包,任意解压到文件系统即可

modify /etc/apt/sourc.list
deb http://ftp2.cn.debian.org/debian stretch main
modify /etc/ssh/sshd_config
PermitRootLogin yes
Buildroot 根文件系统构建
wget https://buildroot.org/downloads/buildroot-2021.02.tar.gz
tar xvf buildroot-2021.02.tar.gz
cd buildroot-2021.02
make menuconfig
查询编译工具链所在位置:
which arm-linux-gnueabihf-gcc
读取编译工具链里的内核版本:
cat /opt/gcc-linaro-7.5.0-2019.12-x86_64_arm-linux-gnueabihf/arm-linux-gnueabihf/libc/usr/include/linux/version.h

查询得到
#define LINUX_VERSION_CODE 264707
#define KERNEL_VERSION(a,b,c) (((a) << 16) + ((b) << 8) + (c))
十进制数264707的十二进制为0x40A03,则对应的内核版本号为4.10.3。
基本配置:
Target options  --->
	Target Architecture (ARM (little endian))  --->
	Target Binary Format (ELF)  --->
	Target Architecture Variant (cortex-A7)  --->
	Target ABI (EABIhf)  --->
	Floating point strategy (VFPv4)  --->
	ARM instruction set (ARM)  --->


### 编译工具链配置:
Toolchain  --->
	Toolchain type (External toolchain)  --->
	*** Toolchain External Options ***
	Toolchain (Custom toolchain)  --->
	Toolchain origin (Pre-installed toolchain)  --->
	/opt/gcc-linaro-7.5.0-2019.12-x86_64_arm-linux-gnueabihf/arm-linux-gnueabihf/)
	Toolchain path
	($(ARCH)-linux-gnueabihf) Toolchain prefix 改为工具链前缀是: arm-linux-gnueabihf
	External toolchain gcc version (7.0.x)  --->
	External toolchain kernel headers series (4.10.x)  --->
	External toolchain C library (glibc/eglibc)  --->
	[*] Toolchain has SSP support? (NEW)
	[*] Toolchain has RPC support? (NEW)
	[*] Toolchain has C++ support?
	[*] Enable MMU support (NEW)
编译
make
如果出错则使用make clean然后再编译。
编译完成后,生成的根文件系统在 output/images/rootfs.tar。
烧录
# 查询挂载名
df -h
# 把buildroot产生的rootfs.tar解压到第二分区根目录
sudo tar xvf output/images/rootfs.tar -C /挂载的tf卡第二个分区目录(例:/media/pjw/9009f48f-8b2b-4b4c-a7f8-21887dd8432b)
复制到TF卡
- TF卡中的系统镜像一般分为三个区:
- boot区或者引导区 - 该部分没有文件系统而是直接将二进制的bootloader(uboot)文件直接写入。
- linux内核区 - fat文件系统,存放linux内核、内核参数文件还有设备数dtb文件。
- rootfs分区 - 用来存放根文件系统和用户数据等,一般是ext4文件分区格式。
boot.scr(主线llinux boot引导)
sun8i-v3s-licheepi-zero.dtb(设备树文件在arch/arm/boot/dts/下)
u-boot-sunxi-with-spl.bin(Uboot 已烧录 )
zImage(Linux内核)
最后终于到了激动人心的环节了,插上TF卡电源启动
故障答疑
- Uboot 如果烧录正常的话会有Uboot 界面
- bootargs引导参数正常会有一排排代码出现
- Buildroot正常会有顺利进入系统
无法识别复合设备虚拟串口CDC Composite Device
只需使用Zadig为这个设备安装一个串口驱动,只需编辑/etc/inittab文件,添加一行ttyGS0::respawn:/bin/getty -L ttyGS0 57600 vt100即可启用这个终端。
接下来是网络共享的问题。之前我们提到过,这个默认的配置文件启用的是一个复合设备,然而我们在这里并没有看到其他的设备。看到这里,你应该猜到是什么问题了吧——没错,是Windows没有正确识别这个复合设备。根据这里(http://irq5.io/2016/12/22/raspberry-pi-zero-as-multiple-usb-gadgets/)的提示,我们需要手动编写一个脚本,让其手工配置USB Gadget的各项参数。这个脚本可以在这里(https://gist.github.com/geekman/5bdb5abdc9ec6ac91d5646de0c0c60c4)找到,不过需要修改一下一开始的部分。首先是去掉modprobe的部分,这个驱动在内核中已经自动加载了。然后是手动挂载ConfigFS,使用mount none /config -t configfs
可以将configFS挂载到/config目录。这个脚本编辑完毕后,可以在/etc/init.d/里面放一个起动脚本,让其开机自动启动。
脚本部分写完之后,需要到编译的地方修改一些编译参数。具体是取消预配置”USB Gadget precomposed configurations”,然后启用”USB Gadget functions configurable through configfs”,并按需启用下面的子项目(例如CDC ACM、RNDIS等)。
重新编译并放入配置脚本后,就可以在设备管理器中看到两个设备了。RNDIS设备又是没有驱动,不过这次可以安装“网络适配器-Microsoft-远程NDIS兼容设备”来使其工作。
添加Serial + RNDIS的功能
https://blog.csdn.net/lan120576664/article/details/101081608
串口输出和屏幕显示问题
测试一下屏幕是否正常
chvt 1
cat /dev/urandom > /dev/fb0
cat /dev/zero > /dev/fb0
sd卡buildroot根文件系统
修改/etc/inittab
console::respawn:/sbin/getty -L  console 0 vt100 # GENERIC_SERIAL
ttyS0::respawn:/sbin/getty -L ttyS0 115200 vt100 # tx rx串口
ttyGS0::respawn:/sbin/getty -L ttyGS0 57600 vt100 #USB虚拟串口
使用技巧
适配Ethernet
zero-4.13.y已经适配Ethernet
ifconfig eth0 192.168.1.99 up
echo “nameserver 114.114.114.114” >> /etc/resolv.conf
以下是在配置好内核以及成功加载网卡的前提下实现能够自动配置网络,能够ping通的步骤
(1)修改 /etc/network/interfaces 即vi /etc/network/interfaces后添加如下语句:
auto lo
iface lo inet loopback
 auto eth0
 iface eth0 inet static
 address 192.168.1.218    # 3 你要变化的IP地址
 gateway 192.168.1.251   (该网关最好需要设置成跟电脑的网关一致,我这里是 192.168.1.251,跟路由器设置相关)
 netmask 255.255.255.0
(2)vi /etc/resolv.conf
添加以下语句
nameserver 127.0.0.1
nameserver 114.114.114.114
(3)为了能够实现自动开机设置
nameserver 127.0.0.1
nameserver 114.114.114.114
可以 vi /etc/init.d/rcS
然后添加以下三句即可:
nameserver 127.0.0.1
nameserver 202.96.134.33
nameserver 114.114.114.114
之后就可以直接ping通了!!!
Architecture select>Generic Driver Option>Allwinner Sun8i Ethernet MAC support
修改dts
sun8i-v3s-licheepi-zero.dts:
diff --git a/arch/arm/dts/sun8i-v3s-licheepi-zero.dts b/arch/arm/dts/sun8i-v3s-licheepi-zero.dts
index 3d9168c..b8b9fc3 100644
--- a/arch/arm/dts/sun8i-v3s-licheepi-zero.dts
+++ b/arch/arm/dts/sun8i-v3s-licheepi-zero.dts
@@ -49,6 +49,7 @@
        compatible = "licheepi,licheepi-zero", "allwinner,sun8i-v3s";

        aliases {
+               ethernet0 = &emac;
                serial0 = &uart0;
        };

@@ -81,3 +82,14 @@
        usb0_id_det-gpio = <&pio 5 6 GPIO_ACTIVE_HIGH>;
        status = "okay";
 };
+
+&emac {
+       phy = <&phy0>;
+       phy-mode = "mii";
+       allwinner,use-internal-phy;
+       allwinner,leds-active-low;
+       status = "okay";
+       phy0: ethernet-phy@0 {
+               reg = <1>;
+       };
+};
sun8i-v3s.dtsi:

diff --git a/arch/arm/dts/sun8i-v3s.dtsi b/arch/arm/dts/sun8i-v3s.dtsi
index ebefc0f..cb81dd5 100644
--- a/arch/arm/dts/sun8i-v3s.dtsi
+++ b/arch/arm/dts/sun8i-v3s.dtsi
@@ -96,6 +96,11 @@
                #size-cells = <1>;
                ranges;

+               syscon: syscon@01c00000 {
+                       compatible = "allwinner,sun8i-h3-syscon","syscon";
+                       reg = <0x01c00000 0x34>;
+               };
+
                mmc0: mmc@01c0f000 {
                        compatible = "allwinner,sun7i-a20-mmc";
                        reg = <0x01c0f000 0x1000>;
@@ -208,6 +213,17 @@
                        interrupt-controller;
                        #interrupt-cells = <3>;

+                       emac_rgmii_pins: emac0@0 {
+                               allwinner,pins = "PD0", "PD1", "PD2", "PD3",
+                                               "PD4", "PD5", "PD7",
+                                               "PD8", "PD9", "PD10",
+                                               "PD12", "PD13", "PD15",
+                                               "PD16", "PD17";
+                               allwinner,function = "emac";
+                               allwinner,drive = ;
+                               allwinner,pull = ;
+                       };
+
                        uart0_pins_a: uart0@0 {
                                pins = "PB8", "PB9";
                                function = "uart0";
@@ -270,6 +286,20 @@
                        status = "disabled";
                };

+               emac: ethernet@1c30000 {
+                       compatible = "allwinner,sun8i-h3-emac";
+                       reg = <0x01c30000 0x104>, <0x01c00030 0x4>;
+                       reg-names = "emac", "syscon";
+                       interrupts = ;
+                       resets = <&ccu RST_BUS_EMAC>, <&ccu RST_BUS_EPHY>;
+                       reset-names = "ahb", "ephy";
+                       clocks = <&ccu CLK_BUS_EMAC>, <&ccu CLK_BUS_EPHY>;
+                       clock-names = "ahb", "ephy";
+                       #address-cells = <1>;
+                       #size-cells = <0>;
+                       status = "disabled";
+               };
+
                gic: interrupt-controller@01c81000 {
                        compatible = "arm,cortex-a7-gic", "arm,cortex-a15-gic";
                        reg = <0x01c81000 0x1000>,
编译:
$ make ARCH=arm CROSS_COMPILE=arm-linux-gnueabihf-
烧写:
$ dd if=u-boot-sunxi-with-spl.bin of=${card} bs=1024 seek=8
添加USB UVC摄像头
.Device Drivers>Multimedia support>V4L2
>Video capture adapters>V4L USB devices>UVC,UVC input event device support
lsusb 或cat /dev出现video*,说明摄像头识别成功。
可以顺便把 kernel 里的 CONFIG_USB_ANNOUNCE_NEW_DEVICES 给设置成yes,这样每次插入新的USB设备时,内核都会输出设备的相关信息,方便调试。
添加ssh
buildroot里选中了openssh
修改sshd配置文件:vi /etc/ssh/sshd_config
PermitRootLogin yes
PubkeyAuthentication no
PasswordAuthentication yes
UseLogin yes
模拟鼠标键盘usb hid gadget
模拟U盘 g_mass_storage.ko
modprobe g_mass_storage file=/dev/mmcblk0p2 stall=0 removable=1 iSerialNumber=20190920 iProduct=RNDIS iManufacturer=zreo
//注意这里是mmcblk0p2
usb虚拟串口实现
选择Ethernet以太网otg共享网络或usb虚拟串口
将linux5.2/out/lib目录复制到荔枝派根系统/usr/lib中
modprobe g_serial
lsmod //查看所有模块
modprobe  -r xxx 删除
modprobe -D 查看依赖
modinfo 查看模块信息
在 /etc/inittab 文件中添加
ttyGS0::respawn:/sbin/getty -L ttyGS0 57600 vt100 //USB虚拟串口
添加驱动开机启动,根系统目录/etc/init.d/rcS
echo -e "modprobe g_serial\nexit 0" >>/etc/init.d/rcS
添加wifi驱动及配置
buildroot 开启wifi配置功能
make menuconfig> Target packages -> Networking applications
Linux/x86 5.2.0 Kernel Configuration
> Device Drivers > Staging drivers
	 >    Realtek RTL8723BS SDIO Wireless LAN NIC driver
驱动在drivers/staging/rtl8723bs/r8723bs.ko
荔枝派中添加wpa_supplicant.conf
vim /etc/wpa_supplicant.conf
ctrl_interface=/var/run/wpa_supplicant
ap_scan=1

network={
  ssid="PDCN"
  psk="xxxxxxx"
  key_mgmt=WPA-PSK
}
拷贝 rtl8723bs_nic.bin 到根文件系统的 /lib/firmware/rtlwifi/ 目录下
https://github.com/muhviehstah/rtl8723bs/blob/master/rtl8723bs_nic.bin
cd /root添加connect_wx脚本
vi connect_wx.sh
#!/bin/sh
insmod /usr/lib/r8723bs.ko #加入驱动
ifconfig wlan0 up      #开启wifi
wpa_supplicant -B -d -i wlan0 -c /etc/wpa_supplicant.conf    #搜索wifi
udhcpc -i wlan0       #连接wifi
提权
chmod 777 connect_wx.sh
添加以下内容让他开机启动
vi /etc/init.d/rcS
if [ -e /etc/init.d/connect_wx.sh ]; then
        /etc/init.d/connect_wx.sh
fi
# 荔枝派安装驱动
insmod  r8723bs.ko
然后重启,终于可以连接到我的WiFi了!
参考
https://blog.csdn.net/u012577474/article/details/104678522
使用sunxi-fel 借 u-boot ram启动 Linux系统, 无需 spi flash / TF 卡
bootcmd引导中修改root=/dev/ram0
文件系统打包成 initramfs:
cd /opt/buildroot-2018.08.2/output/target

find . | cpio -o -Hnewc |gzip -9 > ../rootfs.cpio.gz

mkimage -A arm -T ramdisk -C none -n uInitrd -d ../rootfs.cpio.gz  /var/www/html/rootfs.cpio.gz.uImage

mkimage -A arm -T ramdisk -C none -n uInitrd -d ../rootfs.cpio.gz  ../rootfs.cpio.gz.uImage
烧录到RAM
sudo sunxi-fel uboot u-boot-sunxi-with-spl.bin write 0x41000000 zImage write 0x41800000 sun8i-v3s-licheepi-zero.dtb write 0x41900000 boot.scr write 0x41A00000 rootfs.cpio.gz.uImage
荔枝派等ARM嵌入式移植QT5.15.2以上版本
安装交叉编译器并配置环境gcc-linaro-7.5.0-2019.12-x86_64_arm-linux-gnueabihf
并安装编译所需的依赖
sudo apt install autoconf automake libtool m4 pkg-config
QT
方案一: 利用Buildroot交叉编译QT
make menuconfig
Target packages > Graphic libraries and applications (graphic/text) > Qt5
│ │    [*]     gui module
  │ │    [*]       widgets module
make
编译例程
buildroot-2021.02/output/build/qt5base-5.15.2
查看版本,可以自行改一下环境变量,arm qmake
buildroot-2021.02/output/build/qt5base-5.15.2/qmake -v
顺便选个例程
buildroot-2021.02/output/build/qt5base-5.15.2/examples/widgets/widgets/analogclock
qmake analogclock.pro
make
将analogclock放入荔枝派并运行
./analogclock -platform linuxfb
方案二:自己交叉编译QT费时费力
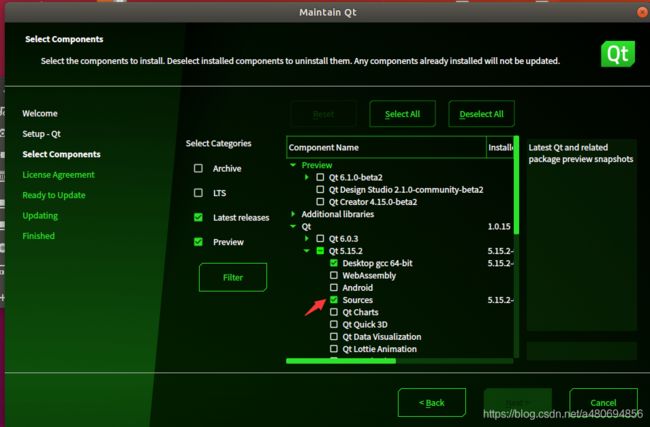
在线安装qt
https://download.qt.io/official_releases/online_installers/qt-unified-linux-x64-online.run
下载QT源代码,并安装qtcreator

qt/Src/qtbase/mkspecs/linux-arm-gnueabi-g++/qmake.conf
修改如下
QMAKE_CC                = /opt/gcc-linaro-7.5.0-2019.12-x86_64_arm-linux-gnueabihf/bin/arm-linux-gnueabihf-gcc
QMAKE_CXX               = /opt/gcc-linaro-7.5.0-2019.12-x86_64_arm-linux-gnueabihf/bin/arm-linux-gnueabihf-g++
QMAKE_LINK              = /opt/gcc-linaro-7.5.0-2019.12-x86_64_arm-linux-gnueabihf/bin/arm-linux-gnueabihf-g++
QMAKE_LINK_SHLIB        = /opt/gcc-linaro-7.5.0-2019.12-x86_64_arm-linux-gnueabihf/bin/arm-linux-gnueabihf-g++
篇幅所限请参考考野火官方教程
http://doc.embedfire.com/linux/imx6/base/zh/latest/linux_env/qt_cross_compiling.html
关于提取编译后的Image,u-boot,设备树,基础信息汇编信息
安装binwalk工具
https://github.com/ReFirmLabs/binwalk/blob/master/INSTALL.md
怎么使用?查看 -h

可以实现不用重新编译修改相应功能(PS:虽然主要用于路由器固件的修改),注意假定header里面只记录了压缩前后数据的大小,那么这种修改是正确且有效的。
Linux堆利用
空
您的赞赏是我继续更新的动力


